Sign In
Upload
Manuals
Brands
Polycom Manuals
Conference System
RealPresence Group 310
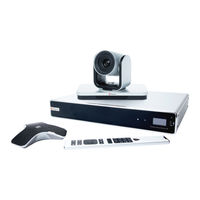
Polycom RealPresence Group 310 Manuals
Manuals and User Guides for Polycom RealPresence Group 310. We have
6
Polycom RealPresence Group 310 manuals available for free PDF download: Administrator's Manual, User Manual, Documentation, Quick Tips
Polycom RealPresence Group 310 Administrator's Manual (369 pages)
Brand:
Polycom
| Category:
Conference System
| Size: 3.93 MB
Table of Contents
Table of Contents
3
Before You Begin
16
Getting Help
16
Polycom and Partner Resources
16
The Polycom Community
16
Getting Started
18
High Definition Video Conferencing
18
User Interface Customization
19
Security Setting Management
19
Call Setting Configuration
20
Powering on and off
20
Power on the System
20
Power off the System
20
Powering on the Realpresence Group 700 System
21
Navigating the System
21
Access the System Web Interface
21
Changing a Password
22
Search the Web Interface
22
Setting up System Hardware
23
Mount and Position the System
23
Setting up a Microphone
24
Available Microphone Inputs by System
24
Set up Third-Party Microphones
24
Soundstructure Digital Mixer
25
Setting up the Polycom Stereosurround Kit
25
Adding a Touch Monitor
27
Touch Monitor Support
27
Adding a Polycom Soundstation IP 7000 Conference Phone
28
Running the Setup Wizard
29
Run the Setup Wizard Locally
29
Run the Setup Wizard from a Remote Location
29
Configuring General System Settings
31
Name the System
31
Enter Contact Information
31
Set the Location
32
Set the Language
33
Set the Date and Time
33
Displaying Participant Names Continuously in a Call
34
Configure Participant Name Display
34
Using a Provisioning Service
36
Enable a Provisioning Service
37
Configure a Provisioning Service
37
Disable a Provisioning Service
38
ZTP Web Service Solution
38
Certificates and Security Profiles Within a Provisioned System
38
Set up Multitiered Directory Navigation
39
Polycom Realpresence Cloud Service
39
Activating System Options
41
System Software Options
41
View System Software Options
42
Obtain Software or System Option Keys
42
Create a Single Key File to Update Multiple Systems
43
Key File Formats
43
Activate System Options
44
Microsoft Interoperability
45
Skype for Business-Hosted Video Conferencing
46
Register a System with Skype for Business
46
Configure the Skype for Business Directory Server
50
Org ID Authentication
50
Upload Logs to the Skype for Business Server
50
Managing System Software through Skype for Business Server
51
Configure System to Upgrade or Downgrade Software through Skype for Business Server
51
Configure the Directory Services Contact List
51
Dial Plan Normalization
52
Enable Dial Plan Normalization
52
Support for Location-Based Routing in Skype for Business Hosted Calls
52
Skype for Business Content Sharing
53
Vbss Support in Skype for Business Environments
53
Registering with a Calendaring Service
56
Enable the Calendaring Service
56
Join Scheduled Meetings
58
Configuring Network Settings
59
Connecting to a LAN
59
LAN Status Lights
59
Configure LAN Properties
60
Configure IP Address (Ipv4) Settings
63
Configure IP Address (Ipv6) Settings
64
Configure DNS Server Settings
65
LLDP and LLDP-MED Support
65
LLMP-MED Information Discovery
66
Behavior When LLDP Is Enabled
66
Enable LLDP Using a USB Storage Device
66
Enable LLDP in the Web Interface
66
IP Network Settings
67
Configure H.323 Settings
67
Configure the System to Use a Gatekeeper
67
SIP Settings
69
RTV and Skype-Hosted Conference Support
72
AS-SIP Settings
72
Enable the AS-SIP Setting
72
Configure AS-SIP Settings for MLPP
72
Add an AS-SIP Service Code
73
Delete an AS-SIP Service Code
73
Defining AS-SIP Outbound Precedence Call Defaults
73
Multilevel Precedence and Preemption (MLPP)
73
Define MLPP Network Domains
74
Add an MLPP Network Domain
75
Alternative Network Address Type (ANAT)
75
Multipoint Conference on a Realpresence Collaboration Server
75
Enable Call Escalation of Point-To-Point Calls
75
Web Proxy Auto-Discovery Protocol
76
Sample PAC File
76
Enable Web Proxy
77
Configure Web Proxy Settings
77
Update Proxy Auto-Config (PAC) File
77
Verify Proxy Auto-Config (PAC) File
78
Verify Proxy Auto-Config (PAC) File Status
78
Limitations
78
Configure Network Quality Settings
79
Lost Packet Recovery and Dynamic Bandwidth Settings
81
Simplified ISDN Dialing
82
Configure Gateway Call Type Settings
82
Securing the System
83
Configure Security Profiles
83
Maximum Security Profile Requires Default Value Changes
84
Managing System Access
85
Enable External Authentication
85
Configure Local Access
86
Configure Remote Access
87
Local Accounts
89
Detecting Intrusions
93
View Connections to Your System in a Sessions List
94
Secure API Access
94
Enable Secure API Access
94
Disable Secure API Access
95
Access the API with SSH
95
Port Lockout
95
Configure Port Lockout Settings
96
Whitelisting
97
Enable a Whitelist
97
Add IP Addresses to a Whitelist
98
Ipv4 Address Formats
98
Ipv6 Address Formats
98
Encryption
99
Configure Encryption
99
Configuring Encryption Settings for SVC Calls
100
Set the Transport Protocol for SVC Calls
100
Set up AES Encryption for SVC Calls
101
Verify H.323 Media Encryption
101
802.1X Authentication
102
Supported 802.1X Configurations
102
Configure 802.1X Authentication
102
Firewall/Nat Traversal
103
Basic Firewall/Nat Traversal
104
Configure the H.460 Firewall/Nat Traversal
104
Security Certificates
106
How Certificates Are Used
107
Certificate Signing Requests
107
Configure Certificate Validation Settings
111
Install Certificates
112
Certificate Revocation
113
Remove a Certificate and CRL
114
Simple Certificate Enrollment Protocol
115
Set up a Security Banner
117
Set a Meeting Password
118
Visual Security Classification
118
Enable Visual Security Classification
119
Enable Room and Call Monitoring
119
Monitor a Room or Call
120
Enable Video Shapshot During a Call
120
Send a Message to a System
120
Configure the OCSP Method
121
Configuring Call Settings
122
Configure Call Settings
122
Setting Call Preferences for SVC
124
Configure SVC Dialing Options
124
Enable SVC Preference (H.264) for Calls
126
Enable Automatic Answering of SVC Point-To-Point Calls
126
Set Preferred Call Speeds
126
Configure the Recent Calls List
127
Set Call Answering Mode
128
Set the Maximum Call Length
128
Set a Multipoint Viewing Mode
128
Enable Flashing Incoming Call Alerts
129
Turn off Flashing Alerts
130
Setting up Audio-Only Calls
130
Enable Audio-Only Calls
130
Disable Audio-Only Calls
130
Select the Call Type Order for Audio-Only Calls
130
Place an Audio-Only Call from the System Web Interface
131
Enable Show Content in Audio-Only Call
131
Displaying Participant Names Continuously in a Call
131
Configure Participant Name Display
131
Configure System Display Name During Call
132
Registering with a Directory
133
Enable H.323
133
Configure the Polycom GDS
134
Configure the LDAP Directory Server
135
Managing Favorites Contacts and Groups
135
Types of Favorites Contacts
136
Create a Favorites Contact
136
Create a Favorites Group
136
Edit a Favorites Group
136
Delete a Favorites Group
137
Importing and Exporting Favorites
137
Setting up Speed Dial
138
Enable Speed Dial
138
Add Speed Dial Contacts
138
Image File Requirements for Speed Dial Contacts
139
Upload an Image File for Speed Dial Contacts
139
Remove Speed Dial Contacts
139
Kiosk Mode
139
Setting up and Configuring Directory Servers
140
Configuring a Directory Server
140
Configuring Audio Settings
142
Configure General Audio Settings
142
Configure Audio Input Settings
143
MM Audio Input
146
Audio Output Settings
146
Configure Audio Output Settings
147
Set the Speaker Volume
148
Stereo Settings
148
Test Stereosurround
149
Polycom Acoustic Fence
149
Configure the Acoustic Fence
150
USB and Bluetooth Headset Support
150
Configuring Video Settings
151
Monitor Resolution Rates for Realpresence Group Series Systems
151
Full-Motion HD
152
Maximize HDTV Video Display
153
Monitor Profiles
153
Configure Monitor Profile Settings
154
Prevent Monitor Burn-In
157
Adjust Brightness for Room Lighting
157
Monitors with CEC
158
Enable CEC Controls
158
Disable CEC Controls
158
Configure Video Input Settings
158
Configure RS-232 Serial Port Settings
161
Configuring Monitor Settings
163
Configure Monitor Settings
163
Third-Party Touch Panel Controls
164
Configure Secondary Monitors for Content
165
Configuring a Camera or Camera Control System
166
Integrating Realpresence Group Series with Polycom Eagleeye Cube HDCI
167
Position the Eagleeye Cube HDCI Camera
167
LED Indicators
167
Configure Camera Settings
167
Camera Tracking
168
Participant Count CDR Details
169
Eagleeye Cube HDCI Camera Software Updates
169
Factory Restore the Eagleeye Cube HDCI
170
Setting up a Polycom Eagleeye IV Camera
170
Eagleeye IV Camera Orientation
170
Replace the Eagleeye IV Camera
171
Improve Camera Tracking Performance
171
Polycom Eagleeye Director II Camera System
171
Position the Eagleeye Director II Camera System
173
Indicator Lights
175
View System Status for Eagleeye Director II Camera System
176
Eagleeye Director II Camera System Diagnostics
177
Perform a Factory Restore
178
Setting up a Polycom Eagleeye Producer System
179
Calibration
179
Camera Tracking
180
Set up the Polycom Eagleeye Director
185
Positioning the Polycom Eagleeye Director
186
Indicator Lights
187
Adjust the Room View
188
Calibrate the Eagleeye Director Cameras
188
Camera Tracking in the Local Interface
189
Camera Presets
190
Transfer Eagleeye Director Logs
191
Eagleeye Director Software Updates
191
Perform a Factory Restore for the Eagleeye Director
191
Troubleshooting Eagleeye Director Camera Calibration
192
Troubleshooting Eagleeye Director Camera Tracking
192
Setting up Polycom Eagleeye Acoustic Camera
192
Indicator Lights
193
Configuring Remote Control Behavior
194
Configure Remote Control Behavior
194
Programming the Remote Control
195
Set the Remote Control Channel ID
196
Set the Remote Control Channel ID for a Specific System
196
Confirm the Channel ID
196
Recharge the Remote Control Battery
197
Remote Control Operation on Realpresence Group 700 Systems
198
Enabling Mobile Devices as Controllers
199
Enabling Realpresence Mobile
199
Smartpairing Prerequisites
199
Configure Smartpairing
199
Enabling Content Sharing
201
Configure Content Sharing
201
Adjust Audio Level for Content
202
Connecting a Computer
202
Configure Monitor 1 as the Content Monitor
202
Configure Monitor 2 as the Content Monitor
202
Setting up a Polycom Content Display Application
203
Download and Install Polycom ® People+Content ™ Technology
203
Closed Captioning
204
Enter Closed Captions on the System Web Interface
204
Enter Closed Captions Using Equipment Connected to a Serial RS-232 Port
204
Dial-Up Connection to the System's RS-232 Serial Port
205
Enable Visualboard Content Sharing
205
Prerequisites for the Visualboard Application
205
Configure the Polycom UC Board
206
Sharing Content During Calls
206
Configuring DVD Player Settings
207
Adjust DVD Audio Settings for Content
207
Configuring Call Recording
208
Polycom Realpresence Media Suite Recording
208
Enable Recording Controls
208
Recording Calls Remotely
208
Configure Monitor Settings for Recording on a Realpresence Group 700 System
210
Customizing the Local Interface
211
Change the Background Image on the Home Screen
211
Change the Startup Image on the Home Screen
212
Set up the Address Bar
212
Calling
214
Call a Favorite Contact
214
Call a Speed Dial Contact
214
Call a Recent Call Contact
215
Place a Call
215
Searching Directory Contacts to Call
215
Browse Global Contact Entries to Call
215
Place a Cascaded Call
216
Placing an Audio-Only Call
217
Large Conference
217
Setting up a Polycom Realpresence Touch Device
218
Positioning the Realpresence Touch Device
218
Run the Realpresence Touch Device Setup Wizard (OOB)
218
Power off the Realpresence Touch
219
Wake the Realpresence Touch
219
Enable the Realpresence Touch Device
220
Set the Language
220
Pairing the Device
220
Pairing States
220
Pair for the First Time
221
Pair to a Previously Paired System
221
Unpair a Realpresence Touch
221
Remove a System from the Paired System List
222
Managing the Realpresence Touch Device
222
Disable TLS V1.0
223
Open a Remote Management Window
223
Pair Using Realpresence Touch Web Interface
223
Unpair Using the Realpresence Touch Web Interface
223
Change the Realpresence Touch User Name and Password
223
Configure Network Settings
224
Enable Recent Calls and Speed Dial
226
Security Certificates for Realpresence Touch
226
Customize the Realpresence Touch Screens
226
Choose the Home Screen Icons
227
Choose the Place a Call Screen Icons
227
Change the Background Image
228
Setting up and Configuring Directory Servers for the Realpresence Touch
228
Set up Directory Servers for the Realpresence Touch
228
Enable Microsoft Skype Mode for Realpresence Touch
230
Enable Skype for Business Mode
230
Disable Skype for Business Mode
231
Updating Software
231
Dynamic Polycom Touch Device Software Updates
231
Managing Polycom Touch Device Software on Your Server
232
Update Software from the Web Interface
233
Update Software from the Local Interface
233
Update Realpresence Touch Software from a USB Storage Device
234
Update the Software and the Factory Restore Partition from a USB Storage Device
234
Troubleshooting the Realpresence Touch Device
235
View System Details and Connection Status
235
View Call Statistics
235
Download Realpresence Touch Logs
236
Transfer Realpresence Touch Logs to a USB Storage Device
236
Manually Reboot a Realpresence Touch Device
236
Restart a Realpresence Touch Device
237
Restart a System from a Realpresence Touch Device
237
Perform a Factory Restore on the Realpresence Touch
237
Perform a Factory Restore Using a USB Storage Device
238
Test the Software Download URL
238
Setting up a Polycom Touch Control Device
240
Positioning the Polycom Touch Control
240
Set up the Polycom Touch Control
240
Enable the Polycom Touch Control
241
Configuring the Software
241
Configure LAN Settings
242
Configure Location and Time Settings
243
Configure Admin ID and Password
244
Powering on the Polycom Touch Control
244
Power off the Polycom Touch Control
244
Wake the Polycom Touch Control
245
Pairing States for the Polycom Touch Control
245
Pairing the Polycom Touch Control Device
246
Pair the Polycom Touch Control Device
246
Pair to a System after Setup
246
Unpair the Polycom Touch Control Device
246
Managing the Polycom Touch Control Remotely
247
Open the Remote Management Window
247
Transfer Polycom Touch Control Logs to a USB Storage Device
247
Updating the Software
248
Configure Your Web Server as the Update Site for the Polycom Touch Control
248
Update Software Manually from the Web Interface
249
Update Software Automatically in the Web Interface
249
Update Software Automatically in the Local Interface
250
Update Software Manually in the Local Interface
251
Update Software from a USB Storage Device
251
Set a Software Version as Current for the Polycom Touch Control
252
Remove a Polycom Touch Control Software Version
252
Troubleshooting on the Polycom Touch Control Device
253
Polycom Touch Control Indicator Light
253
View System Details
253
Perform a Factory Restore on the Polycom Touch Control
253
Perform a Factory Restore Using a USB Storage Device on the Polycom Touch Control
254
System Maintenance
256
Managing System Profiles
256
Store a Setting Profile
256
Upload a Profile
256
Perform a Factory Restore of a System
257
Delete Data and System Files
259
Controlling the System Fan Speed
259
Configure the System Fan Speed
259
Restoring and Resetting a System
260
Logs
260
View Log File Status
260
Configure System Log Management
260
Configure System Log Level and Remote Logging
261
Retrieving Log Files
263
Download System Log Files
263
Transfer System Log Files
264
SNMP Reporting
264
Upgrading System Software
267
Preparing to Upgrade
267
System Software Updates
267
Downgrading System Software
272
Determine the Software Version
272
Delete System Settings
272
Troubleshooting
274
General Troubleshooting
274
View Remote Sessions on the System
275
Placing a Test Call
276
Realpresence Group System Indicator Lights
276
Eagleeye Producer Indicator Lights
277
Audio and Video Tests
278
Audio Meters
279
Set Audio Meter Levels
280
System Diagnostics
280
Access Diagnostic Screens in the Web Interface
280
Access Diagnostic Screens in the Local Interface
280
Viewing System Details on the Local Interface
283
Access the Information Screen
283
Access the Status Screen
284
View Call Statistics for an Active Point-To-Point Call with the Remote Control
286
View Call Statistics for an Active Multipoint Call with the Remote Control
286
View Call Statistics for an Active Point-To-Point Call on the Polycom Touch Control
287
View Call Statistics for an Active Multipoint Call on the Polycom Touch Control
287
Provisioning Service Registration Failure
287
Call Detail Report (CDR)
287
Enable the Call Detail Report
291
Download a Call Detail Report (CDR)
291
Troubleshoot a Manual System Software Update
291
Knowledge Base
292
Before You Contact Polycom Technical Support
292
Locate the System Serial Number
292
Locate the Software Version
292
Locate Active Alert Messages
292
Locate the IP Address and H.323 Extension Settings
292
Locate the LAN Status
293
Locate Diagnostics on the Local Interface
293
Contacting Technical Support
293
Polycom Solution Support
293
System Panel Views
294
Polycom Realpresence Group 300 System
294
Polycom Realpresence Group 310 System
295
General Settings > Serial Ports
295
Network > LAN Properties
295
Location in Web
295
Interface
295
Ref. Number Admin Settings
295
Advertisement
Polycom RealPresence Group 310 User Manual (113 pages)
Brand:
Polycom
| Category:
Conference System
| Size: 1.05 MB
Table of Contents
Table of Contents
3
Before You Begin
13
Audience, Purpose, and Required Skills
13
Get Help
13
Polycom Partner and Solution Resources
13
The Polycom Community
14
Getting Started with Polycom Realpresence Group Series
15
Realpresence Group System Power
15
Power on the Realpresence Group System
15
System Health Check
16
Power off a Realpresence Group System
16
Using a Polycom Realpresence Group Series Remote Control
17
Remote Control Buttons and Descriptions
18
Recharge the Remote Control Battery
19
Wake a Realpresence Group System
19
Contacts
19
Contact Presence States
20
Browse the Global Directory
20
Search for Directory Contacts
20
Calling
21
Call by Entering a Name or Number
21
Call from the Contacts Screen
22
Call from the Recent Calls List
22
Call a Speed Dial Entry
22
Answer a Call
22
Ignore a Call
23
Hold a Call
23
Hold a Call and Answer a Call
23
Hold a Call and Place a Call
23
Switch between Point-To-Point Calls
23
Resume a Call
23
Hang up All Calls and Answer a Call
24
End a Call
24
Multipoint Conference Calls
24
Incoming Call Handling of Multipoint Conference Calls
24
Place a Call While a Multipoint Call Is on Hold
24
Place a Multipoint Call by Adding Participants
24
Hang up a Held Call and Add a Call
25
Hang up an Individual Call in a Multipoint Call
25
Hold and Answer a Call in a Conference
25
Resume a Held Call in a Multipoint Call
25
Switch between Calls in a Multipoint Call
25
Enter a Meeting Password
26
Hang up All Calls
26
Passwords for Multipoint Calls
26
Set up a Meeting Password
26
Microsoft Meetings
27
Join a Scheduled Meeting from the Calendar
27
Join a Scheduled Meeting from the Home Screen
27
View Scheduled Meetings with the Remote
27
Content
27
Content Connections of Realpresence Group Systems
28
Show Content from a Computer Connected to Realpresence Group System
30
Polycom People+Content IP
30
Download and Install People+Content IP
31
Share Content with People+Content IP
31
Stop Sharing Content with People+Content IP
31
Microsoft Content Management
31
Scroll and Zoom Microsoft Content
31
Control Microsoft Content
32
Return Control of Microsoft Content
32
Recording Calls
32
Manage Recordings with Polycom Realpresence Media Suite
32
Realpresence Media Suite Connection Methods
33
Realpresence Media Suite Touch Tones
33
Play Back a Recording
34
Record on Realpresence Media Suite
34
Stop Recording on Realpresence Media Suite
34
Use the Remote Control to Manage the Realpresence Media Suite
35
Record Calls on a DVD or DVR
35
Record Calls with a Laptop or Tablet
35
Settings
35
Video Adjustments
36
Adjust for Room Lighting
36
Configure Automatic Self View Control
36
Switch between Full-Screen Video and the Home Screen
36
Allow Video Display on the Web
37
Start Video
37
Stop Video
37
Turn Self View off
37
Turn Self View on
37
Multipoint Viewing Layouts
38
Multipoint Viewing Modes
38
Set the Multipoint Viewing Mode
38
Change Multipoint Viewing Layout
39
Audio Adjustments
39
Adjust the Volume
39
Mute the Microphone
39
Unmute the Microphone
39
Cameras
40
Adjust Cameras
40
Allow the Far-End System to Control Your Camera
40
Select Cameras
40
Switch between Cameras
40
Camera Presets
41
Disable Eagleeye Director Tracking in a Call
41
Enable Eagleeye Director Tracking in a Call
41
Store a Camera Preset
42
View Stored Camera Presets
42
Move the Camera to a Stored Preset
43
Call Answering Settings
43
Enable Answering Video Calls Automatically
43
Mute Automatically Answered Video Calls
43
Temporarily Refuse Calls
43
Encryption and Security
44
Verify Encryption Check Code
44
Change the Call Security Level
45
Troubleshooting
45
Make a Test Call
45
System Information
46
Locate Active Alert Messages
46
Locate the Software Version
46
Locate the System Serial Number
46
View Self Test Warnings
46
Locate Diagnostics
47
Locate the IP Address and H.323 Extension Settings
47
Locate the LAN Status
47
Regulatory Notices
47
Using the Touch User Interface
48
Wake the System
48
Contacts
48
Contacts
49
Contact Presence States
49
Browse the Global Directory
49
Search for Directory Contacts
49
Calling
50
Call by Entering a Name or Number
50
Call from the Contacts Screen
50
Call from the Recent Calls List
51
Call a Speed Dial Entry
51
Answer a Call
51
Answer a Call During a Call
51
Ignore a Call
51
Hold a Call
51
Hold a Call and Place a Call
52
Hold a Call and Answer a Call
52
Resume a Call
52
Switch between Calls
52
Hang up a Call and Answer a Call
52
End a Call
52
Multipoint Conference Calls
53
Incoming Call Handling of Multipoint Conference Calls
53
Place a Call During a Multipoint Call
53
Place a Multipoint Call
53
Add an Incoming Call to a Multipoint Call
54
Answer an Incoming Call During a Multipoint Call
54
Hang up All Calls
54
Hang up an Individual Call in a Multipoint Call
54
Hold a Multipoint Conference Call
54
Leave a Multipoint Call
54
Passwords for Multipoint Calls
54
Enter a Meeting Password
55
Join Meetings from the Calendar
55
Microsoft Meetings
55
Set a Meeting Password
55
Add Participants to a Microsoft Conference Call
56
Initiate a Microsoft Conference
56
Microsoft Conference Calls
56
View Meeting Details
56
Content
57
Polycom People+Content IP
57
Download and Install People+Content IP
57
Share Content with People+Content IP
57
Stop Sharing Content with People+Content IP
57
Visualboard
58
Access Visualboard in a Call
58
Access Visualboard When Not in a Call
58
Annotate Content with Visualboard
58
Create a New Whiteboard or Blackboard
58
Erase Annotations
59
Exit Visualboard
59
Undo Annotations
59
Sharing Content from a Laptop or Tablet
59
Content Source Resolutions and Refresh Rates
59
Share Content from a Laptop or Tablet
59
Stop Content from a Laptop or Tablet
60
Show Content from USB Flash Drive
60
Stop Content from a USB Flash Drive
60
Scroll and Zoom Microsoft Content
61
Control Microsoft Content
61
Return Control of Microsoft Content
61
Recording Calls
61
Manage Recordings with Polycom Realpresence Media Suite
61
Realpresence Media Suite Connection Methods
62
Realpresence Media Suite Touch Tones
62
Playback a Recording
63
Record Calls with Realpresence Media Suite
63
Stop Recording
63
Record Calls with a Laptop or Tablet
64
Record Calls on a DVD or DVR
64
Settings
64
Adjust for Room Lighting
65
Call Settings
65
Answering Video Calls Automatically
65
Temporarily Refuse Calls
65
Configure Automatic Self View Control
66
Video Adjustments
66
Allow Video Display on the Web
66
Change the Video Layout
66
Turn off Self View
66
Start Sending Video
67
Stop Sending Video
67
Switch between Full Screen Video and the Home Screen
67
Turn on Self View
67
Multipoint Viewing Modes
68
Set the Multipoint Viewing Mode
68
Camera Presets
68
Select a Stored Preset
69
Store a Camera Preset
69
View Stored Presets
69
Audio Adjustments
69
Adjust the Volume
70
Mute Automatically-Answered Calls
70
Mute the Microphone
70
Unmute the Microphone
70
Encryption and Security
71
Verify Encryption Check Code
71
Change the Call Security Level
72
Troubleshooting
72
Make a Test Call
72
System Information
72
Locate Active Alert Messages
73
Locate Diagnostics Information
73
Locate the IP Address and H.323 Extension Settings
73
Locate the LAN Status
73
Locate the Software Version
73
Locate the System Serial Number
73
View System Health Check Warnings
73
Using a Polycom Realpresence Touch Device
74
Power on the Realpresence Touch
75
Wake a Realpresence Group System
75
Pair a Previously Paired Realpresence Touch and Realpresence Group System
75
Calling
75
Call Using Contacts
75
Call by Entering a Name or Number
75
Call Using Recent Calls
76
Call Using Speed Dial
76
Search for Directory Contacts to Call
76
Answer a Call
76
Decline a Call
77
Hold a Call
77
Hold a Call and Answer a Call
77
Hold a Call and Place a Call
77
Switch between Calls
77
Resume a Call
77
End a Call
78
Multipoint Conference Calls
78
Place a Multipoint Call by Adding Participants
78
Place a Multipoint Call from Contacts
78
Place a Multipoint Call from Recent Calls
78
Answer a Call in a Multipoint Conference
79
Hang up All Calls
79
Hang up an Individual Call in a Multipoint Call
79
Incoming Call Handling of Multipoint Conference Calls
79
Switch between Calls in a Multipoint Call
80
Microsoft Meetings
80
Set up a Meeting Password
80
Join a Meeting in an Overbooked Time Slot on the Calendar
81
Join a Scheduled Meeting on the Calendar
81
View Scheduled Meetings on the Calendar
81
Content
81
Content Connections of Realpresence Group Systems
82
Show Content from a Connected Computer
83
Stop Sharing Content from a Connected Computer
84
Share Content Using Visualboard
84
Stop Sharing Content from Visualboard
84
Settings
84
Audio Adjustments
84
Adjust the Call Volume
85
Generate Touch Tones
85
Mute the Microphone
85
Unmute the Microphone
85
Video Adjustments
85
Change Monitor Layouts on the Realpresence Touch
85
Allow Video Display on the Web
86
Control the Brightness
86
Turn off Video Display on the Web
86
Cameras
86
Select and Adjust a Camera
86
Start Video
87
Turn Camera Tracking off
87
Turn off Far End Control of Camera
87
Turn on Camera Tracking
87
Turn on Far End Control of Camera
87
Select a Stored Preset
88
Stop Video
88
Store a Camera Preset
88
View Camera Presets
88
Troubleshooting
88
Make a Test Call
88
View Device Details for a Realpresence Touch
89
View System Details and Connection Status for a Room System
89
Locate Company Contact Information
89
View Call Statistics
90
Using a Polycom Touch Control Device
91
Power on the Polycom Touch Control
91
Wake the Realpresence Group System
91
Pair a Polycom Touch Control with a Realpresence Group System
91
Using the Polycom Touch Control as a Virtual Remote Control
92
Disconnect a Polycom Touch Control from a Realpresence Group System
92
Calling
93
Call by Entering a Name or Number
93
Call from the Contacts Screen
93
Call from the Recent Calls List
94
Answer a Call
94
Ignore a Call
94
Hold a Call
94
Hold a Call and Answer a Call
94
Hold a Call and Place a Call
94
Switch between Calls
95
Resume a Call
95
End a Call
95
Multipoint Conference Calls
95
Enter a Meeting Password
96
Hang up All Calls
96
Hang up an Individual Call in a Multipoint Call
96
Hold and Answer a Call in a Conference
96
Place a Call While a Multipoint Call Is on Hold
96
Place a Multipoint Call by Adding Participants
96
Resume a Held Call in a Multipoint Call
96
Set up a Meeting Password
96
Microsoft Meetings
97
Contact Presence States on the Polycom Touch Control
97
View Scheduled Meetings on the Calendar
97
Content
97
Content Connections of Realpresence Group Systems
98
Share Content from a Connected Computer
100
Stop Sharing Content from a Connected Computer
100
Download and Install People+Content IP
101
Share Content with People+Content IP
101
Stop Sharing Content with People+Content IP
101
Share Content from a USB Drive
101
Annotate Content on a USB Drive with Polycom Touch Control
103
Recording Calls
103
Record and Stream with the Realpresence Media Suite
103
Settings
104
Audio Adjustments
104
Adjust the Volume
104
Mute the Microphone
104
Adjust the Polycom Touch Control Ring Tone and Alert Volume
105
Video Adjustments
105
Adjust for Room Lighting
105
Allow Video Display on the Web
106
Call Answering Settings
106
Enable Answering Video Calls Automatically
106
Mute Automatically Answered Video Calls
106
Temporarily Refuse Calls
107
Cameras
107
Adjust Cameras
107
Select a Camera
107
Allow the Far-End System to Control Your Camera
108
Disable Eagleeye Director Tracking in a Call
108
Enable Eagleeye Director Tracking in a Call
108
Camera Presets
109
Store a Camera Preset
109
View Stored Camera Presets
109
Move the Camera to a Stored Preset
110
Polycom RealPresence Group 310 Documentation (54 pages)
Brand:
Polycom
| Category:
Conference System
| Size: 0.78 MB
Table of Contents
Table of Contents
2
1 Copyright and Trademark
4
2 Before You Begin
6
Getting Help
6
Polycom Partner and Solution Resources
6
The Polycom Community
7
3 Getting Started with Polycom Realpresence Group Series
8
Realpresence Group System Power
8
Power on the System
8
System Health Check
9
Power off a Realpresence Group System
9
4 Using a Polycom Realpresence Group Series Remote Control
10
Remote Control Buttons and Descriptions
10
Recharge the Remote Control Battery
12
Wake the System
13
Contacts
13
Contact Presence States
14
Browse the Directory
14
Search for Directory Contacts
15
Calling
15
Call by Entering a Name or Number
16
Call from the Contacts Screen
16
Call from the Recent Calls List
17
Call a Speed Dial
17
Place an Audio-Only Call
17
Answer a Call
18
Accept a Call During a Call
18
Ignore a Call
18
Hold a Call
19
Hold a Call and Place a Call
19
Switch between Point-To-Point Calls
19
Resume a Call
20
End a Call
20
Conference Calls
20
Joining Meetings from the Calendar with the Remote Control
25
Sharing Content
26
Content Connections on Realpresence Group Systems
27
Supported Content Resolutions and Refresh Rates
28
Polycom People+Content IP
28
Managing Content from Microsoft Clients
30
Recording Calls
32
Realpresence Media Suite Recording Methods
32
Record Calls on a DVD or DVR
37
Record Calls with a Laptop or Tablet
38
Settings
38
Video Adjustments
39
Audio Adjustments
44
Cameras
46
Call Answering Settings
51
Encryption and Security
52
Advertisement
Polycom RealPresence Group 310 User Manual (20 pages)
Brand:
Polycom
| Category:
Conference System
| Size: 0.67 MB
Table of Contents
Table of Contents
3
Before You Begin
5
Getting Help
5
Polycom Partner and Solution Resources
5
The Polycom Community
5
Getting Started with Polycom Realpresence Group Series
6
Realpresence Group System Power
6
Power on the System
6
System Health Check
6
Power off a Realpresence Group System
7
Using a Polycom ® Realpresence Touch ™ Device with Skype for Business
8
Using a Polycom Realpresence Touch Device with Skype for
8
Wake the System
8
Pair for the First Time
8
Pair a Previously Paired Realpresence Touch Device
9
Calling
9
Call by Entering a Number
9
Accept a Call
9
Decline a Call
9
Accept or Decline Incoming Calls Forwarded from a Contact
9
End a Call
10
Managing Multiple Calls
10
Joining Meetings from the Calendar with Realpresence Touch
10
Sharing Content
12
Managing Content from Microsoft Clients
12
Polycom People+Content IP
13
Settings
14
Set the System to Answer Video Calls Automatically
14
Audio Adjustments
15
Video Adjustments
15
Cameras
17
Troubleshooting
19
Make a Test Call
19
Upload a Log File
19
View Device Details for the Realpresence Touch
19
View System Details and Connection Status
19
Polycom RealPresence Group 310 User Manual (9 pages)
Brand:
Polycom
| Category:
Conference System
| Size: 0.94 MB
Table of Contents
Table of Contents
3
Before You Begin
4
Getting Help
4
Polycom Partner and Solution Resources
4
The Polycom Community
4
Getting Started with Polycom Realpresence Group Series
5
Realpresence Group System Power
5
Power on the System
5
System Health Check
5
Power off a Realpresence Group System
6
Using a Polycom ® Soundstation ™ IP 7000 Conference Phone
7
Answer a Call with a Connected Soundstation IP 7000
7
Place a Call
7
Place a Conference Call
8
Control Volume with a Connected Soundstation IP 7000 Conference Phone
8
Mute the Microphone
8
End a Call
8
Display Content with a Connected Soundstation IP 7000
9
Polycom RealPresence Group 310 Quick Tips (2 pages)
Brand:
Polycom
| Category:
Conference System
| Size: 0.49 MB
Advertisement
Related Products
Polycom RealPresence Group 700 system
Polycom RealPresence Group 500 systems
Polycom RealPresence Group 300
Polycom realpresence group 550
Polycom G7500
Polycom RealPresence Group Series
Polycom RealPresence Immersive Studio
Polycom realpresence group convene
Polycom realpresence trio visual+
Polycom RealPresence Group
Polycom Categories
IP Phone
Telephone
Conference System
Conference Phone
Server
More Polycom Manuals
Login
Sign In
OR
Sign in with Facebook
Sign in with Google
Upload manual
Upload from disk
Upload from URL