Sign In
Upload
Manuals
Brands
Toshiba Manuals
All in One Printer
e-STUDIO6530c
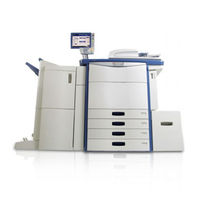
Toshiba e-STUDIO6530c Manuals
Manuals and User Guides for Toshiba e-STUDIO6530c. We have
7
Toshiba e-STUDIO6530c manuals available for free PDF download: Service Manual, Service Handbook, Imaging Manual, Management Manual, Printing Manual, Troubleshooting Manual, User Manual
Toshiba e-STUDIO6530c Service Manual (1612 pages)
MULTIFUNCTIONAL DIGITAL COLOR SYSTEMS
Brand:
Toshiba
| Category:
All in One Printer
| Size: 79 MB
Table of Contents
Cautionary Labels
5
Specifications/Accessories/Options/Supplies
37
Internet Fax
45
Network Fax
45
System List
49
Outline of the Machine
51
Sectional View
51
Rear Side
52
Electric Parts Layout
53
Symbols and Functions of Various Components
77
Electromagnetic Spring Clutches
85
System Block Diagram
90
Front Cover
91
Top Right Cover
91
FAX Cover
93
Receiving Tray
93
Left Middle Cover
93
Left Lower Cover
94
Paper Feed Cover
95
Right Rear Cover
96
Top Rear Cover
97
Copy Process
99
Description of Operation
101
Overview of Operation
113
Ready (Ready for Copying)
115
Drawer Feed Copying (1St Drawer Paper Feeding)
115
Bypass Feed Copying
121
Interruption Copying
121
Detection of Abnormality
122
Types of Abnormality
122
Description of Abnormality
122
Flow Chart
127
Power on to Ready
127
Automatic Feed Copying
129
Control Panel
133
General Description
133
Relation between the Equipment State and Operator's Operation
140
LED Display Circuit
144
Control Panel Unit
145
Panel Inverter Board (P-INV)
147
Control Panel Cover
151
General Description
153
Initialization at Power-ON
159
Control Signal
160
Exposure Lamp Control Circuit
161
General Description of CCD Control
164
Automatic Original Size Detection Circuit
165
Lens Cover
171
Exposure Lamp (EXP)
174
Scan Motor (M1)
182
Inverter Board (INV)
185
Carriage Home Position Sensor (S6)
189
Belt Tension Adjustment of the Scan Motor
191
Image Processing
193
General Description
193
Image Processing PC Board (IMG)
195
Functions of Image Processing Circuit
200
Adjustment of the Auto-Toner Sensor
202
Test Mode
202
Performing Image Quality Control (IQC)
204
Adjustment of Color Registration Control
206
Image Dimensional Adjustment (General Description)
207
Paper Alignment at the Registration Roller
209
Printer-Related Image Dimensional Adjustment
215
[A] Image Distortion
223
Scanner-Related Image Dimensional Adjustment
223
[E] Image Location of Secondary Scanning Direction
226
[F] Top Margin
227
[G] Right Margin
228
[H] Bottom Margin
229
Density Adjustment
234
Color Mode
234
Color Balance Adjustment
235
Gamma Balance Adjustment
237
Background Adjustment
238
Setting Range Correction
240
Adjustment of Smudged/Faint Text
241
Color Adjustment of Marker
241
Beam Level Conversion Setting
242
Maximum Toner Density Adjustment to Paper Type
243
Maximum Text Density Adjustment
243
Text/Photo Reproduction Level Adjustment
244
Black Reproduction Switching at the Twin Color Copy Mode
244
Black Header Density Level Adjustment
245
Background Offsetting Adjustment for ADF
246
Gamma Balance Adjustment (Black Mode)
249
Adjustment of Faint Text
252
Upper Limit Value at Toner Saving Mode
252
Maximum Toner Density Adjustment (OHP)
253
"Pureblack/Puregray" Threshold Adjustment (PCL)
254
Toner Limit Threshold Adjustment
255
Sharpness Adjustment
256
Background Adjustment (Color Mode)
260
Fine Adjustment of Black Density
262
RGB Conversion Method Selection
263
Adjustment of Saturation
263
Background Processing Offset Adjustment
264
Laser Optical Unit
267
General Description
267
Polygonal Motor Control Circuit
276
Control Signal
276
Mirror Motor Control Circuit
277
Shutter Motor
285
Paper Feeding System
289
General Descriptions
289
Description of Operation
294
Drive of Rollers
294
Operation of Bypass Pickup Roller
295
Operation of Drawer Pickup Roller
296
Paper Size Detection
297
Separation of Paper
298
General Operation
299
Feed Motor Control Circuit
304
Feed/Transport Motor Control Circuit
305
Disassembly and Replacement
310
Bypass Feed Tray
310
Bypass Feed Unit
310
Bypass Pickup Roller
312
Bypass Feed Roller
314
Bypass Transport Roller
314
Bypass Separation Roller
317
Drawer Feeding Unit
320
Pick-Up Roller
321
Separation Roller
322
Transport Roller
322
Registration Roller (Rubber)
327
Registration Guide
329
Registration Roller (Metal)
330
Adjustment of the Paper Feeding System
355
Separation Roller Pressure Force Adjustment
356
Sheet Sideways Deviation Caused by Paper Transporting Adjustment
357
Adjusting the Clearance of the Paper and Side Guides
360
Process Unit Related Section
363
General Description
363
[ 1 ] General Description
370
High-Voltage Transformer Control Circuit
370
Drum Surface Potential Sensor Control Circuit
372
Drum Temperature Detection Circuit
375
Drum Motor Control Circuit
376
Control Signal
376
Temperature/Humidity Detection Circuit
377
Toner Motor Control Circuit
378
Waste Toner Transport Motor Control Circuit
379
Auto-Toner Circuit
380
Developer Unit Motor Control Circuit
384
Disassembly and Replacement
386
Drum Cleaner Unit
390
Drum Cleaning Blade
392
Main Charger Unit
394
Main Charger Grid
394
Needle Electrode
395
Developer Unit
405
Developer Material
407
Developer Sleeve
410
Doctor Blade
412
Drum Drive Unit
413
K Drum Phase Sensor (S44)
415
Waste Toner Box
418
Ozone Filter
422
Toner Filter
422
Waste Toner Transport Unit
427
Temperature/Humidity Sensor (S12)
431
Adjustment of the Doctor-Sleeve Gap
436
Transfer Unit
439
General Descriptions
439
Printing in the Color Modes
444
Printing in the Black Mode
445
Color Registration Control
446
Electric Circuit Description
448
Transfer Belt Motor Control Circuit
448
Control Signal
448
Disassembly and Replacement
450
Transfer Belt Cleaning Unit
452
Transfer Belt Cleaning Blade
453
Transfer Belt Unit (TBU)
455
Transfer Belt
457
Tension Roller
463
2Nd Transfer Roller
468
Image Quality Control
479
General Description
479
Principle of the Sensor
481
Performing Image Quality Control
486
Fuser Unit
487
Description of Operation
492
Fuser Unit Control Circuit
493
Error Code
499
Fuser Motor Control Circuit
509
Disassembly and Replacement
510
Fuser Unit
512
Pressure Roller Cover
513
Separation Finger
516
Gap Adjustment for Fuser Unit
551
Gap Adjustment for Pressure Roller Thermistors
555
Gap Adjustment for Pressure Roller Thermostats
558
Gap Adjustment for Separation Plate
561
General Description
567
Paper Exit Unit
572
Bridge Unit
573
Duplexing Unit
574
Description of Operations
575
Disassembly and Replacement
584
Reverse Roller
605
ADU Transport Roller
625
Reversing Automatic Document Feeder (Radf)
635
General Description
635
Paper Path
637
Original Size Detection
639
Electric Circuit Description
642
Signal Block Diagram
642
RADF Front Cover
649
RADF Rear Cover
650
Original Jam Access Cover
651
RADF Left Cover
652
Original Tray
652
Original Reverse Tray
653
RADF Exit Tray
654
Reading Start Guide Unit
655
Exit Guide / Exit/Reverse Guide / Reading End Guide
656
Paper Feeder Unit
658
Feed Roller
660
Original Registration Roller
662
Intermediate Transport Roller
663
Reading Start Roller
664
Reading End Roller
666
Exit Roller
667
Exit/Reverse Roller
668
Exit Intermediate Roller
669
Original Feed Motor (MR1)
672
Read Motor (MR2)
673
Read Motor Bracket
674
Original Reverse Motor (MR3)
675
RADF Cooling Fan (FR1)
676
Original Pickup Solenoid (SOLR1)
677
Original Reverse Solenoid (SOLR2)
678
Original Exit Solenoid (SOLR3)
679
Original Jam Access Cover Opening/Closing Switch (SWR1)
680
RADF Opening/Closing Sensor (SR15)
682
Original Jam Access Cover Opening/Closing Sensor (SR13)
683
Original Width Detection Sensor-3 (SR8)
684
Original Width Detection Sensor-1 (SR6)
685
Original Tray Sensor (SR1)
686
Original Tray Width Sensor (SR2)
687
Original Exit/Reverse Sensor (SR11)
688
Original Reverse Unit Opening/Closing Sensor (SR14)
689
Original Reading End Sensor (SR4)
690
Original Reading Start Sensor (Prism)
691
Harness Guide
693
RADF Height Adjustment
698
RADF Image Skew Adjustment
700
RADF Leading Edge Position Adjustment
702
RADF Horizontal Position Adjustment
704
RADF Copy Ratio Adjustment
705
RADF Opening/Closing Switch Adjustment
706
Original Reading Start Sensor Adjustment
707
Platen Sheet
710
Power Supply Unit
711
Operation of DC Output Circuits
712
Output Channel
713
Configuration of Power Supply Unit
718
Sequence of Power Supply
719
AC Wire Harness
721
Preventive Maintenance (Pm)
723
General Description
723
PM Display Contents
724
Counter Clearing
726
General Descriptions for PM Procedure
727
Operational Flow
728
Operational Screen
729
Access Tree
734
General Description
736
Preventive Maintenance Checklist
738
Main Charger
744
Drum / Cleaner Unit / Filter
745
Developer Unit (K, Y, M, and C)
750
Transfer Belt Unit / Transfer Belt Cleaning Unit
754
Parts List
754
Image Quality Control Unit
757
Bridge Unit
764
Storage of Supplies and Replacement Parts
768
Maintenance Part List
770
Grease List
772
Operational Items in Overhauling
772
Firmware Updating
773
Firmware Updating with USB Media
777
Master Data/System ROM/PFC Rom/Engine Rom/Scanner ROM
779
Imaging Acceleration Board ROM (GE-1170)
789
Firmware Updating with PWA-DWNLD-350-JIG2
794
Pwa-Dwnld-350-Jig2 (48Mb)
794
Writing the Data to the Download Jig (PWA-DWNLD-350-JIG2)
795
System ROM
798
Engine ROM
800
Scanner ROM
805
RADF Firmware
808
Saddle Stitcher Firmware (MJ-1104)
812
Hole Punch Unit Firmware (MJ-6102)
814
[B] Firmware Update
815
Fax Unit Firmware (GD-1270)
819
Confirmation of the Updated Data
822
When Firmware Updating Fails
823
Flow Chart for Correcting USB Update Failure
824
Replacement of Pc Boards/Hdd
827
Removal and Installation of PC Boards/Hdd
827
SYS Board Cover
827
SYS Board Case
828
SYS Board Cooling Fan (F27)
829
IMG Board (IMG)
830
LGC Board (LGC)
831
LGC Board Case
832
PFC Board (PFC)
833
PFC Board Case
834
Hard Disk (HDD)
835
HDD Cooling Fan (F28)
836
Switching Regulator (PS)
840
High-Voltage Transformer-1 (HVT1)
842
FIL Board
844
HDD Fault Diagnosis
846
Precautions and Procedures When Replacing the HDD
848
Precautions and Procedures When Replacing the SYS Board
853
Procedures and Settings When Replacing the SLG Board
854
Precautions and Procedures When Replacing SRAM Board (for SYS Board)
855
Precautions and Procedures When Replacing SRAM Board (for LGC Board)
859
Firmware Confirmation after the PC Board/Hdd Replacement
861
Electronic Key Re-Registration Using the One-Time Dongle
862
Precautions for Installation of GP-1070 and Disposal of HDD/ Board
863
Backup Function
865
Data Cloning
865
Backup Files
867
List of Codes Available for Cloning
869
Cloning Procedure
872
Setting Procedure
879
Procedure for Disabling Data Encryption Function
884
Operating Procedure of Assist Mode
886
Self-Diagnostic Mode
887
Advertisement
Toshiba e-STUDIO6530c Service Handbook (648 pages)
MULTIFUNCTIONAL DIGITAL COLOR SYSTEMS
Brand:
Toshiba
| Category:
All in One Printer
| Size: 148 MB
Table of Contents
General Description
7
Table of Contents
19
1 Specifications/Accessories/Options/Supplies
25
Copy
27
Print
32
Internet Fax
33
Accessories
34
Options
35
Supplies
36
System List
37
2 Self-Diagnostic Mode
39
Input Check (Test Mode 03)
42
Output Check (Test Mode 03)
53
Test Print Mode (Test Mode 04)
60
List Printing
61
Adjustment Mode (05)
73
Operating Procedure
79
Test Print Pattern in Adjustment Mode (05)
81
Process
85
Image Processing
90
Scanner
123
Printer
125
Setting Mode (08)
154
Operating Procedure
167
Process
169
Printer
171
Counter
172
System
173
Pixel Counter
177
PM Support Mode Related Code
190
Default Setting / Restore Setting of the EFI Printer Board
198
Adjustment
199
Adjustment of the Auto-Toner Sensor
200
Performing Image Quality Control (IQC)
202
Adjustment of Color Registration Control
204
Image Dimensional Adjustment (General Description)
205
Paper Alignment at the Registration Roller
207
Printer-Related Image Dimensional Adjustment
213
Scanner-Related Image Dimensional Adjustment
221
Image Quality Adjustment (Copying Function)
230
Density Adjustment
232
Color Balance Adjustment
233
Gamma Balance Adjustment
235
Background Adjustment
236
Judgment Threshold for ACS (Common for Copy & Network Scan)
237
Setting Range Correction
238
Adjustment of Smudged/Faint Text
239
Beam Level Conversion Setting
240
Maximum Toner Density Adjustment to Paper Type
241
Text/Photo Reproduction Level Adjustment
242
Black Header Density Level Adjustment
243
Background Offsetting Adjustment for ADF
244
Image Quality Adjustment (Printing Function)
245
Gamma Balance Adjustment (Black Mode)
247
Color Balance Adjustment
249
Adjustment of Faint Text
250
Maximum Toner Density Adjustment (OHP)
251
Pureblack/Puregray" Threshold Adjustment (PCL)
252
Toner Limit Threshold Adjustment
253
Sharpness Adjustment
254
Background Adjustment
255
Image Quality Adjustment (Scanning Function)
256
Density Adjustment
257
Background Adjustment (Color Mode)
258
Sharpness Adjustment
259
Fine Adjustment of Black Density
260
RGB Conversion Method Selection
261
Background Processing Offset Adjustment
262
Image Quality Adjustment (FAX Function)
263
Beam Level Conversion Setting
264
Adjustment of the Process Unit Related Section
265
Adjustment of the Doctor-Sleeve Gap
266
Adjustment of the Scanner Section
268
Belt Tension Adjustment of the Scan Motor
269
Adjustment of the Reversing Automatic Document Feeder (RADF)
270
RADF Height Adjustment
274
RADF Image Skew Adjustment
276
RADF Leading Edge Position Adjustment
278
RADF Horizontal Position Adjustment
280
RADF Copy Ratio Adjustment
281
RADF Opening/Closing Switch Adjustment
282
Original Reading Start Sensor Adjustment
283
Platen Sheet
286
Adjustment of the Paper Feeding System
287
Separation Roller Pressure Force Adjustment
288
Sheet Sideways Deviation Caused by Paper Transporting Adjustment
289
Adjusting the Clearance of the Paper and Side Guides
292
Adjustment of the Transfer Belt
294
Gap Adjustment for Fuser Unit
295
Gap Adjustment for Pressure Roller Thermistors
299
Gap Adjustment for Pressure Roller Thermostats
302
Gap Adjustment for Separation Plate
305
4 Backup Function
311
Backup Files
313
List of Codes Available for Cloning
315
Cloning Procedure
318
AES Data Encryption Function Setting
325
Procedure for Disabling Data Encryption Function
330
Assist Mode
331
Operating Procedure of Assist Mode
332
5 Preventive Maintenance (Pm)
333
PM Display Contents
334
Counter Clearing
336
General Descriptions for PM Procedure
337
PM Support Mode
338
Operational Screen
339
Access Tree
344
General Description
346
Preventive Maintenance Checklist
348
Scanner
349
Feed Unit
350
Duplexing Unit
352
Bypass Feed Unit
353
Main Charger
354
Drum / Cleaner Unit / Filter
355
Developer Unit (K, Y, M, and C)
360
Waste Toner Box
363
Transfer Belt Unit / Transfer Belt Cleaning Unit
364
Image Quality Control Unit
367
Nd Transfer Roller Unit
368
Fuser Unit
371
Bridge Unit
374
Radf
375
Lcf (Mp-2501)
376
Storage of Supplies and Replacement Parts
378
Maintenance Part List
380
Grease List
382
6 ERROR CODE and TROUBLESHOOTING
383
Service Call
393
Error in Internet FAX / Scanning Function
400
Printer Function Error
408
Topaccess Related Error
410
Diagnosis and Prescription for each Error Code
411
Paper Misfeeding
413
Paper Transport Jam
416
Other Paper Jam
426
Cover Open Jam
430
RADF Jam
432
Jam in Bridge Unit
436
Paper Jam in Finisher Section
437
Paper Jam in Saddle Stitcher Section
443
Paper Jam in Puncher Unit
445
Other Paper Jam
446
Paper Feeding System Related Service Call
456
Scanning System Related Service Call
459
Fuser Unit Related Service Call
460
Communication Related Service Call
468
RADF Related Service Call
470
Circuit Related Service Call
471
Laser Optical Unit Related Service Call
473
Finisher Related Service Call
476
Image Control Related Service Call
488
Copy Process Related Service Call
501
Other Service Call
508
Error in Internet FAX / Scanning Function
509
Printer Function Error
523
Topaccess Related Error
525
Toshiba e-STUDIO6530c Imaging Manual (288 pages)
Brand:
Toshiba
| Category:
All in One Printer
| Size: 12 MB
Table of Contents
Table of Contents
7
1 General Adjustments - Copying, Printing and E-Filing (Output from Box)
11
To Obtain a Darker Image
11
To Adjust the Density on a Solid Colored Image
15
To Achieve the Image Quality most Suitable for the Paper Used
20
(To Eliminate Blur and Graininess from an Image)
20
To Minimize Variations in the Image Quality under the Operating Conditions
25
(To Optimally Program Image Quality Control)
25
To Correct Out-Of-Registration Colors
31
2 Copier-Specific Adjustments
35
To Copy Text Clearly (to Eliminate Faint, Smudged or Blurred Text)
35
To Adjust the Copy Image Quality in the Black Mode
36
To Adjust the Copy Image Quality in the Full Color Mode
40
To Adjust the Copy Image Quality in the Auto Color Mode
43
To Closely Match the Color Balance of the Original
46
To Improve the Reproducibility of Gray
50
To Copy in VIVID Colors
52
Adjust Value
55
To Make the Pale Area of the Original Look Darker and Sharper
56
(To Improve the Highlight Reproducibility)
56
To Eliminate the Background Color
59
To Adjust the Copy Image Quality in the Black Mode
60
To Adjust the Copy Image Quality in the Full Color Mode
62
To Avoid Copying the Image Seen through
65
The Back of a Page Printed on Thin Paper
65
To Adjust the Copy Image Quality in the Black Mode
66
To Adjust the Copy Image Quality in the Full Color Mode
69
To Eliminate Moiré
71
To Copy Sharply (to Enhance Sharpness)
75
To Make Photo Edges Look Softer
78
To Make Solid Filled Bold Text (Logo) Highly Colored
83
To Adjust the Copy Image Quality of a Black Logo
84
To Adjust the Copy Image Quality of a Colored Logo
86
To Sharply Contrast the Hues of Highlighters on the Copy
88
To Obtain a Good Color Balance on Thick Paper
91
To Obtain Smooth Gray-Scale Photo Images
95
To Change the Threshold in Auto Color Mode (to Change the Threshold between the Full Color Mode and the Black Mode to Meet the User's Needs)
97
To Adjust the Twin-Color Copy Image Quality
100
To Adjust the Tint of Colors Other than Black
101
To Adjust the Reproducibility of Black in the Red and Black Mode
102
To Adjust the Boundary between Black and Colors Other than Black
103
To Adjust the Image Quality Scanned from the RADF
104
To Program Frequently Used Copy Settings (to Use Custom Mode)
107
To Adjust Custom Mode Settings in Black Mode
107
To Adjust Custom Mode Settings in Color Mode
112
To Copy While Erasing Shadow Outside of Image
116
To Avoid Copying Blank Page of Original Scanned with RADF
117
To Obtain Image in Even Density Level
119
3 Printer-Specific Adjustments
121
Restrictions on Use of Printer Functions
121
To Maintain a Steady Color Balance
122
To Maintain a Steady Color Balance on Thick Paper or Special Paper
124
To Obtain the Desired Color Balance
126
For Windows
127
To Closely Match the Color Balance on the Monitor
134
To Maintain a Uniform Gray Hue (to Maintain Consistency in Gray Among Text, Photos and Graphics)
137
To Use Only the Black Toner to Reproduce Gray Areas (to Use Only the Black Toner to Reproduce Black-And-White Photos or Gradational Images)
140
To Easily Adjust the Overall Brightness
144
To Adjust the Overall Saturation
147
To Easily Adjust the Overall Contrast
151
To Obtain a Sharper Print Image
154
To Obtain a Softer Image
157
To Make Low-Resolution Data Look Finer (to Soften an Image)
160
To Eliminate Smudges from Highly Colored Text and Lines (to Prevent Toner Scattering Around Text and Lines Where a Large Amount of Toner Is Used)
163
To Clearly Print Light-Colored Thin Lines or Text
167
To Adjust the Print Image Quality in the Color Mode
168
To Adjust the Print Image Quality in the Black and White Mode
176
For Macintosh
177
To Make the Light-Colored Area Darker on the Printout
180
To Clearly Print Thin Lines/Double Lines
186
To Decrease the Image Density and Save Toner
191
(To Print in the Toner Save Mode)
191
To Adjust the Image Density in the Toner Save Mode
194
To Print Illegible Gray or Colored Text in Black
197
To Ignore Blank Pages for Printing
199
To Sharply Print Black Text
202
To Prevent Dark Toner from Coming off
212
To Register the Image Quality Adjusted Corresponding to a Preference
214
(To Use the Custom Color Settings)
214
To Print a Full-Color Original in Two Colors
217
To Adjust Colors
218
To Adjust the Sharpness
223
To Print a Full-Color Original in Two Colors
225
To Use ICC Profile
226
To Create ICC Profiles for Printing on the Paper to be Used
227
To Print Precise Colors Using Existing RGB Source ICC Profiles
232
Each Ink Manufacturer
236
To Convert Colors with Specified Source ICC Profiles
240
To Perform Further Adjustment after Using ICC Profiles
245
Advertisement
Toshiba e-STUDIO6530c Management Manual (226 pages)
MULTIFUNCTIONAL DIGITAL SYSTEMS e-STUDIO855 Series, e-STUDIO455 Series, e-STUDIO4520C Series, e-STUDIO6530C Series
Brand:
Toshiba
| Category:
All in One Printer
| Size: 6 MB
Table of Contents
Preface
3
Table of Contents
5
Chapter 1 SETTING ITEMS (USER)
10
Entering User Menu
10
Setting General Functions
11
Setting the Auto Clear Mode
11
Changing the Display Language
13
Setting the Reversed Display Mode
14
Adjusting the Display Contrast
15
Setting the Calibrations
16
Setting the Registration
18
Replacing the Toner Cartridge
19
Setting Copy Functions
20
Setting Fax Functions
26
Setting Scan Functions
27
Setting E-Filing Functions
31
Printing Lists
32
Setting Drawer
35
Managing Address Book
38
Managing Contacts in Address Book
38
Editing Contacts
42
Deleting Contacts
44
Managing Groups in Address Book
50
Editing Groups
53
Deleting Groups
59
Checking E-Mail
66
Setting BIP Printing
67
Chapter 2 SETTING ITEMS (ADMIN)
71
Entering Admin Menu
71
Setting General Functions
73
Setting the Device Information
73
Setting the Notification
75
Changing the Administrator Password
77
Setting the Date and Time
79
Setting the Energy Saver Modes
81
Setting the Auto Power Save Mode
84
Setting the Calibration and Registration Display Level
87
Setting the Drawer Set Pop-Up and Paper Jam Recovery Pop-Up
88
Setting the Status Message
89
Setting the Calibration
90
Setting the Registration
95
Setting the Panel Calibration
96
Touch Panel
97
Setting the Option
98
Setting Network Functions
99
Setting the TCP/IP Protocol (Ipv4)
99
Setting the Ipv6 Protocol
103
Setting the IPX/SPX Protocol
110
Setting the Netware Settings
112
Setting the SMB Protocol
114
Setting the Appletalk Protocol
116
Setting the HTTP Network Service
118
Setting the Ethernet Speed
120
Setting the LDAP/SNMP Network Services and the Filtering Functions
121
Ipsec (IP Security) Setting
123
Decrypting the User Certificate
125
Network Check
127
Setting Copy Functions
130
Setting Fax Functions
132
Setting the Discard and Reduction Print Option for the RX Print
132
Setting File Functions
134
Setting E-Mail Functions
135
Setting Internet Fax Functions
137
Setting Security Functions
139
Setting List/Report
141
Setting the Communication Report
143
Printing Lists
146
Setting Printer/E-Filing Functions
147
Wireless Settings and Bluetooth Settings
148
Change User Password
149
IEEE 802.1X Authentication Setting
150
Setting IEEE802.1X Authentication
150
Error Messages
163
Managing Counters (Counter Menu)
165
Toshiba e-STUDIO6530c Printing Manual (180 pages)
MULTIFUNCTIONAL DIGITAL COLOR SYSTEMS
Brand:
Toshiba
| Category:
All in One Printer
| Size: 8 MB
Table of Contents
Preface
3
Table of Contents
5
Chapter 1 OVERVIEW
8
About Printer Drivers
9
For Macintosh
9
For Unix/Linux
9
Features and Functions
8
Chapter 2 Printing from Windows
11
Before Using the Printer Driver
12
Configuring the Options
12
Setting the Department Code
14
Entering Department Code
15
Copying the PPD File for Windows
16
Printing from Application
17
Considerations and Limitations
17
How to Print
18
Setting up Print Options
20
How to Set up
20
Print Options
20
P.59 "Printing with Best Functions for Your Needs
20
Print Options
23
P.59 "Printing Various Print Job Types
25
Basic] Tab
26
Finishing] Tab
30
Booklet Details
34
Insert Pages
38
Image Quality] Tab
41
Effect] Tab
47
Custom Paper Size
54
Postscript Settings
55
Fonts] Tab
56
Configuration] Tab
58
Drawer Settings
60
Printing with Best Functions for Your Needs
61
Printing Various Print Job Types
61
P.65 "Layout and Finishing Options in [Basic] Tab Menu
61
P.67 "Layout and Finishing Options in [Finishing] Tab Menu
61
P.74 "Finishing Options in [Paper Handling] Tab Menu
61
P.76 "Finishing Options in [Effect] Tab Menu
61
P.80 "Using Various Types of Paper
61
Printing Private Print Jobs
62
Printing Confidential Documents
62
Printing Proof Print Jobs
63
Creating an Overlay File
64
Layout and Finishing Options in [Basic] Tab Menu
67
Printing Color Document in Gray Scale
68
Layout and Finishing Options in [Finishing] Tab Menu
69
Printing on both Sides of a Sheet
70
Making a Booklet
71
Printing Several Pages on One Sheet
74
Printing Multiple Pages Per Sheet
74
Hole Punching
75
Punching Holes
75
Finishing Options in [Paper Handling] Tab Menu
76
Finishing Options in [Effect] Tab Menu
78
Printing with an Overlay File
80
Using Various Types of Paper
82
Control Panel
84
Chapter 3 Printing from Macintosh
87
Printing from Application on Mac os X 10.2.4 to Mac os X 10.5.X
88
Considerations and Limitations
88
How to Print from Mac os X 10.2.4 to Mac os X 10.5.X
89
Page Setup Dialog on Mac os X 10.2.4 to Mac os X 10.5.X
90
Custom Page Sizes
91
Print Dialog on Mac os X 10.3.X to Mac os X 10.5.X
95
Output Options
97
Paper Handling
98
Color Matching
100
Cover Page
100
Error Handling
101
Paper Feed
101
Print Mode
104
Printer Features
105
Print Dialog on Mac os X 10.2.X
110
Color Settings
115
Printing Modes
121
Chapter 4 Printing from Unix/Linux
125
Printing from Application
126
Considerations and Limitations
126
Printing Using Lp Command
126
Generic "Lp" and "Lptap" Options
126
General Options
127
Output bin
128
Media Type
129
Paper Source
129
Paper Size
130
Department Code
131
Distinguish Thin Lines
131
Toner Save
131
Booklet Modes
132
Page Layout
133
Center Margin
133
Outer Margin
134
Font Pitch
134
Page Length
135
Color Mode
135
Pure Black and Pure Gray
135
Image Quality Type
136
Black over Print
136
Color Balance
136
Pcl5E Specific Options
138
Banner Page
139
Toshiba e-STUDIO6530c Troubleshooting Manual (114 pages)
Brand:
Toshiba
| Category:
All in One Printer
| Size: 10 MB
Table of Contents
Troubleshooting Guide
1
Preface
3
Table of Contents
5
Chapter 1 TROUBLESHOOTING for the HARDWARE
10
Messages Displayed on the Touch Panel
10
Clearing a Paper Jam
13
Locating a Paper Jam
13
Clearing a Paper Jam
14
Paper Jam in the Reversing Automatic Document Feeder
15
Paper Jam in the External Large Capacity Feeder (Optional)
17
Paper Jam in the Drawer Feeding Portion
19
Paper Jam in the Bypass Tray
20
Paper Jam in the Right Side of the Equipment
20
Fuser Unit
21
Paper Jam in the Duplexing Unit
23
Paper Jam in the Finisher and the Hole Punch Unit (both Optional)
24
Paper Jam in the Saddle Stitch Unit (Optional)
28
Paper Jam in the Receiving Unit
32
Paper Jam in the Bridge Unit
34
Clearing Paper Jams Caused by a Wrong Paper Size Setting
35
Clearing Paper Jams Caused by a Wrong Paper Type Setting
40
Clearing a Staple Jam
44
Staple Jam in the Finisher
44
Staple Jam in the Saddle Stitch Unit
45
Replacing a Toner Cartridge
48
Replacing a "Near Empty" Toner Cartridge
51
Replacing the Waste Toner Box
54
Refilling with Staples
56
Refilling the Finisher Staples
56
Refilling the Saddle Stitch Unit Staples
57
Cleaning the Hole Punch Dust bin
60
Chapter 2 TROUBLESHOOTING for COPYING
61
Copying Problems
62
Chapter 3 TROUBLESHOOTING for PRINTING
66
Print Job Problems
66
Clearing Print Job Errors
66
Cannot Remember the Document Password for a Private Print Job
67
Printer Driver Problems
68
Cannot Print (Port Setting Problems)
68
Cannot Print (SNMP Community Name Problems)
68
Command Line Options Not Processed
68
Retrieval of Printer Configuration Failed
69
Cannot Print a Job as Expected Using PS3 Printer Driver
69
Cannot Change Settings on the [Fonts] Tab and the [Configuration] Tab
69
Network Connection Problems
70
Cannot Print with the Equipment (Network Connection Problems)
70
Cannot Print with SMB Print
70
Cannot Print Properly with Appletalk Print
70
Client Problems
71
Checking the Client Status
71
Hardware Problems
72
Startup Page Not Printed
72
Print Jobs Not Output
72
Chapter 4 TROUBLESHOOTING for SCANNING
73
Scanning Problems
74
Cannot E-Mail My Scans
74
Cannot Find the Data Saved in the Shared Folder
74
Chapter 5 TROUBLESHOOTING for E-Filing
76
E-Filing Web Utility Problems
76
E-Filing Web Utility Terminates the Session
76
Numerous Sub Windows Repeatedly Appear
76
Displaying the Items in the Contents Frame Takes a Long Time
76
Error Messages
77
Chapter 6 TROUBLESHOOTING for NETWORK CONNECTIONS
80
Locating the Equipment in the Network
80
Cannot Locate the Equipment in the Network
80
Cannot Locate the Equipment with Local Discovery
81
Equipment Does Not Respond to Ping Command
82
LDAP Search and Authentication Problems
83
Network Shutdown Occurs or Touch Panel Disabled after LDAP Search
83
LDAP Authentication Takes a Long Time
83
Printing Problems (Network Related)
84
SMB Print and Point&Print in a Windows Operating System Environment
84
Raw TCP or LPR Print in a Windows Operating System Environment
84
IPP Print in a Windows Operating System Environment
85
Novell Print in a Netware Environment
85
Macintosh Environment
86
Unix/Linux Environment
86
Network Fax (N/W-Fax) Driver Problems
87
N/W-Fax Driver Installation Error Messages
87
N/W-Fax Driver General Errors
88
Fax Transmission Cannot be Performed with a Cover Sheet
89
Toshiba e-STUDIO6530c User Manual (52 pages)
Print Solution
Brand:
Toshiba
| Category:
Printer Accessories
| Size: 3 MB
Table of Contents
Software License Agreement
3
Limitation of Liability
4
Trademarks and Copyright
5
Disclaimer Notice
6
Preface
7
About this Guide
7
Conventions
7
Table of Contents
9
1 AXIS Network Print Server
11
Overview
12
Components
12
Finishing Options and Logical Printers
13
Installation
14
Installation Procedure
14
Configuration
17
Available AXIS Firmware Version
17
Update Procedure
17
Copier Model
19
Only PCL Available
20
Available Finisher Options
21
Hole Punch
24
Paper Source
26
General Settings
28
IPDS Emulator
29
Custom Copier Driver
31
Problem Solving
32
Problems and Recommended Solutions
32
Customer Service
32
2 Workstation Customization Object for TOSHIBA E-STUDIO
33
Overview
34
Components
34
Finishing Options and Logical Printers
34
Installation
35
Installation Procedure
35
Uninstallation
40
Uninstallation Procedure
40
Execute a Command
41
Operation
44
Operational Procedure
44
Print File Script
45
Appendix
47
Stapling Specifications
47
Printing Character Size - Reference Values
48
Glossary
49
Definitions of Terms
49
Advertisement
Related Products
Toshiba e-STUDIO6520c
Toshiba E-STUDIO655
Toshiba e-STUDIO656
Toshiba E-studio656se
Toshiba e-STUDIO657
Toshiba E-STUDIO6506AC
Toshiba E-STUDIO6508A
Toshiba e-STUDIO 6550C e-STUDIO 5560C
Toshiba e-STUDIO6508AC
Toshiba e-STUDIO6570C Series
Toshiba Categories
Laptop
Air Conditioner
TV
LCD TV
All in One Printer
More Toshiba Manuals
Login
Sign In
OR
Sign in with Facebook
Sign in with Google
Upload manual
Upload from disk
Upload from URL