Sign In
Upload
Manuals
Brands
Korg Manuals
Voice Recorder
D1600
Korg D1600 Manuals
Manuals and User Guides for Korg D1600. We have
4
Korg D1600 manuals available for free PDF download: Owner's Manual, Manuald Tour, Easy Start, Leaflet
Korg D1600 Owner's Manual (152 pages)
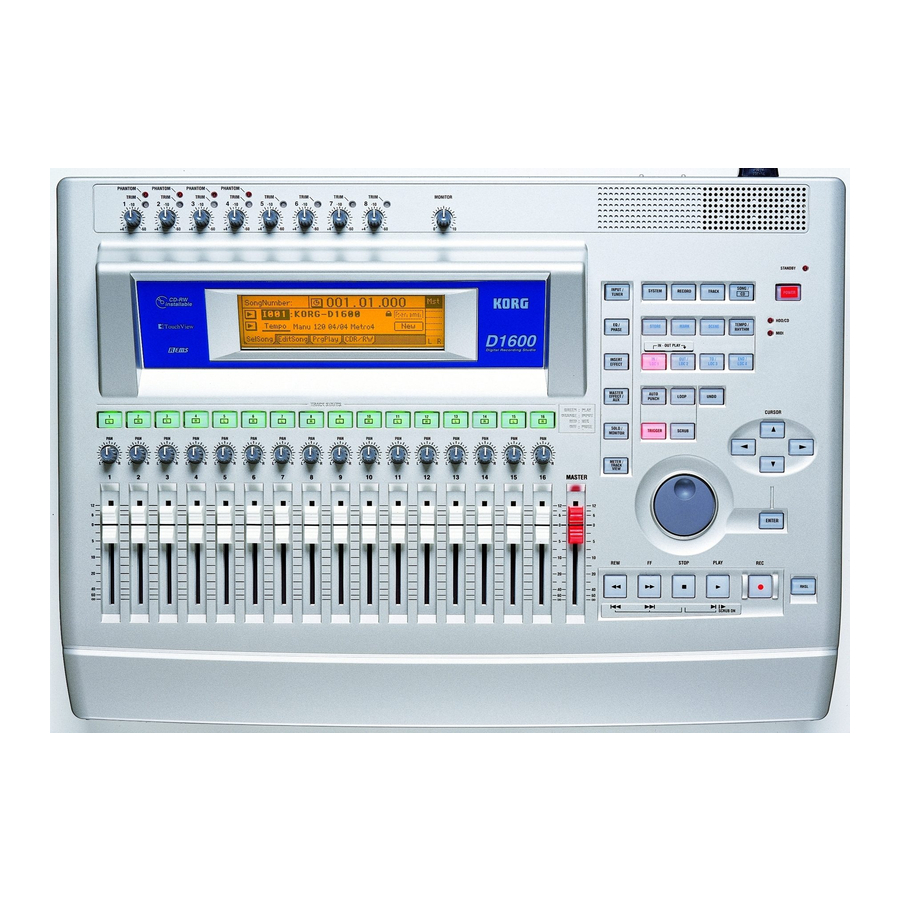
Korg Digital Recording Studio Owner's Manual
Brand:
Korg
| Category:
Recording Equipment
| Size: 6.35 MB
Table of Contents
Important Safety Instructions
2
Table of Contents
4
Introduction
7
Features
7
Printing Conventions in this Manual
9
Panel Overview of the D1600
10
Top Panel
10
Front Panel
13
Rear Panel
13
Objects in the LCD Screen and Their Functions
15
Objects in the LCD Screen
15
Adjusting the LCD Screen Contrast
16
Basic Operation
16
Selecting a Mode
16
Selecting a Tab Page
16
Selecting and Setting a Parameter
16
Basic Operation
17
Step 0. Starting
17
Preparations
17
Using the D1600
17
Step 1. Making Connections, and Turning the Power On/Off
19
Connections
19
Turning the Power On/Off
20
Listening to the Demo Song
21
Step 2. Creating/Selecting a Song
23
Creating a New Song
23
Naming a Song
23
Selecting Another Song
24
Step 3. Assign Audio Inputs to the Mixer
25
Analog Inputs
25
Digital Input
27
Using the Tuner
27
Step 4. Recording
29
Adjust the Recording Level, and Record
29
Recording on Virtual Tracks
29
Playback While Recording Addition Tracks: Overdubbing
30
Re-Record Part of a Performance: Punch-In/Out
30
Combining Multiple Tracks into Two: Bounce
31
Other Recording Methods
33
Step 5. Playback
35
Playback
35
Program Play
35
Other Playback Options
35
Step 6. Changing the Time Location
37
Switching the Counter Display
37
Moving the Current Time Location
37
Using Scrub Playback Etc. to Find a Precise Time Location
38
Step 7. Using the Mixer
39
Adjusting the Volume
39
Adjusting the Stereo Position
39
Using EQ to Adjust the Tone
39
Pairing
40
Monitor Settings
40
Solo Settings
41
Registering and Playing Scenes
41
Step 8. Using Effects
45
Overview of the Effects
45
Insert Effects
45
Master Effects
47
Final Effect
48
Editing an Effect
48
Controlling an Effect from an External Device
49
Using an External Effect
50
Step 9. Mixdown
51
Creating an Audio CD
51
Recording to a Master Tape
52
Using the Sub Inputs
52
Step 10. Track Editing
53
Track Editing Functions
53
Track Editing Examples
54
Step 11. Song Editing
61
Song Editing Procedure
61
Examples of Song Editing
61
Step 12. Rhythm/Tempo Settings
63
Specifying and Playing a Rhythm
63
Recording Your Performance While You Listen to the Rhythm
63
Recording the Rhythm
63
Setting the Tempo
64
Step 13. Saving Your Data
67
Copy Song, Copy All Songs
67
Backup/Restore
67
Connecting External Drives
69
Importing/Exporting WAV Files
70
Drive and Data Compatibility Within the Digital Recording Studio Series
72
Regarding Disk Capacity
73
Note When Using DOS Format Disks
74
Step 14. MIDI
75
MIDI Connections
75
MIDI Messages Used by the D1600
75
Using MIDI
75
Reference
77
Counter
77
Counter: Counter Display
77
System
77
P1 Control: Foot Switch/Control Change Device (Pedal/MIDI) Settings
77
P2 MIDI: MIDI Settings
78
P3 Sync: Synchronization Settings
78
P4 MMC: MMC Settings
79
P5 B-U/Rst: Backing-Up and Restoring Data to Removable Disk
79
P6 Diskutil: Initialize/Format/Check a Drive
81
Record
82
P1 Recmode: Selecting the Recording Mode
82
P2 Bounce: Settings for Bounce Recording
83
Track
83
P1 Vtr1-8: Select Virtual Tracks 1-8
83
P2 Vtr9-16: Select Virtual Tracks 9-16
83
P3 Edittrk: Track Editing
83
P4 Import: Import a WAV File
88
P5 Export: Export a WAV File
89
Song
90
P1 Selsong: Selecting a Song
90
P2 Editsong: Song Editing
91
P3 Prgplay: Program Playback of Songs
92
P4 CDR/RW: Creating and Playing a CD-R/RW
93
Store
94
Mark
94
P1 Mark: Editing Marks
94
Scene
95
P1 Readdel: Scene Playback On/Off and Editing
95
P2 Mixview: Pan/Fader Scene Display
96
Tempo/Rhythm
97
P1 Setup: Tempo and Rhythm Settings
97
P2 Tmpmap: Editing the Tempo Map
97
P3 Tmptrk: Create a Tempo Track
98
In/Loc1, Out/Loc2, To/Loc3, End/Loc4
99
P1 Atpunch: Settings for Auto Punch-In/Out Recording
100
Loop
101
P1 Loop: Loop Playback/Recording Settings
101
Undo
101
Trigger
102
P1 Trigger: Settings to Start Trigger Recording
102
Scrub
103
Enter
103
Input
104
P1 Ch1-8: Select the Inputs for Mixer Channels 1-8
105
P3 Ineq1-4: EQ Settings for Inputs 1-4
105
P4 Ineq5-8: EQ Settings for Inputs 5-8
105
P5 Tuner: Tuner
105
Eq/Phase
106
P1 Eq1-4: EQ Settings for Mixer Channels 1-4
106
P2 Eq5-8: EQ Settings for Mixer Channels 5-8
106
P3 Eq9-12: EQ Settings for Mixer Channels 9-12
106
P4 Eq13-16: EQ Settings for Mixer Channels 13-16
106
P5 Phase: Phase Settings for Mixer Channels
106
Insert Effect
107
P1 Insass: Insert Effect Insertion Location/Type
107
P2 Inseff1: Selection and Settings for Insert Effect 1
108
P3 Inseff2: Selection and Settings for Insert Effect 2
109
P4 Inseff3: Selection and Settings for Insert Effect 3
109
P5 Inseff4: Selection and Settings for Insert Effect 4
109
P6 Ins5-8: Selection and Settings for Insert Effects 5-8
109
Master Effect/Aux/Final Effect
109
P1 Msteff1: Selection and Settings for Master Effect 1107
109
P2 Msteff2: Selection and Settings for Master Effect 2108
110
P3 Effsnd1: Send Settings for Effect 1
110
P4 Effsnd2: Send Settings for Effect 2
110
P5 Auxsend: External Send Settings
110
P6 Finaleff: Selection and Settings for the Final Effect
110
Solo/Monitor
111
P1 Solo: solo Select
111
P2 Monitor: Monitor Settings
112
Meter/Track View
113
Track Status
113
Pan
113
Fader
114
Transport Keys
114
Effect Parameter List
115
Insert (2In2Outx2)/Master/Final Effect
115
Reverb RV1 - RV7
115
Category: Reverb-Type Effects
115
1: RV1: Reverb Hall
115
2: RV2: Smooth Hall
115
3: RV3: Reverb Wet Plate
115
4: RV4: Reverb Dry Plate
115
5: RV5: Reverb Room
115
6: RV6: Bright Room
115
9: DL2: St/Cross Delay (Stereo/Cross Delay)
116
10: DL3: St.multitap Delay (Stereo Multitap Delay)
116
11: DL4: St.modulation Delay
116
12: DL5: St.dynamic Delay (Stereo Dynamic Delay)
116
13: DL6: St.auto Panning Delay
117
Modulation MO1- MO7 Category: Modulation-Type Effects
117
14: MO1: St.chorus (Stereo Chorus)
117
15: MO2: St.flanger (Stereo Flanger)
117
16: MO3: St.phaser (Stereo Phaser)
117
17: MO4: St.vibrato (Stereo Vibrato)
117
18: MO5: St.tremolo (Stereo Tremolo)
118
19: MO6: St.auto Pan (Stereo Auto Pan)
118
20: MO7: Ensemble
118
Dynamics DY1 - DY7 Category: Dynamics-Type Effects
118
21: DY1: St.compressor (Stereo Compressor)
118
22: DY2: St.limiter (Stereo Limiter)
118
23: DY3: Multiband Limiter
119
24: DY4: St.gate (Stereo Gate)
119
25: DY5: St.exciter/Enhancer
119
26: DY6: St.decimator (Stereo Decimator)
119
27: DY7: St.parametric 4Band EQ
120
Special Effect SE1 - SE4 Category: Special Effect
120
28: SE1: St.ring Modulator
120
29: SE2: Doppler
120
30: SE3: St.analog Record
120
31: SE4: Talking Modulator
120
Insert (2In2Outx2), Final
121
Large Size LS1 - LS7 Category: Large Size Effects
121
32: LS1: St.graphic 7Band EQ
121
33: LS2: St.multiband Limiter
121
34: LS3: Vocoder
121
35: LS4: St.pitch Shifter
121
36: LS5: Early Reflections L
121
37: LS6: Rotary Speaker
122
38: LS7: Center Canceller
122
Insert (1In2Outx2)
122
GT1 - GT6 Category: Guitar Multi
122
39: GT1: Guitar Multi1
122
40: GT2: Guitar Multi2
122
41: GT3: Guitar Multi3
122
42: GT4: Guitar Multi4
122
43: GT5: Guitar Multi5
122
44: GT6: Guitar Multi6
122
PA1 Category: Pre-Amp Simulator
123
PA1: Pre Amp Simulator
123
EB1 – EB3 Category: Bass Multi
123
EB1: Bass Multi1
123
EB2: Bass Multi2
123
EB3: Bass Multi3
123
MS1 Category: MIC Multi
123
MS1: MIC Multi
123
VO1 – VO2 Category: Vocal Multi
123
VO1: Vocal Multi1
123
Ampsim (Ampsimulator)
124
Cabres (Cabinetresonator)
124
Tone
124
Gate
124
Deess (Deesser)
124
Cho/Fl (Chorus/Flanger)
124
Treml (Tremolo)
124
Phaser
124
Delay
124
S.dly (Stereo Delay)
124
Micsim (MIC Simulator)
125
Insert (1In1Outx4)
125
MM1: P4EQ – Exciter
125
MM2: P4EQ – Wah
125
MM3: P4EQ – Cho/Flng
125
MM4: P4EQ – Phaser
125
MM5: P4EQ – Mt.delay
125
MM6: Comp – Wah
125
MM7: Comp – Ampsim
125
MM8: Comp – Od/Hig
125
MM14: Exciter – Limiter
126
MM15: Exciter – Cho/Flng
126
MM16: Exciter – Phaser
126
MM17: Exciter – Mt.delay
126
MM18: Limiter – P4EQ
126
MM19: Limiter – Cho/Flng
126
MM20: Limiter – Phaser
126
MM21: Limiter – Mt.delay
126
MM22: Od/Hig – Cho/Flng
126
MM23: Od/Hig – Phaser
126
Ampsim (Amp Simulator)
127
Chfl1 (Chorus/Flanger)
127
Chfl2 (Chorus/Flanger2)
127
Comp2 (Compressor2)
127
Decima (Decimator)
127
Lmtr (Limiter)
127
Micsim (MIC Simulator)
127
Odhig (Overdrive/Highgain)
127
Phaser
127
Trml (Tremolo)
127
Insert (1In1Outx8)
128
MN1: Overdrive/Highgain
128
MN2: Compressor2
128
MN3: Limiter
128
MN4: Gate
128
MN5: Exciter2
128
MN6: Parametric 4Band EQ
128
MN7: Amp Simulator
128
MN8: Multitap Delay
128
MN9: Chorus/Flanger2
128
Appendices
129
Troubleshooting
129
Messages
133
Error Messages
133
Installing a Hard Disk or CD-R/RW Drive
136
About the Internal Hard Disk
136
About the Internal CD-R/RW Drive
138
Using the Internal CD-R/RW Drive
140
Updating the System Software
141
D1600 Specifications
144
MIDI Implementation Chart
144
Block Diagram
145
Effect Program List
146
Rhythm Pattern List (215Patterns)
148
Demo Song List
149
Index
149
Advertisement
KORG D1600 Manuald Tour (43 pages)
Digital Recording Studio
Brand:
KORG
| Category:
Voice Recorder
| Size: 0.99 MB
Table of Contents
Getting Started
1
Table of Contents
2
D1600 Guided Tour
3
Getting Started
3
Scene Memory Mode
7
Insert Effect Mode
8
Master Effect Mode
8
Solo Mode
9
Monitor Mode
9
Tuner Mode
10
D1600 Additional Features
13
Using the Ff and Rew Keys in a Song
15
Copy the Demo Song to a New Song Location for Editing
15
Select and Work with the Demo Song
15
Disable Scene Memory and Work with the Mixview Display
16
View the Post Fader Levels as You MIX
16
Mute/Un-Mute Tracks with the TRACK STATUS Keys
16
Work with the EQ Function
16
View the Insert Effect Assignments for the Demo Song
17
Work with the Lead Vocal Track in "SISTER DANCE
18
Set a New Locate Point in the Song
18
Work with the Counter
19
Work with the Lead Guitar Track
19
Assign and Work with a New Insert Effect for Track 3
20
Store in and out Points, and Use the Loop Playback Function
21
Work with the Master and Final Effects
21
Set New Master Effect Send Levels
22
Work with the Final Effect
22
Store the New Final Effect in a User Location
23
Playback the Song and Make any Final MIX Changes
23
Store a New Initial Scene for the Song
23
Additional Tips When Working with Scenes
24
Work with the solo Function
25
Work with the Monitor Cue Function
25
Work with the Metronome and Rhythm Patterns
26
Connect a Microphone and Set the Input Level
27
Check the Pre Fader Level and Adjust the Input Signal
28
Working with Virtual Tracks
29
Create a "16-2" Virtual Mixdown
30
Work with the Clipboard, Fade and Undo Functions
32
Create a New Song and Connect a Guitar
35
Record the New Tempo Map to Stereo Tracks
37
Write and Finalize a CD
39
Playback the New Song from CD
39
Basic Operations
40
Loop Recording
41
Loop Playback
41
Song and Track Editing
42
Owner's Manual References
43
Korg D1600 Easy Start (5 pages)
Digital recording studio
Brand:
Korg
| Category:
Recording Equipment
| Size: 0.26 MB
Table of Contents
Creating a New Song
3
Using the Insert Effects
4
Using the Master Effects
4
Working with Scenes
4
Advertisement
Korg D1600 Leaflet (5 pages)
Additions and changes
Brand:
Korg
| Category:
Measuring Instruments
| Size: 0.06 MB
Advertisement
Related Products
Korg D4
Korg D3200
Korg D1200 mkII
Korg D16XD
Korg D12
Korg D16
Korg EASYSTART D1600MKII
Korg D1
Korg D1WH
Korg SoundLink DRS 1212 I/O
Korg Categories
Synthesizer
Musical Instrument
Recording Equipment
Tuner
Electronic Keyboard
More Korg Manuals
Login
Sign In
OR
Sign in with Facebook
Sign in with Google
Upload manual
Upload from disk
Upload from URL