Table of Contents
Advertisement
Quick Links
Advertisement
Table of Contents

Related Manuals for BEOVISION Avant DVD


Summary of Contents for BEOVISION Avant DVD
- Page 1 BeoVision Avant DVD Reference book...
- Page 2 Til det norske marked: Batterij niet Mekaniske og elektroniske komponenter i weggooien, maar inleveren als KCA. produktene slites ved bruk. Det må derfor påregnes reparasjoner og utskiftning af komponenter innenfor kjøpslovens reklamasjons- tid, som må regnes som vedlikehold av This product fulfils the conditions stated in the produktene.
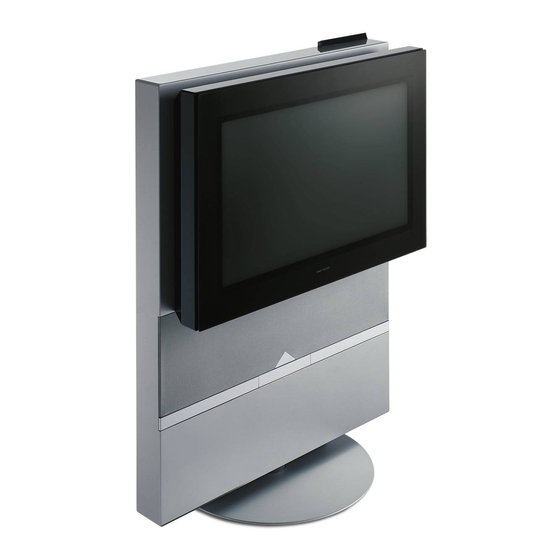
- Page 3 BeoVision Avant DVD – your Home Theatre With one push on a Beo4 remote control button, BeoVision Avant turns towards you, offering you a genuine wide-screen experience and optimum picture and sound quality. You don’t have to worry about placing your DVD player or running cables across the floor –...
- Page 4 Contents of the Reference book Set up your BeoVision Avant Set up BeoVision Avant in a link Key to using this guide room Use this Key to identify what a button, 6 Handling your BeoVision Avant source or status display looks like in an 6 Placing your BeoVision Avant in your 18 Before you start…...
-
Page 5: Table Of Contents
54 Switch on audio or video system speakers 37 Adjust or mute the sound volume 37 Change sound type or language Use BeoVision Avant in a link room 55 Switch on main room and link room Look up Teletext information... - Page 6 (50–105ºF). to the opposite page and the – Do not place any items on top of the BeoVision Leave enough space around the TV to allow it to chapters The display bar, page 51, turn freely.
- Page 7 BeoVision Avant turns, it is essential that the cables are run and fastened as depicted: > Turn the BeoVision Avant all the way to the left. > Run the cables from the AV panel (and the speakers panel) behind the bracket (A) and in a loop to the bracket (B).
- Page 8 (or a cable TV network) to the socket Avant to the mains. Switch on the mains switch marked VHF/UHF on the BeoVision Avant rear on the front of BeoVision Avant. A tiny, red light socket panel. appears in the display panel. The system is in stand-by mode and ready to be used.
- Page 9 Loudspeaker connections – surround sound A surround sound* setup with Placing loudspeakers BeoVision Avant is easy to fit into It is important that you find out where you your living room. Determine your wish to place your loudspeakers before you ideal listening and viewing position connect the speakers.
- Page 10 >> Loudspeaker connections Connect external speakers You can connect Bang & Olufsen speakers and a BeoLab 2 subwoofer to BeoVision Avant via the socket panel on the rear of the television. The speakers must be from the range of Bang &...
- Page 11 Set speaker distance To achieve the best possible surround sound, customise your setup by setting the speaker distance. Place yourself in your favourite television viewing position and turn on the system, enter the straight-line distances in meters between your position and the individual speakers.
- Page 12 1 Adjustment speakers in a surround sound setup to the available). 2 Speaker type BeoVision Avant, you will have to perform a > Press 2 to call up the Sound menu. 3 Speaker distance speaker calibration. > Press 4 to call up the Speaker level menu. TV is...
- Page 13 Olufsen retailer. Follow the procedure described Make sure that all connected > Connect one end to the set-top box. below to connect two set-top boxes to BeoVision > Run the cable to the AV, DECODER or V.TAPE Avant: equipment is registered in the socket on the back of BeoVision Avant.
- Page 14 If you wish to connect an RF decoder, then remember to connect the external aerial cable to the decoder input socket and then forward the signal or cable to the BeoVision Avant aerial socket (marked VHF/UHF). Connect the RF decoder to the 21-pin socket marked DECODER on the BeoVision Avant.
- Page 15 The connection of an analogue satellite dish We recommend that you use the close-up BeoVision Avant, such as a satellite to the BeoVision Avant requires a built-in sockets for equipment you connect on a dish, a video tape recorder or a satellite receiver module.
- Page 16 Choose settings Your AV system can be placed If your BeoVision Avant has been set up in an AV system, you may need to program it to the together in one room, or in two correct Option. Option programming is done...
- Page 17 LINK equipment. > If the Master Link socket on the BeoVision Avant already has an audio system connected, you must split the Master Link cable in two and join Tuning them with the cable from the link room using a special junction box.
- Page 18 Before you start… Main room Link room system installed, you can either use If you choose to use your BeoVision Avant in a your BeoVision Avant in the main link room, the setup procedure differs from Option 6 room, such as a living room, or in a setup of a stand-alone BeoVision Avant.
- Page 19 Connections Link frequency Your BeoVision Avant in the link room must If a TV channel is broadcasting on the same When the connections are complete, you can be connected to your main room system using frequency that the main room system uses to...
- Page 20 Register extra equipment If you connect additional video sources Registering the equipment connected to BeoVision Avant enables you to operate it or equipment to your BeoVision Avant, with the Beo4 remote control. then you must register the equipment in the Connections menu.
- Page 21 Beo4 list of DECODER functions. Please refer to the chapter ‘Gain access can only be connected to BeoVision Avant if your Decoder(1)… for a primary decoder or expander BeoVision Avant does not have the built-in satellite to extra functions via Beo4’...
- Page 22 Tune in TV or satellite channels You can make BeoVision Avant find When you set up BeoVision Avant for the first time, you can tune in those TV and satellite your TV and satellite* channels for channels that are available in your area via you, or you can key in the exact the TV tuning and Sat tuning menus.
- Page 23 Add new TV or satellite channels You can tune in new channels or You can add new or previously deleted TV and satellite channels to your channel lists at any re-tune previously deleted channels. time using the Add program menu. During this tuning process, your previously tuned channels are left alone.
- Page 24 Finally, you can make adjustments to displayed before you begin tuning. the individual channels by choosing a suitable picture format or sound type. NOTE! satellite channels are only available if your BeoVision Avant is equipped with the built-in satellite receiver module.
- Page 25 If you have only one decoder connected, your the correct broadcast system is displayed before options are ON or OFF. If you have two you start tuning: decoders connected to BeoVision Avant, you B/G… for PAL/SECAM B/G can choose between Dec1, Dec2, or OFF.
- Page 26 >> Edit tuned TV or satellite channels Adjust tuned satellite channels You can store satellite channels on their own channel numbers, fine tune the channel reception, indicate the presence of coded channels and choose appropriate sound types for the individual channels. >...
- Page 27 Tune in the mono sound frequency. options are ON or OFF. If you have two (Left – Right) decoders connected to BeoVision Avant, you Only applies if Stereo sound is selected. Press ▼ can choose between Dec1, Dec2, or OFF.
- Page 28 >> Edit tuned TV or satellite channels Move tuned channels Name tuned channels You can rearrange the order in which your BeoVision Avant will name your tuned channels appear when you switch channels, as channels automatically during auto tuning, well as in the on-screen channel list.
- Page 29 Delete tuned channels You can remove all your unwanted tuned channels from the channel list, thereby reducing the time you spend changing channels. > Switch on the system and press MENU to call > Switch on the system and press MENU to call TV tuning up the main menu.
- Page 30 NO (displays the time on request). If Fri… Friday DISPLAY is set to NO, you can see the time in Sat… Saturday the Avant DVD display by pressing LIST on Beo4 Sun… Sunday until CLOCK is shown, and then pressing GO.
- Page 31 Beo4 remote control. > Switch on BeoVision Avant and press MENU to Furthermore, you can program the Setup call up the main menu. Avant to rotate automatically to face >...
- Page 32 You can adjust picture brilliance, colour or contrast. Sound settings > Switch on BeoVision Avant and press MENU to Setup include volume, bass, treble, call up the main menu. > Press 3 to call up the Setup menu (4 if Sat is loudness and balance.
- Page 33 Sound menu to be able to adjust bass, treble, loudness or balance. > Switch on BeoVision Avant and press MENU to Setup call up the main menu. > Press 3 to call up the Setup menu (4 if Sat is 1 Tuning available).
- Page 34 Beo4 display. ADDED is shown in the Beo4 display You can, though, customise your TEXT MENU Beo4 to suit your BeoVision Avant, and change the order in which these extra functions appear when you call them up*. LIST EXIT STOP *NOTE! Please refer to Beo4’s own User’s guide...
-
Page 35: Set Video Tape Recorder Preferences
BeoVision Avant, you can the V 8000 Setup menu. gain access to the V 8000 main menu. > Switch on BeoVision Avant and press V TAPE to Menu Please refer to the guide enclosed switch on the video tape recorder. -
Page 36: Daily Operations
Beo4 remote separate lists, which you can call up on the – Choose a TV or satellite* channel; control. BeoVision Avant switches on the last screen. The lists contain channel numbers and channel you watched. names, and can contain up to 99 TV channels –... -
Page 37: Adjust Viewing Position
EXIT Press to exit the SOUND function Please refer to ‘Set positions for BeoVision Avant to turn to’ on page 31 for more information about In order to display SOUND in the Beo4 display, you how to preset positions for TV viewing. -
Page 38: Look Up Teletext Information
Teletext service, BeoVision Avant gives you access to Teletext pages. Sometimes a single page will consist of several subpages, which appear While BeoVision Avant is turned on… A typical Teletext page. The current page TEXT Press to see the Teletext index number, channel name, date and time appear at one by one in a repeating series. -
Page 39: Store Frequently Read Pages
Press to return to TV viewing Please note that set-top box Teletext pages can be viewed, but not stored as memory pages! *NOTE! If your BeoVision Avant is linked via BeoLink to another television, stored memory pages will not be shared among linked televisions. -
Page 40: Preset A Recording From Teletext Tv
*NOTE! The PDC/VPS option on the video tape recorder’s Setup menu must be set to On for BeoVision Avant to record a delayed or extended broadcast. Please refer to the chapter Set video tape recorder preferences on page 35 for information about the video tape recorder’s... -
Page 41: Go Directly To A Page Via Fastext
Go directly to a page via Fastext Some Teletext broadcasters offer immediate access facilities, called Fastext, that enable you to step directly to one of four linked Teletext pages. Fastext is supported by the BeoVision Avant. While the TV is turned on… TEXT... -
Page 42: Use The Dvd Player
It informs you of the The DVD loader will close automatically when you BeoVision Avant will always start by turning on current settings for these functions turn off the television. -
Page 43: While The Dvd Is Playing
GO to restart playback from the beginning *NOTE! If you restart playback after a pause of less than half an hour, BeoVision Avant will prompt you to resume playback at the point of interruption. A window on the screen shows RESUME. -
Page 44: The Dvd Disc Menu
>> Use the DVD Player The DVD disc menu The on-screen tool bar DVDs may contain particular functions, such as The main functions of the DVD player are selection of individual scenes or chapters, accessible via a tool bar along the top of the subtitle language, etc. - Page 45 The tool bar symbols… Personal Preferences menu Camera angle* Still mode You can change settings for picture, sound and It is possible on some DVDs to change to a Pressing during playback pauses playback on a ▲ language via this menu. different camera angle.
-
Page 46: Play Audio Cd
Change picture, sound or language When it is convenient for you, use your The Personal Preferences menu allows you to BeoVision Avant to play audio CDs. store DVD playback settings for picture, sound and language. When an audio CD is loaded…... - Page 47 Video CD) discs. Options are ON and OFF. LOW POWER STANDBY… Set to OFF. The following options, if shown on the Personal Preference menu, are inactive in BeoVision Avant: ACCESS CONTROL. *NOTE! Some DVDs will require you to choose a...
-
Page 48: Select Speakers For Movie Sound
If you have connected only two external front speakers to be switched on. You are speakers to BeoVision Avant, you will only be able still free to choose the speaker setup EXIT Press to remove SPEAKER from to choose SPEAKER 1–3. -
Page 49: Make The Picture Fill Out The Screen
▼ picture up and down EXIT Press to leave the FORMAT The illustration at the top shows the Avant DVD function standard picture format, which is a 15:9 format. The overlapping illustrations above show what happens to a letter-box picture when you choose format 2. -
Page 50: See Two Sources At The Same Time
Beo4 list of functions. Please refer to ‘Gain access to extra functions via Beo4’ on page 34 for further instruction. *NOTE! The Picture-in-Picture function requires that your BeoVision Avant is equipped with the built-in Picture-in-Picture module. - Page 51 Dolby Digital and Dolby Pro Logic Surround PT remains on during stand-by. are only available in BeoVision Avant models equipped with a surround sound module. “TV 12” (Status display) Please contact your Bang & Olufsen retailer Status display for the BeoVision Avant.
-
Page 52: Timed Play And Timed Stand-By
You can preset BeoVision Avant to Timed play and timed stand-by Menu switch itself on or off automatically Preset BeoVision Avant for timed play if e.g. by programming a built-in timer. If 1 Timer play there is a program you do not want to miss,... - Page 53 > Press GO to delete the setting, or EXIT to keep *NOTE! You can only select the options listed if the source is present in your BeoVision Avant setup. If RADIO is available, CD and A.TAPE will also appear, regardless of whether they are...
- Page 54 Video sound recording If you press the source button before pressing LIST If you listen to sound from your BeoVision Avant the BeoVision Avant speakers. as well as after AV is displayed, the screen will be on your Bang &...
-
Page 55: Use Beovision Avant In A Link Room
Use BeoVision Avant in a link room You can watch and listen to all of If you have BeoLink installed in your home and choose to place your BeoVision Avant in a your available sources on a BeoVision link room, simply operate your BeoVision Avant placed in a link room, Avant as if it were placed in a main room. -
Page 56: The Socket Panels
These sockets are only available if your equipment, such as a video tape BeoVision Avant has a built-in surround sound module! recorder or a linked Bang & Olufsen REAR SUBWOOFER... - Page 57 Connection to the mains. CamCorders only. To watch your CamCorder recordings on the BeoVision Avant, connect the camera and switch the BeoVision Avant on by pressing, e.g. the TV button on the Beo4 remote control. Then, when you start playback on your camera, the BeoVision Avant...
-
Page 58: Close-Up Operation
Switches on the BeoVision Avant timer function, which ensures that any timer play instruction you have programmed into the system will be executed with the BeoVision Avant picture screen and/or speakers cut in. • Switches the BeoVision Avant to stand-by. - Page 59 CamCorder to the second set-top box, you can connect the CamCorder to the sockets on a temporary basis, close-up sockets on the back of the BeoVision second set-top box to the close-up socket without changing settings in the Connections Avant display panel, you can copy CamCorder panel on the back of the Avant display bar.
- Page 60 If the DVD is always held by its edges and placed in its original cassette when out of BeoVision Avant, no cleaning will be required. Should the DVD become soiled by fingerprints, dust or dirt, it can be wiped clean with a lint-free, soft, dry cloth.
-
Page 61: The Pin-Code System
The PIN-code system You can protect your BeoVision Activate the PIN-code system Change or delete your PIN-code* Avant by entering a four-digit PIN (Personal Identification Number) Menu Pincode code. Should your BeoVision Avant 1 Timer play 1 Delete code be disconnected from the mains for... -
Page 62: Use Your Pin-Code
Re-enter the on-screen display code To start using your PIN-code again… Five incorrect entries will cause the BeoVision Enter a new personal PIN-code PIN ** _ _ Avant to shut down for three hours, during which and destroy the slip with your remote control access is not possible. - Page 63 For your information… Your needs as a user are given careful consideration during the design and development process of a Bang & Olufsen product and we strive to make our products easy and comfortable to operate. Therefore, we hope that you will take the time to tell us about your experiences with your Bang &...
Need help?
Do you have a question about the Avant DVD and is the answer not in the manual?
Questions and answers