Panasonic AJ-SPX900e Operating Instructions Manual
Memory card camera recorder
Hide thumbs
Also See for AJ-SPX900e:
- Operating instructions manual (118 pages) ,
- Mechanical parts list (22 pages) ,
- Operating instructions manual (128 pages)

Related Manuals for Panasonic AJ-SPX900e


Summary of Contents for Panasonic AJ-SPX900e
-
Page 1: Operating Instructions
Operating Instructions Memory Card Camera Recorder Model No. Before operating this product, please read the insructions carefully and save this manual for future use. ENGLISH F1004T1035 -F VQT0P98-1 (E) -
Page 2: Software Information For This Product
\LDOC. (The description is the original (written in English)). To download the relevant source code, visit http://panasonic.biz/sav/. Please note that we cannot answer any questions you may have about the content, etc. of any source code you may obtain from the above Web site. -
Page 3: Precautions For Use
The lithium battery in this equipment must only be Replace only with the same or equivalent type replaced by qualified personnel. When necessary, recommended by the equipment manufacturer. contact your local Panasonic supplier. Discard used batteries according manufacturer’s instructions. - Page 4 Attention/Attentie Batteries are used for the main power source and memory back-up in the product. At the end of their useful life, you should not throw them away. Instead, hand them in as small chemical waste. Voor de primaire voeding en het reservegeheugen van het apparaat wordt gebruikgemaakt van een batterij.
-
Page 5: Table Of Contents
Contents Precautions for Use ....3 Chapter 4 Adjustments and Settings Chapter 1 Introduction ....8 for Recording . - Page 6 7-1-1 Preparing for Inspections ....92 the AJ-SPX900E and a PC ....76 7-1-2 Inspecting the Camera Unit .
- Page 7 Chapter 8 Menu Description Tables. . . 99 8-7 FILE ....... 121 8-1 Menu Configuration.
-
Page 8: Chapter 1 Introduction
(VTR) that supports DVCPRO50, DVCPRO and DV formats. The camera offers a choice of interlaced scanning and progressive scanning modes. The AJ-SPX900E provides for a wide range of uses, with such features as film-like gamma correction capability for authoring, and storage-type gain-up capability for news picture shooting. -
Page 9: Recorder/Player Features
1-2 Recorder/player Features Multiple Slots Clip Thumbnailing The AJ-SPX900E is equipped with five slots for P2 cards. Automatic generation of thumbnails Up to five cards may be inserted in these slots for The AJ-SPX900E automatically generates a thumbnail for continuous recording. They also provide new recording each recording cut (clip). - Page 10 Regarding SD memory cards, please also see <Cautions in using SD memory cards> (page 18). Features USB2.0 port By connecting with a PC via USB2.0, a P2 card inserted in the AJ-SPX900E can be used as a bulk storage device. DVCPRO/DV (IEEE1394 Digital...
-
Page 11: System Configuration
NP-L50 Lens: Battery mount (Bayonet type) Fujinon, Canon BP-90 type BP-H120 Memory Card Camera Battery mount HP-90L Recorder GPS unit: AJ-SPX900E AJ-GPS900G AC adapter: AJ-B75 Tripod adapter: SHAN-TM700 SDI output board: AJ-YA902AG Rain cover: SHAN-RC700 IEEE1394 Interface Board: AJ-YAD800G Soft carrying case:... -
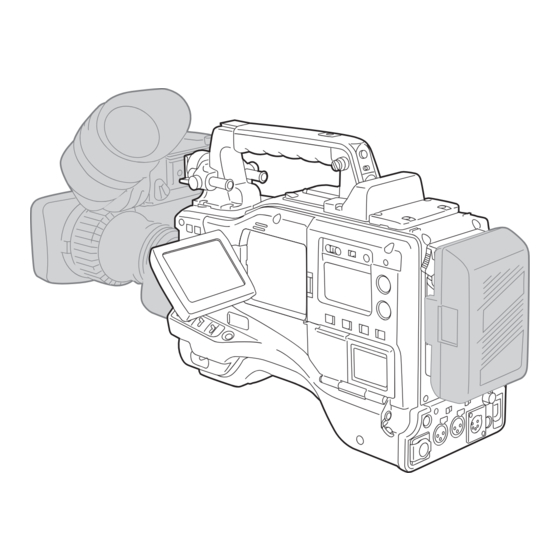
Page 12: Chapter 2 Parts And Their Functions
Tripod mount To operate your AJ-SPX900E on AC power, the AC adaptor AJ-B75 (optional accessory) must be connected to this When you want to mount the AJ-SPX900E on a tripod, the socket. optional tripod adaptor (SHAN-TM700) is attached here. BREAKER switch... -
Page 13: Audio (Input) Function Section
2-2 Audio (input) Function Section MIC IN (microphone input) jack (XLR, 3-pin) <Note> A microphone (optional accessory) is connected here. When you use stereo microphone (AJ-MC900G optional), Power for the microphone comes from this jack. set both CH1 and CH2 to [FRONT]. The signal from L CH is A remote microphone may be connected. -
Page 14: Audio (Output) Function Section
2-3 Audio (output) Function Section AUDIO OUT connector (XLR, 5-pin) Speakers This connector outputs audio signals recorded on Channels The speakers output EE sound during recording, and 1/2 or 3/4. reproduced sound during playback. Output signals are selected with the MONITOR SELECT The speakers emit an alarm sound when the warning lamp CH1/2 / CH3/4 selector switch. - Page 15 2-4 Shooting and Recording/Playback Functions Section !30" !32" !31" Shooting and Recording (camera unit) CC FILTER/ND FILTER (filter selector) controls AUTO W/B (white/black) BAL switch Use this knob to select a filter depending on the luminance AWB: White balance is automatically adjusted. and color temperature of the subject.
-
Page 16: Shooting And Recording/Playback Functions
OUTPUT/AUTO KNEE selector switch MARKER SELECT button Used to select the video signals sent from the camera unit to This button selects the marker information indicated on the the memory, viewfinder and video monitor. viewfinder screen. It switches between two marker information indications, which can be selected using a menu CAM. - Page 17 AJ-SPX900E and a PC]. Even if this switch is set to “CAM”, if “VIDEO” or “1394” is selected for REC SIGNAL the AJ-SPX900E performs the GENLOCK IN connector operation when “MEM” is selected. The menu option REC...
-
Page 18: Menu Operation Section
For proxy recording (optional), high-speed SD memory cards (256MB, 512MB, and 1GB) should be used. For the latest information on SD memory cards that can be used with the AJ-SPX900E, see the following support site: https://eww.pavc.panasonic.co.jp/pro-av/ MENU button BUSY (operation mode display) lamp Used to turn on/off the menu. -
Page 19: Time Code Section
Select this position to set the time code and/or TC OUT connector (BNC) user bits. When you inter-lock the time code of the AJ-SPX900E with R-RUN: Select this position to advance the time code only during recording. that of an external device this must be connected with the time code input (TC IN) connector of the external device. -
Page 20: Warning And Status Display Functions
2-7 Warning Status Display 2-8 Display Window Functions Functions P2 card/battery-remaining level indications Media-remaining space indication bar The bar indicates the remaining free space on each P2 card, using a seven-segment display. Each segment can represent either three or five minutes of remaining free space, depending on the value set through the menu option CARD REMAIN/ . -
Page 21: Lcd Monitor
2-9 LCD Monitor Mode indication Stays illuminated in 16:9 mode. Stays illuminated when the recording/playback format is DV. GPS: Stays illuminated when radio waves are not received during GPS operation. : Stays illuminated when radio waves are received during GPS operation. -
Page 22: Viewfinder
2-10 Viewfinder Back tally lamp This lamp stays illuminated during shooting. It also blinks in synchronisation with the REC lamp in the viewfinder, and provides alerts. When the lever is positioned at [OFF], the back tally lamp is hidden. Eyepiece Diopter adjustment ring Use this to make adjustments in line with your diopter, in order to obtain optimum clarity in the viewfinder image. -
Page 23: Chapter 3 Recording And Playback
ACCESSS out door to the left. The door opens. Slide lock Insert a P2 card into the AJ-SPX900E. The P2 CARD button ACCESS LED for the appropriate slot indicates the status of the P2 card. For how the P2 card status is indicated, see [P2 CARD ACCESS LED and status of P2 cards] (page 24). - Page 24 (P2 CARD ACCESS LED blinks in orange), do Writing and reading enabled. not remove the P2 card. However, some clips If your AJ-SPX900E is not set to turn on the P2 CARD Stays on in ACTIVE ! recorded on the P2 card may...
-
Page 25: Basic Procedures
Turn on the POWER switch and ensure that more than four When a battery and P2 cards are installed, set the switches as segments of the battery-remaining amount indication bar detailed below, before starting to use your AJ-SPX900E. are illuminated. If the number of illuminated segments is fewer than five, Setting the switches before shooting and recording first check the battery placement. - Page 26 Shooting White/Black balance adjustment to recording completion White/Black Balance Adjustment to Recording Completion For shooting, follow the steps below. Select a filter according to light conditions. When the white balance is saved: Position the WHITE BAL switch to [A] or [B]. When the white or black balance is not saved and you have no time to adjust the white balance: Position the WHITE BAL switch to [PRST].
-
Page 27: Normal Recording
3-4 PRE-RECORDING function Pressing either the REC START/STOP button, REC button on The internal memory of your AJ-SPX900E is capable of storing the handle or VTR button at the lens starts recording of video several seconds of video and sound data coming from the and sound on the P2 card. -
Page 28: Loop Recording
During recording of IEEE1394 input or INTERVAL REC operation, LOOP REC is not available. Terminating the Loop Recording Mode You can terminate the loop recording mode by either: Turning off the POWER switch of the AJ-SPX900E; or Setting the menu option LOOP REC MODE to “OFF”. - Page 29 To check the previous recording during a pause TOTAL REC TIME (Recording time on P2 card) Press the RET button at the lens to put the AJ-SPX900E into REC REVIEW mode. ONE SHOT operation continues after the REC REVIEW. For continuous recording...
-
Page 30: Recording Review Function
If the power is turned off during recording The function of the RET button may be assigned to a desired If the AJ-SPX900E is turned off during interval recording, the user button by using one of the menu options USER MAIN SW, video stored in memory is recorded onto the P2 card, and then USER1 SW or USER2 SW. -
Page 31: Normal And Variable Speed Playback
When a P2 card has been just removed or inserted, or when the power has been just turned on for playback, it may take some time for the AJ-SPX900E to read clip information. If this is the case, the viewfinder displays “UPDATING”. -
Page 32: Shot Mark Function
[6-7-1 Playing Back Voice Memos] and [6-7-3 Deleting Voice Memos]. 3-11 Recording Setting and Operation Mode The AJ-SPX900E recording mode works according to the priorities outlined in the following table, relative to the setting of the menus and switches. Menu switches related to system/recording... -
Page 33: Adjustments And Settings For Recording
Chapter 4 Adjustments and Settings for Recording To record high-quality video with the AJ-SPX900E, the black and Place a white pattern at a point where the light conditions white balances must be adjusted according to conditions. match those for the light source of the subject. Then zoom-... - Page 34 When the menu option FILTER INH is set to “OFF”, the adjusted value for each CC filter can be automatically stored in the memory that corresponds to the position of the WHITE BAL switch (A or B). Your AJ-SPX900E has four built-in CC filters; it stores eight (4 2) adjusted values.
-
Page 35: Adjusting The Black Balance
During a black balance adjustment, light is automatically You use your AJ-SPX900E the first time; cut off. Your AJ-SPX900E has not been used for some time; During a black balance adjustment, the gain switchover The ambient temperature has changed substantially;... -
Page 36: Setting The Electronic Shutter
CAM OPERATION mode SCAN mode page. The selected shutter speed is retained even if the AJ-SPX900E <Note> is turned off. Your AJ-SPX900E is not factory-set to display the SUPER V mode on the viewfinder screen. To display this mode, set the menu option SUPER V found in the <SHUTTER... -
Page 37: Placing The Camera-Recorder
4-3 Selecting Recording Signals and SYNCHRO SCAN Mode Recording System To place the camera-recorder in SYNCHRO SCAN mode, follow The AJ-SPX900E is capable of utilising user-selected recording the steps below. signals and format. Press the SHUTTER switch positioned at [ON] towards 4-3-1 Selecting the Recording Signals. -
Page 38: Selecting The Recording System
Adjusting Recording Levels non-standard signals output from the GENLOCK IN connector, may degrade video quality. In any format (DVCPRO50, DVCPRO or DV), the AJ-SPX900E When “PROG.” is specified for the menu option V.RES (25P), supports independent four-channel audio recording. -
Page 39: Adjusting Recording Levels
Audio level meter in the viewfinder F:1---- R:2---- ---+ When operating the AJ-SPX900E without a sound recordist, it is recommended that the FRONT AUDIO LEVEL control should be used to adjust the audio level. In advance, check the level meter in the viewfinder screen and use the AUDIO LEVEL control to adjust the appropriate audio channel so that no excessive audio signals will be admitted. -
Page 40: Setting Time Data
<Note> DISPLAY switch The AJ-SPX900E also records the time code and user bits in the VIDEO AUX area. The value for the time code (VITC) is the same as that of the time code (LTC) in the sub-code area. The user bits (of VITC) also records special information, including the shoting frame rate. -
Page 41: Setting The Internal Clock's Date And Time
4-5-2 Setting the Internal Clock’s Date and Time Time Time Area Area difference difference Position the DISPLAY switch at [UB]. 00:00 Greenwich – 00:30 – 01:00 Azores Islands – 01:30 Press the HOLD button to display a date in the display –... -
Page 42: Setting The Time Code
When the menu option FIRST REC TC is set to “REGEN”, the device. AJ-SPX900E reads the time code recorded in the last frame on the last recorded clip (with the most recent recording date and Reference device time) to maintain and record that value. - Page 43 <Notes> Position the DISPLAY switch at [TC]. To externally lock the AJ-SPX900E, as the master device, with more than one unit, the mode must be the same as that of the Set the menu option GENLOCK to “EXT”. camera. Note that in a system using both interlaced and This option can be found in the <GENLOCK>...
-
Page 44: Providing An Id To The Camera
4-5-6 Setting UMID Information The camera ID is specified through the <CAMERA ID> screen. The AJ-SPX900E supports UMID metadata. You need to specify The ID can include up to 10 alphanumeric characters, symbols, as UMID information the country where you live (using up to and/or spaces. -
Page 45: Ctl Count Setting And Display
The viewfinder can display a screen that allows you to check the by shooting dates), previous playback CTL count is disabled. settings and status of the AJ-SPX900E. The first frame of the first clip is used as a reference value for Each press of the MODE CHECK button switches the screen as recalculation, and the new playback CTL count is displayed. -
Page 46: Menu Displays In The Viewfinder Screen
<USER MENU <Note> SELECT> screen, which is accessible from the When the AJ-SPX900E is in thumbnail mode, the viewfinder MAIN MENU page. displays “THUMBNAIL OPEN”, disabling navigation through the For more information, see [4-6-3 Selecting menu. -
Page 47: Selecting Options For User Menu
When the settings are finalised, press the MENU button. This terminates the menu option setting mode and returns the AJ-SPX900E to normal operation mode. 4-6-3 Selecting Options for USER MENU Go to the USER MENU SELECT page from MAIN MENU. Then,... -
Page 48: Viewfinder Screen Status Displays
For more information, see [7-3 Warning System]. Abnormal Operating Status Warning Lamp This lamp comes on when the AJ-SPX900E is in any of the abnormal operating statuses specified through the menu sub-option !LED. For statuses that activate the lamp, see the options in the <!LED>... - Page 49 Information Item Indication Status 50i, 25P Camera shooting mode (progressive or interlaced) Camera Shooting Mode Lens extender used. Extender LOW/MID/HIGH Value set for the master gain MODE CHECK –3 to 30 Example: LOW: 0 Indication Area S.GAIN 30/36/42/48 Gain value to which S.GAIN and DS.GAIN are assigned (STATUS: DS.GAIN 6 /12 /20...
- Page 50 Information Item Indication Status AWB A ACTIVE AWB being performed on Ch A. Camera Warning and AWB B ACTIVE AWB being performed on Ch B. Report Area AWB A OK AWB successful on Ch A. (related to AWB, ABB AWB B OK AWB successful on Ch B.
- Page 51 Shot mark been added or deleted. For information on shot marks, see [3-10 Shot Mark Function]. UPDATING Clip information is being updated. Playback operation disabled. USB DRIVE AJ-SPX900E is in USB mode. When communication is disabled, the indication blinks. THUMBNAIL OPEN Thumbnail is being manipulated. 1394 INITIAL ERROR Displayed when the connection of the DVCPRO/DV connector is abnormal (when AJ-YAD800G is attached).
- Page 52 Digital battery remaining level, as a percentage level/voltage Digital battery empty. Digital battery fully charged. When the AJ-SPX900E is used as a system camera using a 26-pin extender or Camera-recorder Triax, the recording status of the camera-recorder is displayed using characters. REC indication The indication stays illuminated during recording.
- Page 53 P2 Card Remaining Free Space/capacity Indication Status of Menu option P2 card remaining free space P2 card remaining free space Recording status AJ-SPX900E P2 CARD REMAIN* indication indication (during MODE CHECK) Under normal Other than LOOP TOTAL The total remaining free space of all P2...
-
Page 54: Display Modes And Setting Changes/Adjustment Result Messages
4-7-4 Display Modes and Setting Changes/ adjustment Result Messages The messages that appear on the viewfinder screen to indicate changes to settings and adjustment results may be limited, or set not to appear, through the menu option DISP MODE. This menu option can be found in the <VF DISPLAY>... -
Page 55: Setting The Marker Displays
RET SW. This option can be found in the <SW MODE> screen, which is accessible from the CAM OPERATION page. The viewfinder can display a screen that allows you to view the marker settings of the AJ-SPX900E. Pressing the MARKER SELECT button on the camera-recorder switches the marker indication as follows. -
Page 56: Adjusting And Setting The Lcd Monitor
Using the LCD Monitor This menu option can be found in the <OUTPUT SEL> screen, which is accessible from the SYSTEM SETTING Turn on the POWER switch of the AJ-SPX900E. page. Slide the OPEN button in the arrow direction to open the LCD monitor. -
Page 57: Menu-Driven Function Setup
GAIN attached, an SDI signal can be output from the VIDEO OUT connector. In addition to the standard L/M/H gain mode, the AJ-SPX900E For more information, see [8-2-5 OUTPUT SEL]. supports S.GAIN (super gain) mode, featuring greater than 30- dB analog gain-up, together with DS.GAIN (digital super gain) mode, storage-type gain-up based on progressive drive technology. -
Page 58: Assigning Functions To User Main
The target (reference) value in Auto Iris mode must be changed. To change the target value, put the AJ-SPX900E 4-9-5 Setting Color Temperature Manually into this mode and press the JOG dial button. Turn the JOG dial button clockwise or anti-clockwise to The white balance can be manually adjusted by setting the color change the value. -
Page 59: Handling Data
SD memory cards must not be used or stored in an environment where they may be Exposed to high temperatures/humidities; Exposed to water droplets; or Electrically charged. For storage, the SD memory card must be kept inserted into the AJ-SPX900E with the lid closed. - Page 60 Press the JOG dial button. This moves the cursor to the CARD READ/WRITE> screen open, the data title cannot entry area, putting the AJ-SPX900E in entry mode. be edited. Move the cursor to the option TITLE READ and press the JOG dial button.
- Page 61 A to Z (No SD memory card inserted.) WRITE NG The card has not been formatted Numerals: 0 to 9 FORMAT ERROR using the AJ-SPX900E. (SD memory card not properly Replace the card. Symbols: ', >, <, /, - formatted.) WRITE NG The card may be defective.
- Page 62 READ NG The card has not been formatted To read data on a selected file FORMAT ERROR using the AJ-SPX900E. (SD memory card not properly Replace the card. formatted.) Turn the JOG dial button to move the cursor to the option READ NG Write file data.
-
Page 63: How To Use The User Data
The data written in the user area of the internal memory of the AJ-SPX900E is read to complete the setting. To exit the menu, press the MENU button. To write settings data in the user area The set user data may be also read without navigating the menu. -
Page 64: How To Use Scene File Data
It is possible to write the settings data into the scene file area of This writes the setting data into the scene file area of the the internal memory of the AJ-SPX900E, or to read data written AJ-SPX900E internal memory. - Page 65 The data stored in the scene file area of the internal The data stored in the scene file area of the internal memory of the AJ-SPX900E is read to complete the memory of the AJ-SPX900E is reset to the defaults.
-
Page 66: Resetting Menu Option Settings To Defaults
4-10-6 Lens File Data eight characters). When the title is set, turn the JOG dial button to move the The AJ-SPX900E is capable of correcting the lens white cursor to [:]. shading. This lens white shading correction may be stored as lens file data (maximum number of data sets is eight). -
Page 67: Chapter 5 Preparation
Please contact Anton/ Bauer for information about the lighting system. Using a Battery Pack Insert the battery and slide it in the direction of the arrow. Battery packs from the following manufacturers can be used: • Panasonic • Anton/Bauer • • PACO •... - Page 68 When using a BP-90 type battery pack Connect the battery pack plug to the socket inside the battery case, and insert the battery pack into the case. Remove the battery holder. Label Battery holder surface Attaching the battery case to the camera-recorder. Connect the cable on the camera-recorder to the cable on the battery case (BP-90 type).
- Page 69 Using an NP-1 type battery pack Setting the battery type. Select the battery type listed under BATTERY SELECT. Remove the battery holder. Select BATTERY SELECT from the <BATTERY/P2CARD> screen on the MAIN OPERATION page. Mount the NP-1 type battery case on the camera-recorder. When using a battery not listed under BATTERY SELECT: Tighten the mounting screws.
-
Page 70: Using An Ac Power Supply
5-1-2 Using an AC Power Supply 5-2 Mounting the Viewfinder and Adjusting its Position When using the Panasonic AJ-B75 AC adapter Please refer to the viewfinder instruction manual. Plug the AJ-B75 DC OUT connector into the camera- Note: A slide rail is required to mount any viewfinder other than recorder’s external DC input socket. -
Page 71: Mounting The Lens And Performing The Flange Back And White Shading Adjustments
5-3 Mounting the lens and Adjusting the Lens Flange Back Performing the Flange Back and If images are not clearly focused at both telephoto and wide- White Shading Adjustments angle positions during zoom operations, adjust the flange back (distance from the lens mounting surface to the image formation Mounting the Lens surface). - Page 72 Adjusting the Lens White Shading Set the WHITE BAL selector switch to A or B, and Take the following steps to adjust the white shading: execute Auto White Balance (AWB) with the AUTO W/B BAL switch. <Note> Next, execute Auto Black Balance (ABB) with the AUTO Vertical coloring may occur near the open position of the lens W/B BAL switch.
- Page 73 This completes the white shading adjustment. The compensation values are stored in the non-volatile internal Press the JOG Dial button again and turn it until a desired memory. Therefore, re-adjusting the white shading is not letter for the title appears. required, even after the camera-recorder power has been turned Turning the JOG Dial button changes the letter displayed in off.
- Page 74 Reading out the Lens File Data Resetting Lens File Data to Factory Standard Settings The lens file data can be reset to the standard setting values that Select the lens file No. to read out by following Steps were set when the camera was shipped from the factory. in the [Storing the Lens File Data] section.
-
Page 75: Preparing For Audio Input
5-4 Preparing for Audio Input 5-4-2 When Using a Wireless Receiver Using an External Wireless Receiver Take the following steps to prepare the camera for connecting audio input devices. Mount a wireless receiver when using a wireless system. 5-4-1 When Using the Front Microphone Mount the wireless receiver on the camera attachment. -
Page 76: When Using Audio Devices
Remove the cover to insert the wireless receiver and secure it with the screws. By connecting the AJ-SPX900Ewith an external PC using USB 2.0, the P2 card connected to the AJ-SPX900E can be used as a mass storage device. Procedures for establishing a connection with a PC Connect the USB cable to the USB 2.0 port. -
Page 77: Mounting The Camera On A Tripod
Slide the camera forward along the grooves until you hear a “click”. There are two ways to terminate the USB mode, as follows: Turn the POWER switch of the AJ-SPX900E OFF. Set the USB to OFF from the menu (operations). Removing the Camera from the Tripod Adapter... -
Page 78: Attaching The Shoulder Strap
5-7 Attaching the Shoulder Strap 5-9 Connecting the AJ-EC3E Extension Controller Shoulder Strap Some functions can be remote-controlled when the AJ-EC3E extension control unit (optional) is connected to the camera. When the AJ-EC3E is connected, the camera automatically enters remote control mode after the power switches of both the camera and the AJ-EC3E are turned ON. -
Page 79: Attaching The Front Audio Level Control
5-10 Attaching the Front Audio Level Control Knob If you use the Front Audio Level control frequently, attach the accessory knob so that it can be easily operated. Front Audio Level Control Knob (Accessory) Screw (Accessory) Marks Screw Remove the screw in the center of the Front Audio Level control, and attach the accessory knob using the screw (included). -
Page 80: Manipulating Clips With Thumbnails
Chapter 6 Manipulating Clips with Thumbnails A clip is a data group that includes the images and voices created from one shooting session, together with additional information such as voice memos and meta data. The following manipulations can be performed using the cursor and SET buttons, while checking the images displayed on the LCD monitor: Playback, delete, copy or restore the clip. -
Page 81: Thumbnail Screen
6-2 Thumbnail Screen Time Display Press the THUMBNAIL button to display the thumbnail screen You can set this to display the time code at the start of clip on the LCD monitor. Pressing the THUMBNAIL button again recording, the user bits at the start of clip recording, the returns the display to the regular display. -
Page 82: Selecting Thumbnails
6-3 Selecting Thumbnails 6-4 Playing Back Clips Multiple thumbnails can be randomly selected in the thumbnail screen. Press the THUMBNAIL button. The thumbnail screen appears on the LCD monitor. Use the cursor buttons to move the pointer (yellow frame) to the desired clip and press the SET button. Use the cursor buttons to move the pointer over the desired The frame around the selected thumbnail changes to a blue clip. -
Page 83: Switching The Thumbnail Display
6-5 Switching the Thumbnail Display 6-6 Shot Mark The display can be switched so that only those clips matching A shot mark can be added to a clip thumbnail to distinguish this the specified conditions are displayed in the thumbnail screen. clip from the others. -
Page 84: Voice Memo
6-7 Voice Memo Press the left/right cursor buttons ( ) to move the pointer over the still image that is related to the voice memo you A voice memo is audio data that can be attached to the clip wish to play back. Then, press the SET button. separately from the voice recorded during shooting. -
Page 85: Deleting Voice Memos
6-7-3 Deleting Voice Memos 6-8 Deleting Clips Perform Steps in the [6-7-1 Playing Back Voice Press the THUMBNAIL button. Memos] section to select the voice memo in the clip. The thumbnail screen appears on the LCD monitor. Move the pointer over the clip you want to delete, and press Use the cursor buttons to move the pointer over the clip you the MENU BAR button. -
Page 86: Restoring Clips
6-9 Restoring Clips 6-11 Copying clips Restores clips that are defective as a result of sudden powering- Selected clips can be copied to the P2 card or SD memory card down during recording, or removal of the P2 card being in the desired slot. -
Page 87: Setting Of Clip Meta Data
(object of shooting). MEMO* : Displays [OFFSET] (location of the frame where the text memo is added), [TEXT] (contents of the text memo), [PERSON] (person recorded the text memo added to the clip). The AJ-SPX900E can record one text memo per clip. -
Page 88: Setting Of Proxy (Optional)
FORMAT. <Note> The following screen appears. Select the slot number for The AJ-SPX900E only displays printable ASCII characters. the P2 card you want to format. Select EXIT if formatting is not required. To set whether or not the uploaded metadata is... -
Page 89: Formatting Sd Memory Cards
6-15 Formatting SD memory cards 6-16 Setting the Thumbnail Display Mode SD memory cards can also be formatted from the thumbnail screen. With an SD memory card inserted into the camera- The thumbnail display mode can be customised to suit your recorder, perform the following operation: preferences. -
Page 90: Properties
6-17 Properties 6-17-2 P2 Card Status Display From the menu bar, select PROPERTY CARD STATUS. The The clip’s properties and the P2 card’s status are displayed. following screen appears. 6-17-1 Clip Property From the menu bar, select PROPERTY CLIP PROPERTY. The following screen appears. -
Page 91: Sd Memory Card Status Display
“SD STANDARD: NOT SUPPORTED” is displayed. If this is the case, writing or reading will not be successful. Format the card with the AJ-SPX900E.For more on formatting SD memory cards, see [6-15 Formatting SD memory cards]. 6-17-4 Confirmation of Metadata Upload The contents of the metadata upload file that is read from the SD memory card can be checked. -
Page 92: Inspections
Chapter 7 Maintenance and Inspections 7-1 Inspections Before Shooting 7-1-2 Inspecting the Camera Unit Make sure you check that the system is operating normally Set the zoom to electric zoom mode and check the zoom before embarking on a shoot. We recommend using a color operation. -
Page 93: Inspecting The Memory Recording Functions
7-1-3 Inspecting the Memory Recording 2. Inspecting the Audio Level Automatic Adjustment Functions Set the AUDIO SELECT CH1 and CH2 switches to [AUTO]. Make sure you successively carry out the inspections from [1. Set the AUDIO IN CH1 and CH2 switches to [FRONT]. Inspecting the P2 Card Recording] to [4. -
Page 94: Maintenance
7-2 Maintenance 6. Inspection of the clock, time code, and user bits 7-2-1 Cleaning Inside the Viewfinder Set the user’s bit as required. Please refer to [4-5-1 Setting the User Bits] for the setting procedures. Do not use thinner or other solvents to remove dirt from the viewfinder. -
Page 95: Connector Signals
AUDIO IN L CH OUT (H) AUDIO IN (H) L CH OUT (C) AUDIO IN (C) +12V R CH OUT (H) Panasonic Part No. K1AB103A0007 R CH OUT (C) Manufacturer Part No. HA16PRM-3SG Panasonic Part No. K1AA104H0024 (Hirose Electric Co.) Manufacturer Part No. -
Page 96: Warning System
7-3 Warning System 7-3-1 Warning Description Tables If a problem is detected immediately after the power is turned on, or during operation, this will be indicated by the WARNING lamp, lamps inside the viewfinder and a warning tone. <Note> The WARNING lamp has the highest priority, followed by the tally lamp, and then the warning tone. When multiple errors occur simultaneously a higher priority indication will be triggered. - Page 97 5. P2 Card Fully Recorded 7. Low Wireless Signal Reception Display window All 7 bar indicators for remaining MEDIA capacity Display window No display. indication start blinking. indication Continues to light up until an operation is Blinks 4 times per second. (During pause and WARNING lamp WARNING lamp performed.
-
Page 98: Error Codes
7-3-2 Error Codes 9. Battery Nearly Empty The following error codes are displayed in the display window if Display window One of the bars in the battery remaining indicator an error occurs in the camera: indication starts blinking. WARNING lamp Blinks once per second. -
Page 99: Chapter 8 Menu Description Tables
Chapter 8 Menu Description Tables 8-1 Menu Configuration MENU USER MENU SYSTEM SETTING SYSTEM MODE MAIN MENU OPTION MODE 1 PAINT OPTION MODE 2 MATRIX REC FUNCTION OPTION MENU COLOR CORRECTION OUTPUT SEL LOW SETTING OPTION LCD MONITOR MID SETTING GENLOCK HIGH SETTING ADDITIONAL DTL... -
Page 100: System Setting
LCD monitor when the SAVE ON/ REC TALLY Selects display of the recording status of the OFF switch is set to [ON]. camera when the AJ-SPX900E is used with GREEN Turn off LCD monitor. a 26-pin extender or Triax, or when it is CHAR OFF: Do not turn off LCD monitor. -
Page 101: Option Mode 2
– C U F – defaults to OFF when the power is next 26PIN Sets the recording control between the turned on. – – – F – external VTR and the AJ-SPX900E when a CONTROL BOTH REC TIME 00s01f Set REC TIME (1 cut). -
Page 102: Output Sel
8-2-5 OUTPUT SEL Items/ Adjustable Items/ Adjustable Remarks Remarks Data Saved Range Data Saved Range VOICE MEMO Set the available memory space for voice VIDEO OUT Select the output signal on the VIDEO OUT memos in P2 cards. RESERV terminal. ON: Reserve a voice memo area of 10 VBS:Output a regular composite signal. -
Page 103: Lcd Monitor
8-2-6 LCD MONITOR 8-2-7 GENLOCK Items/ Adjustable Items/ Adjustabl Remarks Remarks Data Saved Range Data Saved e Range BRIGHTNESS –7 Adjust the LCD monitor brightness. GENLOCK Switch the camera synchronising signal. INT: Synchronise with the internal reference signal regardless of the reference 26P EXT signal input to the GENLOCK IN –... -
Page 104: Paint
8-3 PAINT 8-3-1 ROP 8-3-2 MATRIX Items/ Adjustable Items/ Adjustabl Remarks Remarks Data Saved Range Data Saved e Range MASTER PED –200 Set the master pedestal level. MATRIX Select the color correction table. 2 types of TABLE tables can be stored: type A and type B. +008 S C U F E S C U F E... -
Page 105: Color Correction
8-3-3 COLOR CORRECTION 8-3-4 LOW SETTING Items/ Adjustable Items/ Adjustable Remarks Remarks Data Saved Range Data Saved Range –63 Perform red color correction (saturation and MASTER –3dB Select the master gain from –3, 0, 3, 6, 9, (SAT/PHASE) hue). GAIN 12, 15, 18, 21, 24, 27, or 30dB. -
Page 106: Mid Setting
8-3-5 MID SETTING 8-3-6 HIGH SETTING Items/ Adjustable Items/ Adjustable Remarks Remarks Data Saved Range Data Saved Range MASTER –3dB Select the master gain from –3, 0, 3, 6, 9, MASTER –3dB Select the master gain from –3, 0, 3, 6, 9, GAIN 12, 15, 18, 21, 24, 27, or 30dB. -
Page 107: Additional Dtl
8-3-7 ADDITIONAL DTL 8-3-8 SKIN TONE DTL Items/ Adjustable Items/ Adjustable Remarks Remarks Data Saved Range Data Saved Range KNEE APE LVL OFF Set KNEE APE LEVEL. SKIN TONE Set the skin tone DTL to ON or OFF. S C U F E S C U F E SKIN TONE ON/OFF switching for ZEBRA within the... -
Page 108: Knee/Level
8-3-9 KNEE/LEVEL 8-3-10 GAMMA Items/ Adjustable Items/ Adjustable Remarks Remarks Data Saved Range Data Saved Range MASTER PED –200 Set the master pedestal. MASTER 0.35 Set the master gamma in 0.01% steps. GAMMA +008 0.45 S C U F E +200 S C U F E 0.75... -
Page 109: Camera Setting
8-4 VF 8-3-12 CAMERA SETTING 8-4-1 VF DISPLAY Items/ Adjustable Items/ Adjustable Remarks Remarks Data Saved Range Data Saved Range DETAIL Set the DTL (H, V) to ON or OFF. DISP NORMAL NORMAL: Display status constantly. CONDITION HOLD HOLD: Display status only when the MODE CHECK switch is pressed. -
Page 110: Vf Marker
8-4-2 VF MARKER 8-4-4 VF INDICATOR1 Items/ Adjustable Items/ Adjustable Remarks Remarks Data Saved Range Data Saved Range TABLE Select the VF MARKER setting table. EXTENDER Set the extender indication to ON or OFF. First, select table A or B, then set the items below for each table. -
Page 111: Vf Indicator2
OFF: REC indication not enabled. ONE-CARD: <Note> Display the remaining capacity of the P2 This option is useful when the AJ-SPX900E card currently used for recording. is used independently. When a 26-pin OFF: Disable the remaining capacity extender, external VTR, or Triax is indication. -
Page 112: Led
8-5 CAM OPERATION 8-4-7 !LED 8-5-1 CAMERA ID Items/ Adjustable Items/ Adjustable Remarks Remarks Data Saved Range Data Saved Range GAIN(0dB) Select whether or not to illuminate when Setting 1 for the CAMERA ID recorded on GAIN is set to other than 0 dB. color bars. -
Page 113: Shutter Select
8-5-3 SHUTTER SELECT 8-5-4 USER SW Items/ Adjustable Items/ Adjustable Remarks Remarks Data Saved Range Data Saved Range SUPER V FRM1 Select the SUPER V switching mode. USER MAIN SW INH Allocate the USER MAIN button. MODE FRM2 FRM1: Normal mode. S.GAIN FRM2: After-image reduction mode. -
Page 114: Sw Mode
8-5-5 SW MODE 8-5-6 WHITE BALANCE MODE Items/ Adjustable Items/ Adjustable Remarks Remarks Data Saved Range Data Saved Range RET SW Select the RET switch function. FILTER INH Select whether or not to retain white balance CHECK REC CHECK: memory (A/B) data for individual CC filters. ON: Retain data in the A/B memory (2 CAM RET Perform REC REVIEW. -
Page 115: User Sw Gain
8-5-7 USER SW GAIN 8-5-8 IRIS Items/ Adjustable Items/ Adjustable Remarks Remarks Data Saved Range Data Saved Range S.GAIN Select whether or not to enable 30dB for A.IRIS LEVEL Set the target value for auto iris. 30 dB • SUPER GAIN. : Enable. -
Page 116: Main Operation
8-6 MAIN OPERATION 8-6-1 BATTERY/P2CARD Items/ Adjustable Items/ Adjustable Remarks Remarks Data Saved Range Data Saved Range CARD NEAR Select whether or not to set the alarm to BATTERY PRO14 Select the battery to use. Remaining beep for P2 CARD NEAR END ALARM. END ALARM SELECT TRIM14... -
Page 117: Battery Setting1
8-6-2 BATTERY SETTING1 Items/ Adjustable Items/ Adjustable Remarks Remarks Data Saved Range Data Saved Range DIONIC90 Enable selection under BATTERY SELECT. PRO14 Enable selection under BATTERY SELECT. :Enable selection. • • :Enable selection. • :Disable selection. • :Disable selection. AUTO Select auto or manual to set the NEAR END AUTO Select auto or manual to set the NEAR END... -
Page 118: Battery Setting2
8-6-3 BATTERY SETTING2 Items/ Adjustable Items/ Adjustable Remarks Remarks Data Saved Range Data Saved Range ENDURA50 Enable selection under BATTERY SELECT. NiCd14 Enable selection under BATTERY SELECT. :Enable selection. • • :Enable selection. • :Disable selection. • :Disable selection. AUTO Select auto or manual to set the NEAR END NEAR END 11.0 Set the NEAR END voltage in 0.1 V steps. -
Page 119: Mic/Audio1
8-6-4 MIC/AUDIO1 Items/ Adjustable Items/ Adjustable Remarks Remarks Data Saved Range Data Saved Range TEST TONE NORMAL Select the test signal. FRONT VR CH1 FRONT Select whether or not to enable the FRONT NORMAL: Output test tones to CH1/2 when ALWAYS W.L. -
Page 120: Tc/Ub
8-6-6 TC/UB Items/ Adjustable Items/ Adjustable Remarks Remarks Data Saved Range Data Saved Range P.OFF LCD Select whether or not to display the time UB MODE USER Select the user bits mode. code setting and counter indication on the DISPLAY TIME USER:Select UB value set in the LCD LCD monitor when the power is turned OFF. -
Page 121: File
8-7 FILE 8-7-1 SD CARD READ/WRITE 8-7-3 LENS FILE Items/ Adjustable Items/ Adjustable Remarks Remarks Data Saved Range Data Saved Range R.SELECT Select the file number to read out. FILE NO. Select the lens file number. – – – F – –... -
Page 122: Maintenance
8-8 MAINTENANCE 8-8-1 SYSTEM CHECK 8-8-5 DIAGNOSTIC1 Items/ Adjustable Items/ Adjustable Remarks Remarks Data Saved Range Data Saved Range COLOR CHECK ON ON/OFF switching for checking proper CAMSOFT(IN) Display the software version for the operation of the camera-recorder. microprocessor-controlled flash. Displays the center Y and RGB levels on the –... -
Page 123: Diagnostic2
8-9 OPTION MENU 8-8-6 DIAGNOSTIC2 8-9-1 OPTION Items/ Adjustable Items/ Adjustable Remarks Remarks Data Saved Range Data Saved Range SYSCON SOFT Display the software version for the system Select whether or not to prohibit opening the control microprocessor. SECURITY menu screen. ON: Menu screen cannot be opened. -
Page 124: Connection With External Unit
CA901EN) and using this in conjunction with the AJ-BS901EN, By attaching the optional 26-pin camera adapter (AJ-CA905G), enables the AJ-SPX900E to be operated as a system camera. connection with the remote control unit AJ-RC905EN is possible It is possible to transfer video recorded by the AJ-SPX900E... -
Page 125: Chapter 10 Specifications
Chapter 10 Specifications [General] Shutter speeds: 1/60, 1/120, 1/250, 1/500, 1/1000, 1/2000 Synchro-scan shutter: Power supply DC 12 V (11.0 V - 17.0 V) 1/50.4 to 1/248.0 Power consumption: Lens mount: 24 W (Main unit only, with LCD monitor OFF) 2/3-inch bayonet type 27 W (With the SDI and IEEE1394 option Color separation optical system:... - Page 126 Audio System Time code input Sampling frequency: TC IN: BNC, 0.5 V to 8 V , 10 k 48 kHz (synchronised with video) Quantizing: Time code output 16 bits Frequency response: TC OUT: 20 Hz - 20 kHz ± 1.0 dB (at standard level) BNC, low impedance, 2.0 ±...
- Page 127 MEMO...
- Page 128 Panasonic Broadcast Europe Panasonic Marketing Europe GmbH Hagenauer Str. 43, 65203 Wiesbaden-Biebrich Deutschland Tel: 49-611-235-481 © 2005 Matsushita Electric Industrial Co., Ltd. All Rights Reserved.
Need help?
Do you have a question about the AJ-SPX900e and is the answer not in the manual?
Questions and answers