Table of Contents
Advertisement
Quick Links
Advertisement
Table of Contents

Related Manuals for Avaya 960 Series


Summary of Contents for Avaya 960 Series
-
Page 1: 9600 Series User Guide
IP Office 9.0 9600 Series User Guide Issue 08b - (10 April 2014) - Page 2 Concurrent User License (CU). End User may install and use the Software on multiple Designated Processors or one or more Servers, so long as only the licensed number of Units are accessing and using the Software at any given time. A “Unit” means the unit on which Avaya, at its sole discretion, bases the pricing of its licenses and can be, without limitation, an agent, port or user, an e-mail or voice mail account in the name of a person or corporate function (e.g., webmaster or helpdesk), or a directory entry in the administrative database utilized by the...
- Page 3 Each Product has its own ordering code. Note that each instance of a Product must be separately licensed and ordered. “Instance” means one unique copy of the Software. For example, if the end user customer or Avaya channel partner would like to install two instances of the same type of Products, then two Products of that type must be ordered.
- Page 4 Contact Avaya Support See the Avaya Support website: http://support.avaya.com for product notices and articles, or to report a problem with your Avaya product. For a list of support telephone numbers and contact addresses, go to the Avaya Support website: http://support.avaya.com, scroll to the bottom of the page, and select Contact Avaya Support.
-
Page 5: Table Of Contents
Contents 7.1 Forced Account Code Entry ..............50 Contents 7.2 Manual Account Code Entry ..............50 Conference Calls Introduction 8.1 Starting a Conference ..............52 1.1 Important Safety Information ..............11 8.2 Adding a Call to a Conference ..............52 1.2 9608 Telephone .............. - Page 6 13.3 Locking the Phone ..............84 16.2.19 Suppress Digits ................110 13.4 Auto Lock ..............85 16.2.20 Twinning ................110 13.5 Unlocking the Phone ..............85 16.2.21 User BLF ................110 13.6 Changing Your Security PIN ..............85 Home Screen Redirecting Calls 17.1 Editing Your Home Screen ..............
- Page 7 Contents 19.6 Forward Unconditional ..............136 23.32 System Phone User ..............161 19.7 Forwarded Here ..............136 23.33 Twinning ..............161 19.8 Group Membership ..............137 Document History 19.9 Group Service Status ..............137 Index ................165 19.10 Mobile Twinning ..............137 19.11 Parked Calls ..............
-
Page 9: Introduction
Chapter 1. Introduction 9600 Series User Guide Page 9 IP Office 9.0 Issue 08b (10 April 2014) -
Page 11: Important Safety Information
· During a power surge, EFT (Electronically Fast Transients), or ESD (Electrostatic Discharge), calls may be dropped. After a power surge, EFT or ESD, it is normal for the phone to restart. · Using a cell phone, mobile phone, GSM phone or two-way radio in close proximity to an Avaya telephone might cause interference. -
Page 12: 9608 Telephone
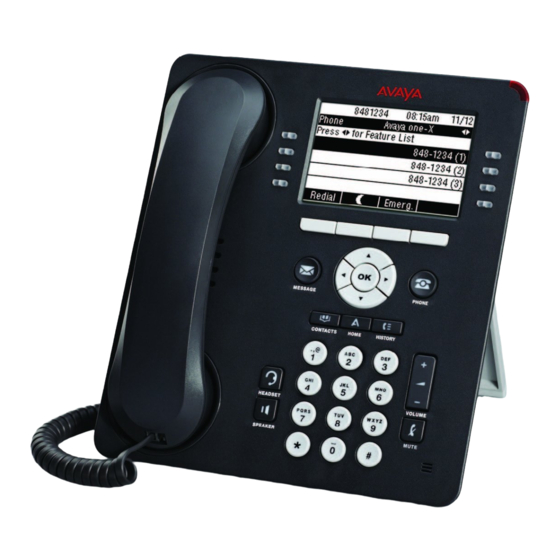
1.2 9608 Telephone The IP Office supports the 9608 and 9608G telephones. The latter support Gigabit ethernet. This phone supports 24 programmable call appearance/feature buttons. The labels for these buttons are visible on the main display and can be controlled by the adjacent buttons. Functions can be assigned to the phone's feature buttons by your system administrator or by yourself using self- administration. -
Page 13: 9611 Telephone
Introduction: 9608 Telephone 1.3 9611 Telephone The IP Office supports the 9611G telephone. This phone supports 24 programmable call appearance/feature buttons. The labels for these buttons are visible on the main display and can be controlled by the adjacent buttons. Functions can be assigned to the phone's feature buttons by your system administrator or by yourself using self- administration. -
Page 14: 9620 Telephone
1.4 9620 Telephone The IP Office supports the 9620L and 9620C versions of the 9620 telephone. This phone supports 12 programmable call appearance/feature buttons. The labels for 3 of these buttons are visible on the main display and can be controlled by the adjacent buttons to the right. You can use the up and down arrow keys to scroll the display. -
Page 15: 9621 Telephone
Introduction: 9620 Telephone 1.5 9621 Telephone The IP Office supports the 9621 telephone. This phone supports 24 programmable call appearance/feature buttons. The labels for 6 of these buttons are visible on the main display and can be controlled by the adjacent buttons to the right. You can use the up and down arrow keys to scroll the display. -
Page 16: 9630 Telephone
1.6 9630 Telephone The IP Office supports the 9630G version of the 9630 telephone. This phone supports 24 programmable call appearance/feature buttons. The labels for 6 of these buttons are visible on the main display and can be controlled by the adjacent buttons to the right. You can use the up and down arrow keys to scroll the display. -
Page 17: 9640 Telephone
Introduction: 9630 Telephone 1.7 9640 Telephone The IP Office supports the 9640 and 9640G versions of the 9640 telephone. This phone supports 24 programmable call appearance/feature buttons. The labels for 6 of these buttons are visible on the main display and can be controlled by the adjacent buttons to the right. You can use the up and down arrow keys to scroll the display. -
Page 18: 9641 Telephone
1.8 9641 Telephone The IP Office supports the 9641 telephone. This phone supports 24 programmable call appearance/feature buttons. The labels for these are displayed in the scrollable main display along with icons for the status of the buttons. In addition, some features can be accessed using the fixed buttons displayed at the bottom of the screen. Through the phone's own menus you can select whether to display one row of four, two rows of two, or no fixed buttons at the bottom of the display. -
Page 19: 9650 Telephone
Introduction: 9641 Telephone 1.9 9650 Telephone The IP Office supports the 9650 and 9650C versions of the 9650 telephone. This phone supports 24 programmable call appearance/feature buttons. The labels for 3 of these buttons are visible on the main display and can be controlled by the adjacent buttons to the right. You can use the up and down arrow keys to scroll the display. -
Page 20: Button Modules
1.10 Button Modules The addition of a button module allows the phone to support additional programmable buttons. · Do not connect or disconnect a button module yourself. Your system administrator will arrange this if necessary. Failure to connect and restart the equipment in the correct order may cause the phone and or the button module to function incorrectly. -
Page 21: Phone Keys
· · On touch screen phones, these buttons are replaced by their text labels on the screen. · The CONFERENCE, DROP, HOLD, REDIAL and TRANSFER keys found on other Avaya phones are presented as soft key functions relative to the current call. -
Page 22: Status Letters
1.12 Status Letters When your own extension name is shown on the second line of the display, for example when the phone is idle, the name may be followed by a series of letters. These letters are used to indicate your current status. ·... - Page 23 Other Stands If the phone needs to be used in a situation other than on a desk, for example wall-mounted, a number of other stand designs are available from Avaya. Contact your system administrator. 9600 Series User Guide Page 23 IP Office 9.0...
-
Page 25: Making Calls
Chapter 2. Making Calls 9600 Series User Guide Page 25 IP Office 9.0 Issue 08b (10 April 2014) -
Page 26: En-Bloc Dialing
2. Making Calls If you are not already on a call, then you can just dial the number. The first available appearance button will be used for the call. Alternatively, you can press a specific appearance button in order to make a call using that button. If the number you dial matches a user or group on the telephone system, the directory name of the user or group is shown and the call starts altering the target. -
Page 27: Call Soft Key Options
Making Calls: En-Bloc Dialing 2.2 Call Soft Key Options The options displayed for the buttons at the bottom of the display will change dynamically to reflect actions that you can perform during calls or while the phone is idle. Some or all of these options will only be available if enabled by your system administrator. ·... -
Page 28: Calling From The Contacts List
2.3 Calling from the Contacts List You can use any directory contact to make a call. You can also use the directory in almost any telephone function where you need to select the number for a destination, for example during a transfer. 1. -
Page 29: Redialling A Previous Number
Making Calls: Calling from the Call Log/History 2.5 Redialling a Previous Number When Redial is displayed it can be used in one of two ways, set by the phone's redial mode setting List Mode This redial method is used when your phone's redial mode is set to List. -
Page 30: Adjusting The Call Volume
2.8 Adjusting the Call Volume While talking, you can adjust the volume of the incoming call. The volume is adjusted separately for whichever device is in use (handset headset speaker 1. With the call connected, press the VOLUME key. 2. Use the + plus and – minus keys to adjust the volume. 3. -
Page 31: Answering Calls
Chapter 3. Answering Calls 9600 Series User Guide Page 31 IP Office 9.0 Issue 08b (10 April 2014) -
Page 32: 3. Answering Calls
3. Answering Calls A slow flashing red lamp on an appearance button indicates an alerting call. This may also be accompanied by ringing and by the message lamp flashing Selected Button If you are currently not on a call, you can answer the alerting call in the following ways: 1. -
Page 33: Diverting A Call To Voicemail
Answering Calls: 3.1 Diverting a Call to Voicemail You can transfer a call targeted at you directly to your voicemail mailbox. 1. If the call is not the currently highlighted call on the display, use the up and down arrow keys to highlight it. 2. -
Page 34: Using Call Pickup
3.4 Using Call Pickup Pickup is used to answer a call ringing elsewhere on the phone system. 1. Press the Features soft key if shown. To do this during a call, press the PHONE key and then press the Features soft key. 2. -
Page 35: Redialling
Chapter 4. Redialling 9600 Series User Guide Page 35 IP Office 9.0 Issue 08b (10 April 2014) -
Page 36: Open Call Log Mode
4. Redialling The phone's redial operation can work in either of the following modes: Open Call Log · If this mode is selected, pressing Redial will display a menu of the most recent outgoing calls in your call log. You can select the call that you want to redial and perform a number of other functions. Last Dialed ·... -
Page 37: Holding And Parking Calls
Chapter 5. Holding and Parking Calls 9600 Series User Guide Page 37 IP Office 9.0 Issue 08b (10 April 2014) -
Page 38: 5. Holding And Parking Calls
5. Holding and Parking Calls Holding a call and parking a call are two similar actions. The current caller is placed on hold and hears music if available. The table below summarizes the main differences between parking a call and holding a call. When used to park or hold a call... -
Page 39: Holding Calls
Holding and Parking Calls: 5.1 Holding Calls You can hold one or more calls. · The held call will still occupy the appearance button on which it was made or answered. · The caller will hear music on hold. If your system does not have music on hold available, the caller will hear double beep tones every few seconds. -
Page 40: Switching Between Calls
5.1.3 Switching Between Calls With a call on hold (fast-flashing appearance button) and another call connected (red call appearance button), you can switch between calls by pressing the appearance button of the held call. The current call is automatically put on hold and the previously held call is connected. -
Page 41: Parking Calls
Holding and Parking Calls: Holding Calls 5.2 Parking Calls Parking a call is similar to holding a call. However, parked calls can be unparked by other users on the phone system. Each parked call is given a number. By default, the number is your extension number plus a digit. Calls that you park return to your phone (when idle) if they remain parked for too long. -
Page 42: Park & Page
5.2.3 Park & Page This method of parking calls is available only if specifically configured on your telephone system. To use it, you also need to add a Park & Page button on your phone. See Button Features Park and page uses a set of park slot numbers, configured by your system administrator, that act like extension numbers. - Page 43 Holding and Parking Calls: Parking Calls 9600 Series User Guide Page 43 IP Office 9.0 Issue 08b (10 April 2014)
-
Page 45: Transferring Calls
Chapter 6. Transferring Calls 9600 Series User Guide Page 45 IP Office 9.0 Issue 08b (10 April 2014) -
Page 46: Transferring To Voicemail
6. Transferring Calls You are able to transfer calls even if all your current call appearance buttons are in use. 1. Press Transfer. The current call is automatically put on hold pending transfer. 2. Dial the number for the transfer. Alternatively, press Dir to select a destination from the directory or use the Redial option, if applicable. -
Page 47: Transferring A Held Call
Transferring Calls: Transferring to Voicemail 6.2 Transferring a Held Call There are various call transfer scenarios to consider: 1. If you have multiple calls on hold and you want to transfer a connected call to one of the held calls: ·... -
Page 49: Account Codes
Chapter 7. Account Codes 9600 Series User Guide Page 49 IP Office 9.0 Issue 08b (10 April 2014) -
Page 50: 9600 Series User Guide Ip Office
7. Account Codes The telephone system can store a number of account codes. Account codes may be used to keep track of calls in relation to particular activities or clients. They can also be used to keep track of calls by particular users or sets of users. ·... -
Page 51: Conference Calls
Chapter 8. Conference Calls 9600 Series User Guide Page 51 IP Office 9.0 Issue 08b (10 April 2014) -
Page 52: Starting A Conference
8. Conference Calls The telephone system supports multiple conference calls, with additional parties addable to any conference call until the system's conference capacity is reached. A maximum of 64 parties in any particular conference call is supported. Conference resources are also used for call recording and other features, reducing the available conference capacity for ordinary conference calls. -
Page 53: Dropping/Muting Parties
Conference Calls: Dropping/Muting Parties 8.4 Dropping/Muting Parties You can drop parties from a conference call, including yourself. You can also mute other parties. 1. While connected to a conference call, if you press the Details key, the conference details menu is displayed. 2. -
Page 54: Context Sensitive Conferencing
8.6 Context Sensitive Conferencing The scenarios for starting a conference adding a call to a conference cover just simple scenarios where no other calls are in progress. The phone supports a range of context sensitive scenarios to control which calls are added to the conference For this phone, which calls are conferenced when Conf or Conference is pressed depends on which call is currently highlighted on the phone's display and the types of other held calls. -
Page 55: Headset/Handsfree Operation
Chapter 9. Headset/Handsfree Operation 9600 Series User Guide Page 55 IP Office 9.0 Issue 08b (10 April 2014) -
Page 56: Headset Operation
9. Headset/Handsfree Operation 9.1 Headset Operation Your phone has a headset socket located under the phone. This is suitable for the connection of phone headsets that connect via a HIS headset cable. · If there are no currently connected call to which you are talking, a call answered by pressing its appearance button is connected either handsfree or through the headset according to the phone's audio path setting ·... -
Page 57: Headset Volume
Headset/Handsfree Operation: Headset Operation 9.1.1 Headset Volume While talking via the headset, you can adjust the volume of the incoming call. The status indication line displays a icon followed by eight bubbles that represent the volume level. 1. With the call connected on the headset, press the key. -
Page 58: Headset Alert Sounds
9.1.4 Headset Alert Sounds When using a headset, the phone can provide additional audio alerts through that headset, These alerts are in addition to the phone's normal visual alerting and ringer. The phone can provide headset alerts when it goes off and on hook. It can also provide a headset alert when calls are waiting to be answered. -
Page 59: Handsfree Speaker Operation
Headset/Handsfree Operation: Headset Operation 9.2 Handsfree Speaker Operation Your phone has a speaker and microphone that allows you make and answer calls handsfree. The speaker is located under the handset. The microphone is located near the bottom right of the phone's keypad. ·... -
Page 60: Speaker Volume
9.2.1 Speaker Volume While talking handsfree via the phone's speaker, you can adjust the volume of the incoming call. The status indication line will display a icon followed by eight bubbles that represent the volume level. 1. With the call connected on the speaker, press the key. -
Page 61: Contacts/Directory
Chapter 10. Contacts/Directory 9600 Series User Guide Page 61 IP Office 9.0 Issue 08b (10 April 2014) -
Page 62: Managing External Contacts
10. Contacts/Directory This menu is accessed by pressing the CONTACTS key. It is used to display names and numbers that you can then use for making calls. The directory includes names stored for use by all users, names stored for use by just you and the name and numbers of all the other users and groups on the phone system. -
Page 63: Viewing Contacts Details
Contacts/Directory: Managing External Contacts 10.2 Viewing Contacts Details 1. Access the contacts directory: a. Press the CONTACTS key. The directory menu is displayed. b. Use the left and right arrow keys to select which type of directory entries you want to display. ·... -
Page 64: Making A Call From The Directory
10.3 Making a Call from the Directory You can use any directory contact to make a call. You can also use the directory in almost any telephone function where you need to select the number for a destination, for example during a transfer. 1. -
Page 65: Adding A New Contact
Contacts/Directory: Using the Directory for Other Functions 10.5 Adding a New Contact So long as the telephone system capacity has not been reached, you can add up to 100 personal directory entries. 1. Access your personal directory contacts: a. Press the CONTACTS key. -
Page 66: Editing A Contact
10.7 Editing a Contact You can edit the contacts in your own personal directory. 1. Access your personal directory contacts: a. Press the CONTACTS key. The directory menu is displayed. b. Use the left and right arrow keys to select your Personal directory. c. -
Page 67: Call History
Chapter 11. Call History 9600 Series User Guide Page 67 IP Office 9.0 Issue 08b (10 April 2014) -
Page 68: 11. Call History
11. Call History This menu is accessed by pressing the HISTORY key. The call log you see is a call log stored on the telephone system. If you log in at another phone that also stores a call log, your call history moves with you. Your call history contains your most recent answered calls, the most recent calls you made and the most recent missed calls. -
Page 69: Accessing The Call Log/History
Call History: 11.1 Accessing the Call Log/History 1. Access the call log. a. Press the HISTORY button. b. The display will change to show your call log records. The caller's name is shown if known, otherwise the number. If you have any new missed call records, the button is illuminated and the call log will open showing your missed calls. -
Page 70: Viewing Call Details
11.3 Viewing Call Details You can view additional details about the currently shown call. 1. Access the call log. a. Press the HISTORY button. b. The display will change to show your call log records. The caller's name is shown if known, otherwise the number. -
Page 71: Deleting A Record
Call History: Viewing Call Details 11.4 Deleting a Record You can delete the currently displayed call record. If the record is a missed hunt group call, the record is also deleted from the call log of other users configured to see the same hunt group's missed calls. 1. -
Page 73: Voicemail
Chapter 12. Voicemail 9600 Series User Guide Page 73 IP Office 9.0 Issue 08b (10 April 2014) -
Page 74: Message Waiting Indication
12. Voicemail If your telephone system includes a voicemail server, pressing the MESSAGES button accesses voicemail. Your system administrator can configure whether the access uses either spoken prompts from the voicemail server or visual menus on the phone called 'visual voice'. This guide assumes the default operation of using the visual voice menus. Using visual voice, you can access the following functions: Checking Messages ·... -
Page 75: Visual Voice
Voicemail: Message Waiting Indication 12.2 Visual Voice This menu option provides an alternate route into visual voice if the MESSAGES key has not been setup to do that. 1. Press the Features soft key if shown. To do this during a call, press the PHONE key and then press the Features soft key. -
Page 76: Sending A Message
12.4 Sending a Message You can use visual voice to record and send a voicemail message to other users' mailboxes. 1. Press the MESSAGES button. · Depending on how your system is configured, you may be required to enter your voicemail password and then press the Done soft key. -
Page 77: Mailbox Greeting
Voicemail: Mailbox Greeting 12.6 Mailbox Greeting While the voicemail system will play a generic greeting to a caller, prompting them to leave a message, you can record your own greeting. 1. Press the MESSAGES button. · Depending on how your system is configured, you may be required to enter your voicemail password and then press the Done soft key. -
Page 78: Mailbox Name
12.7 Mailbox Name Use the following procedure to record a mailbox name. This feature is only available on systems using Embedded Voicemail. 1. Press the MESSAGES button. · Depending on how your system is configured, you may be required to enter your voicemail password and then press the Done soft key. -
Page 79: Switching Voicemail On/Off
Voicemail: Changing Your Voicemail Code 12.9 Switching Voicemail On/Off You can control whether the telephone system uses voicemail to answer your unanswered calls. This does not switch off your mailbox which you can still access to play existing messages and use other functions. 1. -
Page 81: Logging In/Out
Chapter 13. Logging In/Out 9600 Series User Guide Page 81 IP Office 9.0 Issue 08b (10 April 2014) -
Page 82: 13. Logging In/Out
13. Logging In/Out You may always use the same phone in the same location. However, the telephone system provides a number of features that allow you to use any phone on the system to make and receive calls. Log In ·... -
Page 83: Logging In
Logging In/Out: 13.1 Logging In When you log in to a phone, you take control of that phone. Incoming calls for you are redirected to that phone and your user information and settings are available. Any existing user on the phone is logged off when you log in. The method for logging in depends on the current state of the phone: Phone In Use ·... -
Page 84: Logging Out
13.2 Logging Out 1. Press the Features soft key if shown. To do this during a call, press the PHONE key and then press the Features soft key. 2. Use the up and down arrow keys to highlight Phone User. Press Select. 3. -
Page 85: Auto Lock
Logging In/Out: Locking the Phone 13.4 Auto Lock Rather than logging out, you can lock your phone. You can either lock your phone manually using the steps below or have it automatically locked after a period of phone inactivity. To use this feature you need a security PIN (login code) set. -
Page 87: Redirecting Calls
Chapter 14. Redirecting Calls 9600 Series User Guide Page 87 IP Office 9.0 Issue 08b (10 April 2014) -
Page 88: 14. Redirecting Calls
14. Redirecting Calls This section looks at the different ways that you can redirect your calls to another phone. Follow Me · Temporarily redirect all your calls to another phone that you will be sharing with that phone's normal user. This function can be used in two ways: ·... -
Page 89: Follow Me
Redirecting Calls: 14.1 Follow Me 'Follow me to' is used to redirect your calls to another extension where you will be working. The calls are presented with your user name so that they can be distinguished from calls for the extensions normal user. This allows you to share another person's phone without logging them off their phone. -
Page 90: Follow Me To (Features Menu)
14.1.1 Follow Me To (Features Menu) Using the user menu you can set and clear follow me to settings. 1. Press the Features soft key if shown. To do this during a call, press the PHONE key and then press the Features soft key. -
Page 91: Forwarding Calls
Redirecting Calls: Follow Me 14.2 Forwarding Calls Forwarding is used to redirect calls to another extension or an external number. Forward Unconditional Forward unconditional can be used to immediately redirect your calls. · By default this function is only applied to incoming external calls made to you. However, if required, internal calls and or hunt group calls can also be selected. -
Page 92: Default Short Codes
Default Short Codes Short codes are numbers that you can dial to enable and disable various features. The following are default short codes that may be available. However, your system administrator can remove and change the short codes available to you or all users. -
Page 93: Forward Unconditional (Status Menu)
Redirecting Calls: Forwarding Calls 14.2.1 Forward Unconditional (Status Menu) You can clear or change your 'forward unconditional' settings through the Status menu. 1. Press the Status soft key if shown. · To access the Status menu during a call, press the PHONE key and then press the Status soft key if shown. -
Page 94: Forward On Busy/No Answer (Features Menu)
14.2.3 Forward On Busy/No Answer (Features Menu) You may be able to use the Features menu to switch 'forward on no answer' and 'forward on busy' on or off. 1. Press the Features soft key if shown. To do this during a call, press the PHONE key and then press the Features soft key. -
Page 95: Forward On Busy (Status Menu)
Redirecting Calls: Forwarding Calls 14.2.5 Forward On Busy (Status Menu) If your phone is set to 'forward on busy,' you can clear or change the forward settings through the Status menu. 1. Press the Status soft key if shown. · To access the Status menu during a call, press the PHONE key and then press the Status soft key if shown. -
Page 96: Do Not Disturb
14.3 Do Not Disturb · When you are in 'do not disturb,' your callers are redirected to voicemail if available. Otherwise, you hear a busy tone. · The only people who can call you are those calling from numbers in your 'do not disturb' exceptions list. Forwarding can still be applied to these calls. -
Page 97: Dnd On/Off (Features Menu)
Redirecting Calls: Do Not Disturb 14.3.1 DND On/Off (Features Menu) You can use the Features menu to switch 'do not disturb' (DND) on or off. Enabling DND will not affect any calls already being presented to your phone. Hunt group calls will also still be presented if you are the only available member of the group. -
Page 98: Twinning
14.4 Twinning Twinning is a process whereby your calls ring on two phones. Twinning is only available if configured by your system administrator. The system supports two twinning methods: internal twinning mobile twinning Internal Twinning This method of twinning twins your normal phone with another internal phone. Your incoming calls will ring on both phones. -
Page 99: Transferring A Call To Your Mobile
Redirecting Calls: Twinning 14.4.2 Transferring a Call to Your Mobile If you have been configured as a mobile twinning user, you can transfer a call to your mobile device using the features menu. 1. Press the Features soft key if shown. To do this during a call, press the PHONE key and then press the Features soft key. -
Page 101: Groups
Chapter 15. Groups 9600 Series User Guide Page 101 IP Office 9.0 Issue 08b (10 April 2014) -
Page 102: 15. Groups
15. Groups Your system administrator can include you as a member of a group along with other users. Each group has its own extension number which can be used as the destination for a call. When a call is made to a group, it is presented to the available group members, either one at a time or all at the same time, until answered by one of the members. -
Page 103: Group Membership
Groups: 15.1 Group Membership Only the system administrator can change a group, the group members, or group settings. However, you can be provided with options to enable or disable your group membership. While membership to a group is disabled, you will not receive any group calls for that group. -
Page 104: Group Service Status And Fallback
15.2 Group Service Status and Fallback · Group Service Status A hunt group can be in one of the following service modes: · In Service The groups operates as normal, distributing calls to available members of the group. · Night Service The group is in 'night service' mode. -
Page 105: Changing The Group Service Status (Features Menu)
Groups: Group Service Status and Fallback 15.2.1 Changing the Group Service Status (Features Menu) Using the Features menu you may be able to change the service status of some groups to which you belong. 1. Press the Features soft key if shown. To do this during a call, press the PHONE key and then press the Features soft key. -
Page 106: Changing The Group Fallback
15.2.3 Changing the Group Fallback You may be able to use the Features menu to change the fallback group destination for some of the hunt groups of which you are a member. 1. Press the Features soft key if shown. To do this during a call, press the PHONE key and then press the Features soft key. -
Page 107: Button Features
Chapter 16. Button Features 9600 Series User Guide Page 107 IP Office 9.0 Issue 08b (10 April 2014) -
Page 108: Editing Your Programmable Buttons
16. Button Features Functions can be assigned to the phone's feature buttons by your system administrator or by yourself using self- administration. Note how you cannot replace features assigned to buttons by your system administrator but you can replace other features. Note also that there are features that the system administrator can assign that are not available for you to assign. -
Page 109: Abbreviated Dial
Button Features: Features 16.2.1 Abbreviated Dial This action can be used as a speed dial button. While setting up the button, enter the number you would like it to dial. You can enter a partial number and complete the dialing after pressing the button. For example, you can pre-program a button with a particular international dialing code. -
Page 110: Flash Hook
16.2.12 Flash Hook A button configured for this action will send a flash hook signal to a currently connected analog line. 16.2.13 Group BLF A button can be programmed to indicate if there are any calls to a group waiting to be answered. A red flashing lamp indicates that there are calls waiting for the hunt group. - Page 111 Button Features: Features · Auto Callback - Set an automatic callback on the user. The callback will occur when the user ends their current call. The following options are only available if configured for you by your system administrator: · Drop Call - Disconnect the user's current call. ·...
-
Page 113: Home Screen
Chapter 17. Home Screen 9600 Series User Guide Page 113 IP Office 9.0 Issue 08b (10 April 2014) -
Page 114: 17. Home Screen
17. Home Screen The 9621 and 9641 phones have a home screen that contains a number of icons for accessing functions. Some of the icons are configured by your system administrator, some are fixed. You can add up to 8 icons to access special functions. -
Page 115: Editing Your Home Screen
Home Screen: 17.1 Editing Your Home Screen There are a wide range of actions that can be assigned to the buttons. This guide only includes details of those that you can assign to a button using the self-administer menu. Functions that can only be assigned by your system administrator will be explained by the system administrator. -
Page 116: Abbreviated Dial
17.2 Abbreviated Dial This action can be used as a speed dial button. While setting up the button, enter the number you would like it to dial. You can enter a partial number and complete the dialing after pressing the button. For example, you can pre-program a button with a particular international dialing code. -
Page 117: Phone Settings
Chapter 18. Phone Settings 9600 Series User Guide Page 117 IP Office 9.0 Issue 08b (10 April 2014) -
Page 118: 18. Phone Settings
18. Phone Settings Pressing the MENU/HOME key accesses a menu that can be used to control various phone settings. These are mainly settings stored by the phone rather than user settings that move with you. General Display Controls Mobile Twinning Display Brightness ·... -
Page 119: Mobile Twinning
Phone Settings: 18.1 Mobile Twinning This menu option is only available if you have been configured by the system administrator to be able to use mobile twinning. · Setting a button to the Twinning function is recommended—contact your system administrator. Such a button allows you to transfer calls to your twinning destination, retrieve calls from the twinning destination, and access the menu options below to set the twinning destination number and switch twinning on/off. -
Page 120: En-Bloc Dialing
18.4 En-Bloc Dialing By default, when you start dialing a number on your phone, the phone immediately connects to the telephone system and starts passing the digits you dial to the phone system. You cannot correct the digits you have already dialed except by ending the call and starting over. -
Page 121: Auto Lock
Phone Settings: En-Bloc Dialing 18.5 Auto Lock Enter topic text here. 18.6 Ringer Controls This section covers controls for adjusting the ringing used by your phone. Disabling the ringer · Flash the message lamp for calls (Visual Alerting) · Coverage Ring ·... -
Page 122: Visual Alerting
18.6.2 Visual Alerting The message waiting lamp at the top-right corner of the phone can also be used to indicate when you have a call alerting your phone. The lamp is flashed to indicate a call waiting to be answered. 1. -
Page 123: Ringer Volume
Phone Settings: Ringer Controls 18.6.5 Ringer Volume You can adjust the ringer volume while the phone is idle or while it is ringing. The status indication line displays a icon followed by eight bubbles that represent the volume level. When no ringer is audible, the indication line displays a icon. -
Page 124: Display Brightness
18.7.1 Display Brightness 1. Press the MENU/HOME button and select Settings. 2. Use the up and down arrow keys to highlight Options & Settings. Press Select. 3. Use the up and down arrow keys to highlight Screen & Sound Options. Press Select. 4. -
Page 125: Last Call Duration Display
Phone Settings: Display Controls 18.7.3 Last Call Duration Display As an alternate to call timer display, you can have the phone briefly (4 seconds) display the duration of the call after it is ended. 1. Press the Features soft key if shown. To do this during a call, press the PHONE key and then press the Features soft key. -
Page 126: Display Language
18.7.6 Display Language The system administrator can configure which languages are available for use by the phone for its own menus. Up to five languages can be made available. Through the phone's menu you can select which of those languages the phone should use. Note that many of the messages displayed on the phone use text sent from the telephone system. -
Page 127: Inactivity Timer (Auto Return)
Phone Settings: Display Controls 18.7.8 Inactivity Timer (Auto Return) You can set a timer which will return the phone to its normal call display after a set period of phone inactivity. By default the phone will be set to auto return after 60 seconds. Note that the timer is not applied to all menus. - Page 128 3. Use the up and down keys to highlight Self Administer. Press Select. 4. Enter your security PIN and press Done. 5. On 9621 and 9641 phones, select Button Features. Use the up and down arrow keys to scroll through the list of current functions assigned to each button.
-
Page 129: Volume And Sound
Phone Settings: Display Controls 18.8 Volume and Sound This section covers controls that relate to volume and to the various sounds that your phone uses. These are in addition to the available ringer controls Button Click · Turn the phone menu key click on or off. Error Tones ·... -
Page 130: Handset Volume
18.8.4 Handset Volume While talking via the handset, you can adjust the volume of the incoming call. The status indication line displays a icon followed by eight bubbles that represent the volume level. 1. With the call connected on the handset, press the key. -
Page 131: Backup/Restore
Phone Settings: Volume and Sound 18.9 Backup/Restore If backup/restore has been setup by your system administrator, it is used automatically when you log in and log out of the phone. Backup/restore is used for the phone settings that you have configured within the menus provided by the phone's MENU/HOME button. -
Page 132: Viewing Information
18.10 Viewing Information You can view information about the phone's settings and current operation. When reporting a problem to your system administrator, they may ask you to provide some of this information to help resolve the problem. 1. Press the MENU/HOME button and select Settings. -
Page 133: Status Menu
Chapter 19. Status Menu 9600 Series User Guide Page 133 IP Office 9.0 Issue 08b (10 April 2014) -
Page 134: Do Not Disturb
19. Status Menu The Status menu is not always visible. It is shown when you have any special call routing features active; for example, 'do not disturb' switched on. It is also shown if the system administrator has given you the rights to change the status of your hunt group memberships or to change the service status of the hunt groups. -
Page 135: Follow Me Here
Status Menu: Follow Me To 19.3 Follow Me Here If other users has a 'follow me' set to you phone, you can clear or change the setting through the Status menu. 1. Press the Status soft key if shown. · To access the Status menu during a call, press the PHONE key and then press the Status soft key if shown. -
Page 136: Forward On No Answer
19.5 Forward On No Answer If your phone is set to 'forward on no answer ' you can clear or change the forward settings through the Status menu. 1. Press the Status soft key if shown. · To access the Status menu during a call, press the PHONE key and then press the Status soft key if shown. -
Page 137: Group Membership
Status Menu: Group Membership 19.8 Group Membership Your system administrator can grant you the ability to enable/disable your membership to a group through the Status menu. When your membership to a group is disabled, you do not receive group calls for that group. 1. -
Page 138: Parked Calls
19.11 Parked Calls While parked calls are parked on the telephone system and can be unparked by any other user, the parked call indication is sent to a particular extension. If there are any calls parked against your phone, you can view and unpark them via the Status menu. -
Page 139: Short Codes
Chapter 20. Short Codes 9600 Series User Guide Page 139 IP Office 9.0 Issue 08b (10 April 2014) -
Page 140: 20. Short Codes
20. Short Codes Short codes are numbers that you can dial to enable and disable various features. The following are default short codes that may be available. However, your system administrator can remove and change the short codes available to you or all users. -
Page 141: Hunt Group
Short Codes: Forwarding · Cancel All Forwarding: *00 Switch off any forwarding (includes 'forward unconditional,' 'forward on busy,' 'forward on no answer,' 'follow me,' and 'do not disturb'). · Set the Forward Unconditional Destination: *07*N# Set the destination number (N) for 'forward unconditional' when it is switched on. ·... -
Page 143: System Administration
Chapter 21. System Administration 9600 Series User Guide Page 143 IP Office 9.0 Issue 08b (10 April 2014) -
Page 144: Checking The System Information
21. System Administration If necessary, the system administrator can configure you as a 'system phone' user. This allows you to perform a range of additional functions to help maintain your phone system, such as: Checking the system and software version ·... -
Page 145: Checking The Time Server Status
System Administration: Setting the Date 21.3 Checking the Time Server Status For systems that automatically obtain the time from a time server, this option is available in place of the Date Time Time Offset functions. It allows you to check the current status of the time server and the information the system has obtained from the time server. -
Page 146: Setting The Time
21.4 Setting the Time The process below can be used when the telephone system does not obtain the time and date automatically. On systems that are configured to obtain the time automatically, the option for checking the Time Server Status is available instead. -
Page 147: Shutting Down The System
System Administration: Setting the Time Offset 21.6 Shutting Down the System You can shutdown the telephone system for a specified number of minutes. Note that this is not a polite shut-down, once you have confirmed the action, any existing calls and services using the telephone system will start being disconnected. The telephone system will then remain unavailable for the duration you specify, the default being 10 minutes. -
Page 148: Managing Memory Cards
21.7 Managing Memory Cards The telephone system can be fitted with an additional memory card or cards which are used for various functions. The memory card menu allows you to check the status of the memory card or cards fitted to your telephone system and to perform a number of actions on the cards. -
Page 149: Reporting System Alarms
System Administration: Managing Memory Cards 21.8 Reporting System Alarms If you have been configured as a system administrator (also called a system phone user), an S on the phone's display indicates a system alarm message. While you are not expected to be able to fix the error causing the alarm, the error message allows you to report the problem to your system administrator. -
Page 150: Debug Mode
21.9 Debug Mode This topic is tagged for 9600 Series phones only. In addition to backing up and restoring phone information, it is possible to enter a debug/troubleshooting mode on the 9608, 9611, 9621, and 9641 phones. In Debug Mode, you can save all applicable debug data in a file named nnn _report.gz, where nnn is replaced by the telephone extension, and then send that file to an appropriate server configured by your system administrator. -
Page 151: Menus
Chapter 22. Menus 9600 Series User Guide Page 151 IP Office 9.0 Issue 08b (10 April 2014) -
Page 152: Features Menu
22. Menus 22.1 Features Menu This menu is accessed by pressing the Features soft key. It can be used to access a range of user settings. To exit the whole user menu and return to the appearance menu, press the PHONE/EXIT button or, if displayed, press the Exit soft key. -
Page 153: Status Menu
Menus: Features Menu · The system administrator is able to configure whether you can access the Forward and Follow Me menu and status options. · The Park menu and status options are only accessible while you are talking to a caller or already have parked calls. -
Page 154: A Menu
22.3 A Menu This menu is used mainly for phone specific settings that are stored by the phone rather than settings that are stored by the phone system and move with you when you log into another phone. The menu is accessed by pressing the key. - Page 155 Menus: Menu Access Control · System Administration Controls The System Admin option is only shown if you have been configured as a 'System Phone' user. Note that restricting menu access does not restrict access using available short codes and programmable buttons. However, those can also be removed or added by your system administrator.
-
Page 157: Glossary
Chapter 23. Glossary 9600 Series User Guide Page 157 IP Office 9.0 Issue 08b (10 April 2014) -
Page 158: Abbreviated Ring
23. Glossary 23.1 Abbreviated Ring A single non-repeated ring. By default, this is the type of ring used when another call alerts you and you already have a call in connected. 23.2 Appearance Button Appearance buttons are used to represent calls made and received by you and other users on the telephone system. They are configured by your system administrator. -
Page 159: Do Not Disturb Exceptions
Glossary: Do Not Disturb Exceptions 23.10 Do Not Disturb Exceptions · These are numbers for callers who can call you even when you are set to 'do not disturb.' This only applies for calls to you. It does not apply for calls to a hunt group of which you are a member. 23.11 Follow Me 'Follow me to' is used to redirect your calls to another extension where you will be working. -
Page 160: Group
· D = Diverting (Forwarding) Calls A D is shown after your extension name on the phone's idle display when you have 'forward unconditional' enabled. 23.17 Group Your system administrator can include you as a member of a group along with other users. Each group has its own extension number which can be used as the destination for a call. -
Page 161: System Phone User
Glossary: Mobile Twinning 23.25 Mobile Twinning Mobile twinning allows your calls to ring at both your phone's and at another phone's number, which can include an external number. If you have been configured as a mobile twinning user, you can switch the use of mobile twinning on or off through the phone's menus and can also change the number to which you are twinned. -
Page 163: Document History
Chapter 24. Document History 9600 Series User Guide Page 163 IP Office 9.0 Issue 08b (10 April 2014) - Page 164 24. Document History Date Issue Changes 5th February 2014 · Update list of self-admin button features to match those supported in Release 9.0. 13th March 2014 · Added 9608G support. Added Headset Alerts operation. · Added Park & Page 17th March 2014 ·...
-
Page 165: Index
Index End automatically 52, 53 Index Hold 39, 53 Last internal user 52, 53 Abbreviated ring 122, 158 Music on hold 39, 53 Access Control Contact Fallback 103, 104, 105, 106, 137 65, 71 Follow Me 29, 34, 41, 47, 50, 75, 76, 83, 84, 85, 90, add external 62, 65, 66 93, 94, 95, 97, 99, 108, 119, 123, 134, 135, 136, 138... - Page 166 Follow me here from Call Log 28, 69 Status from Contacts 28, 64 Follow Me To from redial list 29, 36 90, 134 Manual Status 90, 134 Restore Forward Memory Card Failure 138, 149 All Calls 93, 136 Menu External and Group 93, 136 A-Menu 118, 154...
- Page 167 Index Ringer Volume 123, 129 S 22 SBM32 20 Send All Calls 93, 136 Speaker Volume 60, 130 Status Do Not Disturb 97, 134 Follow Me here Follow Me To 90, 134 Forward on Busy 95, 135 Forward on No Answer 94, 136 Forward unconditional 93, 136...
- Page 169 9600 Series User Guide Page 169 IP Office 9.0 Issue 08b (10 April 2014)
- Page 170 Template: 29th August 2013 Performance figures and data quoted in this document are typical, and must be specifically confirmed in writing by Avaya before they become applicable to any particular order or contract. The company reserves the right to make alterations or amendments to the detailed specifications at its discretion.
Need help?
Do you have a question about the 960 Series and is the answer not in the manual?
Questions and answers