RADVision SCOPIA XT4000 Series User Manual
Video conferencing
Hide thumbs
Also See for SCOPIA XT4000 Series:
- User manual (102 pages) ,
- Installation manual (184 pages) ,
- Administrator's manual (43 pages)
Table of Contents
Advertisement
Quick Links
Advertisement
Table of Contents

Related Manuals for RADVision SCOPIA XT4000 Series


Summary of Contents for RADVision SCOPIA XT4000 Series
- Page 1 SCOPIA XT4000 Series User Guide Version 3.0 For Solution 7.7...
- Page 2 If there is any software on removable media described in this publication, it is furnished under a license agreement included with the product as a separate document. If you are unable to locate a copy, please contact RADVISION Ltd and a copy will be provided to you.
-
Page 3: Table Of Contents
Activating the Screen Saver................15 Entering Alphanumeric Characters..............15 Pairing a XT Remote Control Unit with a XT Codec Unit.......... 16 Restoring Default User Settings..............17 Viewing System Information................18 RADVISION | User Guide for SCOPIA XT4000 Series Version 3.0 Table of Contents | i... - Page 4 About Video Layouts in the SCOPIA XT Series Using One Monitor..... 35 About Video Layouts in the SCOPIA XT Series Using Two Monitors....37 Changing the Video Layout During a Video Call......... 39 RADVISION | User Guide for SCOPIA XT4000 Series Version 3.0 Table of Contents | ii...
- Page 5 Adding a Contact to the Phonebook............45 Searching for a Contact in the Phonebook............ 47 Modifying a Contact in the Phonebook............47 Deleting a Contact from the Phonebook............48 RADVISION | User Guide for SCOPIA XT4000 Series Version 3.0 Table of Contents | iii...
- Page 6 SCOPIA XT Series Remote Control This section explains function of the SCOPIA XT Series Remote Control keys. RADVISION | User Guide for SCOPIA XT4000 Series Version 3.0 SCOPIA XT Series Remote Control | 1...
- Page 7 Figure 1-1 The upper part of the XT Remote Control Unit RADVISION | User Guide for SCOPIA XT4000 Series Version 3.0 SCOPIA XT Series Remote Control | 2...
- Page 8 Figure 1-2 The middle part of the XT Remote Control Unit Figure 1-3 The lower part of the XT Remote Control Unit RADVISION | User Guide for SCOPIA XT4000 Series Version 3.0 SCOPIA XT Series Remote Control | 3...
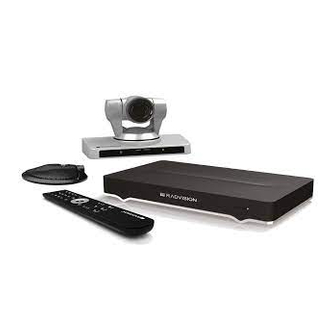
- Page 9 20 kHz full band audio with 48 kHz sampling rate and 1080p 30fps PC data sharing for an immersive life-like experience. • SCOPIA XT4000 Series RADVISION | User Guide for SCOPIA XT4000 Series Version 3.0 About the SCOPIA XT Series | 4...
- Page 10 The SCOPIA XT4000 Series provides cost-effective true HD 720p videoconferencing at 60 fps with the impressive price performance. It is a new innovative small room series, incorporating dual 720p at 60 fps live video and content, high profile H.264 and scalable video coding technology (SVC).
-
Page 11: About Securing Your Calls And Videoconferences
If your system administrator enabled encryption in your system and your call is secured, an icon showing a padlock appears on your display. RADVISION | User Guide for SCOPIA XT4000 Series Version 3.0 About the SCOPIA XT Series | 6... -
Page 12: Getting Started
Please ask your service administrator for details on your system’s customization. Once you have completed the installation, you are ready to use the system’s menus. RADVISION | User Guide for SCOPIA XT4000 Series Version 3.0 Getting Started | 7... -
Page 13: Accessing The Main Menu
The system home page appears on the monitors. If you access the system for the first time, the Quick Setup wizard is displayed; otherwise the Main menu appears. RADVISION | User Guide for SCOPIA XT4000 Series Version 3.0 Getting Started | 8... -
Page 14: Performing Basic Configuration
The quick setup wizard automatically appears when you turn the XT Codec Unit on for the first time. If the quick setup wizard is not displayed automatically, select Configure on the Main Menu page and then select Quick setup. RADVISION | User Guide for SCOPIA XT4000 Series Version 3.0 Getting Started | 9... -
Page 15: Setting The System Name And Language-Related Settings
Select the required country from the Country list using the arrow keys and press The system menu and the Language field automatically change to the language used in the selected country. RADVISION | User Guide for SCOPIA XT4000 Series Version 3.0 Getting Started | 10... -
Page 16: Adjusting The Image Position
If the image is centered correctly, skip this procedure and select Next. Figure 3-3 Examining the image position Step 2 Press 1 to align the top left corner. RADVISION | User Guide for SCOPIA XT4000 Series Version 3.0 Getting Started | 11... -
Page 17: Configuring Network Settings
This procedure is performed as part of the basic configuration after “Adjusting the Image Position” on page Procedure Step 1 Press and scroll to Yes from the Automatic IP address list. RADVISION | User Guide for SCOPIA XT4000 Series Version 3.0 Getting Started | 12... -
Page 18: Configuring Gatekeeper Settings
Before you begin This procedure is performed as part of the basic configuration after “Configuring Network Settings” on page Procedure Step 1 Set the Enabled list to Yes. RADVISION | User Guide for SCOPIA XT4000 Series Version 3.0 Getting Started | 13... -
Page 19: Setting The Interface Language
You may set the interface language in the Quick Setup Wizard or from the SCOPIA XT Series web interface. Procedure Step 1 Access the SCOPIA XT Series web interface. Step 2 Select the User settings tab. The User Preferences page opens. RADVISION | User Guide for SCOPIA XT4000 Series Version 3.0 Getting Started | 14... -
Page 20: Activating The Screen Saver
The confirmation message appears on the screen. Step 2 Select No. The screen saver is activated. Entering Alphanumeric Characters Use the XT Remote Control Unit keypad to enter letters and digits. RADVISION | User Guide for SCOPIA XT4000 Series Version 3.0 Getting Started | 15... -
Page 21: Pairing A Xt Remote Control Unit With A Xt Codec Unit
Decide what numeric code you want to use for your monitor and the XT Codec Unit. Procedure Step 1 Access the SCOPIA XT Series web interface. Step 2 In the User settings tab, select User preferences > General > General. RADVISION | User Guide for SCOPIA XT4000 Series Version 3.0 Getting Started | 16... -
Page 22: Restoring Default User Settings
Select the User Settings tab. Step 3 Select Load default values. Step 4 Select General. Step 5 Select the Restore default button. The default settings are restored. RADVISION | User Guide for SCOPIA XT4000 Series Version 3.0 Getting Started | 17... -
Page 23: Viewing System Information
From the Main Menu, select Configure using the XT Remote Control Unit. Figure 3-9 The Main Menu Step 2 Select System Status. The system information is displayed. RADVISION | User Guide for SCOPIA XT4000 Series Version 3.0 Getting Started | 18... -
Page 24: Tailoring Your User Experience
Procedure Step 1 Access the SCOPIA XT Series web interface. Step 2 Select the User Settings tab. Step 3 Select General under Call-Answer. RADVISION | User Guide for SCOPIA XT4000 Series Version 3.0 Tailoring Your User Experience | 19... -
Page 25: Enabling Call Disconnection Confirmation
You can configure the system to request a confirmation when a call is disconnected. Procedure Step 1 Access the SCOPIA XT Series web interface. Step 2 Select the User Settings tab. Step 3 Select General under Call-Answer. RADVISION | User Guide for SCOPIA XT4000 Series Version 3.0 Tailoring Your User Experience | 20... -
Page 26: Configuring The Scopia Xt Series To Block Incoming Calls By Default
XT Remote Control Unit. Procedure Step 1 Access the SCOPIA XT Series web interface. Step 2 Select the User Settings tab. Step 3 Select General under Call-Answer. RADVISION | User Guide for SCOPIA XT4000 Series Version 3.0 Tailoring Your User Experience | 21... -
Page 27: Configuring The Scopia Xt Series To Block Its Video Input By Default
Procedure Step 1 Access the SCOPIA XT Series web interface. Step 2 Select the User Settings tab. Step 3 Select General under Call-Answer. RADVISION | User Guide for SCOPIA XT4000 Series Version 3.0 Tailoring Your User Experience | 22... -
Page 28: Configuring The Scopia Xt Series To Enter The Local Presentation Mode Automatically
DVI and the audio settings associated to DVI are automatically used. You can also enter the local presentation mode manually by pressing the Presentation button on the XT Remote Control Unit. RADVISION | User Guide for SCOPIA XT4000 Series Version 3.0 Tailoring Your User Experience | 23... -
Page 29: Setting The Monitor Resolution
When you are not in a call, you can set the refresh frequency of the monitor display: • Set to 50 Hz by pressing then 5. • Set to 60 Hz by pressing then 6. RADVISION | User Guide for SCOPIA XT4000 Series Version 3.0 Tailoring Your User Experience | 24... -
Page 30: Preparing For A Video Call Or Videoconference
Step 2 Press the Preset key on the XT Remote Control Unit, and enter a number for the current position. RADVISION | User Guide for SCOPIA XT4000 Series Version 3.0 Preparing for a Video Call or Videoconference | 25... -
Page 31: Connecting The Computer
Connect the VGA cable to the PC/Laptop VGA out socket. Step 2 Connect the computer audio to the XT Codec Unit. RADVISION | User Guide for SCOPIA XT4000 Series Version 3.0 Preparing for a Video Call or Videoconference | 26... -
Page 32: Selecting The Computer Display Resolution
1280x720 60, 50, 30, 25 1024x768 60, 70, 75, 85 SVGA 800x600 60, 70, 75, 85 640x480 60, 70, 75, 85 RADVISION | User Guide for SCOPIA XT4000 Series Version 3.0 Preparing for a Video Call or Videoconference | 27... -
Page 33: What You Should Know About Participating In A Video Call
Speak in a normal voice, not louder or softer. • Avoid using your cellular phones during your meeting to avoid EMI (electromagnetic interference). RADVISION | User Guide for SCOPIA XT4000 Series Version 3.0 Preparing for a Video Call or Videoconference | 28... -
Page 34: Making Calls
If you manage your SCOPIA XT Series remotely using web interface, you can dial a number remotely by accessing the web interface and navigating to Make your call > Direct call > Basic options. RADVISION | User Guide for SCOPIA XT4000 Series Version 3.0 Making Calls | 29... -
Page 35: Redialing The Number
If you manage your SCOPIA XT Series remotely using web interface, you can redial the number remotely by accessing the web interface and navigating to Make your call> Recent calls. RADVISION | User Guide for SCOPIA XT4000 Series Version 3.0 Making Calls | 30... -
Page 36: Dialing From The Phonebook
Select the contact you wish to dial. Step 4 Press Answering a Video Call You can answer calls manually or set the system to answering the call automatically. RADVISION | User Guide for SCOPIA XT4000 Series Version 3.0 Making Calls | 31... -
Page 37: Ending A Call
Ending a Call Procedure Step 1 Press on the XT Remote Control Unit. Step 2 Press to confirm, if your system is set to Confirm disconnection. RADVISION | User Guide for SCOPIA XT4000 Series Version 3.0 Making Calls | 32... -
Page 38: Managing Calls And Videoconferences
You can control the remote camera when the connection with the remote endpoint is established and the remote camera is configured to be remotely managed. RADVISION | User Guide for SCOPIA XT4000 Series Version 3.0 Managing Calls and Videoconferences | 33... -
Page 39: Recalling A Camera Position
“Storing a Camera Position” on page Procedure Step 1 Press preset on the XT Remote Control Unit. Step 2 Enter the number corresponding to the required preset position. RADVISION | User Guide for SCOPIA XT4000 Series Version 3.0 Managing Calls and Videoconferences | 34... -
Page 40: How To Change The Video Layout In A Call
If the remote terminal does not show any content, the display shows the remote video in the main part of the screen, and the local presentation in the small image. RADVISION | User Guide for SCOPIA XT4000 Series Version 3.0 Managing Calls and Videoconferences | 35... - Page 41 Figure 7-4 on page 37 depicts a PoP (Picture out Picture) view in which two images of different size are presented side by side. RADVISION | User Guide for SCOPIA XT4000 Series Version 3.0 Managing Calls and Videoconferences | 36...
-
Page 42: About Video Layouts In The Scopia Xt Series Using Two Monitors
The auxiliary monitor (HD2) shows the presentation (local or remote), if available. The audio is automatically enabled on HD1. This is the default configuration. RADVISION | User Guide for SCOPIA XT4000 Series Version 3.0 Managing Calls and Videoconferences | 37... - Page 43 (local or remote), if available. HD2 shows the system menus, the received video, and the local video in a small overlapping window. RADVISION | User Guide for SCOPIA XT4000 Series Version 3.0 Managing Calls and Videoconferences | 38...
-
Page 44: Changing The Video Layout During A Video Call
Codec Unit. Changing the Video Layout During a Video Call During the call, you can change your monitor’s current layout to best serve your purpose. RADVISION | User Guide for SCOPIA XT4000 Series Version 3.0 Managing Calls and Videoconferences | 39... -
Page 45: Sharing Content
The original video source and graphics are restored, and system displays the prompt allowing you to choose how to handle the call (accept/reject/do not disturb). RADVISION | User Guide for SCOPIA XT4000 Series Version 3.0 Managing Calls and Videoconferences | 40... -
Page 46: Sharing Content During A Call
By default, the total available bandwidth is evenly divided between live video and presentation. In most cases it ensures the best content sharing experience. If necessary, your RADVISION | User Guide for SCOPIA XT4000 Series Version 3.0 Managing Calls and Videoconferences | 41... -
Page 47: Blocking Video From The Scopia Xt Series
Block Its Video Input by Default” on page Managing the Audio You can change the volume of calls, call ringing, and the volume of the microphone pod. RADVISION | User Guide for SCOPIA XT4000 Series Version 3.0 Managing Calls and Videoconferences | 42... -
Page 48: Adjusting The System Volume
Adjusting the Ringing Volume When not in a meeting, you can set the ringing tone of the incoming call to a comfortable hearing level. RADVISION | User Guide for SCOPIA XT4000 Series Version 3.0 Managing Calls and Videoconferences | 43... -
Page 49: Muting The Microphone Pod
XT Remote Control Unit or press the Mute button on the Microphone Pod. The icon appears on the display. icon shows that the Microphone Pod of the remote endpoint is muted. RADVISION | User Guide for SCOPIA XT4000 Series Version 3.0 Managing Calls and Videoconferences | 44... -
Page 50: Blocking Incoming Calls
Access the SCOPIA XT Series web interface. Step 2 Select the Make your call tab. Step 3 Select Contacts on the left. Figure 7-11 The Contacts page RADVISION | User Guide for SCOPIA XT4000 Series Version 3.0 Managing Calls and Videoconferences | 45... - Page 51 The purpose of label is provide a short description of the contact, for example: home, office or virtual room. Step 10 Enter the number or alias in the Number field. Step 11 Select the protocol from the Type list. RADVISION | User Guide for SCOPIA XT4000 Series Version 3.0 Managing Calls and Videoconferences | 46...
-
Page 52: Searching For A Contact In The Phonebook
Step 1 Access the SCOPIA XT Series web interface. Step 2 Select the Make your call tab. Step 3 Select Contacts on the left. RADVISION | User Guide for SCOPIA XT4000 Series Version 3.0 Managing Calls and Videoconferences | 47... -
Page 53: Deleting A Contact From The Phonebook
Step 1 Access the SCOPIA XT Series web interface. Step 2 Select the Make your call tab. Step 3 Select Contacts on the left. RADVISION | User Guide for SCOPIA XT4000 Series Version 3.0 Managing Calls and Videoconferences | 48... -
Page 54: Contact Information
Search for the contact you want to modify. The contact information is displayed. Figure 7-18 Contact information Step 5 Select Delete number. Step 6 Select Yes to confirm. RADVISION | User Guide for SCOPIA XT4000 Series Version 3.0 Managing Calls and Videoconferences | 49... - Page 55 This document is not part of a contract or license as may be expressly agreed. RADVISION is a registered trademark of RADVISION, Ltd. All product and company names herein may be trademarks of their registered owners. All rights reserved © 2012 RADVISION, Ltd.
Need help?
Do you have a question about the SCOPIA XT4000 Series and is the answer not in the manual?
Questions and answers