
Related Manuals for Lorex LN Series


Summary of Contents for Lorex LN Series
- Page 1 REMOTE SURVEILLANCE INTERNET CAMERA INSTRUCTION MANUAL English Version 3.0 MODELS: LN SERIES www.lorextechnology.com © Copyright 2010 Lorex Technology Inc.
- Page 2 Thank you for purchasing the Lorex Remote Surveillance Internet Easy-Connect Camera. This manual refers to the following models: • LNE1001, LNE1001i: Wired, Easy Connect, Internet Camera • LNE3003, LNE3003i: Wired/Wireless, Day/Night, Easy Connect, Internet Camera • LNZ4001,LNE4001i: Wired/Wireless, Day/Night, Pan/Tilt, Easy Connect, Internet Camera...
- Page 3 Cu s to m e r F e e dba c k i nfo@lorexcorp.c om By Phone: NORTH AMERICA: CUSTOMER SERVICE: 1-888-425-6739 (1-888-42-LOREX) TECH SUPPORT: 1-877-755-6739 (1-877-75-LOREX) MEXICO: 1-866-427-6739 INTERNATIONAL: +800-425-6739-0 (E xa mple: Fro m the U K, dia l 00 in s t ea d of + )
- Page 4 Por Teléfono: Par Téléphone: L’AMÉRIQUE DU NORD: NORTE AMÉRICA: ATENCIÓN AL CLIENTE: 1-888-425-6739 (1-888-42-LOREX) SERVICE À LA CLIENTÈLE: 1-888-425-6739 (1-888-42-LOREX) SUPPORT TECHNIQUE: 1-877-755-6739 (1-877-75-LOREX) SOPORTE TÉCNICO: 1-877-755-6739 (1-877-75-LOREX) MEXICO: 1-866-427-6739 MEXICO: 1-866-427-6739 INTERNACIONAL: +800-425-6739-0 INTERNATIONAL: +800-425-6739-0 (Exemple: À partir du Royaume-Uni, composez 00 au lieu de +)
- Page 5 B E F O R E Y O U S TA R T THIS PRODUCT MAY REQUIRE PROFESSIONAL INSTALLATION LOREX IS COMMITTED TO FULFILLING YOUR SECURITY NEEDS • We have developed user friendly products and documentation. Please read the Quick Start Guide and User Manual before you install this product.
- Page 6 ESTE PRODUCTO PUEDE EXIGIR UNA CE PRODUIT POURRAIT EXIGER UNE INSTALACIÓN PROFESIONAL INSTALLATION PROFESSIONNELLE LOREX S’ENGAGE À SATISFAIRE LOREX SE COMPROMETE A SATISFACER VOS BESOINS SÉCURITAIRES SUS NECESIDADES EN SEGURIDAD • Veuillez lire le guide de démarrage rapide et le •...
-
Page 7: Important Safeguards
Important Safeguards In addition to the careful attention devoted to quality standards in the manufacturing process of your video product, safety is a major factor in the design of every instrument. However, safety is your responsibility too. This sheet lists important information that will help to assure your enjoyment and proper use of the video product and accessory equipment. - Page 8 Service 13. Servicing - Do not attempt to service this video 19. Cleaning - Unplug the video product from the wall equipment yourself as opening or removing covers outlet before cleaning. Do not use liquid cleaners or may expose you to dangerous voltage or other aerosol cleaners.
- Page 9 General Precautions 1. All warnings and instructions in this manual should be followed. 2. Remove the plug from the outlet before cleaning. Do not use liquid aerosol detergents. Use a water dampened cloth for cleaning. 3. Do not use this unit in humid or wet places. 4.
-
Page 10: Important Note
INDUSTRY CANADA STATEMENT This device complies with RSS-210 of the Industry Canada Rules. Operation is subject to the following two conditions: 1. This device may not cause interference. 2. This device must accept any interference, including interference that may cause undesired operation of the device. - Page 11 • 6 channel surveillance application for real time viewing and recording • Free LOREX DDNS included for remote connection • Secure web management connectivity (password protected) • Professional grade camera (HTTP event – camera can trigger or be triggered by other LOREX camera) ®...
- Page 12 • Motion event triggers e-mail notification with JPEG image attachment • Two-way audio via integrated microphone and external speakers (not included) • 6 channel surveillance application for real time viewing and recording • Free LOREX DDNS included for guaranteed connection • Secure web management User/Password protection ®...
- Page 13 Windows Vista is a registered trademark of Microsoft Corporation. iPhone and iPod touch are registered trademarks of Apple, Inc. Other trademarks are the property of Lorex Technology Inc. We reserve the right to change models, configurations or specifications without notice or liability. Product may not be exactly as shown.
-
Page 15: Table Of Contents
TABLE OF CONTENTS Getting Started ..........1 System Requirements . - Page 16 Using Lorex Live 2 / Lorex iMobile ........
- Page 17 Uninstalling DigiConsole ........50 Recording Live Video .
- Page 18 Remote Access ............74 Yoics Instant Networking .
- Page 19 Scearnio B: Multiple Routers ..............102 Example .
-
Page 21: Getting Started
GETTING STARTED The system comes with the following components: LNE1001 LNE3003 LNZ4001 POWER SUPPLY POWER SUPPLY POWER SUPPLY ETHERNET CABLE ETHERNET CABLE ETHERNET CABLE MOUNTING WIRELESS MOUNTING STAND WIRELESS MOUNTING ANTENNA STAND ANTENNA BRACKET MOUNTING KIT MOUNTING KIT MOUNTING KIT QUICKSTART GUIDE QUICKSTART GUIDE QUICKSTART GUIDE... -
Page 22: System Requirements
SYSTEM REQUIREMENTS For setup and viewing, the camera requires the following: • PC running Windows XP/Vista / 7 • Mac OSX 10.4 or later (Viewing only) • Pentium 4 2.4 Ghz or above processor • 1 GB of memory • Internet connection •... -
Page 23: Camera Overview
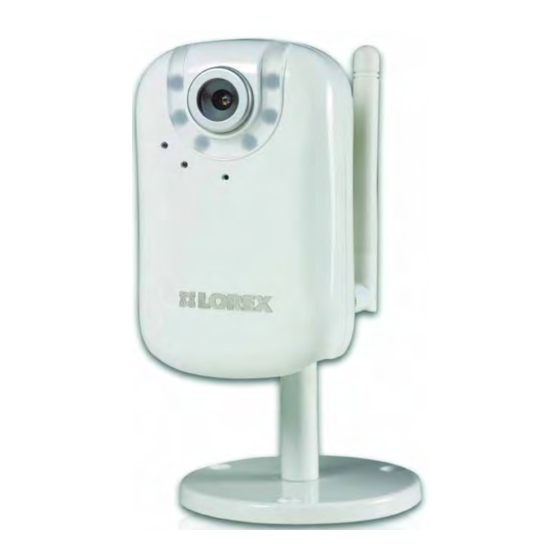
CAMERA OVERVIEW LNE1001 Wired, Easy-Connect Internet Camera 1. Focus: Manually adjust the focus ring to sharpen the image. 2. Lens: 1/4" lens with a CMOS image sensor. 3. Power LED Indicator: Lights up solid blue when camera is powered on. 4. -
Page 24: Lne3003 Wired/Wireless, Day/Night, East-Connect Internet Camera
Camera Overview LNE3003 Wired/Wireless, Day/Night, East-Connect Internet Camera 1. Focus: Manually adjust the focus ring to sharpen the image. 2. Lens: 1/4" lens with a CMOS image sensor. 3. Power LED Indicator: Lights up solid blue when camera is powered on. 4. -
Page 25: Lnz4001 Wired/Wireless, Day/Night, Pan/Tilt, Easy-Connect Internet Camera
Camera Overview LNZ4001 Wired/Wireless, Day/Night, Pan/Tilt, Easy-Connect Internet Camera 1. Network Indicator: Pulses blue during network access. 2. Power LED Indicator: Lights up solid blue when camera is powered on. 3. Microphone: Built-in microphone for listen-in audio over the network. 4. -
Page 26: Rear Panel
REAR PANEL LNE1001 1. Speaker: 3.5 mm audio port for external speakers or other audio devices (not included). 2. Reset: Using a paper-clip, hold for 10 seconds to reset the camera to its default configuration. 3. LAN: Network port. Connect one end of the included network cable to this port, and then connect the other end of the network cable to a network router, switch, or active wall port. -
Page 27: Lnz4001
Rear Panel LNZ4001 1. Antenna Connection (SMA): Connect the wireless antenna—angle at 90°, 180°; rotate 360°. 2. 12VDC: Connect the 12V DC power adapter. 3. Reset: Using a paper-clip, hold for 10 seconds to reset the camera to its default configuration. -
Page 28: Setting Up The Camera
SETTING UP THE CAMERA Basic setup for your network camera. NOTE: Pedestal assembly refers to LNE1001 and LNE3003 series only To set up the camera: 1. Attach the stand to the base 2. Attach the mounting bracket to the stand. 3. -
Page 29: Positioning The Camera
POSITIONING THE CAMERA Before you install the camera, carefully plan where and how it will be positioned. Installation Warnings • Select a location for the camera that provides a clear view of the area you want to monitor, which is free from dust, and is not in line-of-sight to a strong light source or direct sunlight. •... -
Page 30: Mounting The Camera
MOUNTING THE CAMERA The camera can be mounted to walls, ceilings, desks, tables, or other flat surfaces. To mount the camera to a wall or ceiling: 1. Select a location for the camera. Make sure you are able to drive screws into the surface. If necessary, use the mounting bracket/pedestal to mark holes for drilling. -
Page 31: Connecting The Camera
CONNECTING THE CAMERA With the camera assembled, you can now connect the power and network cables. To connect the camera: 1. Connect the included Ethernet cable to the Ethernet port on the rear panel of the camera. 2. Connect the other end of the Ethernet cable to a network router, switch, or active wall port. NOTE: For a wireless connection, the camera only needs to be wired to your network for initial setup and configuration. -
Page 32: Configuring The Camera
CONFIGURING THE CAMERA With the camera setup and connected, you can now set up local viewing, remote viewing, and wireless connectivity. : Before starting the installation, please ensure your computer is connected to the ATTENTION same local network as the camera and has access to the Internet. NOTE: It is recommended to install the camera when your computer is wired to the local network. -
Page 33: Finding Your Camera As An Upnp Device (Optional)
Configuring the Camera 3. Click Find to discover Lorex cameras on your network. Figure 4.1 Select your camera from the list of devices DigiViewer 4. Double-click the selected camera to launch in your default browser. 5. At the prompt, enter your user name and password (by default, admin / admin). For details on local viewing, see see “Setting Up Local Viewing”... -
Page 34: Viewing Your Camera Using A Mac
Configuring the Camera Viewing Your Camera Using a Mac If you are using one of the Lorex network cameras with a Mac, you can view your camera using the Safari web browser. NOTE: If using a Mac, you will not be able to record live video directly to your Mac. -
Page 35: Using The Camera
USING THE CAMERA DigiViewer DigiConsole helps you setup and configure your camera. You will use for viewing, playback, and further camera configurations. NOTE: For complete details on DigiViewer functions, see “DigiViewer” on page 53. About DigiViewer DigiViewer is a browser-based remote surveillance software that lets you view, playback, record, and configure your network camera from a remote location. -
Page 36: Setting Up Local Viewing
Using The Camera Setting Up Local Viewing With your camera now detected by DigiConsole, you can begin to view live images from your camera on your local network. When using Internet Explorer, you need to install ActiveX in order for DigiViewer to run properly; other supported browsers will require QuickTime. To setup local viewing: 1. -
Page 37: Adjusting Focus
Using The Camera Adjusting Focus You can manually adjust the focus of the camera. NOTE: Make sure the camera is powered on and connected to a network before attempting to adjust the focus. NOTE: Please remove the clear vinyl cling over the lens before using the camera. -
Page 38: Controlling Ptz
CONTROLLING PTZ LNZ4001 ATTENTION: This section applies to LNZ4001 Series cameras only. To use PTZ (Pan, Tilt, Zoom) functions: 1. Open DigiViewer in your default browser. 2. Log in to your camera using your user name and password (by default, admin / admin). 3. - Page 39 Controlling PTZ 4. Click SET to open the Preset/Patrol Control pane. 1. Set (Preset): Enter a preset number for the current position of the camera (i.e. Preset 1). 2. Preset Go: Open the list of presets. 3. Set (Patrol): Open the list of tours. 4.
-
Page 40: Presets, Tours, And Patrols
Controlling PTZ Presets, Tours, and Patrols Preset, Tour, and Patrol are advanced features of a PTZ Internet camera. You can use DigiViewer to access and customized these advanced features. A: Setting Presets To set Presets: 1. Use the navigation arrows to position the camera at point where you want to patrol. •... -
Page 41: B: Customizing Tours
Controlling PTZ B: Customizing Tours To customize a tour: 1. From Digiviewer, click Events and then click Patrol. 2. Select a Tour Number (e.g. Tour1). 3. Under Tour Position, click the Order drop-down menu and select an Order number (first will be the default position). - Page 42 Controlling PTZ 6. Repeat the order and position selection until you have completed the tour (each tour can have up to eight preset positions). Figure 7.9 Tour positions—Tour position 1 appears as Preset Position 1 in the list (default). Tour position 5 appears as Preset Position 5 in the list.
-
Page 43: C: Using Patrols
Controlling PTZ C: Using Patrols Use the saved tour data to set an automatic patrol for the PTZ network camera. To set a patrol: 1. From the DigiViewer main menu, click Surveillance and then click Figure 7.10 Click Surveillance to return to live viewing and click "Play." 2. -
Page 44: Using Yoics
1. From DigiViewer, click Settings and then click Remote Access. 2. Under Yoics Instant Networking, click Register this camera. Ensure the checkbox beside "Enable Yoics Remote Access & Sharing" is selected. The Lorex Remote Viewing page opens (http://lorex.yoics.com). Figure 8.0 DigiViewer settings / registering with Yoics 3. -
Page 45: Registering Your Camera
2. From the Lorex pop-up, click Continue. The Register New Devices page opens. NOTE: Please watch for Yoics pop ups; if the pop up is does not include the LOREX logo, you can click Remind Me Later to continue with the setup. - Page 46 Using Yoics 4. Your camera and will appear under "My Stuff / Cameras / [camera name]." TIP! If your camera does not appear in the under “My Stuff,” press F5 on your keyboard to refresh the page. Figure 8.4 Completed registration NOTE: For complete details on registering with Yoics and information on resetting or deleting services, see “Appendix K: Registering, Removing, and Resetting Yoics Services”...
-
Page 47: Removing A Camera From Yoics
Yoics website. Next, you must reset Yoics within the camera. Step 1 of 2: To remove a camera from the Yoics service: 1. Log in to your Yoics account at http://lorex.yoics.com. 2. Under "My Stuff", click ( ) beside the name of your camera. - Page 48 Look at the 7th and 8th number of the Mac address. The smaller value will be the wired address. The larger value will be the wireless address. This applies to Lorex LN series cameras only. The wired and wireless Mac address is also printed on a sticker that is affixed to the camera.
-
Page 49: Remote Viewing Using A Web Browser
(www.apple.com/quicktime/download). NOTE: If you have an external (WAN) static IP address or you have registered with the free LOREX DDNS service, you can configure your router to port-forward the incoming Internet connections to the camera. -
Page 50: Setting Up Wireless Connectivity
Setting Up Wireless Connectivity ATTENTION: This section is applicable to wireless camera models only ATTENTION: The cameras are B/G wireless devices. N wireless routers must be in "mixed B &G" mode (not in N mode) to detect the camera. Prerequisite: Set up the camera through a wired connection. For details, see “Configuring the Camera”... -
Page 51: Remote Viewing Using Msn Messenger
Remote Viewing Using MSN Messenger REMOTE VIEWING USING MSN MESSENGER Your Easy-Connect Remote Surveillance Internet Camera can be accessed remotely using MSN’s Windows Live Messenger™. Remote Viewing through Messenger involves first creating an MSN/ Windows Live account for the camera, configuring your camera in DigiViewer, and adding the camera as an MSN/Windows Live contact in Messenger. -
Page 52: Configuring Msn Messenger On Your Camera
Remote Viewing Using MSN Messenger Configuring MSN Messenger on Your Camera Once you have registered a new MSN account for your camera, you need to configure your camera’s network settings to allow you to access it remotely using Messenger. Figure 9.2 Enter the MSN address of the camera along with the MSN addresses of allowed users To configure Messenger on your camera: 1. -
Page 53: Configuring Msn Messenger
Remote Viewing Using MSN Messenger Configuring MSN Messenger With your camera configured for MSN in DigiViewer, you can add the camera’s MSN address as one of your contacts in Windows Live Messenger. To configure Windows Live Messenger: 1. On your PC, open Messenger >... -
Page 54: Can't See The Video
Remote Viewing Using MSN Messenger 5. Click the web-cam icon in the top-left corner of the profile window and select View this contact’s webcam. After a few moments you will be viewing live video from your camera. Figure 9.5 Click the prompt to view the profile Figure 9.6 View the contact’s webcam to see live video from your camera (image simulated) Can’t See the Video? •... -
Page 55: Remote Viewing Using Iphone, Ipod Touch & Ipad
Compatible cameras • Lorex LNE1001, LNE3003, and LNZ4001 The iPhone, iPod Touch and iPad are capable of remotely viewing the LN series cameras. To do this, you will need to download an App onto your device. • iPhone, iPod Touch Users must download the Lorex Live 2 App from the App store. -
Page 56: Adding A Camera
Starting Lorex Live 2 / Lorex iMobile • Touch the Lorex Live 2 icon to run the application. Adding a Camera After registering for Lorex DDNS, you can add a Lorex LN Series Network Camera to Lorex Live Mobile. To add a camera: 1. -
Page 57: Full Screen View
Remote Viewing Using iPhone, iPod touch & iPad Full Screen View • While in Single-Channel view, rotate your iPhone sideways to change landscape orientation. Flip View • While in Single-Channel view, tap at the bottom of the screen. The image flips vertically. Mirror View •... -
Page 58: Advanced Controls
Advanced Controls Controlling Multiple Cameras If you have added several cameras (up to 8) to Lorex Live 2/ Lorex iMobile, you can take advantage of the split-screen and scroll views built into the application. Attention: Video streaming speed is dependant on your Wifi / 3G connection on your device. -
Page 59: Pan/Tilt Controls
Pan/Tilt controls. your camera's instruction manual for more information. Advanced Settings Use the advanced settings of Lorex Live 2 / Lorex iMobile to adjust the image stream and ports of your connected cameras. These settings are recommended for advanced users only. -
Page 60: Changing Streaming Protocols (Advanced)
If you decide to change streaming types (i.e Jpeg to Mjpeg), you must apply the changes within the Lorex Live 2/ Lorex iMobile application AND within the camera. The image streaming types MUST BE THE SAME on the camera and in the Lorex Live 2/ Lorex iMobile application. -
Page 61: Troubleshooting
Why do I not see Pan/Tilt in Single Channel view? A: You must have a Pan/Tilt camera - such as the LNZ4001 - connected to Lorex Live 2 in order to see the "Pan/Tilt" button in the single camera view interface. - Page 62 Remote Viewing Using iPhone, iPod touch & iPad...
-
Page 63: Digiconsole
DIGICONSOLE About DigiConsole DigiConsole is a discovery tool that lets you find Internet cameras on your local network. System Requirements The DigiConsole software (included with the IP device) has the following installation requirements: Description Requirement ® Pentium 4 2.4 GHz or above ®... -
Page 64: Using Digiconsole
Figure 10.1 DigiConsole functions • HOME: Main screen with links to software documentation and product information • FIND: Locates all IP products on your network • REGISTER: Lorex registration and Warranty information • INSTALL: Installs DigiConsole to the local PC for easy access... -
Page 65: Find
Firewall windows. Figure 11.0 Find Menu The Find menu lets you discover Lorex IP devices on your network. Click Find to discover connected Lorex Internet cameras on your network. NOTE: An IP device must be connected and networked to view live images. You may need to click Find several times to locate the device. -
Page 66: View Live Image
Using DigiConsole View Live Image NOTE: You must install DigiConsole to your PC in order to view live video in DigiConsole. View Live Image displays live video from the IP device in DigiConsole. To view live streaming video in DigiConsole: •... -
Page 67: Live Video Options
Using DigiConsole Live Video Options NOTE: You must install DigiConsole to your PC in order to view live video in DigiConsole. With live video playing in DigiConsole, you can access more options for the IP device. To view more options, right-click the selected device and choose any of the following: •... -
Page 68: Enable Microphone
Register Click Register for information on how to register your camera for Lorex’s FREE DDNS service; For more details, warranty information is also displayed. see “Appendix F: Setting Up DDNS Service”... -
Page 69: Installing Digiconsole
INSTALLING DIGICONSOLE You can run DigiConsole from the software CD included with your product. However, you can also choose to install DigiConsole to your PC. Installing DigiConsole allows you to record and playback live video. NOTE: Mac installation is not supported. NOTE: External programs and components will be installed during the DigiConsole... -
Page 70: Uninstalling Digiconsole
UNINSTALLING DIGICONSOLE To uninstall DigiConsole: > > > 1. Select Start Settings Control Panel Add or Remove Programs. 2. From the Add or Remove Programs list, select DigiConsole and click Change/Remove. Figure 13.0 DigiConsole Uninstaller window 3. In the DigiConsole Uninstaller window, click OK. NOTE: Your data files and recorded files are not removed when uninstalling DigiConsole. -
Page 71: Recording Live Video
RECORDING LIVE VIDEO With DigiConsole installed on your PC, you have the option to record and playback live video. NOTE: Recording does not include audio. Figure 14.0 Recording live video To record live video: 1. Click Find, and select your camera from the list of devices. 2. -
Page 72: Playing Recorded Video
PLAYING RECORDED VIDEO Once you have recorded live video, you can access the video from DigiConsole. NOTE: You must have DigiConsole installed on your PC in order to record and playback live video. NOTE: Playback in Windows Media Player requires the Xvid codec. A link to Xvid can be found on the Home page of DigiConsole. -
Page 73: Digiviewer
DIGIVIEWER About DigiViewer DigiViewer software is a browser-based application that lets you view live video, control, and configure IP devices on your network from a compatible Web browser. NOTE: DigiViewer is not installed to the local PC. System Requirements Description Requirement ®... -
Page 74: Opening Digiviewer
OPENING DIGIVIEWER You can open DigiViewer by two methods: from DigiConsole or from a Web browser. For initial use, we recommend opening DigiViewer through DigiConsole. Figure 16.0 DigiViewer main screen To open DigiViewer: DigiConsole 1. Launch DigiConsole from the software CD included with your product (or from the Desktop or Start Menu if installed on your local PC). -
Page 75: Surveillance
SURVEILLANCE DigiViewer streams live video in Surveillance mode. If you select other DigiViewer options, such as Settings or Events, click Surveillance to return to live viewing. The DigiViewer main window consists of a main menu on the left panel, live video image, and advanced controls toolbar. -
Page 76: Main Menu
Surveillance Main Menu The Main Menu consists of the following: • Surveillance: Live Viewing; always click Surveillance to return to Live Viewing • Events: Configuration settings for Motion Detection • Settings: Configuration settings for the IP Device • System Log: View the list of events, actions, operations of DigiViewer •... -
Page 77: Advanced Controls Toolbar
Surveillance Advanced Controls Toolbar Click to activate Advanced Controls at the bottom of the main window: Channel Display View Single-Screen, Quad, and Six-channel displays. Click to view Full-Screen. Click to change channels automatically in Sequence mode. Control movement and presets of a PTZ camera. For more details, see “Controlling PTZ”... -
Page 78: Recording Video (Pc Only, Using Internet Explorer)
Recording Video (PC only, using Internet Explorer) To record video: 1. Click the (Record) button. • A Browse for Folder window opens. NOTE: If you have configured a camera setting, you must press the (Play) button before pressing the Record button. Browse for Folder window The Record button turns red during recording. -
Page 79: Adding Digiviewer As A Trusted Site
Surveillance Adding Digiviewer as a Trusted Site If you cannot see the recorded folder on your computer, you may have to add Digiviewer to a "Trusted Sites" list in Internet Explorer. After adding Digiviewer to the Trusted Sites list, you will be able to view the recorded file on your computer. - Page 80 Surveillance • The Trusted Sites window opens. 4. Click Add and then click Close to add the website. 5. Close Internet Explorer, and re-login to your camera. After you have added the Digiviewer address into Internet Explorer’s "Trusted Site" list, you will be able to see the recorded videos on your computer.
-
Page 81: Events
Events EVENTS Use the Events menu to configure options and settings for Motion Events, HTTP Events, PTZ options, and Alarm input/output. NOTE: PTZ and alarm input/output is applicable to LNZ4001 Series models only To open the Event menu: • Click Events in the DigiViewer main window. Figure 18.0 Events menu (by default, Motion Events menu) Motion Events Use the Motion Events menu to configure motion detection and email notification. -
Page 82: Http Events
Events NOTE: Check the FTP box to send the snapshot image to an FTP server. Enter the filename prefix in the text field. Your FTP server needs to be setup separately. Enter the FTP server login information in > > Network Recorder Server Settings Network Services... -
Page 83: Discovery
(Universal Plug and Play). By default, Bonjour and UPnP are enabled on the camera. If you are using one of the Lorex network cameras with a Mac, Bonjour will allow you to connect to your camera using DigiViewer in Safari. For details on detecting and viewing your camera using a Mac, see “Viewing Your Camera Using a Mac”... -
Page 84: Preset
Events Preset only ATTENTION: This section is applicable to LNZ4001 camera models Use the Preset menu to configure up to 32 presets on a PTZ Internet camera. NOTE: You must have at least one saved preset on the camera in order to use the Preset menu. For details on setting presets, see “Events”... -
Page 85: Home Position
Events Home Position The Home Position is the position that the camera will automatically take when the camera is powered on. To set the Home Position: 1. Enter a preset from the list in the Preset Pos. Name field. 2. Select the box beside Home and click Set. The new Home Position will appear in the Home Pos. -
Page 86: Patrol Control
Patrol Control You can set up to four patrol tours composed of up to eight preset positions. The camera will move to the programmed positions sequentially. Figure 18.5 Patrol Control menu To set a patrol tour: 1. Select a Tour Number (e.g. Tour1). 2. -
Page 87: Alarm Input/Output
Events Alarm Input/Output ATTENTION: This section is applicable to LNZ4001 camera models only Configure Alarm Input settings for an external alarm/sensor (not included) and Alarm Output settings for an external alarm light/siren (not included). Alarm Input To configure alarm input settings: 1. -
Page 88: Alarm Output
Events Alarm Output To configure alarm output settings: 1. Connect an external alarm, such as light or siren, to the two right ports of the alarm block on the rear panel of the camera. > 2. Open DigiViewer and click Events Alarm SIREN Input/Output. -
Page 89: Settings
Settings SETTINGS The Settings Screen controls the options and configurations for the camera. To open the Settings menu: • Click Settings in the DigiViewer main window Figure 19.0 Settings menu The Settings menu consists of the following options (click to open the related sub-menu): •... -
Page 90: Preferences
Settings Preferences Open the Preferences sub-menu to view network information for your device, as well as settings for the on-screen display and lighting. Figure 19.1 Preferences menu Device Description The Device Description menu lists the following important information about your camera: •... -
Page 91: Lighting
Settings Lighting To configure lighting settings: 1. Under Illuminator control, select AUTO, ON, or OFF from the drop-down menu. This option control the night vision LEDs around the lens. By default, the camera is set to Auto. 2. Under Mode, select Outdoor, Indoor 50 Hz, or Indoor 60 Hz. This option controls the mode of the night vision LEDs. -
Page 92: System Clock
Settings System Clock You may need to change the time zone depending on your region, and daylight savings (DST) settings. You must manually configure your camera when your daylight savings settings change. To configure the system clock: 1. Select the box to enable/disable Network Time Protocol (NTP). NTP automatically sets the system clock using a Network Time Server. -
Page 93: Network Configuration
RTSP port. You MUST forward (open) the new ports on your router. For more details, see “Appendix D: Router Port Forwarding” on page 96. Use the Lorex Auto Port Forwarding Wizard to simplify the port forwarding process. For details, see “Appendix E: Auto Port Forwarding Wizard” on page 97. -
Page 94: Remote Access
Settings Remote Access Use the Remote Access Menu to configure remote viewing settings for your device through Yoics, MSN, or Lorex DDNS. To open the Remote Access menu: > • Click Settings Remote Access Figure 21.0 Remote Access menu Yoics Instant Networking By default, your Internet camera is enabled with Yoics Easy-Connect Remote Viewing. -
Page 95: Msn Messenger
Dynamic DNS You can also access your camera remotely using Lorex’s free DDNS service. NOTE: If you have yet registered for Lorex DDNS, click Register with DDNS Service at the bottom of the Remote Access screen. Port forward ports 80, 554, 8070 before configuring Dynamic DNS (DDNS) settings. -
Page 96: Network Services
If using Lorex DDNS, go to step 4. If using your own email server, go to step 2. 2. Under SMTP Server, enter the SMTP server address for the outgoing email account. -
Page 97: Network Recorder Server
Settings Network Recorder Server NOTE: This section is for advanced user. Knowledge of FTP servers is required. NOTE: Your FTP server must be set up separately. You can also send snapshots of triggered events to an FTP server. To create a folder, insert a back slash "... -
Page 98: Accounts
Settings Accounts Use the Accounts Menu to control user accounts and access to the camera. There are three user authorities on the camera: • Admin: Unrestricted access to the device including all settings and options; default user name and password: admin/admin •... -
Page 99: General User Accounts
Settings General User Accounts The General user has limited access to the settings of the server. You can only create five General User accounts. To configure general user options: 1. Under User Name, enter the new name for [General User 1]. 2. -
Page 100: Wireless
• Name Server 1 & 2: The external IP address of the Name Server. The Name Server is a machine on a network that enables a hostname to be resolved into an IP address. (i.e. www.lorex.com translates to IP Address 207.97.199.227) 6. Click Submit Wireless to save your settings. Please allow a few moments for your camera to update. -
Page 101: Channels
Remote Cameras and Video Servers To configure channel options: 1. Under Channel Name, enter a name for the channel. 2. Under Model, select LOREX (default). 3. Under URL or IP Address, enter the IP Address or DDNS domain of the remote/additional camera. -
Page 102: System
System Use the System menu to access Advanced Parameter Settings to perform camera maintenance and firmware upgrades. Figure 26.0 Advanced Parameters menu—Maintenance and upgrades Advanced Parameter Settings The restart your camera: 1. Click Reboot to restart your camera. 2. Wait for 5 seconds, and then close the browser. 3. - Page 103 Settings To backup your camera settings: 1. Under Backup Setting Data, click the Backup button. • A file security window opens. 2. Click Save and then select the directory that you wish to save the "backup" file (default file name is backup).Keep this file in a safe place. To restore your camera settings: Prerequisite: Backup your camera settings (see above).
-
Page 104: Upgrading Firmware
Settings Upgrading Firmware When new firmware becomes available for your product, you can use DigiViewer to upgrade the device. NOTE: Ensure your device is connected to your network prior to performing a firmware upgrade. To upgrade firmware: 1. Visit www.lorextechnology.com and download the latest firmware for your camera from its product page. -
Page 105: System Log
System Log SYSTEM LOG Open the System Log to view all the activity related to the devices on your network. Changes to settings or configurations are listed in the System log. To open the System Log: > • Click Settings System Log Figure 27.0 System Log menu... -
Page 106: Help
Open the Help screen to view support and contact information for DigiViewer. To open the Help screen: > • Click Settings Help Figure 28.0 Help screen The Help menu also displays DigiViewer information, system and software requirements, and a link to contact Lorex Customer Support. -
Page 107: Appendix A: Camera Specifications
APPENDIX A: CAMERA SPECIFICATIONS LNE1001... -
Page 108: Lne3003
Appendix A: Camera Specifications LNE3003... -
Page 109: Lnz4001
Internet Explorer, Firefox, Safari, Google Chrome ©2009 Lorex Technology Inc. As our product is subject to continuous improvement, Lorex Technology & subsidiaries reserve the right to modify product design, specifications & prices without notice and without incurring any obligation. E&OE Lorex Technology Inc. -
Page 110: Appendix B: Adding Cameras
APPENDIX B: ADDING CAMERAS DigiViewer can let you view and control up to six Internet cameras simultaneously. To purchase additional LNE Series Internet cameras, please visit www.lorextechnology.com. Setting up Additional Cameras Following your camera’s quick start guide and instruction manual, set up the additional camera(s). -
Page 111: Port Ranges
Appendix B: Adding Cameras 4. Under Network Configuration, enter a new Web port for the additional camera. By default, the Web port is 80. The new Web port must be different from that of the original camera. For example, change the Web port of the additional camera to 81. Figure 29.2 Change the Web port and streaming video port on your additional camera(s). -
Page 112: Adding Cameras To Digiviewer
DDNS domain of the additional camera in the URL field combined with a new Web port. You will need to register the additional camera for Lorex’s FREE DDNS service prior to entering any DDNS information in the Channels menu. -
Page 113: Viewing Cameras
Appendix B: Adding Cameras Viewing Cameras Once your new cameras have been entered in the Channels menu, you can view them simultaneously in DigiViewer. To view cameras simultaneously: 1. Log in to your original camera using DigiViewer in your default browser. 2. -
Page 114: Appendix C: Network Connectivity
3. Run DigiConsole from the provided software CD (optional installation to PC), and configure DigiViewer to allow DDNS connectivity. For details, see “Appendix F: Setting Up DDNS Service” on page 104. DDNS DDNS Lorex Live 2 App REMOTE COMPUTER iPad iPHONE / iPOD TOUCH INTERNET... -
Page 115: Locating The Ip And Mac Addresses
Appendix C: Network Connectivity Locating the IP and MAC addresses To find your IP and MAC addresses using DigiConsole: 1. Run DigiConsole from the software CD included with the product. 2. From the main menu, click Find to open the list of devices. -
Page 116: Appendix D: Router Port Forwarding
APPENDIX D: ROUTER PORT FORWARDING In order to view the device remotely (over the Internet), follow the steps outlined on the following pages to setup a free DDNS Remote Access account. You will need to enable port forwarding on your router to allow for external communications with your device. -
Page 117: Appendix E: Auto Port Forwarding Wizard
Installation To install the Lorex Auto Port Forwarding Wizard: 1. Insert the system’s software CD, and follow the instructions to launch the Lorex Auto Port Forwarding Wizard software. • The installation window opens. -
Page 118: Obtaining Your Router Model Number And Version
Select the users who can see the software shortcut (optional) 5. Click the Next button and then click Finish to complete the software installation. Finish button 6. Double-click the Lorex Auto Port Forwarding shortcut ( )from your desktop to start the program. -
Page 119: Configuration
2. Your router’s user name and password 3. Your Lorex device’s IP address 4. Your Lorex device’s port numbers that require port forwarding Initial Startup: Select language 1. Click the Language drop-down menu and select a language (English, French, Spanish). Click the Start button to continue. -
Page 120: Step 2: Enter Your Router Settings
Enter port number 4. Under IP, enter the IP address of your Lorex device. • To find your system IP, exit to the main viewing mode, and then press the INFO button on your remote, or press the RETURN button on the front panel of the system. -
Page 121: Step 3: Update The Router Settings
Step 4: Test your connection 1. Click the Test Your Connection button. • Your system’s default browser opens and connects to your Lorex device. NOTE: Ensure that Internet Explorer is your system’s default internet browser. NOTE: You will be prompted to enter your user name and password (do not enter IP device’s... -
Page 122: Scenario A: Router/Modem Combination + Router
Appendix E: Auto Port Forwarding Wizard • The "Possible 1st Router" refers to the router directly connected to your system. This is the router that requires the port forward information. • The "Possible 2nd Router" refers to the router immediate to the internet connection. This is the router that requires you to configure a DMZ host connection. -
Page 123: Example
Configuring a DMZ host connection Example • Connect to "Router 1" on your network (referred DMZ stands for Demilitarized Zone. Enabling a DMZ to as "Possible 1st Router" in the Auto Port IP on your router enables one of the routers to pass Forwarding Wizard). -
Page 124: Appendix F: Setting Up Ddns Service
Appendix F: Setting Up DDNS Service APPENDIX F: SETTING UP DDNS SERVICE Lorex offers a free DDNS server for use with your Internet camera. A DDNS account creates a website address that allows you to access your camera from a remote location. - Page 125 Appendix F: Setting Up DDNS Service You will need this information for remote access to your system. Record your information below: Username: Domain name*: Password: * Only the first part of the Domain Name is required for setup on the system. For tomsmith.lorexddns.net example, if the full domain sent is , you only need to enter...
-
Page 126: Configuring Ddns In Digiviewer
NOTE: If you have not already registered for free Lorex DDNS Service, click at the bottom of the remote access window to go to the Lorex DDNS website. 7. Click System Log. Scroll to the bottom of the log to confirm that DDNS has been successfully... -
Page 127: Appendix G: Connecting Alarm And Motion Devices
Appendix G: Connecting Alarm and Motion Devices APPENDIX G: CONNECTING ALARM AND MOTION DEVICES This section is applicable to LNZ4001 Series models only GROUND OUTPUT INPUT PTZ INTERNET CAMERA SENSOR SIGNAL CABLE ALARM CABLE GROUND CABLE ALARM / SIREN Figure 35.0 Alarm block on rear panel of LNZ4001 cameras You can connect 12V alarm and motion devices to an LNZ4001 Series camera. -
Page 128: Appendix H: Remote Access With Internet Explorer
APPENDIX H: REMOTE ACCESS WITH INTERNET EXPLORER You can access your device from a remote location without using DigiConsole. Figure 36.0 Access your device remotely using Internet Explorer To access your device remotely using Internet Explorer: • Open Internet Explorer, and enter the Local IP address of the camera (i.e. http://192.168.0.104 if inside the Local Network), or the Remote IP address of the camera (i.e. -
Page 129: Internet Explorer Security Warnings
Appendix H: Remote Access with Internet Explorer Internet Explorer Security Warnings Several security warnings may appear (based on your Internet Explorer settings) when launching DigiViewer in Internet Explorer. If not already installed on your system, you need to install ActiveX. You also need to grant DigiViewer and other related components or applications access to the Internet. -
Page 130: Appendix I: Setting Up Http Events
Appendix I: Setting Up HTTP Events APPENDIX I: SETTING UP HTTP EVENTS Your Lorex Internet camera includes an advanced feature that allows you to enable HTTP Events. NOTE: HTTP Events require at least two cameras on the same network. HTTP Event means that if motion is detected, or an alarm is triggered on one camera, an event notification can be sent to another camera. -
Page 131: Entering Http Event Information
Appendix I: Setting Up HTTP Events 4. Click SET to open the Preset/Patrol Control pane. Figure 37.1 Click Set 5. Click Set to save the position as a preset. Entering HTTP Event Information With your preset saved, you must now enter the network information for Camera A as an HTTP Event. -
Page 132: Result
Appendix I: Setting Up HTTP Events Result Camera A will now turn to face Camera B when motion is detected by Camera B. Camera A (LNZ4001) Camera B (LNE3003) DOORWAY Figure 37.3 HTTP Event trigger diagram When Camera B detects motion, such as an intruder, Camera A will immediately turn to face the doorway. -
Page 133: Appendix J: Rebooting, Resetting, And Recalibrating The Camera
Appendix J: Rebooting, Resetting, and Recalibrating the Camera APPENDIX J: REBOOTING, RESETTING, AND RECALIBRATING THE CAMERA If you experience problems or errors with your camera, you may simply need to reset the camera. Your camera features both a software reboot and hardware reset, and can be restored to factory defaults. -
Page 134: Resetting The Camera
Resetting the Camera If you are still experiencing problems with your camera, you can perform a hardware reset. To reset your camera: 1. Make sure the camera is powered on and connected to your network. 2. Using a pin, press and hold the Reset button on the rear panel of the camera for 10~15 seconds. -
Page 135: Appendix K: Registering, Removing, And Resetting Yoics Services
2. From the Lorex pop-up, click Continue. The Register New Devices page opens. NOTE: Please watch for Yoics pop ups; if the pop up is does not include the LOREX logo, you can click Remind Me Later to continue with the setup. - Page 136 Appendix K: Registering, Removing, and Resetting Yoics Services 3. To register the camera for Video Stream Service, enter a name for the camera in the Yoics Device Name text field and click Register Now. Video Stream will both be registered to your camera under "My Stuff."...
- Page 137 Appendix K: Registering, Removing, and Resetting Yoics Services 5. Enter a name for the camera in the Yoics Device name field and click Register Now. Figure 39.3 Register for Camera Viewer service Both Video Stream and Camera Viewer services are now registered to your camera and will appear under under "My Stuff."...
-
Page 138: Removing Yoics Services
Appendix K: Registering, Removing, and Resetting Yoics Services Removing Yoics Services If desired, you can remove Yoics services (Video Stream, Camera Viewer) from your camera. To remove Yoics services: 1. Log in to the Yoics website using your Yoics ID and password. 2. -
Page 139: Removing Services Using Digiviewer
Appendix K: Registering, Removing, and Resetting Yoics Services Removing Services Using DigiViewer You can also remove all Yoics services registered to your camera using DigiViewer. To remove Yoics servics using DigiViewer: 1. Log in to the camera through Digiconsole, or click on Start>Network (on Windows Vista/7), and double-click the name of your camera. -
Page 140: Troubleshooting Camera Registration
Appendix K: Registering, Removing, and Resetting Yoics Services Troubleshooting Camera Registration If you still cannot see your camera after registering for Yoics services, use the Unregister and Enable check mark to retry renewing the connection to registration. 1. Open DigiViewer in your default browser using DigiConsole or through the camera’s IP address/DDNS domain name. - Page 143 CONNECT . PROTECT Enhance your security with genuine Lorex Cameras, Digital Video Recorders, Integrated Systems and Accessories. Order whatever you need at www.lorextechnology.com or call 1-888-42-LOREX (1-888-425-6739) Warehouse Office Restaurant Convenience Store CVC6998HR LNZ4001 LW2100 VQ1536HR PROTECT EVERYTHING Day Care...
Need help?
Do you have a question about the LN Series and is the answer not in the manual?
Questions and answers