Table of Contents
Troubleshooting

Related Manuals for Classe Audio CP-800


Summary of Contents for Classe Audio CP-800
- Page 1 Owner’s Manual CP-800 Stereo Preamp/Processor...
- Page 2 NOTICE All of us at Classé take extreme care to ensure that your purchase will remain a prized investment. We are proud to inform you that all Classé components have been officially approved for the European Community (CE) mark. This means that your Classé product was subjected to the most rigorous manufacturing and safety tests in the world. The CE mark certifies that your purchase meets or exceeds all European Community requirements for manufacturing consistency and consumer safety.
- Page 3 Important Safety Instructions Read these instructions. Keep these instructions. Heed all warnings. Follow all instructions. Do not use this apparatus near water. Clean only with dry cloth. 7. Do not block any ventilation openings. Install in accordance with the manufacturer’s instructions. Do not install near any heat sources such as radiators, heat registers, stoves, or other apparatus (including amplifiers) that produce heat.
-
Page 4: Table Of Contents
................7 room equalization and speaker control .............7 flexible GUI ....................7 extraordinary longevity ................7 Unpacking and Placement ................8 unpacking your CP-800 ................8 CP-800 placement considerations .............8 warm-up/break-in period ................9 operating voltage ..................9 Front Panel .....................10 Rear Panel ......................13 serial number .................. - Page 5 CAN-Bus ....................37 features ....................37 hardware setup ..................37 using CAN-Bus ..................39 CAN-Bus shared features ............... 39 configuration ..................39 operate ....................39 AC status ....................40 status ...................... 40 name ...................... 40 global brightness ..................40 global standby ..................40 CAN-Bus model-specific features ............
-
Page 6: Introduction
Introduction Welcome to the Classé family! Congratulations on your purchase of the Classé CP-800, a next-generation stereo preamp/processor with reference-quality performance. We are sure that you will enjoy it for many years to come. Classé values its relationships with our customers and intend on supplying the highest level of support along with our product. -
Page 7: Exceptional Design Features
The CP-800 features a system of filters which, in the hands of an experienced acoustician, can help optimize the performance of your system. -
Page 8: Unpacking And Placement
Unpacking and Placement We have taken all precautions, and made every effort to make the CP-800 simple and straightforward to install and use. Still, we recommend that you take a few minutes to review this manual. Even if you are having the preamp/ processor professionally installed, you will want to know how to efficiently operate it to its potential. -
Page 9: Warm-Up/Break-In Period
AC power. Make certain that the CP-800 is in Standby prior to disconnecting it. Physically disconnect any and all valuable electronics from AC power during electrical storms. -
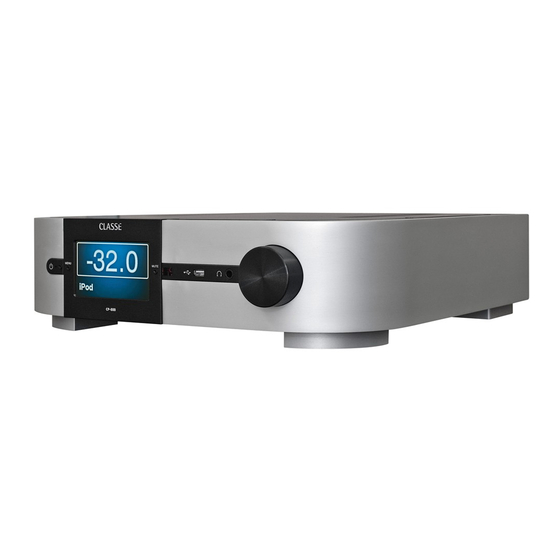
Page 10: Front Panel
MUTE CP-800 Front Panel The front panel of the CP-800 is shown above. The numbers in the drawing refer to the descriptions that follow. Standby/On Button and Status Indicator LED Pressing the Standby button puts the CP-800 into standby mode – a... - Page 11 When updates are posted in the software downloads section of the Classé web site, they may be loaded onto a USB stick and plugged into the front panel of the CP-800. When the power is switched on from the rear panel, the update will proceed automatically. Near the end of the update you will be asked to touch the screen in three identified locations for touchscreen calibration.
- Page 12 Volume Control Knob The large rotary knob on the right side of the front panel controls the system volume level. It is also used for adjustments such as balance and input offset. he volume knob increases and decreases volume in precise 0.5 dB increments throughout most of the volume range.
-
Page 13: Rear Panel
MAIN L AUX2 AUX1 Rear Panel The rear panel of the CP-800 is shown above. The numbers in the drawing refer to the descriptions in this section. serial number You’ll find your CP-800 serial number on the top right corner of the rear panel, as shown in the graphic above. Please record this number for future reference. - Page 14 TOSlink™ connections to a maximum rate of 96 kHz. Analog Audio Inputs - Single-Ended The CP-800 supports 3pr of RCA type connectors for single-ended analog sources. They are labeled R1/L1 to R3/L3. NOTE: An optional phono stage may be installed inside the CP- 800.
- Page 15 CP-800 is installed in a cabinet. Attach this input to an infrared repeater system to route signals from the remote control to the CP-800 via a mono mini-jack (3.5mm phono). The list of available IR command codes can also be used in macros for sophisticated remote control systems, facilitating the control of the CP-800 in the larger context of the complete system.
-
Page 16: Analog Outputs
12 Analog Outputs The CP-800 supports five analog audio outputs, with both balanced (XLR) and single-ended (RCA) connections. Connect the Main R and Main L outputs to the Right and Left amplifier channels respectively. The Aux 1 and 2 outputs are configurable and can be used for the following purposes: • Assigned to mirror the main L/R speakers for use in a power... -
Page 17: The Remote Control
Preamp/Processor itself and several aspects of the rest of a Classé-based system. The buttons are arranged in logical groups according to their functions. The remote control of the CP-800 is shown on the left. The numbers in the drawing refer to the descriptions that follow. - Page 18 Remote Fkeys description in the Menu System section found later in the manual for more information. Note: You may also remotely control the CP-800 by connecting it to a Network and using the Classé App, available free of charge in the Apple App store. The Classé...
-
Page 19: Initial Setup
However, if you can’t wait to get started, this section is designed to assist you in setting up and becoming familiar with the CP-800 hardware. Once the initial setup is complete, be sure to read the rest of this manual to familiarize yourself with the daily operation and customizable features of your CP-800. - Page 20 An Installation Worksheet is included at the end of this manual to assist you. NOTE: In the CP-800 default settings, sixteen rear panel inputs are associated with corresponding source selections within the Source Setup menu. Since most users will have fewer sources connected, the Source Selection page(s) can be simplified by unchecking the Enable Source box for each unused input.
- Page 21 CP-800. The CP-800 also provides two Auxiliary analog audio outputs. See the section on Configuration Setup for more details about the Auxiliary outputs. If used, connect the AUX output(s) to its corresponding amplifier(s) or subwoofer.
-
Page 22: Using The Cp-800
If more are enabled, they will be available on the next page by touching the button in the upper right corner of the page. See the section on source setup in the Menu System. The CP-800 has up to 18 selectable source buttons which are all interchangeable. - Page 23 (and you have more than nine source buttons enabled), press the button for the next page of sources. Or, press the button to return to the previous page. The CP-800 comes from the factory with sixteen source buttons labeled and enabled. To change the default settings and labels or to disable unused buttons, see the Menu System.
-
Page 24: The Menu System
The comprehensive menu system provides setup and configuration controls for the CP-800. These installation-specific features let you customize how the CP-800 works within the context of your particular system. Changes are made on-the-fly, which allows you to quickly set up and modify settings without constantly being asked if you’re sure you want to make the change and pressing... -
Page 25: Source Setup
• teach IR commands Source Setup Each of the 18 source buttons supported by your CP-800 can be customized in several ways to enhance system performance or to simplify operation. The source select page is dynamic in that it shows up to nine sources on a single page. If six or fewer are enabled, then the page shows six somewhat larger buttons and if three or fewer are enabled, it shows only three large buttons. -
Page 26: Source Name
Input Offset is used to ensure that all sources playback at comparable level. There can be significant differences in output levels, especially among analog sources, which can lead to unexpected changes in volume when switching among them. The CP-800 provides an input offset adjustment range from -10 to +10 dB. Pass-Thru Selecting Pass-Thru locks the volume at 0.0 dB for this source and passes the... -
Page 27: Configuration Setup
NOTE: It is possible to generate a subwoofer output for an analog source without converting that source to digital. If Digital Bypass is NOT selected, the HP Filter is NOT selected in the configuration and no other DSP functions are called, then L&R signals will remain in the analog domain while a subwoofer output is generated according to the crossover and slope settings for that configuration. -
Page 28: Auxiliary Channels
Auxiliary Channels The CP-800 has two auxiliary channels that can be utilized for bi-amping the L&R speakers. Alternatively, Aux 1 may be used in conjunction with the Sub output to provide a second mono subwoofer or stereo subwoofer configuration. -
Page 29: Brightness
After three seconds of inactivity on your part, the backlight extinguishes itself, essentially turning off the touchscreen. If you prefer the display of the CP-800 to remain on whenever not in Standby mode, select the Never timeout option. The lamp in the touchscreen display is designed for harsh automotive environments and will give you many years of reliable operation. -
Page 30: Max Volume
CP-800 can provide. This setting is interactive. It is easiest to play the system at increasing levels until you reach the volume which you want to use as the maximum for the system. -
Page 31: Mute Setup
• dampening - reduces the current listening level by a specified amount (e.g. -25.0 dB). EQ Setup The CP-800’s Parametric EQ capability allows you to build very precise digital audio filters to help compensate for fixed sonic irregularities defined by the location and characteristics of your speakers, your room and your listening position in the room. -
Page 32: Tone Control Setup
Enable box on the touchscreen. Network Setup The Network Setup page displays the IP address of the CP-800 and the Network status. Pressing the Restore Network Defaults button on this page re-enables DHCP mode. In DHCP mode the CP-800 obtains an IP address from a device on the Network (usually the Wireless AP). -
Page 33: Firmware Update Via Network
URL line of your browser (e.g. 192.168.1.0) and hit return. Alternately if you are using Safari on the Mac, you can “Show All Bookmarks” (See: Bookmarks menu) and click on Bonjour and double click on your CP-800 device listed in the Webpage’s folder. -
Page 34: Dc Triggers
This can sometimes be useful. As an example, F1 could set the CP-800 to the CD Player input, and also set the CD player to Play, both from the press of a single Fkey. -
Page 35: Teach Ir
CP-800. Simply scroll to the command you want your macro-capable remote to learn and touch the Send IR Code button. The CP-800 continuously sends that command code via the front panel - as long as the button is pressed – until your third-party remote control has learned it. -
Page 36: Balance
The Status screen provides several items of information on the currently selected source and configuration as well as access to information on the firmware used in and the internal settings and sensors of the CP-800. While on this page, pressing the more button will access the CAN-Bus features for connected Classé... -
Page 37: Can-Bus
CAN-Bus Classé’s Controller Area Network, or CAN-Bus, opens the way to a new level of interaction between similarly featured Classé components. When the amplifier is connected with other CAN-Bus-equipped Classé components, the different elements in the system are in constant communication, creating a “global” network that delivers system wide status information and shared operational features, all through the preamp/processor’s touchscreen display. Note that some CAN-Bus related features are initially not available for the CA-D200 and some components will require a software update to recognize the CA-D200 on the CAN-Bus. - Page 38 The diagrams below illustrate how to connect the CAN-Bus hardware. Any combination of models in any order. CAN-BUS CAN-BUS CAN-BUS CAN-BUS For any system with SSP-300 or SSP-600. CAN-BUS CAN-BUS CAN-BUS CAN-BUS NOTE: Daisy chain may need to be terminated with CAN-Bus Terminator.
-
Page 39: Using Can-Bus
using CAN-Bus CAN-Bus is controlled via the touchscreen of any Classé component that is so equipped. There is no master component, so Classé series systems where two or more units have a touchscreen can be controlled through any of the touchscreens. However, it is probably easiest to start using CAN-Bus through just one. CAN-Bus is accessed by pressing the menu button on the face of the unit or remote, then the status button, followed by the more button. -
Page 40: Ac Status
AC status The AC status screen displays information from the target unit’s electrical supply sensors. Two screens are available, the second can be accessed by selecting more. status The status screen is the simplest way to access essential information about the target unit. It displays the target unit’s model number, software version, operational status and serial number. name You can set the name that this component will be listed under in the CAN-Bus devices screen. The name will appear next to the unit model and serial number, and facilitate the identification of units in large systems. -
Page 41: Amp Info
The first step in using PlayLink is to choose the input you wish to be selected when play is pressed on the disc player. Press the PlayLink icon, then select the correct input from the list. Once you have selected the input, press back, then select configuration. PlayLink is activated and disabled through the PlayLink icon on the CAN-Bus configuration screen. -
Page 42: Network Sources
Network Sources Network sources are those which stream audio to the CP-800 using its rear panel Ethernet connection. The CP-800 is equipped with a hard-wired Ethernet connection because it provides a more reliable and higher speed connection than is typically available over WiFi. If it is not possible or practical to run a direct Ethernet connection from your router to the CP-800, various solutions are available. A powerline Ethernet adaptor, such as those offered by Netgear and... - Page 43 . Click on the icon to see the list of AirPlay capable “speakers” available on your Network. Select your CP-800 from this list. Choose the music you want to hear and click play. The Network input will be automatically selected and music will begin playing through your system. It’s that simple. The CP-800 display will show the status of the audio stream, so when using AirPlay, it will show the sampling frequency of the signal as well as its format (ALAC is the format AirPlay streams use). You may adjust the volume in iTunes or if using Apple’s free Remote App, change volume and choose and manage music files from your iOS device (iPad, iPhone, iPod touch).
- Page 44 When called to be played, the data transit the Network from the file server, through the Ethernet cable into the CP-800, which is a Renderer. It decodes the file, performs any DSP functions you require and converts the audio from digital data to an analog waveform. It then sets the playback volume and outputs the signal to your amplifier(s).
-
Page 45: Troubleshooting
ON position. P If the CP-800 is properly plugged in and the power from the electrical outlet is at the proper level, try the following: Put the CP-800 in Standby mode, switch off the main power switch on the rear panel, and unplug the unit for at least thirty seconds. -
Page 46: Network/Streaming Troubleshooting
(cycle the power off and on) and then your router. If the problem persists verify that you have a valid IP address. If your address is “Limited Auto IP” then the CP-800 has auto assigned itself an address and this indicates that your DHCP IP address server is... - Page 47 A higher-performance router may be required. The CP-800 sometimes turns itself on unexpectedly. P This is likely caused by “sounds” (e.g. mouse clicks, new mail notifications, etc.) generated by your computer activating the auto select feature for your Network connection. Disable the...
-
Page 48: Care & Maintenace
Surround Sound Processor. Caution! Power down and remove the AC power cord from the CP-800 before performing maintenance. At no time should liquid cleaners be applied directly to the unit, as direct application of liquids may result in damage to electronic... -
Page 49: Specifications
Specifications All specifications are accurate at the time of printing. Classé reserves the right to make improvements without notice. n USB audio up to 24-bit/192 kHz n USB (Host) charging capability 2 Amps n AirPlay supported formats (AAC (8 to 320 Kbps), Protected AAC (from iTunes Store), HE-AAC, MP3 (8 to 320 Kbps), MP3 VBR, Audible (formats 2, 3, 4, Audible Enhanced Audio, AAX, and AAX+), Apple Lossless, AIFF, and WAV) - Page 50 Continued Made for: iPod touch (5th generation) iPod nano (7th generation) iPod touch (4th generation) iPod nano (6th generation) iPod touch (3rd generation) iPod nano (5th generation) iPod touch (2nd generation) iPod nano (4th generation) iPod touch (1st generation) iPod nano (3rd generation) Made for: iPhone 5 iPhone 3GS...
-
Page 51: Dimensions
Dimensions... -
Page 52: Installation Worksheet
Installation Worksheet Source: ______________________________________________________________ Audio Connector:______________________________________________________ Input:_______________________________________________________________ Source: ______________________________________________________________ Audio Connector:______________________________________________________ Input:_______________________________________________________________ Source: ______________________________________________________________ Audio Connector:______________________________________________________ Input:_______________________________________________________________ Source: ______________________________________________________________ Audio Connector:______________________________________________________ Input:_______________________________________________________________ Source: ______________________________________________________________ Audio Connector:______________________________________________________ Input:_______________________________________________________________ Source: ______________________________________________________________ Audio Connector:______________________________________________________ Input:_______________________________________________________________ Source: ______________________________________________________________ Audio Connector:______________________________________________________ Input:_______________________________________________________________... - Page 54 +1 (514) 636-6384 +1 (514) 636-1428 (fax) http://www.classeaudio.com North America: (514) 636-6384 email: cservice@classeaudio.com Europe: 44 (0) 1903 221 700 email: classe@bwgroup.com Asia: (852) 2790 8903 email: classe@bwgroup.hk All Others: +1 514 636 6384 email: cservice@classeaudio.com Copyright © 2014 B&W Group Ltd. V 1.8...
Need help?
Do you have a question about the CP-800 and is the answer not in the manual?
Questions and answers