NTI ST-C5KVM-600 Installation And Operation Manual
Xtendex series
Hide thumbs
Also See for ST-C5KVM-600:
- Installation and operation manual (28 pages) ,
- Installation and operation manual (27 pages)
Table of Contents
Advertisement
Quick Links
NTI
NETWORK
R
TECHNOLOGIES
INCORPORATED
Installation and Operation Manual
1275 Danner Dr
Tel:330-562-7070
Fax:330-562-1999
Aurora, OH 44202
www.networktechinc.com
XTENDEX
EXTENDERS
ST-C5KVM-600
PS/2 KVM Extender
ST-C5KVMRS-600
PS/2 KVM and RS232
Extender
ST-C5SV-600
S-Video Extender
ST-C5KVMA-600
PS/2 KVM and Audio
Extender
ST-C5SV-600
S-Video Extender
®
Series
ST-C5SVA-600
S-Video and
Audio Extender
ST-C5V-600
Video Extender
ST-C5VRS-600
Video and RS232
Extender
ST-C5VA-600
Video and Audio
Extender
Man014 Rev. 8/2/07
Advertisement
Table of Contents

Subscribe to Our Youtube Channel
Related Manuals for NTI ST-C5KVM-600


Summary of Contents for NTI ST-C5KVM-600
- Page 1 Tel:330-562-7070 TECHNOLOGIES Fax:330-562-1999 Aurora, OH 44202 INCORPORATED www.networktechinc.com ® XTENDEX Series EXTENDERS Installation and Operation Manual ST-C5V-600 ST-C5KVM-600 Video Extender PS/2 KVM Extender ST-C5VRS-600 Video and RS232 Extender ST-C5KVMRS-600 PS/2 KVM and RS232 Extender ST-C5SV-600 ST-C5VA-600 S-Video Extender Video and Audio...
-
Page 2: St-C5Kvm
Note: CAT5 connection cable used between NTI XTENDEX Series Local and Remote or any XTENDEX Series products should not be run underground, outdoors or between buildings. WARNING: Outdoor or underground runs of CAT5 cable could be dangerous and will void the warranty. -
Page 3: Table Of Contents
TABLE OF CONTENTS Introduction..................................1 Materials ..................................2 Features and Functions..............................3 Limitations ..................................5 Preparation for Installation .............................. 5 Installation ..................................6 Installing The Local Unit (models with VGA video connectors).................. 6 Installing The Local Unit (models with S-Video connectors) ..................8 Connect The CAT5 Cable............................ -
Page 4: St-C5Kvmrs
• Provides crisp and clear resolution up to 1024 x 768 @ 600 feet (see page 8 for more details) • Compatible with all NTI switches and splitters, enabling the joining of products to create a system that satisfies all networking needs •... -
Page 5: Materials
SVEXT-xx and SA-xx-MF Contact your nearest NTI distributor or NTI directly for all of your KVM needs at 800-RGB-TECH (800-742-8324) in US & Canada or 330-562-7070 (Worldwide) or at our website at http://www.networktechinc.com and we will be happy to be of assistance. -
Page 6: Features And Functions
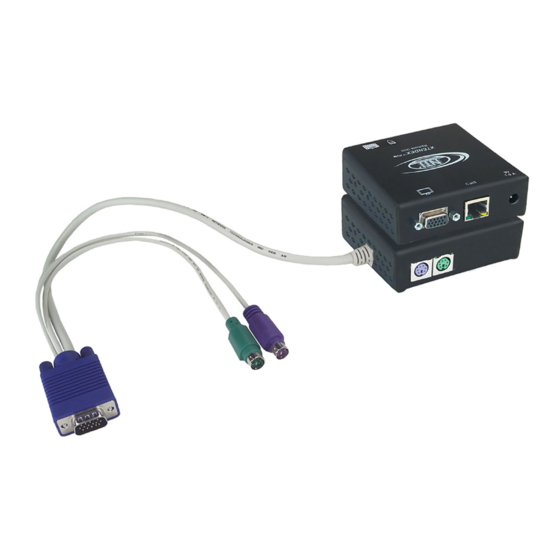
NTI EXTENDEX Extenders FEATURES AND FUNCTIONS XTENDEX Network Technologies Inc Technologies Network XTENDEX (Front View) (Rear View) ST-C5KVMRS-600 Local Unit XTENDEX Technologies Network Network Technologies Inc XTENDEX (Front View) (Rear View) ST-C5KVMA-600 Local Unit XTENDEX Technologies Network Network Technologies Inc... - Page 7 NTI EXTENDEX Extenders 8a. Video Connector- blue 15HD male- for connecting to the video port on the CPU or KVM switch 8b. S-Video Connector- black 4 pin miniDIN male- for connecting to the s-video port on the video source (S-Video models only) Mouse Connector- green male 6 miniDIN- for connecting to the mouse port on the CPU or KVM switch 10.
-
Page 8: Limitations
Note: CAT5 connection cable used between NTI XTENDEX Series Local and Remote or any XTENDEX Series products should not be run underground, outdoors or between buildings. -
Page 9: Installation
NTI EXTENDEX Extenders INSTALLATION Installing The Local Unit (models with VGA video connectors) 1. Plug the cables of the Local Unit into the back of the CPU. (See Fig. 1.) Connect the blue 15HD cable end to the VGA port on the back of the CPU. -
Page 10: Figure 2- Connect The Local Unit With Audio Support To The Cpu
NTI EXTENDEX Extenders (PURPLE-KEYBOARD) (GREEN-MOUSE) Network Technologies Inc AUDIO CONNECTOR XTENDEX line (BLUE- VIDEO) ONE WILL BE MARKED "line out" ,"spkr", "headphones" OR WITH THIS SYMBOL (BLACK- AUDIO) PS/2 CPU ST-C5KVMA-600 Local Unit (Front View) 3.5mm Stereo Plug Figure 2- Connect the Local Unit with Audio support to the CPU Make connections for a local user (see Fig. -
Page 11: Installing The Local Unit (Models With S-Video Connectors)
NTI EXTENDEX Extenders If the Local Unit has RS232 support, connect the local user's RS232 cable from a touch screen monitor to the 9D male port on the Local Unit. If the Local Unit has audio support, connect the cable from the local speakers to the 3.5mm stereo audio jack on the Local Unit. -
Page 12: Connect The Cat5 Cable
NTI EXTENDEX Extenders Make connections for a Local User (see Fig. 6) Connect one end of an SVEXT-xx-MM cable to the s-video port on the display. Connect the other end of the same SVEXT-xx-MM cable to the s-video port on the Local Unit. -
Page 13: Installing The Remote Unit (Models With Vga Video Connectors)
NTI EXTENDEX Extenders Installing The Remote Unit (models with VGA video connectors) Position the Remote Unit such that the CAT5 cable, the monitor cable, device cables, and the AC adapter power connector can each reach the Remote Unit without putting strain on the cables. -
Page 14: Installing The Remote Unit (Models With S-Video Connectors)
NTI EXTENDEX Extenders ST-C5KVMA-600 Remote Unit Front View Network Technologies Inc XTENDEX 3.5mm Stereo Audio Jack Stereo Speakers Figure 9- Connect speakers to the Remote Unit Installing The Remote Unit (models with S-Video connectors) Position the Remote Unit such that the CAT5 cable, the s-video cable, speaker cable, and the AC adapter power connector can each reach the Remote Unit without putting strain on the cables. -
Page 15: Connect The Cat5 Cable
NTI EXTENDEX Extenders Connect the CAT5 cable Make sure the CAT5 cable has been installed in accordance with the “Preparation for Installation” instructions on page 3. Connect the CAT5 cable to the “Cat 5” port on the Remote Unit. (See Fig. 11.) When properly inserted the CAT5 cable end should snap into place. -
Page 16: Video Quality
NTI EXTENDEX Extenders VIDEO QUALITY Automatic Video Quality Adjustment (see chart on page 1) Video quality adjustment is done automatically to assure the image is as clear as possible. Note: When the cable is longer than 300 feet some colored lines can be seen at the black-to-white transitions. This is a normal behavior and is caused by the different twisting rates of each pair of wires in the CAT5 cable. -
Page 17: Technical Specifications
NTI EXTENDEX Extenders TECHNICAL SPECIFICATIONS Models with VGA Video Video Compatibility SVGA, XGA, VGA Video Coupling Video Connectors HD15 male to CPU HD15 female to monitor Input / Output Impedance 75 Ohms Input Horizontal Frequency Range 15kHz to 130 Hz... -
Page 18: Interconnection Cable Wiring Method
NTI EXTENDEX Extenders INTERCONNECTION CABLE WIRING METHOD The connection cable between the remote and local is terminated with RJ45 connectors and must be wired according to the EIA/TIA 568 B industry standard. Wiring is as per the table and drawing below. -
Page 19: Warranty Information
A return authorization number is required for all repairs/returns. Note: CAT5 connection cable used between NTI XTENDEX Series Local and Remote or any XTENDEX Series products should not be run underground, outdoors or between buildings.
Need help?
Do you have a question about the ST-C5KVM-600 and is the answer not in the manual?
Questions and answers