Table of Contents
Advertisement
Quick Links
NTI
NETWORK
R
TECHNOLOGIES
INCORPORATED
Installation and Operation Manual
1275 Danner Dr
Tel:330-562-7070
Aurora, OH 44202
Fax:330-562-1999
www.nti1.com
XTENDEX
EXTENDERS
ST-C5KVM-300
PS/2 KVM Extender
ST-C5KVMA-300
PS/2 KVM and Audio
Extender
TM
Series
ST-C5V-300
Video Extender
ST-C5VA-300
Video and Audio
Extender
MAN074 Rev Date 4/20/2005
Advertisement
Table of Contents

Related Manuals for NTI Xtendex ST-C5KVM-300


Summary of Contents for NTI Xtendex ST-C5KVM-300
- Page 1 1275 Danner Dr Tel:330-562-7070 TECHNOLOGIES Aurora, OH 44202 Fax:330-562-1999 INCORPORATED www.nti1.com XTENDEX Series EXTENDERS Installation and Operation Manual ST-C5KVM-300 PS/2 KVM Extender ST-C5V-300 Video Extender ST-C5KVMA-300 PS/2 KVM and Audio Extender ST-C5VA-300 Video and Audio Extender MAN074 Rev Date 4/20/2005...
-
Page 2: Warranty Information
Warranty Information The warranty period on this product (parts and labor) is one (1) year from the date of purchase. Please contact Network Technologies Inc at (800) 742-8324 (800-RGB-TECH) or (330) 562-7070 or visit our website at http://www.nti1.com information regarding repairs and/or returns. A return authorization number is required for all repairs/returns. COPYRIGHT Copyright ©... -
Page 3: Table Of Contents
TABLE OF CONTENTS Introduction..................................1 Materials ..................................1 Features and Functions..............................2 Limitations ..................................3 Preparation for Installation .............................. 4 Installation ..................................5 Installing The Remote Unit ............................5 Connect the CAT5 cable.............................. 6 Installing The Local Unit .............................. 7 Connect The CAT5 Cable............................ -
Page 4: Introduction
SA-xx-MF Contact your nearest NTI distributor or NTI directly for all of your KVM needs at 800-RGB-TECH (800-742-8324) in US & Canada or 330-562-7070 (Worldwide) or at our website at http://www.nti1.com and we will be happy to be of assistance. -
Page 5: Features And Functions
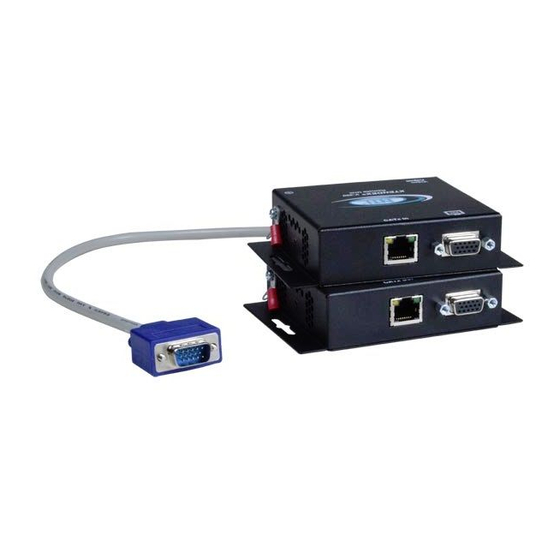
NTI EXTENDEX Extenders N T I N e t w o r k T e c h n o l o g i e s I n c X T E N D E X ( F r o n t V i e w ) -
Page 6: Limitations
NTI EXTENDEX Extenders 16. Video Connector- 15HD female- for connecting the remote user's monitor 17. "EQ" screw- for manually adjusting video quality N T I N e t w o r k T e c h n o l o g i e s I n c... -
Page 7: Preparation For Installation
Locations should be chosen for the monitors, mice, and keyboards that also have space to connect the Remote and Local Units within the distance provided by the cables. If extension cables are needed, contact NTI for the cables required. •... -
Page 8: Installation
NTI EXTENDEX Extenders INSTALLATION Installing The Remote Unit 1. Position the Remote Unit such that the CAT5 cable, the monitor cable, device cables, and the AC adapter power connector can each reach the Remote Unit without putting strain on the cables. -
Page 9: Connect The Cat5 Cable
NTI EXTENDEX Extenders S T - C 5 K V M A - 3 0 0 R e m o t e U n i t ( R e a r V i e w ) 3 . 5 m m... -
Page 10: Installing The Local Unit
NTI EXTENDEX Extenders Installing The Local Unit Make connections for a local user (see Fig. 4) Connect the cable from the local user's VGA monitor to the female 15HD port on the Local Unit. Connect the local user's mouse to the green 6 pin miniDIN female port on the Local Unit. -
Page 11: Figure 6- Connect The Local Unit With Vga Video And Audio Support To The Cpu
NTI EXTENDEX Extenders 2. Plug the cables of the Local Unit into the back of the CPU. (See Fig. 6.) Connect the blue 15HD cable end to the VGA port on the back of the CPU. Connect the green 6 pin miniDIN cable end with the mouse symbol (Mouse) on it to the mouse port on the back of the CPU. -
Page 12: Connect The Cat5 Cable
NTI EXTENDEX Extenders Connect The CAT5 Cable Connect the CAT5 cable to the “Cat 5” port on the Local Unit. (See Fig. 7.) When properly inserted the cable end should snap into place. Note: If an RJ45 wall outlet is being used, connect the other end of the extension cable to the RJ45 wall outlet. -
Page 13: Video Quality Adjustment
NTI EXTENDEX Extenders For ST-C5KVM-300 and ST-C5KVMA-300 models Plug the power cord from the monitor into the power outlet. Connect the AC adapter power connectors to the 9VDC ports on the Remote and Local Units. Plug each AC adapter into a power outlet. -
Page 14: Technical Specifications
NTI EXTENDEX Extenders TECHNICAL SPECIFICATIONS All Models Video Compatibility XGA, VGA Video Coupling Video Connectors HD15 male to CPU HD15 female to monitor Input / Output Impedance 75 Ohms Input Horizontal Frequency Range 15kHz to 130 Hz Input Vertical Frequency Range... -
Page 15: Interconnection Cable Wiring Method
NTI EXTENDEX Extenders INTERCONNECTION CABLE WIRING METHOD The connection cable between the remote and local is terminated with RJ45 connectors and must be wired according to the EIA/TIA 568 B industry standard. Wiring is as per the table and drawing below. - Page 16 NTI EXTENDEX Extenders Problem Cause Solution The picture on the monitor The video cable was not attached to With the cables all properly connected, reboot the CPU. is black and white, rather the CPU when it was booted. than color...
Need help?
Do you have a question about the Xtendex ST-C5KVM-300 and is the answer not in the manual?
Questions and answers