NTI XTENDEX Series ST-C5VRS-600 Installation And Operation Manual
Video and rs232 extender
Hide thumbs
Also See for XTENDEX Series ST-C5VRS-600:
- Installation and operation manual (19 pages) ,
- Installation and operation manual (27 pages)

Related Manuals for NTI XTENDEX Series ST-C5VRS-600


Summary of Contents for NTI XTENDEX Series ST-C5VRS-600
- Page 1 NETWORK TECHNOLOGIES INCORPORATED XTENDEX Series ST-C5VRS-600 VIDEO AND RS232 EXTENDER Installation and Operation Manual Manual 039 Rev. 3/13/03...
-
Page 2: Warranty Information
WARRANTY INFORMATION The warranty period on this product (parts and labor) is one (1) year from the date of purchase. Please contact Network Technologies Inc at (800) 742-8324 (800-RGB-TECH) or (330) 562-7070 or visit our website at http://www.nti1.com for information regarding repairs and/or returns. A return authorization number is required for all repairs/returns. -
Page 3: Table Of Contents
Table of Contents Introduction................................1 Materials .................................. 1 Features and Functions............................2 Limitations ................................3 Preparation for Installation ............................3 Installation ................................4 The Local Unit..............................4 The Remote Unit..............................6 Plug-in and Boot Up ..............................7 Video Quality ................................7 Technical Specifications............................ -
Page 4: Introduction
Additional materials may need to be ordered, depending upon the configuration: VEXT-xx and DINT-xx if the Local Unit will be located further than 15" from the CPU or NTI switch CAT5 unshielded twisted-pair cable(s) terminated with RJ45 connectors wired straight thru- pin 1 to pin 1, etc. -
Page 5: Features And Functions
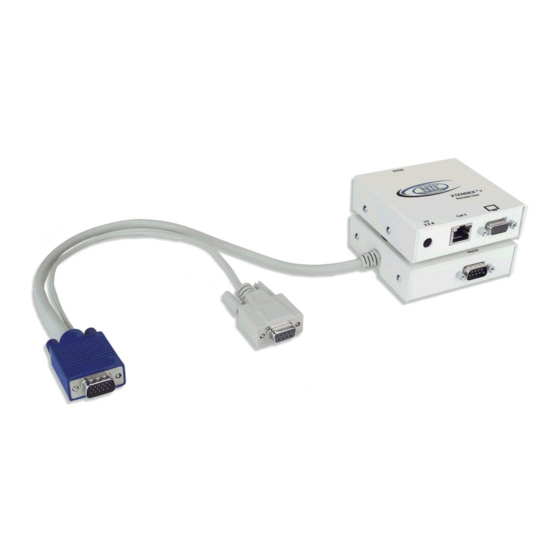
6. RS232 Connector- 9D male- for connecting the local user's touchscreen monitor RS232 cable 7. RS232 Connector- light gray 9D female- for connecting to the RS232 port on the CPU or NTI switch 8. Video Connector- blue 15HD male- for connecting to the video port on the CPU or NTI switch 9. -
Page 6: Limitations
• 2 simple devices (i.e. mice) connected to each unit, or • 1 complex device (i.e. serial modem, RS232 command port on an NTI switch) connected to either the Remote or Local Unit. • Even though two users will have full access to the single CPU, if both users attempt to access the CPU at the same time, there will be a conflict. -
Page 7: Installation
Installation Installation The Local Unit 1. Plug the cables of the Local Unit into the back of the CPU. (See Fig. 1.) a. Connect the blue 15HD cable end to the VGA port on the back of the CPU. b. Connect the light gray 9D cable end to the RS232 port on the back of the CPU. 9 D F e m a l e C o n n e c t o r ( L I G H T G R A Y - R S 2 3 2 ) S E R I A L... -
Page 8: Figure 2- Connect Local User's Monitor To Local Unit
S T - C 5 V R S - 6 0 0 L o c a l U n i t ( F r o n t a n d R e a r V i e w ) F r o n t V i e w L o c a l U n i t R e a r V i e w o f L o c a l U n i t... -
Page 9: The Remote Unit
The Remote Unit 1. Position the Remote Unit such that the CAT5 cable, the monitor cable, RS232 cable, and the AC adapter power connector can each reach the Remote Unit comfortably. 2. Connect the monitor cable to the female 15HD video connector on the Remote Unit. 3. -
Page 10: Plug-In And Boot Up
Plug-in and Boot Up Plug-in and Boot Up 1. Plug the power cord from each monitor into a power outlet. Connect the power connector from each AC adapter to the 5VDC port on the Remote and Local Units. Make sure each power connector goes into the port all the way. Plug each AC adapter into a power outlet. -
Page 11: Technical Specifications
Technical Specifications Technical Specifications Maximum Resolution 1280 x 1024 - up to 600 feet (refresh frequency 60Hz) Video Compatibility SVGA, XGA, VGA Video Quality Adjustment Automatic, for up to 600 feet of CAT5 cable Video Coupling Video Connectors HD15 male to PC HD15 female to monitor RS232 Connectors 9D male to device... -
Page 12: Troubleshooting
Troubleshooting Troubleshooting Each and every piece of every product produced by Network Technologies Inc is 100% tested to exacting specifications. We make every effort to insure trouble-free installation and operation of our products. If problems are experienced while installing this product, please look over the troubleshooting chart below to see if perhaps we can answer any questions that arise. - Page 13 If the answer to a question is not in our troubleshooting chart or on our website and a call to us is required, please have the following information available at the time of the call: 1. NTI Model Number and Serial Number (from the bottom) of the Local Unit and the Remote Unit. Local M/N __________ S/N ______________ Remote M/N __________ S/N ______________ 2.
Need help?
Do you have a question about the XTENDEX Series ST-C5VRS-600 and is the answer not in the manual?
Questions and answers