Table of Contents
Advertisement
Quick Links
Advertisement
Table of Contents

Related Manuals for NTI XTENDEX ST-C5USBVA-300M


Summary of Contents for NTI XTENDEX ST-C5USBVA-300M
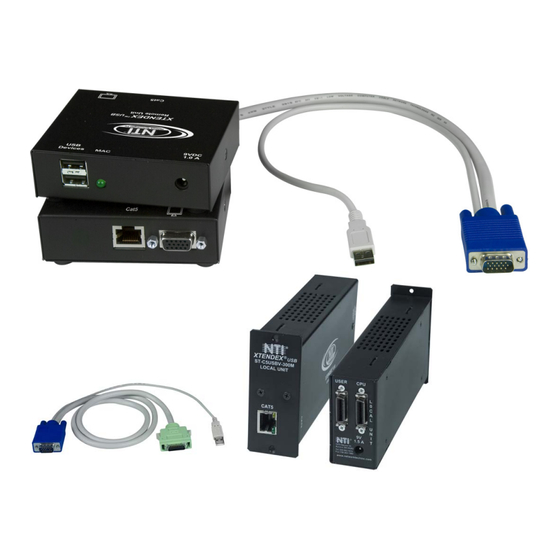
- Page 1 ® XTENDEX Series ST-C5USBV-300(M) ST-C5USBVA-300(M) ST-C5USBV2A-300 300 FOOT USB KVM EXTENDER Installation and Operation Manual ST-C5USBV-300 (Desktop Model) ST-C5USBV-300M (Rackmount Module) UMTINT-xx-MM (Module cable- sold separately) MAN010 Rev 4/26/17...
- Page 2 Note: CAT5 connection cable used between NTI XTENDEX Series Local and Remote or any XTENDEX Series products should not be run underground, outdoors or between buildings.
-
Page 3: Table Of Contents
Table of Contents Introduction..................................1 Features..................................1 Types of User Input Devices Supported:........................1 Operating Systems Supported ............................ 2 Limitations..................................2 Materials ..................................3 Features and Functions..............................4 Preparation for Installation............................5 Installation..................................6 The Local Unit................................6 Connect to the CPU ..............................6 Connect the Local Devices ............................ -
Page 4: Introduction
The ST-C5USBV-300 USB Extender (XTENDEX) is designed to enable the relocation of a monitor, USB keyboard, and USB mouse from a USB CPU or NTI USB KVM switch by as much as 300 feet via CAT5 cable in addition to having a monitor, USB keyboard, and USB mouse connected locally. -
Page 5: Operating Systems Supported
The XTENDEX can be used between two cascaded NTI switches, but the master switch in the configuration will not be able to list the CPUs connected to the extended slave. The OSD menu in the extended slave would have to be used to monitor CPUs connected to it. -
Page 6: Materials
Local or Remote Unit with audio support to a monitor, keyboard, mouse, and stereo speakers- available in 3, 6, 10 and 15 foot lengths. Contact your nearest NTI distributor or NTI directly for all of your KVM needs at 800-742-8324 (800-RGB-TECH) in US & Canada or 330-562-7070 (Worldwide) or at our website at http://www.networktechinc.com... -
Page 7: Features And Functions
FEATURES AND FUNCTIONS LABEL CONNECTOR/LED DESCRIPTION AUDIO OUT Audio Jack for connecting to remote speakers (models with audio support only) MIC IN Audio Jack for connecting to microphone (models with 2-way audio support only) CAT5 RJ45 Connector for connection of CAT5 cable between Local Unit and Remote Unit none Green LED illuminates when power has been supplied to the unit... -
Page 8: Preparation For Installation
Note: CAT5 connection cable used between NTI XTENDEX Series Local and Remote or any XTENDEX Series products should not be run underground, outdoors or between buildings. -
Page 9: Installation
Note: If a SUN CPU is being connected, depending upon the video connector of the SUN CPU, it may be necessary to attach an NTI #13W3M-15HDF (SUN video port-to-VGA adapter) to the video port on the CPU first, and then connect the video cable to the adapter. -
Page 10: Connect The Local Devices
Figure 2- Local unit with audio support connects to CPU Connect the Local Devices If desired, connect the local user devices to the Local Unit as shown in Figure 3. Connect a USB keyboard and mouse to the USB type A female connectors on the Local Unit. Connect a monitor to the 15HD female connector on the Local Unit. -
Page 11: Connect The Cat5 Cable
If the Local Unit has audio support (ST-C5USBVA-300) , connect the cable from the local self-powered stereo speakers to the 3.5mm stereo audio “AUDIO OUT” jack on the Local Unit. (See Figure 4) 4. If the Local Unit has 2-way audio support (ST-C5USBV2A-300), connect a microphone to the pink jack labeled “MIC IN”. -
Page 12: The Remote Unit
The Remote Unit Connect the Remote Devices Position the Remote Unit such that the CAT5 cable, the monitor cable, the keyboard and mouse, and the AC adapter power connector can each reach the Remote Unit comfortably. Connect the monitor cable to the 15HD female VIDEO port on the back of the Remote Unit. (See Figure 6) Connect the devices to the Remote Unit. -
Page 13: Connect The Cat5 Cable
If the Remote Unit has audio support (ST-C5USBVA-300) , connect the cable from the remote self-powered stereo speakers to the 3.5mm stereo audio “AUDIO OUT” jack on the Remote Unit. (See Figure 7) 5. If the Remote Unit has 2-way audio support (ST-C5USBV2A-300), connect a microphone to the pink jack labeled “MIC IN”. -
Page 14: Rackmount Modules (Optional)
Rackmount Modules (optional) If ST-C5USBV-300M or ST-C5USBVA-300M XTENDEX rackmount modules (Local and/or Remote modules) are being installed, then an ST-C5RCK-12 Rackmount Extender Module Tray must be used (sold separately) to mount the modules to a RACK. ST-C5RCK-12 provides a convenient mounting method for up to 12 Local and /or Remote XTENDEX modules. Note: Rackmount Local modules are compatible with rackmount Remote modules or desktop Remote units. -
Page 15: Figure 11- Secure Each Power Supply To The Tray
4. Secure the power supply for each module to the power supply/cable management shelf at the rear of the tray using the bracket and screw supplied. Rearview of ST-C5RCK-12 with XTENDEX Extender Modules Plug power connector USER into Extender module 1.5 A 1275 Danner Dr Aurora, OH 44202... -
Page 16: Connect The Cpu
Connect the CPU Connect a UMTINT-xx-MM (or UMTINTA-xx-MM if module has audio support) to the CPU, and then to the Local Unit at the connector marked “CPU”. Make sure all connections are firmly seated. (xx= 3, 6, 10, or 15 foot length) USB Type A male UMTINTA-3/6/10/15-MM 0.05 SCSI II series... -
Page 17: Connect The Cat5 Cable
Connect the CAT5 cable Connect the CAT5 cable to the “CAT5” port on the front of the Local Unit (see Figure 14). When properly inserted the cable end should snap into place. Connect the other end of the cable to the “CAT5” port on the Remote Unit. WARNING: Never connect the ST-C5USBV-300M Extender to an Ethernet card, Ethernet router hub or switch or other Ethernet RJ45 connector of an Ethernet device. -
Page 18: Plug-In And Boot Up
Plug-in and Boot Up Plug the power cord(s) from the monitor(s) into power outlet(s). Connect the AC adapter power connectors to the 9VDC ports on the Remote and Local Units. (AC adapter shown in Figure Plug the AC adapters into power outlets. The “Power” LED (Green) on the CAT5 connector of each unit should illuminate, indicating that a proper power connection has been made. -
Page 19: Command Mode
COMMAND MODE The XTENDEX has two areas of user control that can be used as needed. The user can adjust video quality (described below), or enable/disable MAC mode (see page 17) These controls are accessed by entering Command Mode. To enter Command Mode, simultaneously press the left and right <Shift> keys on the keyboard connected to the Remote Unit. -
Page 20: Mac Mode
MAC Mode MAC Mode enables the user to connect the Local Unit to a MAC CPU. MAC Mode configures the Local Unit for passing mouse information to the MAC CPU. This is useful when the user wants to use mouse drivers provided by the mouse vendor, which allows the use of programmable functions for each mouse button. -
Page 21: Ddc Support
DDC SUPPORT DDC support allows the CPU to detect the video capability of your monitor by transferring EDID data from your monitor to the CPU. Automatic EDID Updates for ST-C5USBV(A)-300(M) The 15HD connector on the ST-C5USBV(A)-300(M) provides local video as well as DDC support. The EDID data is updated automatically at initial power-ON or whenever a different monitor is connected to the Local Unit. -
Page 22: Common Applications
Command Mode or using the “DDC Update” button on the Local Unit. COMMON APPLICATIONS Figure 11 (below) illustrates three common applications for the ST-C5USBV-300 USB KVM Extender. USBVEXT-xx-MM Existing Local Unit Cable Existing Local Unit Cable NTI USB Multi-Scan Multi-Scan ST-C5USBV-300 ST-C5USBV-300 Monitor... -
Page 23: Technical Specifications
TECHNICAL SPECIFICATIONS Maximum Resolution w/ CAT5/5e/6 UTP 1024 x 768 @ 60Hz- up to 300 feet (refresh frequency 60Hz) 1600 x 1200 @ 60Hz- up to 150 feet 1920 x 1440 @ 60 Hz- up to 100 feet Maximum Resolution w/ CAT5/5e STP 1024 x 768 @ 60Hz- up to 300 feet (refresh frequency 60Hz) 1280 x 1024 @ 60Hz- up to 150 feet... -
Page 24: Interconnection Cable Wiring Method
(View looking into RJ45 female) Figure 19- Pin positions in female RJ45 connector Note: CAT5 connection cable used between NTI XTENDEX Series Local and Remote or any XTENDEX Series products should not be run underground, outdoors or between buildings. WARNING: Outdoor or underground runs of CAT5 cable could be dangerous and will void the warranty. -
Page 25: Keyboard Translation
KEYBOARD TRANSLATION Key Equivalents Using the chart below, find the character needed to be typed on the CPU being accessed, then follow the row across for the equivalent on the keyboard being used. (See Figure 20 on page 23 for reference.) USB 101 WINxx (Apple USB) -
Page 26: Figure 20- Keyboard Layouts
Backspace Lock Enter Caps Lock Shift Shift Enter Ctrl Ctrl Typical 101 Keyboard Print Scroll Screen Pause Lock SysRq Break Backspace Lock Enter Caps Lock Shift Shift Enter Ctrl Ctrl Windows Logo Key Application Key Windows Logo Key Windows USB Keyboard CD Eject lock delete... -
Page 27: Troubleshooting
TROUBLESHOOTING Each and every piece of every product produced by Network Technologies Inc is 100% tested to exacting specifications. We make every effort to insure trouble-free installation and operation of our products. If problems are experienced while installing this product, please look over the troubleshooting chart below to see if perhaps we can answer any questions that arise. If the answer is not found in the chart, a solution may be found in the knowledgebase on our website at http://information.networktechinc.com/jive/kbindex.jspa... -
Page 28: Index
A return authorization number is required for all repairs/returns. Note: CAT5 connection cable used between NTI XTENDEX Series Local and Remote or any XTENDEX Series products should not be run underground, outdoors or between buildings.
Need help?
Do you have a question about the XTENDEX ST-C5USBVA-300M and is the answer not in the manual?
Questions and answers