Bosch 4000 Operating/Safety Instructions Manual
Hide thumbs
Also See for 4000:
- Operating/safety instructions manual (68 pages) ,
- Technical specifications (3 pages)
Table of Contents
Advertisement
Read Before Using
_MPORTANT °°
Life avant usage
Leer antes de usar
Operating/Safety
instructions
Consignes
de fonctionnement/s_curit_.
lnstrucciones
de funcionamiento
y seguridad
Consumer
information
Renseignement
des consommateurs
informaci6n
para
eMconsumidor
Toll Free Number:
AppeM gratuit
:
Nu'mero
de teM6fono
gratuito:
1-877-BOSCHg9
{1-877-267-2499)
For English
See page 2
PaHez-vous
fran(;ais?
Voir page 8
_,HabMa espaSoM?
Vet pagina
14
Advertisement
Table of Contents

Related Manuals for Bosch 4000


Summary of Contents for Bosch 4000
- Page 1 _MPORTANT °° Leer antes de usar Read Before Using Life avant usage Operating/Safety instructions Consignes de fonctionnement/s_curit_. lnstrucciones de funcionamiento y seguridad Consumer information Renseignement des consommateurs informaci6n para eMconsumidor Toll Free Number: AppeM gratuit Nu'mero de teM6fono gratuito: 1-877-BOSCHg9 {1-877-267-2499) For English PaHez-vous...
- Page 2 Read and understand the owner's manual and labels affixed service. to the tool. Learn its application and limitations as well as the specific potential hazards peculiar to this tool. Use only Bosch replacement parts; any DON'T OVERREACH others may create a hazard.
-
Page 3: Basic Table Saw Operation
Additional Safety Rules Tool Care KICKBACKS AND POSSIBLE INJURY CAN USUALLY BE AVOIDED BY: DO NOT ALTER OR MISUSE TOOL a° Maintaining the rip fence parallel to the sawblade. These tools are precision built. Any alteration or modification b° Keeping the sawblade sharp. Replacing or sharpening not specified is misuse and may result in dangerous con- anti-kickback pawls when points become dull. - Page 4 Additional Safety Rules e° NEVER place your face or body in line with the cutting outward on the table) and then pushing thru sawblade. The tool. blade could pick up one or more pieces and cause a binding or loss of control and possible iniury. ®...
- Page 5 Additional Safety Rutes 12, THINK SAFETY Some dust created by power sanding, SAFETY iS A COMBiNATiON OF OPERATOR COMMON sawing, grinding, drilling, and other SENSE AND ALERTNESS AT ALL TIMES WHEN THE construction activities contains chemicals known TABLE SAW iS BEING USED. cause cancer, birth...
- Page 6 Table of Con,en,s Page Page General Safety Rules ....Table Pointer Adiustment ..... 28-29 Additiona! Safety Rules ....Aligning Rip Fence ....30-31 Double Insulated Tools & Extension Cords ..Rip Fence Pointer Adjustment ... 30-31 Table of Contents ....Miter Gauge Adiustment ....
-
Page 7: Ripping
Glossa of Terms WORKPIECE KERF The item on which the cutting operation is being performed. The space in the workpiece where the material was removed The surfaces of a workpiece are commonly referred to as by the blade. faces, ends and edges. KICKBACK An uncontrolled grabbing and throwing... - Page 8 !'outil, afin de bien les comprendre. Vous devezconnaTtre aussi N'utilisez que des pi_ces de rechange bien les possibilit6s et les limites de I'outil queles dangers 6ventuels Bosch;tout autretype de piece risquerait pr6cis qu'il pr_sente. de presenterun danger. GARDEZ TOU,JOURS VOTREEQUHLIDRE...
- Page 9 Entretien de M'outiM y compris) de cOt_pat rapport _ la lameafin de ne pasvous trouver sur latrajectoire de I'ouvrageen casde _< REBO[`,ID ,>. ON PEUTGI_NCRALEI_IENT !tVITERLESRESONDS ET NE MODIFIEZPASL'OUTILETNELESOUrV1ETTEZ PAS._UN D'EVENTSELLES SLESSURES EN PRENANT LESPRECAUTIONS USAGE ASUSIF SUIVANTES : Cet outil a 6t_ fabriqu6 selon des crit_res de [`lautepr@ision. Toute a.
- Page 10 e. Nevous tenez JAMAIS (votre visage y compris) dans I'axe Iols- g. Nefaites JAMAIS de coupe par lots (c'est-&-direaligner plus d'une gitudina!de routil de coupe. piCceen face de la lame verticalementou horizontalement et pous- ser le tout contre la lame). La larne pourrait se coincer dans une ou + Ne rnettez JAMAIS vos doigts ou mains dans une position te!le plus d'une piCceet provoquer une perte de contr01eet d'_ventuelles qu'ils risquent de se faire happer par la lame ou tout autre outil de...
- Page 11 12. LASECURITY: AVANT TOUT Los travau× _ ma mashine ternque POURASSURER SA SEOURITE, UUTILISATEUR DOlT FAIRE pen£age, ssiage, meumage,pergageet PREUVE DEBONSENSETDE PRUDENCE P ENDANT T OUTLE autres travaux du b_timent peuvent sr_er des peussi_res TEMPS OUIL SESERT DELA SCIE A DI_COUPER, sentenant des preduitsshimiques qui sent des causes resennues de cancer, de mamfermatiensengdnitameeu d'autres preN_mes Nelaissezpas rbabitude (d_coulantd'un...
- Page 12 Table des mati res Page Page Consignesg6nSralesde sScurit_ ....R6glagede rindicateurde latable ..... 28-29 Consignesde s_curit6suppl6mentaires ... 9-11 Alignementdu guide de refente ....30-31 Doubleisolation et rallonges ....R6glagede rindicateurdu guide de refente ..30-31 Tabledes rnati_res ...... R6glagedu guide de coupeangulaire .... 30-31 Lexique ......
- Page 13 OUVRAGE VOlE Piece subissant rop_ration de coupe. Les diff_rentes surfaces de %aisseur du trait de scie, correspond & I'_paisseur de rnatiCre rouvrage sont comrnun_rnentappel_esfaces,extr_rnit_set bords. enlev_epar la lame. TAQUETS ANTFREBOND EXTRItMITE A VANT Syst_rne qui, Iorsqu'il est correcternent entretenu sert _ emp_cher ExtrCmit6de rouvrage qui entre la premiere en contact avec la lame que Fouvragene soit projet_en direction de Vutilisateur.
- Page 14 SeguridadpersonaM nicas, deben ser realizadas Onicarnentepor t_cnicos de reparaci6n capacitados. P6ngase en contacto con el Centro de servicio de f_brica Bosch rn_spr6ximo, con la Estaci6nde CONOZDA SU NERRAMIENTA MECANICA servicio Bosch autorizadao con otro servicio de reparacionescom- Lea y entienda el manual del usuario y las etiquetas puestas en la petente.
- Page 15 Cuidadode [a herram[enta LOSRETROCESOS Y LAS POSIBLESLESIONES NOR[v1ALI_IENTE PUEDENEVtTAR: a. Manteeiendoel tope-gu[a para cotter al hilo paraleloala hoia de NO ALTERE NiRAGA USO INCORRECTO DE LA RERRAMIENTA sierra. Estas herramieetas est_n fabricadas con precisiGn.Cualquier a[te- raciGno modificaciGnno especificadaconstituye un use incorrecto y b.
- Page 16 e. NUNCAsit0e la cara o e! cuerpo en linea con la herramienta de trav6s de la hoia de sierra. La hoja podr[a enganchar unao m_s pie- corte. zasy causar un atascoo p6rdidade control y posibleslesiones. ,, NUNCAponga los dedos ni las rnanos en la trayectoriade la hoja h.
- Page 17 12. PNENSE ENLASE[_URIDAD Cierte pemve geaerade per em IHade, LA SEGURIDAD ESUNACOMBINACION DESENTIDO COMUN POR aserrada, amaJado y taJadrade mec_aicas, PARTE DELOPERADOR Y DEESTAR ALERTA ENTODO MOMENTO y per okras actividades de ¢anstrucsida, ¢nntiene agnntes CUANDO SEESTA UTILIZANDO L ASIERRA DEMESA, quimicns qua se sabe qua ¢ausan¢_neer, defnetns de naeiminntn u etros daOnssnbre marepreducciCn.
- Page 18 Pigina P4gina Ajuste delindicador d ela rnesa ....28-29 Normas generalesde seguridad ....Alineaci6n d eltope-gala paracortar al h[Io ..30-3! Normas de seguridad adicionales ..... 15-17 Ajuste delindicador d eltope-gufa para cortaral h[Io ..30-31 Herrarnientascon aislamientodoble y cordones de extensi6n ......
- Page 19 GiosaHo de t rminos PIEZABETRABAJO SEPARACION DECORTE EI obieto en el cua! se est_ reaIizando la operaciOnde corte. Las El espacioentrela piezade trabajo de dondela hoja quit6 e! material. supeliicies de una pieza de trabaio se conocen comt]nrnente como RETROCESO caras,extFernos y bordes.
-
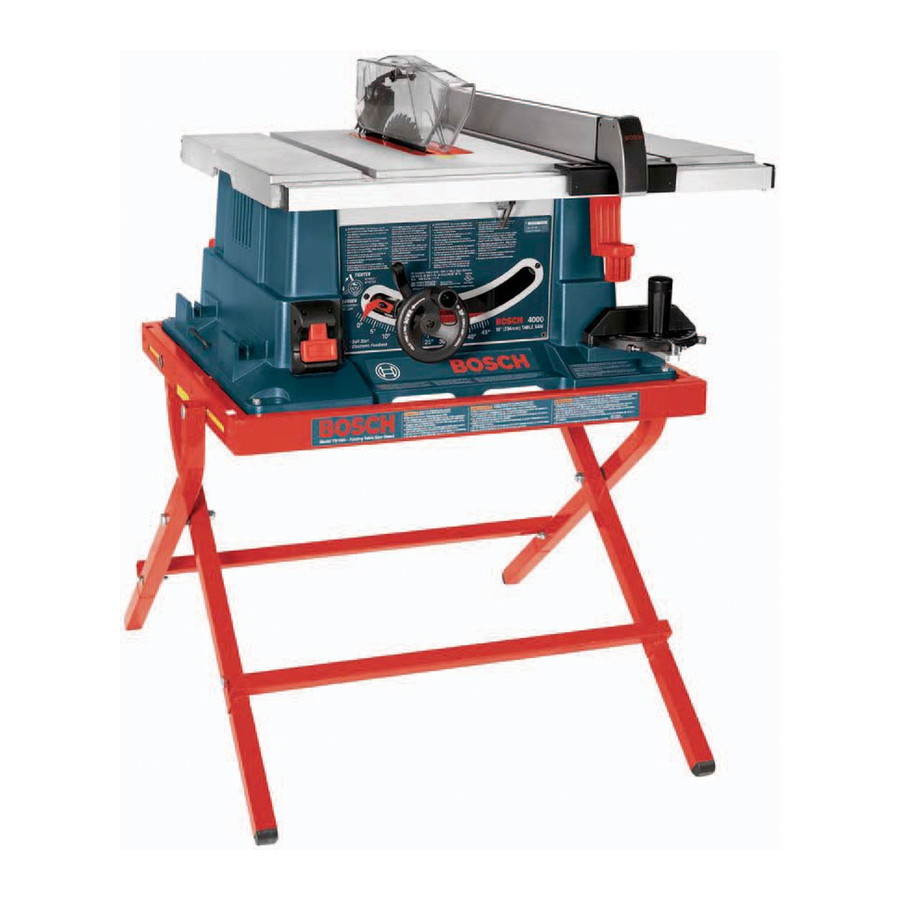
Page 20: Power Switch
Getting To Know Your Table 1. POWER SWITCH Has safety feature, which is intended to prevent accidental starting (Page 36). 2. TABLE Provides large working surface to support workpiece. 3. BASE Supports table saw. For additional stab[I[ty, holes are provided in base to bolt the saw to a workbench or stand. - Page 21 Familiarl ezovous avec Fam Har# ac# n votre scie de table s rra de mesa 1. INTENRUPTON DE ENCEND_DO I. mNTERRUPTEUR _IARCHE=ARRETE Tiene un dispositivo de seguridad que est_ disefiado para evitar el arranque Comporte un dispositif de s_curit_ servant _ pr_venir les rnisesen marche accidental(p_gina37).
-
Page 22: Table Insert
Getting To Know Your Table If you are making a rip type cut in thinner materials, the auxuiliary facing shouJd be attached to the fence so that the bottom edge touches the top surface of the table. In this situation, the facing must be lower than the fence. - Page 23 Famifi an ezovo.s avec votre scie de table s erra de mesa Si usted est_ realizandoun corte del tipo al hilo en materiales m4s delgados, Si vous voulez refendre une piace de faible _paisseur, la planche doit 6tre el refrentadodebesujetarseal tope-guia para cortar al hilo de maneraqee el fixCeau guide de refentede fagon &...
-
Page 24: Table Of Loose Parts
Unpacking i II[_IEI Checking Contents To avoid injury from unexpected starting electrical shock, do not plug the power cord into a source of power. This cord must remain unplugged whenever you are working on the table saw. Model 4000 Table Saw ls shipped complete in one carton. 1. - Page 25 Ouvert.re Desempaquetade rernballage v rification du conte.u det contenido Afin d'Oviterles blessurescaus_espar une rnise Para evitar lesionesdebJdasa! arranque inesperadoo en rnarcheaccidentelleou un choc _lectrique, ne a sacudidas el_ctricas, no enchufe el cordon de branchezpas lecordon d'alirnentationsur une prise 61ectrique. Cecordon ne energia en una fuente de energfa.
- Page 26 Blade Tilting Control Loosen blade tilting lock handle I counterclockwise (Fig. 5), slide the elevation wheel 2 until pointer 5 is at desired angle and tighten blade tilt lock handle I clockwise. Adjusting 90 and 45 Degree Positive Stops Your saw is equipped with positive stops for fast and accurate positioning of the saw blade at 90 and 45 degrees to the table.
- Page 27 R g[age de Find[ha[son de [a lame ControM de indinaci6n de Ma hoja Afloieel mangode fijaci6n de la inclinaci6n de la hoja1 ensent[docontrar[o Desserrezla poignae de verrouiilage de rindinaison 1 en sens anti-horaire al delasagujas del re!oj(Fig.5), desIice la rueda de devaci6n 2 hastaqueel (Fig.
- Page 28 Adjusting Blade Parallel To The Miter Gauge Slots The blade was adjusted parallel to the miter gauge slots at the factory. In order to insure accurate cuts and help prevent kickback, this adjustment should be rechecked. If adjustment is necessary, follow the steps below. To prevent personal injury, always disconnect the plug from power source...
- Page 29 R giage du parail lismede la lamepar Ajustede Ma heja paraMeMa a Mas r anuras rapportaux rainures du guide deM eaMibre de ingMetes de coupe anguMaire La hoja se ajust6 en f_brica paralelaa las ranuras de! calibrede ingletes.Para asegurarse de que se realizan cortes precisos y para ayudar a evitar el Le parall_lisme de la lame a _t_ r6g!6 en usine.
- Page 30 AJigning Rip Fence To prevent persona! injury, always disconnect plug from power source before making adjustments. The rip fence must be parallel with the SAWBLADE in order to prevent KICKBACK when ripping. Your table saw is equipped with a Self-Aligning, Quick-Set fence.
- Page 31 AJiaeaci6ndeJtope-g[gapara cortaraJhiJo Alignement du guide de refente Paraevitar lesionespersonales,desconectesiempreel Pout 6viter de subir des blessures, d_branchez encbufe de la fuente de energfa antes de realizar touiours le cordon d'alimentation avant de cualquieraiuste.El tope-guiapara cortar a! hilo debeestar paraldo a la HOJA proc_der_ des r0glages.Le guidede refentedolt _tre parall_le_ la LAMEafin DESIERRA para evitarel RETROCESO a lcortar alIlilO.
- Page 32 Attaching The BJade guard To prevent personal injury, always disconnect plug from power source before making adjustments. 1. Remove table insert. 2. Raise the blade as high as it will go and tilt to 45° . 3. Loosen screw 5 approximately 3-3 1/2 turns or until you feel resistance to loosening the screw.
- Page 33 Montagedu prot ge-Mame CoMocaci6a dam protector d e Ma hoja Pour _viter de subir des blessures, d_branchez Para evitar lesiones personales,desconectesiempre touiours le cordon d'alirnentation avant de el enchufe de la fuente de energia antes de realizar proc_der_ des r6glages. cualquierajuste.
- Page 34 Changing The BJade To prevent personal injury, always disconnect plug from power source before changing blades. 1. Turn elevation wheel clockwise until the blade is up as high as it will go, using a screwdriver lift the table insert 1 out of the pocket of the table (Fig.
- Page 35 Changement d e Ma Marne Cambiode Ma ho]a Pour _viter les blessures d6branchez toujours le Para evitar lesiones personales,desconecte siempre cordon d'alirnentation avant de proc6der _ des el enchufe de la fuente de energ[a antes de cambiar r_glages. las hojas. 1.Girela rueda deelevaci6n enel sentido de lasagujas del relojhasta quela 1.
-
Page 36: Safety Power Switch
Mounting Table Saw Mounting Table Saw to Workbench If table saw is to be used in a permanent !ocation, it should be fastened securely to a firm supporting surface such as a stand or workbench, using the four mounting holes, I two of which are shown (Fig. - Page 37 l.stallatio, de la scie Montaje de la sierra de table Installation d e [asde detable Nientajede Ma sierra de mesa sur un _tab[[ en un baritede trabaje Si vous voulez installer la scie de fagon permanente, fi vous faut [a fixer Si la sierrade mesa sevaa utilizaren un lugarpermanente, sedebesujetar solidernent sur unesullace robuste,tetle qu'un support ou un 6tabli _ raide firmemente a unasuperficie de soporte firmetalcomeunabaseo un banco...
- Page 38 Basic Table Saw Pre-Cut Locator AIIows you to mark and locate exactJy where the blade wilI enter the workpiece= A =With the blade 90 degrees square to the table, cut off a piece of wood 1= Always make sure you turn the saw off before attempting step C.
- Page 39 Utilisation de la F.ncionarniento b sico scie de table de la sierra de mesa Repi}re desciage Ubica[ier [ie precerte I! permet de marquer et de rep6rer exacternent rendroit o_ B lame Permite rnarcary ubicar exactarnenteel lugar en el que la sierra penetrar_ p@_treradans B piece.
-
Page 40: Using The Miter Gauge
Push Stick and Push Block Make the Push Stick 1 using a piece of 1 x 2 as shown (Fig. 28). Make the Push Block 2 using pieces of 3/8" plywood 3 and 3/4" hardwood 4 (Fig. 29). For proper use of push block, (see page 48). The small piece of wood, 3/8"... - Page 41 Pale empujary b eq e crop,jar Baguette°poussoir e t piateau°poussoir Fabriquezla baguette-poussoir1 _ I'aidedun tasseaud'l pox 2 po, suivant Haga el pato de empujar I ut[lizandoun pedazode 1 x 2 pulgadastal como la fig. 28. se rnuestra(Fig. 28). Fabriquezla baguette-poussoir2 _ partir de morceaux de contre-plaqu_3 de Haga el b!oque de empujar 2 utilizando pedazos de 3/8"...
-
Page 42: Repetitive Cutting
Crosscutting CROSSCUTTING is known as cutting wood across the grain, at 90 °, or square with both the edge and the fiat side of the wood. This is done with the miter gauge set at 90 ° (Fig. 31). The graduations on the miter gauge provide accuracy for average woodworking, in some cases where extreme accuracy is required, when making angle cuts, for example, make a trial cut and then... - Page 43 6orte transversaM Coupe transversale Se conoce como CORTETRANSVERSALa cortar rnadera en direcci6n Une coupe transversab est une coupe _.90° pratiqu@ A contre-fi[, c'est_ - transversala B veta,a 90°, o en Angulorecto tanto con el bordecomo con e] dire une coupe perpendiculaireaux deux bords et _ la surface de lapiace. lado piano de la rnadera.Esto se hacecon el calibre de ingletesaiustado a Ble sefait _ raide du guide de coupeanguBire r@16 A90°...
-
Page 44: Miter Cutting
Miter Cutting MITER CUTTING is known as cutting wood at an angle other than 90 + with the edge of the wood, Follow the same procedure as you would for crosscutting (Fig. 33). Adjust the miter gauge to the desired angle, and Iock it. The miter gauge may be used in either of the grooves in the table. - Page 45 CoupeanguMaire Corte a inglete On appei[eCOUPEANGULA[RE[e d_coupageb,un angle autre que 90° par Se conoce como CORTEA INGLETE a cortar madera a un _ngulo distinto a rapport aux bords de la piece.Suivez la marne rn6thodeque pour la coupe 90° con el borde de la rnadera. Siga el rnismo procedimiento que seguir[a transversale(fig.
-
Page 46: Using The Rip Fence
A. Rip Fence is paralle! to sawblade. B. Spreader is properly a}igned with sawblade. C. Antikickback pawls are functioning properly. When ripping LONG BOARDS or LARGE PANELS, always use a work support. The Bosch table saw outfeed support tabie kit is an ideal accessory to use for this application. - Page 47 C. lestaquetsanti-rebondfonctionnent correctement. soporte para lapiezade trabajo. Lorsque vous d_coupezde LONGUESPLANCHES ou des PANNEAUXDE El iuego de rnesade soporte de avancede salida de la sierra de rnesa Bosch GRANDESDIMENSIONS,soutenez-lestoujours Iorsqu'ils d@assent de la es un accesor[oideal para utilizarseen esta aplicaci6n.
-
Page 48: Making A Featherboard
RESAWING is known as ripping a piece of wood through thickness, The Bosch model 4000 table saw is capable of re- sawing wood up to 6" wide by making two passes, one through each thickness edge, NOTE: To RESAW a piece of wood wider than 3"... - Page 49 Le d_doublementest la coupe d'une planchedans son _paisseur.La scie Se conoce coma REASERRADO a cortar al hilo un pedazo de madera a table de Bosch rnodSle4000 peut dSdoublerdes planches de bois d'une trav6s de su grosor. La sierra de rnesa rnodelo4000 de Bosches capazde largeur rnaximum de 6 po en deux passes permettantchacuned'enleverla reaserrarmaderade hasta 6"...
-
Page 50: Non Thru-Sawing
Non Thru-Sawing Add 8" high fiat facing board to the fence, the full length of the fence (Fig=42). Use featherboards for all "Non Thru-Sawing" operations (when sawbtade guard must be removed). Featherboards 1 are used to keep the work in contact with the fence and table as shown, and WON}( to stop kickbacks. - Page 51 Coupe part[erie Aserrado no pasante Aiiada unatabla de refrentadopiano de 8" de aitura al tope-guiaa Io largo de Montez sur [e guide de refente, sur toute sa Iongueur, une planche de 8 po toda laIongitud deltope-gala (Fig.42). de largeur (fig. 42). UtiIicetablas con canto biselado paratodas [as operacionesde ' aserradono Servez-vousde pIanches_ languettespour toutes [es op6ratJonsde coupe pasante"...
-
Page 52: Dadoing
Dado and Molding cuts should be made in the 90 ° position only. When using the dadoing and molding head it will be necessary to remove the Blade Guard and Spreader. USE CAUTION. 1. When dadoing or molding across the width of the board, use miter gauge to push the board. - Page 53 Todaslas reparacioneseI6ctricaso rnecAnicas, d eben niques ne doivent _tre effectu_es que par un ser reaIizadasOnicamentepor tScnicosde reparaci6n technicien qualifi6.Adressez-vousau Centrede serviceen usine Bosch ou capacitados.POngaseen contacto con e! Centro de servicio de f_brica mAs une Station-service Bosch agr_e ou _ tout autre service de r6paration pr6ximo o con la Estaci6n de servicio autorizada o con otro servicio de competent.
- Page 54 Thegearcasehasbeen completely lubricated at thefactory. However, after s ixmonths to oneyear, depending upon use, i t's wiseto return yourtoolto thenearest Service C enter f orthe following: Brushes replaced. ® Parts c leaned and inspected. ® Relubricated withfresh lubricant. ® Electrical system tested. Allrepairs.
- Page 55 Tousles engrenages ont 8 t_ lubrifi_s enusine. Toutefois, aprSs six rnois Lacaja deengranajes hasido completamente lubricada enf_brica. Sin unanselon l afr_quence d'utilJsation, 11 e st b oll d erenvoyer votre o ut[I au embargo despuSs deseis meses aunaiioseg@ eluso, es aconsejable Centre deservice leplus proche afin defaire proc_der aux op6rations Ilevar laherramienta alCentro deservicio rn_s cercano para hacer Io...
-
Page 56: Operating Adjustments
Trouble Shooting Guide de diagnostic Mettez I'interrupteur en position ARRET ,, et Turn switch "OFF"and always removeplug frorn the dCbranchezle cordon d alimentation avant de power source beforetrouble shooting. rechercher l escausesd'unepanne6ventuelle. TROUBLE: S AWWILL NOTSTART PROBLEME: LASOlENEgttrv_ARRE PAS PROBLEm1 1. - Page 57 Locatizaci6n reparaci6n de averias Apagueelinterruptor(posiciBn"OFF")y saquesiempre elenchufedelafuentede energ[a antesde Iocalizar y repara r aver[as. AVERIA:LA SIERRANOARRANCA PROBLEI'v1A 1 .1. El cordBndeenergiano est_enchufado. 2. El fusible o elcortacircuitohasaltado. 3. CordBndafiado. 4. Interruptor quernado REMEDIO 1. Enchufela sierra. 2. Cambieelfusible o reajusteelcortacircuitoque hasaltado. 3.
- Page 59 TEMPLATE 1 o FOR ADDING MOUNTING ROLES (FOR ATTACHMENT OF AUXILIARY FACING) GABARIT I - POUR AJOUTER DES TROUS DE MONTAGE (POUR FIXER UN GUIDE AUX&IAIRE) PLANT&LA 1: PARA A_'IADIR A GUJEROS DE MONTAJE (PARA COLOCAR UN REFRENTADO AUXILIAR) FOLLOW STEPS: SUIVEZ LESETAPES ' SJGA LOSPASOS:...
- Page 61 TEMPLATE 2 - FOR ADDING MOUNTING HOLES (FOR ATTACHMENT OF AUXILIARY FACING) GABARIT 2 - POUR AJOUTER DES TROUS DE MONTAGE (POUR F_XER UN GUIDE AUX_LIAIRE) PLANTILLA 2:PARA A_'IADIR A GUJEROS DE {VIONTAJE (PARA COLOGAR UN REFRENTADO AUXIUAR) FOLLOW STEPS: SUIVEZ LESETAPES' SIGA LOSPASOS: .,<...
- Page 63 ffHTER GUAGETEMPLATE o FOR ADDING MOUNTING ROLES (FOR ATTACHMENT OF AUXILIARY FACING) GABARIT POUR GUIDE DE COUPE AHGULAIRE POUR AJOUTER DES TROUS DE MONTAGE (POUR F_XERUN GUIDE AUX_LIAIRE) PLANT_LLA PARA EL CALIBRE DE INGLETES:PARA ANAD_R AGUJEROS DE MOHTAJE (PARA COLOCAR UN REFREHTADO AUX_LIAR) FOLLOW STEPS: SUmVEZ LEaC-TAPES : SBGA LOSPASOS:...
- Page 64 S-B Power Tool Company ("el Vendedor") garantiza, {_nicamenteal corrlprador original, que todas las herramientas mec_nicas port,tiles y pars tablero de banco BOSCH estaran Nbres de defectos de material o de fabricaciOn durante un perfodo de un afio a partir de la fecha de compra. LA UNICA OBLIGACION DEL...
Need help?
Do you have a question about the 4000 and is the answer not in the manual?
Questions and answers
does it have a motor brake or a rapid stop