Table of Contents
Advertisement
Available languages
Available languages
Advertisement
Table of Contents
Troubleshooting

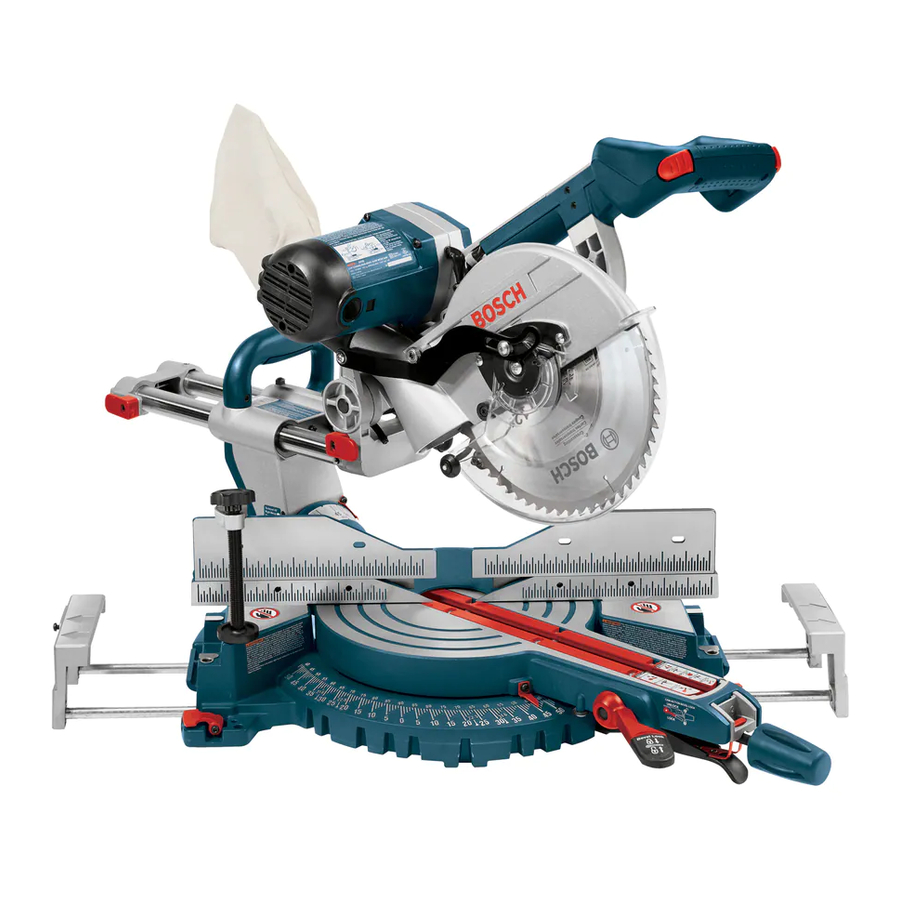
Related Manuals for Bosch 4310


Summary of Contents for Bosch 4310
- Page 1 BM 2610012089 03-10 E:BM 2610012089 03-10 E 3/30/10 7:39 AM Page 1...
-
Page 2: Save These Instructions
BM 2610012089 03-10 E:BM 2610012089 03-10 E 3/30/10 7:39 AM Page 2 “READ ALL INSTRUCTIONS” — Failure to follow the SAFETY RULES identified by BULLET (•) symbol listed BELOW and other safety precautions, may result in serious personal injury. General Safety Rules for Bench Top Tools Work Area •... - Page 3 Your hand region can easily slip or be pulled into the blade. • Do not reach in back of the saw blade behind the fence with either hand to hold down or support the workpiece, remove wood scraps, or for any other reason.
- Page 4 BM 2610012089 03-10 E:BM 2610012089 03-10 E 3/30/10 7:39 AM Page 4 • Do not use the saw until the table is clear of all tools, wood scraps, etc., except the work- piece. Small debris or loose pieces of wood or other objects that contact the revolving blade can be thrown with high speed at the operator.
- Page 5 • THINK SAFETY! SAFETY IS A COMBINATION OF OPERATOR’S COMMON SENSE, KNOWL- EDGE OF THE SAFETY AND OPERATING IN- STRUCTIONS AND ALERTNESS AT ALL TIMES WHEN THE MITER SAW IS BEING USED. WARNINGS BElOW CAN BE fOUND ON YOUR TOOl. THESE WARNINGS ARE ONlY A...
-
Page 6: Table Of Contents
Mounting Applications ....19 Mounting the saw ....20 Safety •... -
Page 7: Electrical Requirements
10. Miter Scale/Miter Angle Indicator – This scale is cast in on the base of the saw. Indicator is fas- tened to the table. 11. Miter Detents – There are ten (10) miter detent slots for fast and accurate miter cuts of common miter angles. - Page 8 26. Quick Action Clamp (Model 4410 only) – Pro- vides fast clamping of workpiece. 27. Workpiece Clamp (Model 4310 only) – Pro- vides fast clamping of workpiece. 28. Cord Wrap – Allows you to easily wrap up the cord so it’s out of the way when transporting or...
- Page 9 32. Bevel Scale – This scale is large and angled to allow you to easily read bevel angles. 33. Head Assembly lock pin – The saw is equipped with a lock pin used to lock the head assembly in the lower position for transporting.
-
Page 10: Assembly
Damage to insulation could cause an electric shock. Damage to wire connec- tions could cause a fire. Models 4310 & 4410 Miter Saws are shipped complete in one box. 1. Separate all parts from packing materials and check each one with the “Table of Loose Parts”... -
Page 11: Installation And Removal Of The Blade
(Item #39 on page 9) while turning bolt clockwise using the (multi purpose tool model 4410) or (multi purpose “L” wrench model 4310). NOTE: The blade bolt has left hand threading. 5. Remove the blade bolt, outer washer and the blade. -
Page 12: Assembling Dust Elbow And Dust Bag
BM 2610012089 03-10 E:BM 2610012089 03-10 E 3/30/10 7:40 AM Page 12 Assembling Dust Elbow And Dust Bag 1. With the miter arm locked in the down position, push the dust elbow onto the dust port. Push the dust bag onto the elbow and rotate both to de- sired position. -
Page 13: Adjustments
5. Check position of bevel range selector knob, it should be at the 0°-45° position. 6. Tilt the saw assembly to the left, then rotate saw assembly to the right until you feel the stop in the vertical position. This is where the saw is currently set for the 0°... -
Page 14: Right 45° Bevel Stop
5. Move bevel range selector knob to “0°-45° Right” position. (See page 28) 6. Tilt the saw to the right until you feel the stop in the 45° right position. This is where the saw is currently set for the 45° right bevel cut. -
Page 15: Left 45° Bevel Stop
5. Move bevel range selector knob to 45°-0° posi- tion. (See page 28) 6. Tilt the saw assembly to the left, then rotate saw assembly to the right until you feel the stop in the 45° left position. This is where the saw is cur- rently set for the 45°... -
Page 16: Blade Square To Fence
Place a com- bination square against the fence and next to the blade as illustrated. Locate the square properly so it does not contact the tooth of saw blade.The saw blade should contact the full length of the square (Figure 9). -
Page 17: Kerf Insert
3. Set the table to the 0° miter position. Push down and slide back saw head to the full back position. 4. While looking at both the blade and the corner where the fence meets the table, turn the Depth Stop Bolt to set the blade depth to about 1/4 inch below the table’s surface. -
Page 18: Slide Action Adjustment
BM 2610012089 03-10 E:BM 2610012089 03-10 E 3/30/10 7:40 AM Page 18 Disconnect source before performing any as- sembly, adjustment or repair to avoid possible injury. Slide Action Adjustment 1. Locate the 4 Set Screws (A, B, C, & D) on the Rail Guide Housing. -
Page 19: Transporting, Placement And Mounting
• Never lift tool by holding switch handle. This may cause serious damage. • Never carry the miter saw by the power cord or the operational handle. Attempting to lift or carry the tool by the power cord will damage the insulation and the wire connections resulting in electric shock or fire. -
Page 20: Mounting The Saw
Transporting, placement and Mounting Mounting the Saw portable Mounting Using Clamps • If necessary, clamp the miter saw to a workbench or table top. • Place two (2) or more “C” clamps on the clamping areas and secure (Figure 17). -
Page 21: Basic Saw Operations
• Be aware of the path of the sawblade. Make a dry run with the saw OFF by conducting a simulated cutting cycle, and observe the projected path of the sawblade. Keep hands out of the path of saw- blade. -
Page 22: Workpiece Support
Clamping Levers, reposition the extensions, and re- lock the levers (Figure 22). (See also Length Stop on page 30.) Extra-long Base Extension Rods – The optional MS1229 Base Extension Kit allow the 4310 or Wing 4410’s base extensions to extend out to 50-1/2”. Knob... -
Page 23: Switch Activation
The auxiliary fence is used with the saw in the 0° bevel position only. 1. Place a piece of wood against the miter saw fence (Figure 24). (Wood can have a maximum height of 4-1/2". Check that auxiliary fence assembly does not interfere with head assembly. -
Page 24: Detent Override
'OFF' position. NOTE: Microfine must be returned to the ‘OFF’ po- sition in order to use the standard detent system. Basic Saw Operations Miter Detent Override clip should automatically disengage and the table should lock into any desired miter detent. -
Page 25: Sliding Fences And Base Extensions
Clamping Levers needs to be adjusted, simply pull the red tab outward and rotate it toward the center of the saw. Let the red tab spring back into a new groove. When the red tabs are rotated down to clamp the rods, they will grip the rods with greater strength. -
Page 26: Saw Operations
• This type of cut is used mainly for wide pieces. • A positive blade hook of 10 degrees or more is recommended for best performance when mak- ing aggressive cuts or cutting thicker materials. -
Page 27: Miter Cut
1. Loosen miter lock knob. Lift miter detent lever and move the saw to the desired angle, using either the detents or the miter scale. Tighten miter lock knob (Figure 32). 2. Extend the base extensions and fence on the side on which the cut will be made. -
Page 28: Bevel Cut
“Max Range” (Figure 34). d. Tilted saw head to any angle from 47° left to 46° 45°-0 right. left e. -
Page 29: Compound Cuts
27 and 28 for miter and bevel cuts. 4. Follow the procedures for either chop cut or slide cut (see page 26). Saw Operations Compound Cuts 5. Wait until blade comes to a complete stop be- fore returning head assembly to the raised po- sition and / or removing workpiece. -
Page 30: Cutting Grooves
The optional MS1230 Length Stop Kit can also be installed on the left side to provide stops on either side of the saw. To increase the length that can be cut using the length stop, replace the tool’s base extension rods... -
Page 31: Cutting Base Molding
38° and 45° spring angles (and the material is laid flat on the miter saw base). Each chart lists the exact miter and bevel settings required for a wide range of corner angles. - Page 32 1. For 90º corner, set the bevel and miter angles using Charts below. Tighten the miter lock knob and the bevel lock lever (Figure 39). 2. Position molding on saw table. Clamp workpiece in place using the quick clamp. Use clamping position that does not interfere with operation.
-
Page 33: Cutting Crown Molding
Crown Molding Angled to Table and fence The preferred method for cutting crown molding with this saw is with the molding laying flat on the table. • The advantage to cutting moldings angled against fence is that no bevel setting is required. Only the miter angle is adjusted. -
Page 34: Special Cuts
Bent or warped work- pieces can twist or rock and may cause binding on the spinning saw blade while cutting (Figure 41). Cutting Round or Irregularly Shaped Material... - Page 35 1st Time Use of the Auxiliary fence: Note: The 1st time the auxiliary fence is used, it will be cut through by the saw blade – cutting through creates minimal clearance which reduces splintering on the workpiece. Set the miter angle and the bevel angle required before making the first cut.
- Page 36 BM 2610012089 03-10 E:BM 2610012089 03-10 E 3/30/10 7:42 AM Page 36 figure 3 Drill 4 holes - 2 as shown from left edge (as shown) and 2 from right edge 3-3/4" 6-3/4" Wood Board Stationary Fence on Tool 3/4" 5/16 Inch Hole Through Flat Washer 1/2 Inch Countersink...
-
Page 37: Maintenance And Lubrication
Motor Brush Replacement To Inspect or Replace Brushes: 1. Unplug the saw. The brush cap is spring loaded by the brush assembly. 2. Remove the brush cap on the motor using a wide flat blade screwdriver. -
Page 38: Troubleshooting
Care of Blades Blades become dull even from cutting regular lum- ber. If you find yourself forcing the saw forward to cut instead of just guiding it through the cut, chances are the blade is dull or coated with wood pitch. - Page 39 4. Sawdust accumulation. 1. Improper operation. 2. Dull blade. 3. Improper blade. 4. Bent blade. 1. Saw blade not round. 2. Saw blade damaged. 3. Saw blade loose. 4. Other. CORRECTIVE ACTION - Pull out 33.9° stop and rotate it 90°.
-
Page 40: Accessories
MS1230 length Stop Kit. MS1231 Replacement Kerf Inserts MS1232 Replacement Dust Bag T3B TracRac™ portable Stand with Wheels T4B Gravity-Rise Wheeled Miter Saw Stand lS010 Miter Saw laser Washer Guide CORRECTIVE ACTION - See Depth Stop Adjustment in the Adjustment section. - Page 41 BM 2610012089 03-10 S:BM 2610012089 03-10 S 3/30/10 8:18 AM Page 41...
- Page 42 BM 2610012089 03-10 S:BM 2610012089 03-10 S 3/30/10 8:18 AM Page 42...
- Page 43 BM 2610012089 03-10 S:BM 2610012089 03-10 S 3/30/10 8:18 AM Page 43...
- Page 44 BM 2610012089 03-10 S:BM 2610012089 03-10 S 3/30/10 8:18 AM Page 44...
- Page 45 BM 2610012089 03-10 S:BM 2610012089 03-10 S 3/30/10 8:18 AM Page 45...
- Page 46 BM 2610012089 03-10 S:BM 2610012089 03-10 S 3/30/10 8:18 AM Page 46...
- Page 47 BM 2610012089 03-10 S:BM 2610012089 03-10 S 3/30/10 8:19 AM Page 47...
- Page 48 BM 2610012089 03-10 S:BM 2610012089 03-10 S 3/30/10 8:19 AM Page 48...
- Page 49 BM 2610012089 03-10 S:BM 2610012089 03-10 S 3/30/10 8:19 AM Page 49 Combination Square Combination Square Must be True Draw Light Line on Board Along this Edge Should be no Gap or Overlap when Square is Flipped Over n Dotted Position Multi Purpose “L”...
- Page 50 BM 2610012089 03-10 S:BM 2610012089 03-10 S 3/30/10 8:19 AM Page 50 Arbor Shaft Inner Washer...
- Page 51 BM 2610012089 03-10 S:BM 2610012089 03-10 S 3/30/10 8:19 AM Page 51 U N L O C K L O C...
- Page 52 BM 2610012089 03-10 S:BM 2610012089 03-10 S 3/30/10 8:19 AM Page 52...
- Page 53 BM 2610012089 03-10 S:BM 2610012089 03-10 S 3/30/10 8:19 AM Page 53 Bevel Pointer...
- Page 54 BM 2610012089 03-10 S:BM 2610012089 03-10 S 3/30/10 8:19 AM Page 54...
- Page 55 BM 2610012089 03-10 S:BM 2610012089 03-10 S 3/30/10 8:19 AM Page 55 Blade...
- Page 56 BM 2610012089 03-10 S:BM 2610012089 03-10 S 3/30/10 8:19 AM Page 56...
- Page 57 BM 2610012089 03-10 S:BM 2610012089 03-10 S 3/30/10 8:19 AM Page 57...
- Page 58 BM 2610012089 03-10 S:BM 2610012089 03-10 S 3/30/10 8:19 AM Page 58...
- Page 59 BM 2610012089 03-10 S:BM 2610012089 03-10 S 3/30/10 8:19 AM Page 59...
- Page 60 BM 2610012089 03-10 S:BM 2610012089 03-10 S 3/30/10 8:20 AM Page 60...
- Page 61 BM 2610012089 03-10 S:BM 2610012089 03-10 S 3/30/10 8:20 AM Page 61...
- Page 62 BM 2610012089 03-10 S:BM 2610012089 03-10 S 3/30/10 8:20 AM Page 62...
- Page 63 BM 2610012089 03-10 S:BM 2610012089 03-10 S 3/30/10 8:20 AM Page 63...
- Page 64 BM 2610012089 03-10 S:BM 2610012089 03-10 S 3/30/10 8:20 AM Page 64...
- Page 65 BM 2610012089 03-10 S:BM 2610012089 03-10 S 3/30/10 8:20 AM Page 65...
- Page 66 BM 2610012089 03-10 S:BM 2610012089 03-10 S 3/30/10 8:20 AM Page 66...
- Page 67 BM 2610012089 03-10 S:BM 2610012089 03-10 S 3/30/10 8:20 AM Page 67...
- Page 68 BM 2610012089 03-10 S:BM 2610012089 03-10 S 3/30/10 8:20 AM Page 68...
- Page 69 BM 2610012089 03-10 S:BM 2610012089 03-10 S 3/30/10 8:21 AM Page 69...
- Page 70 BM 2610012089 03-10 S:BM 2610012089 03-10 S 3/30/10 8:21 AM Page 70...
- Page 71 BM 2610012089 03-10 S:BM 2610012089 03-10 S 3/30/10 8:21 AM Page 71...
- Page 72 BM 2610012089 03-10 S:BM 2610012089 03-10 S 3/30/10 8:21 AM Page 72...
- Page 73 BM 2610012089 03-10 S:BM 2610012089 03-10 S 3/30/10 8:21 AM Page 73...
- Page 74 BM 2610012089 03-10 S:BM 2610012089 03-10 S 3/30/10 8:21 AM Page 74...
- Page 75 BM 2610012089 03-10 S:BM 2610012089 03-10 S 3/30/10 8:21 AM Page 75 3-3/4" Tabla de madera Tope-guía estacionario ubicado en la herramienta Arandela plana Tuerca Tope-guía estacionario ubicado en la herramienta Haga 4 agujeros, 2 como se muestra desde el borde izquierdo (del modo mostrado en la ilustración) y 2 desde el borde derecho 6-3/4"...
- Page 76 BM 2610012089 03-10 S:BM 2610012089 03-10 S 3/30/10 8:21 AM Page 76...
- Page 77 BM 2610012089 03-10 S:BM 2610012089 03-10 S 3/30/10 8:21 AM Page 77...
- Page 78 BM 2610012089 03-10 S:BM 2610012089 03-10 S 3/30/10 8:21 AM Page 78...
- Page 79 BM 2610012089 03-10 S:BM 2610012089 03-10 S 3/30/10 8:21 AM Page 79...
- Page 80 BM 2610012089 03-10 F:BM 2610012089 03-10 F 3/30/10 8:47 AM Page 80...
- Page 81 BM 2610012089 03-10 F:BM 2610012089 03-10 F 3/30/10 8:47 AM Page 81...
- Page 82 BM 2610012089 03-10 F:BM 2610012089 03-10 F 3/30/10 8:47 AM Page 82...
- Page 83 BM 2610012089 03-10 F:BM 2610012089 03-10 F 3/30/10 8:47 AM Page 83...
- Page 84 BM 2610012089 03-10 F:BM 2610012089 03-10 F 3/30/10 8:47 AM Page 84 Wire Sizes in mm Cord Size in A.W.G. Tool’s Ampere Cord Length in Feet Cord Length in Meters Rating...
- Page 85 BM 2610012089 03-10 F:BM 2610012089 03-10 F 3/30/10 8:47 AM Page 85...
- Page 86 BM 2610012089 03-10 F:BM 2610012089 03-10 F 3/30/10 8:48 AM Page 86...
- Page 87 BM 2610012089 03-10 F:BM 2610012089 03-10 F 3/30/10 8:48 AM Page 87...
- Page 88 BM 2610012089 03-10 F:BM 2610012089 03-10 F 3/30/10 8:48 AM Page 88 Combination Square Combination Square Must be True Draw Light Line on Board Along this Edge Should be no Gap or Overlap when Square is Flipped Over in Dotted Position Multi Purpose “L”...
- Page 89 BM 2610012089 03-10 F:BM 2610012089 03-10 F 3/30/10 8:48 AM Page 89...
- Page 90 BM 2610012089 03-10 F:BM 2610012089 03-10 F 3/30/10 8:48 AM Page 90 U N L O C K L O C...
- Page 91 BM 2610012089 03-10 F:BM 2610012089 03-10 F 3/30/10 8:48 AM Page 91...
- Page 92 BM 2610012089 03-10 F:BM 2610012089 03-10 F 3/30/10 8:48 AM Page 92 3mm “L” Wrench Adjusting Access Hole Bevel Pointer...
- Page 93 BM 2610012089 03-10 F:BM 2610012089 03-10 F 3/30/10 8:48 AM Page 93...
- Page 94 BM 2610012089 03-10 F:BM 2610012089 03-10 F 3/30/10 8:48 AM Page 94...
- Page 95 BM 2610012089 03-10 F:BM 2610012089 03-10 F 3/30/10 8:48 AM Page 95...
- Page 96 BM 2610012089 03-10 F:BM 2610012089 03-10 F 3/30/10 8:48 AM Page 96...
- Page 97 BM 2610012089 03-10 F:BM 2610012089 03-10 F 3/30/10 8:48 AM Page 97...
- Page 98 BM 2610012089 03-10 F:BM 2610012089 03-10 F 3/30/10 8:48 AM Page 98...
- Page 99 BM 2610012089 03-10 F:BM 2610012089 03-10 F 3/30/10 8:49 AM Page 99...
- Page 100 BM 2610012089 03-10 F:BM 2610012089 03-10 F 3/30/10 8:49 AM Page 100...
- Page 101 BM 2610012089 03-10 F:BM 2610012089 03-10 F 3/30/10 8:49 AM Page 101...
- Page 102 BM 2610012089 03-10 F:BM 2610012089 03-10 F 3/30/10 8:49 AM Page 102...
- Page 103 BM 2610012089 03-10 F:BM 2610012089 03-10 F 3/30/10 8:49 AM Page 103...
- Page 104 BM 2610012089 03-10 F:BM 2610012089 03-10 F 3/30/10 8:49 AM Page 104...
- Page 105 BM 2610012089 03-10 F:BM 2610012089 03-10 F 3/30/10 8:49 AM Page 105...
- Page 106 BM 2610012089 03-10 F:BM 2610012089 03-10 F 3/30/10 8:49 AM Page 106...
- Page 107 BM 2610012089 03-10 F:BM 2610012089 03-10 F 3/30/10 8:49 AM Page 107...
- Page 108 BM 2610012089 03-10 F:BM 2610012089 03-10 F 3/30/10 8:49 AM Page 108...
- Page 109 BM 2610012089 03-10 F:BM 2610012089 03-10 F 3/30/10 8:49 AM Page 109...
- Page 110 BM 2610012089 03-10 F:BM 2610012089 03-10 F 3/30/10 8:50 AM Page 110...
- Page 111 BM 2610012089 03-10 F:BM 2610012089 03-10 F 3/30/10 8:50 AM Page 111...
- Page 112 BM 2610012089 03-10 F:BM 2610012089 03-10 F 3/30/10 8:50 AM Page 112...
- Page 113 BM 2610012089 03-10 F:BM 2610012089 03-10 F 3/30/10 8:50 AM Page 113...
- Page 114 BM 2610012089 03-10 F:BM 2610012089 03-10 F 3/30/10 8:50 AM Page 114 Percez 4 trous - 2 comme indiqué à partir du bord gauche (comme indiqué) et 2 à partir du bord droit 3-3/4 po 6-3/4 po Planche de bois Guide fixe de la machine 3/4 po Trou débouchant de 5/16 pouce...
- Page 115 BM 2610012089 03-10 F:BM 2610012089 03-10 F 3/30/10 8:50 AM Page 115...
- Page 116 BM 2610012089 03-10 F:BM 2610012089 03-10 F 3/30/10 8:50 AM Page 116...
- Page 117 BM 2610012089 03-10 F:BM 2610012089 03-10 F 3/30/10 8:50 AM Page 117...
- Page 118 BM 2610012089 03-10 F:BM 2610012089 03-10 F 3/30/10 8:50 AM Page 118...
- Page 119 BM 2610012089 03-10 F:BM 2610012089 03-10 F 3/30/10 8:50 AM Page 119...
- Page 120 BM 2610012089 03-10 F:BM 2610012089 03-10 F 3/30/10 8:50 AM Page 120 2610012089 03/10 Printed in Taiwan...
Need help?
Do you have a question about the 4310 and is the answer not in the manual?
Questions and answers