Table of Contents
Advertisement
Quick Links
Advertisement
Table of Contents

Related Manuals for REPLIGEN CTech SoloVPE PLUS


Summary of Contents for REPLIGEN CTech SoloVPE PLUS
- Page 1 CTech SoloVPE PLUS ™ ® System User Guide DOC0362 eRev. 1.0 [Publication Date] repligen.com © 2024 Repligen Corporation. All rights reserved. The trademarks mentioned herein are the property of Repligen Corporation and/or its affiliate(s) or their respective owners.
- Page 2 Product are expressly disclaimed. The customer shall refer to the terms and conditions of sale governing the transaction for all warranties for the Product. Repligen Corporation shall not be liable for errors contained herein or for incidental or consequential damages in connection with the furnishing, performance, or use of this material.
-
Page 3: Table Of Contents
CTech™ SoloVPE® PLUS System User Guide Table of Contents 5.4.1 Computer Requirements ..............................11 7.1.1 How to Clean Optical Surfaces of Fibrette Optical Component ..................23 7.3.1 How to Remove Quick Set Fibrette Coupler Insert ......................24 7.3.2 How to Install Quick Set Fibrette Coupler Insert ......................25 7.3.3 How to Load the Quick Set Fibrette Coupler ........................ - Page 4 CTech™ SoloVPE® PLUS System User Guide List of figures Figure 1. Regulatory information on SoloVPE PLUS instrument back panel....................6 Figure 2. SoloVPE PLUS parts and components (cover down)........................9 Figure 3. SoloVPE PLUS parts and components (cover up)........................10 Figure 4.
-
Page 5: About This Document
Designed for use with the CTech™ ViPER® ANLYTX Software platform integrating data integrity and audit logging, the SoloVPE PLUS is an extremely capable and formidable tool for at-line process analytics. For a full listing of performance specifications of the SoloVPE PLUS System, please see the CTech SoloVPE PLUS System Specification Sheet DOC0361. -
Page 6: Table 3. Regulatory Information
CTech™ SoloVPE® PLUS System User Guide 4. Regulatory Table 3. Regulatory information Symbol Description The CE marking (conformité européenne, or “European conformity”) certifies that a product has met EU health, CE Compliance safety, and environmental requirements, which ensure consumer safety. UKCA The United Kingdom Conformity Assessment (UKCA) marking is used for products being placed on the market in Compliance... -
Page 7: Table 4. Mains Supply Information
PLUS installations utilizing cabling longer than three meters and/or customer-provided 24 VDC power through the I/O cable have not been tested for CE compliance. The CTech SoloVPE PLUS has been designed and tested for compliance by independent testing laboratories in accordance with the standards listed on the Declaration of Conformity documents listed above. - Page 8 4.4 WEEE Compliance Repligen Corporation has met its obligations to the EU WEEE Directive by registering in those countries to which Repligen Corporation is an importer. Repligen Corporation has also elected to join WEEE Compliance Schemes in some countries to help manage customer returns at end-of-life.
-
Page 9: System Overview
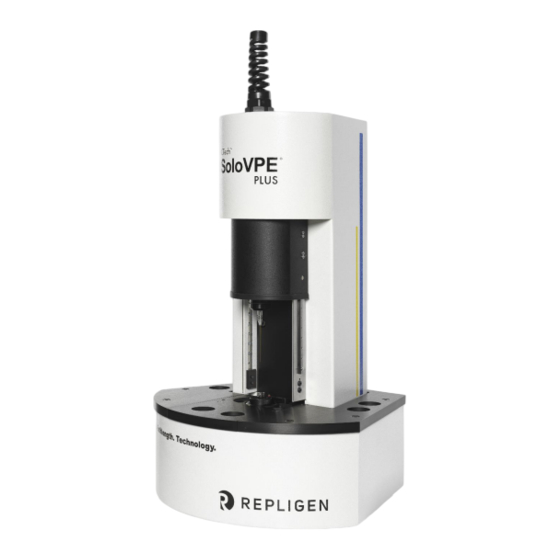
CTech™ SoloVPE® PLUS System User Guide 5. System Overview The CTech™ SoloVPE® PLUS System hardware is composed of several integrated components. 5.1 SoloVPE PLUS Instrument The SoloVPE PLUS instrument measures sample concentration using absorbance spectroscopy and a derivation of the Beer-Lambert law. -
Page 10: Figure 3. Solovpe Plus Parts And Components (Cover Up)
The Cary 60 UV-Vis spectrophotometer serves as the light source and electrical power supply for the SoloVPE PLUS instrument. The Cary 60 uses a Dual Use Fiber Optic Coupler, provided by Repligen, to transmit light through the Delivery Fiber to the SoloVPE PLUS instrument. -
Page 11: Computer Requirements
CTech™ SoloVPE® PLUS System User Guide 5.4.1 Computer Requirements • Microsoft Windows® 10 (64 bit) • Intel® i5 Processor (i7 Preferred) • 8 GB RAM (16 GB Preferred) • 250 GB Storage (solid state recommended) • ViPER ANLYTX v1.3 or newer •... -
Page 12: System Hardware Installation
6. System Hardware Installation Note: System installation should be performed only by a trained Repligen Field Service Engineer or authorized service provider. Please read and understand the following instructions prior to making any connections. These step-by-step directions guide the user through the process of making the four primary connections required between the computer, the Agilent Cary 60, and the SoloVPE PLUS instrument. -
Page 13: Figure 6. Dimensions Of Solovpe Plus Instrument, Cary 60 Spectrophotometer, And Computer
Configuration 1: On top of the Cary 60 Figure 7. Optional configurations of SoloVPE PLUS instrument and Cary 60. 6.1 System Hardware Installation: Step-by-Step Note: System installation should be performed only by a trained Repligen Field Service Engineer or authorized service provider. DOC0362 eRev. 1.0 [Publication Date]... - Page 14 CTech™ SoloVPE® PLUS System User Guide Step 1: Unpack and Verify Carefully unpack the equipment and all accessories. Confirm receipt of all items on the packing list included with the shipment. Step 2: System Computer Setup Use the instructions provided with the computer system for proper setup. Note: It is best to complete this procedure with the computer turned off.
- Page 15 CTech™ SoloVPE® PLUS System User Guide Step 4: Connect the Power Cable to the Power Brick Connect the power cable to the power adapter brick (EC0025). Then plug the opposite end into a power outlet with the approved input voltage (see Table 4. Mains supply information or Figure 5).
- Page 16 CTech™ SoloVPE® PLUS System User Guide Step 7: Connect Detector Cable to SoloVPE PLUS instrument The Detector Cable (EC0027) has two different connectors. The black plastic connector is for the connection to the Cary 60. The silver connector is for the connection to the SoloVPE PLUS instrument’s back panel.
- Page 17 CTech™ SoloVPE® PLUS System User Guide Step 10: Insert Delivery Fiber through Strain Relief Note: Keep the protective plastic cap on the FC end of the Delivery Fiber during this step. The Delivery Fiber has two different connectors: an SMA connector with a hex- shaped nut and an FC connector with a keyed connector with a round knurled nut.
- Page 18 CTech™ SoloVPE® PLUS System User Guide Step 13: Secure Fiber Optic Coupler Within Cary 60 Using the large thumbscrew in its baseplate, secure the FOC to the base of the sample compartment. Tighten securely to prevent shifting. Step 14: Pass the Cables into the Cary 60 Pass the Detector Cable (black, right-angle plug end) and the Delivery Fiber (SMA/hex-nut end) into the sample compartment through the now open sample compartment access port at the rear of the Cary 60.
- Page 19 CTech™ SoloVPE® PLUS System User Guide Step 16: Connect Delivery Fiber to Fiber Optic Coupler With the FOC installed, uncap the Delivery Fiber that was fed into the sample compartment. Connect the SMA end of the Delivery Fiber to the threaded splice bushing at the back of the FOC.
- Page 20 CTech™ SoloVPE® PLUS System User Guide Step 19: Connect Power Cable to Cary 60 Connect the power cord (supplied with the Cary 60) to the back of the Cary 60. The transformer has a separate cord that runs to the wall outlet to allow for various power connectors.
- Page 21 CTech™ SoloVPE® PLUS System User Guide Step 22: Follow Manual Directions to Install All Software Installation of the CTech ViPER ANLYTX Software should only be done by a trained Support Specialist or under the guidance of one. While logged into the computer with administrator privileges, install the ViPER ANLYTX Software.
- Page 22 CTech™ SoloVPE® PLUS System User Guide Step 25: Connect USB Cable to Computer With the computer and Cary 60 powered on, connect the USB cable to the computer. The computer will audibly acknowledge that a USB device was connected and automatically detect and install the drivers for the Cary 60. Congratulations! The SoloVPE PLUS System is ready for use! DOC0362 eRev.
-
Page 23: Using The System
7.1.1 How to Clean Optical Surfaces of Fibrette Optical Component *Warning: Repligen strongly recommends that Fibrette Optical Components only be used once to avoid the risk of measurement errors associated with improper cleaning and storage, damage, or carryover. This procedure is provided strictly for support of noncritical, academic, and non-GxP implementations for which measurement accuracy tolerances have been deemed less critical. -
Page 24: How To Remove Quick Set Fibrette Coupler Insert
Figure 8. Quick Set Coupler with Fibrette Optical Component inserted. 7.3.1 How to Remove Quick Set Fibrette Coupler Insert Before initial installation or removal of a Quick Set Fibrette Coupler Insert, it is best to get assistance from a Repligen analytical support specialist. -
Page 25: How To Install Quick Set Fibrette Coupler Insert
CTech™ SoloVPE® PLUS System User Guide Figure 9. Removing Quick Set Fibrette Coupler. 4. Push the insert up through the Holder for removal, keeping the white O-ring in place. Their connection is magnetized, so there will be some resistance (see Figure 10 and Figure 11). Figure 10. - Page 26 CTech™ SoloVPE® PLUS System User Guide Step 1: Load the Fibrette Optical Component To load the Fibrette Optical Component into the Quick Set Coupler, gently push the Fibrette Optical Component fully upward until it stops against the surface of the Delivery Fiber.
-
Page 27: Fused Silica Sample Vessels
Figure 8 provides information to help users choose the appropriate vessel for their application. Repligen does not recommend reuse of sample vessels. If you do wish to reuse a sample vessel, please follow the steps for proper cleaning listed in CTech SoloVPE and SoloVPE PLUS Best Practices DOC0153. -
Page 28: Plastic Sample Vessels
7.5.3 Plastic Sample Vessels In addition to the fused silica vessels, Repligen’s Analytics business unit provides OC0009-1 small disposable UV-grade plastic vessels. Plastic vessels can be used across a broad wavelength range (220 nm to 800 nm) while providing excellent resistance to a wide variety of chemical species. - Page 29 Run Standard Test Restart the Cary once a week or before every run (if run > 7 Run provided CHEM013 standard, ConfiRM® slope reference days). This is recommended by Repligen for consistent material, or the current UV standard (e.g., BSA). performance.
-
Page 30: Figure 14. Validate Vpt App: Instrument Control Panel
CTech™ SoloVPE® PLUS System User Guide 8. Performing Transmission Tests 8.1 Coupler Check The Coupler Check test conducts a transmission check using the Transmission Tool. The Coupler Check test establishes a baseline transmission reading for the SoloVPE PLUS System. This will also measure the maximum transmission of the system. Quick Check then takes a transmission reading and compares it with the Coupler Check results. -
Page 31: Figure 16. Disconnect Delivery Fiber From Translation Stage
CTech™ SoloVPE® PLUS System User Guide Figure 16. Disconnect Delivery Fiber from Translation Stage. Notch Keyway Figure 17. Connect Delivery Fiber to Transmission Tool. Figure 18. Connect Transmission Tool to Translation Stage. 3. Place the Transmission tool on top of the SoloVPE PLUS Detector Window (Figure 18). 4. -
Page 32: Figure 19. Coupler Check Window With Coupler Check Results
CTech™ SoloVPE® PLUS System User Guide Figure 19. Coupler Check window with Coupler Check results. 7. Remove the Delivery Fiber from the SoloVPE PLUS device and detach the Fiber from the Transmission Tool. 8. Reinsert the Delivery Fiber through the top of the SoloVPE PLUS device via the Strain Relief and reattach it to the SoloVPE PLUS Translation Stage connection by aligning the notch into the keyway and rotating the FC connector end clockwise (see the image below). -
Page 33: Figure 21. Prepare For Quick Check Window Prompt And Requirements
Perform the daily and weekly maintenance best practices and retry the Quick Check once completed. • The Pass/Fail criteria can be revised in the App Configuration tab in Admin Settings. Repligen recommends keeping this value at 70.00% for 500.00 nm. Figure 22. Failed Quick Check. -
Page 34: Figure 24. Reference Standard Information Fields
CTech™ SoloVPE® PLUS System User Guide Figure 24. Reference Standard Information Fields 4. Load the filled sample vessel into the sample vessel holder and insert a clean, new Fibrette Optical Component into the Quick Set Coupler. Slide the SoloVPE cover down to block stray light from reaching the detector. 5. -
Page 35: Table 7. General Troubleshooting Issues And Suggested Actions
CTech™ SoloVPE® PLUS System User Guide 9. General Troubleshooting This chapter lists possible unexpected performance of the system, likely causes of these conditions, and recommended actions to resolve the issue. Table 7. General troubleshooting issues and suggested actions Issue Cause Action Cary 60 Indicator Lamp Not •... - Page 36 • Disconnect both ends of the Delivery Fiber and hold it up to the light to make sure there is not a break. If broken, contact Repligen’s Analytics Support. The light should be visible through the fiber. • Ensure that the Fiber Optic Coupler is set in the proper position.
-
Page 37: Appendix 1 | Sample Volume Help Sheet
CTech™ SoloVPE® PLUS System User Guide Appendix 1 | Sample Volume Help Sheet When using the variable pathlength technology of the SoloVPE PLUS System, it is always important to make sure that enough sample volume has been dispensed to cover the range of pathlengths to be measured. Use the following suggestions and the volume matrix provided in Table 8 to help guarantee adequate sample volume is available for the desired measurement pathlengths. -
Page 38: Appendix 2 | The Derivation Of The Slope Spectroscopy Equation
CTech™ SoloVPE® PLUS System User Guide Appendix 2 | The Derivation of the Slope Spectroscopy Equation Variable pathlength technology enables the Slope Spectroscopy method for finding the concentration of a sample. The Slope Spectroscopy equation is derived from the Beer-Lambert law. Equation Definitions ��... -
Page 39: Appendix 3 | Solovpe Plus Pathlength Defined
CTech™ SoloVPE® PLUS System User Guide Appendix 3 | SoloVPE PLUS Pathlength Defined Figure 25 shows a SoloVPE PLUS sample vessel and Fibrette Optical Component as they are used in the SoloVPE PLUS System. The pathlength is defined by the bottom of the Fibrette Optical Component and the bottom of the sample vessel. By dynamically changing this gap, the SoloVPE PLUS System can produce thousands of different pathlengths for measurement. - Page 40 This section of the manual provides an overview of these concepts and serves as a quick reference. This glossary contains content developed by Repligen subject-matter experts or retrieved (whole or in part) from the American Society for Quality glossary, the International Accreditation Forum website, and Spectroscopy magazine’s “The Molecular Spectroscopy Terminology Guide”...
- Page 41 CTech™ SoloVPE® PLUS System User Guide Sample Vessel: The component of the SoloVPE PLUS System that holds the sample to be measured. There are different sizes (volumes) of sample vessels and materials (fused silica and UV plastic). Sample Vessel Holder: The component of the SoloVPE PLUS System that properly secures the sample vessel in the instrument in preparation for measurement.
-
Page 42: Customer Service
Repligen Corporation 685 Route 202/206 Bridgewater, NJ 08807 analytics-support@repligen.com (908) 707-1009 DOC0362 eRev. 1.0 [Publication Date] repligen.com © 2024 Repligen Corporation. All rights reserved. The trademarks mentioned herein are the property of Repligen Corporation and/or its affiliate(s) or their respective owners.
Need help?
Do you have a question about the CTech SoloVPE PLUS and is the answer not in the manual?
Questions and answers