
Related Manuals for REPLIGEN TangenX PRO PD LHV


Summary of Contents for REPLIGEN TangenX PRO PD LHV
- Page 1 TangenX™ PRO PD Low Holdup Volume (LHV) System USER GUIDE Page 1 of 15 Page 1 of 14 Identification IF.PUG.010 Revision Approved 20-DEC-2018...
- Page 2 The information contained in this document is subject to change without notice. Repligen Corporation makes no warranty of any kind with regard to this material, including, but not limited to, the implied warranties of merchantability and fitness for a particular purpose.
-
Page 3: Table Of Contents
4.8 System Sanitization ........................12 4.9 Cassette Installation ......................... 13 Chemical Restrictions ......................13 5.1 Chemical Restrictions ....................... 13 5.2 CAUTION ..........................13 Repligen TangenX™ Standard Warranty ................14 List of Figures Figure 1.1 Product contents ....................... 4 Figure 4.1 Unpacking the TangenX™... -
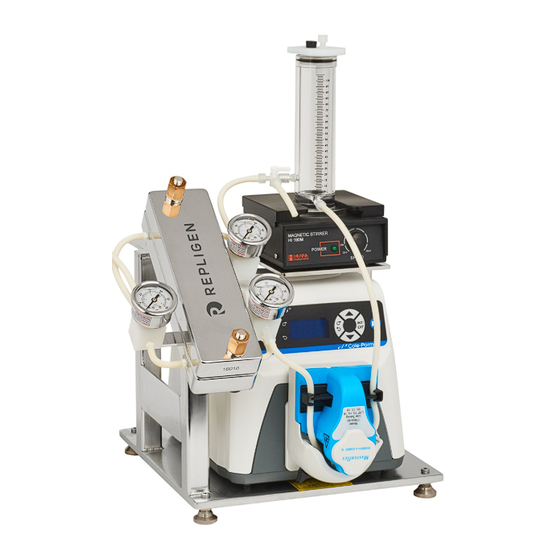
Page 4: Product Contents
User Guide TangenX™ PRO PD LHV System 1. Product Contents Before you begin set up of the TangenX™ PRO PD Low Holdup Volume (LHV) System, please check the shipping carton to ensure the following items have been included: Figure 1.1 Product contents TangenX™... -
Page 5: Required For Operation
User Guide TangenX™ PRO PD LHV System Retentate Tubing Pack Feed Tubing Pack Filtrate Tubing Pack Required for operation • 110V / 220V Power supply • Filtrate Collection Vessel Retentate Collection Vessel • • Waste Collection Vessel •... -
Page 6: Pump Installation
User Guide TangenX™ PRO PD LHV System 5. Locate the four leveling feet in the “accessory package” and thread them into the base of the LHV frame. Figure 4.2 Unpacking the TangenX™ PRO PD LHV frame Step 5 6. The TangenX™ PRO PD LHV frame assembly is complete. 4.2 Pump Installation 1. -
Page 7: Figure 4.4 Pump Installation Step 5
User Guide TangenX™ PRO PD LHV System 5. Mount pump head onto the pump. See the Easy-Load® 3 pump head operating manual for instructions. Figure 4.4 Pump installation Step 5 6. Pump head should be mounted so that the tubing will enter and exit vertically in the upwards position when loaded. -
Page 8: Magnetic Stirrer Installation
User Guide TangenX™ PRO PD LHV System 4.3 Magnetic Stirrer Installation 1. Take the magnetic stirrer and locate the black rubber-padded “feet” underneath the plate. 2. The magnetic stir plate shelf is located on the upper right side of the frame when facing the lab bench. -
Page 9: Reservoir Installation
User Guide TangenX™ PRO PD LHV System 4.4 Reservoir Installation 1. The notched reservoir base that holds the reservoir is located on the frame right above the stir plate. 2. Obtain either the 100 ml or 500 ml reservoir, depending on which one will be used during processing. -
Page 10: Tubing Installation - Retentate Connection
User Guide TangenX™ PRO PD LHV System Figure 4.9 Reservoir to pump head to holder connection 6. Connection is made by gently pushing the tubing onto the barbed fitting and turning the tubing cap clockwise until the tubing is secure. 4.6 Tubing Installation –... -
Page 11: Tubing Installation - Filtrate Connection
User Guide TangenX™ PRO PD LHV System 6. Attach the second, longer length of tubing to the 3-way valve on the acrylic reservoir (connect at the 90° angle end) as shown. Figure 4.11 Retentate Connection Step 6 7. Place the other end of the tubing into a collection vessel. 4.7 Tubing Installation –... -
Page 12: System Sanitization
User Guide TangenX™ PRO PD LHV System 4.8 System Sanitization 1. Open the stainless steel cassette holder by loosening the two bronze silicone nuts and remove them from the holder. 2. Remove the two stainless steel washers 3. Lift the end plate off the manifold. 4. -
Page 13: Cassette Installation
User Guide TangenX™ PRO PD LHV System 4.9 Cassette Installation 1. Membrane cassettes (sold separately) must be installed with gaskets between the top and bottom manifold plates of the holder prior to operation. 2. Refer to the Membrane Cassette User Guide for TangenX™ PRO PD or TangenX™ SIUS™ PD Cassettes. -
Page 14: Repligen Tangenx™ Standard Warranty
In the event of a breach of the foregoing warranty, Repligen’s sole obligation shall be to repair or replace, at its option, the applicable product or part thereof, provided the customer notifies Repligen promptly of any such breach.
Need help?
Do you have a question about the TangenX PRO PD LHV and is the answer not in the manual?
Questions and answers