
Related Manuals for Black Box EMERALD DESKVUE


Summary of Contents for Black Box EMERALD DESKVUE
- Page 1 USER MANUAL EMD5104-R EMERALD DESKVUE ® KVM RECEIVER 24/7 TECHNICAL SUPPORT AT 1.877.877.2269 OR VISIT BLACKBOX.COM...
- Page 2 NEED HELP? LEAVE THE TECH TO US LIVE 24/7 TECHNICAL SUPPORT 1.877.877.2269 This page intentionally left blank. 1.877.877.2269 BLACKBOX.COM...
-
Page 3: Table Of Contents
NEED HELP? LEAVE THE TECH TO US LIVE 24/7 TABLE OF CONTENTS TECHNICAL SUPPORT 1.877.877.2269 QUICK START GUIDE ..................... 5 SETTING UP AND USING DESKVUE ....................................5 CHAPTER 1: INTRODUCTION ..................7 1.1 INTRODUCTION ................................................7 1.2 FEATURES ..................................................8 1.3 WHAT’S INCLUDED ..............................................8 1.4 PRODUCT IMAGES .............................................. - Page 4 NEED HELP? LEAVE THE TECH TO US LIVE 24/7 TABLE OF CONTENTS TECHNICAL SUPPORT 1.877.877.2269 3.10 USERS TAB ............................................65 3.10.1 Add New User ..............................................66 3.10.2 User Menu Options ............................................69 3.11 SYSTEM TAB ............................................74 CHAPTER 4: TROUBLESHOOTING .................77 APPENDIX A: BOXILLA DISCOVERY ..............78 A.1 BOXILLA DISCOVERY ............................................78 A.1.1 Discovering and Managing the DESKVUE Unit ....................................
-
Page 5: Quick Start Guide
NOTE: This is the defaut state only; it will change after the password is changed or managed by Boxilla. Configure the Emerald DESKVUE. NOTE: If using Boxilla, these settings will be available through the Boxilla administrative web interface. When DESKVUE is managed with Boxilla, the Boxilla global hot keys will be applied to the DESKVUE. - Page 6 NEED HELP? LEAVE THE TECH TO US LIVE 24/7 QUICK START GUIDE TECHNICAL SUPPORT 1.877.877.2269 This page intentionally left blank. 1.877.877.2269 BLACKBOX.COM...
-
Page 7: Chapter 1: Introduction
Emerald transmitters, virtual machines using RDP, PCoIP, PCoIP Ultra, and standard H.264/265 sources. The Emerald DESKVUE receiver—as part of the Emerald KVM family and Boxilla KVM Manager—uniquely allows users to tailor their own workspace by connecting a single keyboard, mouse, USB 3/2 devices, audio, and up to four 4K monitors. -
Page 8: Features
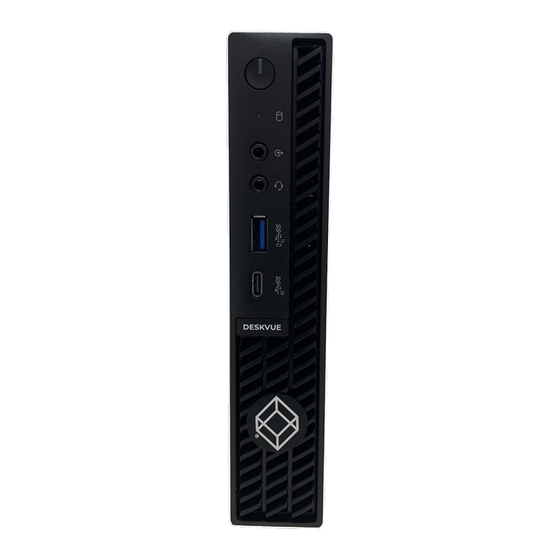
Š (1) Emerald DESKVUE multi-source TAA receiver Š (1) 19.5VDC, 3A, desktop power supply Š (1) Country-specific power cord If anything is missing or damaged, contact Black Box Technical Support at 877-877-2269 or info@blackbox.com. 1.4 PRODUCT IMAGES FIGURE 1-1: FRONT VIEW 1.877.877.2269 BLACKBOX.COM... - Page 9 NEED HELP? LEAVE THE TECH TO US LIVE 24/7 CHAPTER 1: INTRODUCTION TECHNICAL SUPPORT 1.877.877.2269 10 11 FIGURE 1-2: REAR VIEWVIEW TABLE 1-1. EMERALD 5104-R COMPONENTS NUMBER IN FIGURES 1-1 COMPONENT DESCRIPTION THROUGH 1-2 (1) Power Button Use to turn the unit on or off. (1) SSD Activity LED Illuminates to indicate Solid State Drive (SSD) activity (1) 3.5-mm jack (MC)
-
Page 10: Chapter 2: Application Diagram And Specifications
LIVE 24/7 CHAPTER 2: APPLICATION DIAGRAM AND SPECIFICATIONS TECHNICAL SUPPORT 1.877.877.2269 2.1 APPLICATION DIAGRAM Emerald ® KVM over IP System Virtual Machines Physical Machines Emerald DESKVUE User Emerald Transmitter Console (with AV WALL) Emerald DESKVUE Keyboard Mouse User Console 1.877.877.2269 BLACKBOX.COM... - Page 11 NEED HELP? LEAVE THE TECH TO US LIVE 24/7 CHAPTER 2: APPLICATION DIAGRAM AND SPECIFICATIONS TECHNICAL SUPPORT 1.877.877.2269 TABLE 2-1. PRODUCT SPECIFICATIONS SPECIFICATION DESCRIPTION Dimensions Unit: 7.17” H x 1.42” W x 7.01” D (182 x 36 x 178 mm) Weight 2.95 lb.
-
Page 12: Chapter 3: Application
NEED HELP? LEAVE THE TECH TO US LIVE 24/7 CHAPTER 3: APPLICATION TECHNICAL SUPPORT 1.877.877.2269 3.1 LOGIN SCREEN Upon startup, the DESKVUE unit displays three screens in sequence: the boot screen, the product name screen, and the login screen, as shown in Figures 3-1, 3-2, and 3-3 starting below: FIGURE 3-1: BOOT SCREEN FIGURE 3-2: PRODUCT NAME SCREEN 1.877.877.2269... - Page 13 NEED HELP? LEAVE THE TECH TO US LIVE 24/7 CHAPTER 3: APPLICATION TECHNICAL SUPPORT 1.877.877.2269 FIGURE 3-3: LOGIN SCREEN To log into DESKVUE, click on the “Login” button, as shown in Figure 3-3 above. After you click on the “Login” button, the system displays the Username and Password screen, as shown in Figure 3-4 below: FIGURE 3-4: USERNAME AND PASSWORD SCREEN 1.877.877.2269...
- Page 14 NEED HELP? LEAVE THE TECH TO US LIVE 24/7 CHAPTER 3: APPLICATION TECHNICAL SUPPORT 1.877.877.2269 Table 3-1 explains the options on the Username and Password screen. TABLE 3-1. USERNAME AND PASSWORD SCREEN FIELD/ITEM DESCRIPTION Enter the username. By default, the username is “admin” (without the quotes). You can change the username, which is a unique name that uses 1–32 characters.
-
Page 15: On Screen Display (Osd)
NEED HELP? LEAVE THE TECH TO US LIVE 24/7 CHAPTER 3: APPLICATION TECHNICAL SUPPORT 1.877.877.2269 3.2 ON SCREEN DISPLAY (OSD) NOTE: The screenshots and settings shown throughout this manual reference the administrative pages when logged in as an admin user type. If you are logged in as a power user or user, certain pages and options will not be available, since they are only available within the administrator account. - Page 16 NEED HELP? LEAVE THE TECH TO US LIVE 24/7 CHAPTER 3: APPLICATION TECHNICAL SUPPORT 1.877.877.2269 Table 3-2 explains the information and options on the OSD screen. TABLE 3-2. OSD ITEM DESCRIPTION In the top left corner of the screen, the system will display “Unmanaged” when the device is not managed by a Boxilla unit.
- Page 17 NEED HELP? LEAVE THE TECH TO US LIVE 24/7 CHAPTER 3: APPLICATION TECHNICAL SUPPORT 1.877.877.2269 TABLE 3-2. OSD (CONTINUED) ITEM DESCRIPTION Network: This tab allows you to enter network settings. Display: This tab shows you what monitors are connected to the device. The monitors can be checked to find the display’s manufacturer.
-
Page 18: Network Tab
NEED HELP? LEAVE THE TECH TO US LIVE 24/7 CHAPTER 3: APPLICATION TECHNICAL SUPPORT 1.877.877.2269 3.3 NETWORK TAB When the “Network” tab is selected, the system displays the “Network Settings” screen, as shown in Figure 3-10 below: FIGURE 3-10: NETWORK SETTINGS SCREEN NOTE: Use the network port closest to the power connector (left side) when interfacing with Boxilla or target connections. - Page 19 NEED HELP? LEAVE THE TECH TO US LIVE 24/7 CHAPTER 3: APPLICATION TECHNICAL SUPPORT 1.877.877.2269 Table 3-3 explains the options on the “Network Settings” screen. TABLE 3-3. NETWORK SETTINGS ITEM DESCRIPTION When you set this DHCP Slider Bar to the “ON” position by dragging it to the right and then click on the “Save”...
-
Page 20: Display Tab
NEED HELP? LEAVE THE TECH TO US LIVE 24/7 CHAPTER 3: APPLICATION TECHNICAL SUPPORT 1.877.877.2269 3.4 DISPLAY TAB When the “Display” tab is selected, the system displays the details and configuration options for the monitors actively attached to the DESKVUE unit, as shown in Figure 3-13 below: FIGURE 3-13: DISPLAY SETTINGS SCREEN This screen shows the monitor(s) that are connected to the DESKVUE unit along with the settings for the selected monitor. - Page 21 NEED HELP? LEAVE THE TECH TO US LIVE 24/7 CHAPTER 3: APPLICATION TECHNICAL SUPPORT 1.877.877.2269 Table 3-4 explains the options on the “Display Settings” screen. TABLE 3-4. DISPLAY SETTINGS ITEM DESCRIPTION The “Identify” function places numerical numbers on each connected display to show the orientation/order that the system is using.
-
Page 22: Audio Settings Tab
NEED HELP? LEAVE THE TECH TO US LIVE 24/7 CHAPTER 3: APPLICATION TECHNICAL SUPPORT 1.877.877.2269 3.5 AUDIO SETTINGS TAB When the Audio” tab is selected, the administrator can configure the audio output as shown in Figure 3-16 below: FIGURE 3-16: AUDIO SETTINGS PAGE Table 3-5 explains the options on the “Audio Settings”... -
Page 23: Settings Tab
NEED HELP? LEAVE THE TECH TO US LIVE 24/7 CHAPTER 3: APPLICATION TECHNICAL SUPPORT 1.877.877.2269 3.6 SETTINGS TAB When the “Settings” tab is selected, the system displays the options to configure the hot keys, audio interface, system volume, and overlays, as shown in Figure 3-18 below: FIGURE 3-18: GLOBAL SETTINGS PAGE Table 3-6 explains the options on the “Global Settings”... -
Page 24: Transmitter Settings
NEED HELP? LEAVE THE TECH TO US LIVE 24/7 CHAPTER 3: APPLICATION TECHNICAL SUPPORT 1.877.877.2269 TABLE 3-6. GLOBAL SETTINGS (CONTINUED) ITEM DESCRIPTION Use this option to configure if the DESKVUE unit shows overlays by either enabling or disabling overlays via the drop-down menu. These options are shown in Figure 3-19 below: Overlays FIGURE 3-19: OVERLAY OPTIONS... - Page 25 NEED HELP? LEAVE THE TECH TO US LIVE 24/7 CHAPTER 3: APPLICATION TECHNICAL SUPPORT 1.877.877.2269 FIGURE 3-20: TRANSMITTER SETTINGS PAGE The DESKVUE unit is capable of discovering any transmitter device even if it does not match the DESKVUE Network Subnet. The transmitter must be connected to the same physical network or directly connected to the DESKVUE in order to be discovered.
- Page 26 NEED HELP? LEAVE THE TECH TO US LIVE 24/7 CHAPTER 3: APPLICATION TECHNICAL SUPPORT 1.877.877.2269 Table 3-7 explains the options on the “Transmitter Settings” page. TABLE 3-7. TRANSMITTER SETTINGS ITEM DESCRIPTION If the IP address is known for the transmitter that needs accessed/configured, enter it into this field and then press the “Apply”...
- Page 27 NEED HELP? LEAVE THE TECH TO US LIVE 24/7 CHAPTER 3: APPLICATION TECHNICAL SUPPORT 1.877.877.2269 TABLE 3-7. TRANSMITTER SETTINGS (CONTINUED) ITEM DESCRIPTION Use this option to update the DESVKUE unit’s firmware. Place the firmware file on a FAT- or FAT32-formatted flash drive, and then select the file to process the upgrade. An example containing a firmware file is shown in Figure 3-23 below: Transmitter Upgrade FIGURE 3-23: TRANSMITTER UPGRADE SCREEN...
- Page 28 NEED HELP? LEAVE THE TECH TO US LIVE 24/7 CHAPTER 3: APPLICATION TECHNICAL SUPPORT 1.877.877.2269 TABLE 3-7. TRANSMITTER SETTINGS (CONTINUED) ITEM DESCRIPTION You can power cycle the transmitter by using the “Reboot” button. You will need to confirm the action by clicking on the “YES” button or cancel the action by clicking on the “NO”...
- Page 29 NEED HELP? LEAVE THE TECH TO US LIVE 24/7 CHAPTER 3: APPLICATION TECHNICAL SUPPORT 1.877.877.2269 TABLE 3-7. TRANSMITTER SETTINGS (CONTINUED) ITEM DESCRIPTION If the transmitter IP address is unknown, use the Discover feature to find it. Connect the transmitter to the same network or directly to the DESKVUE, and, when prompted to reboot the transmitter, click on the “Next”...
- Page 30 NEED HELP? LEAVE THE TECH TO US LIVE 24/7 CHAPTER 3: APPLICATION TECHNICAL SUPPORT 1.877.877.2269 TABLE 3-7. TRANSMITTER SETTINGS (CONTINUED) ITEM DESCRIPTION Configure the transmitter video and USB settings. Configure the video quality, video optimization, USB HID configuration, and EDID (video resolution) as shown below in Figure 3-31: FIGURE 3-31: TRANSMITTER SETTINGS SCREEN Preferences...
- Page 31 NEED HELP? LEAVE THE TECH TO US LIVE 24/7 CHAPTER 3: APPLICATION TECHNICAL SUPPORT 1.877.877.2269 TABLE 3-7. TRANSMITTER SETTINGS (CONTINUED) ITEM DESCRIPTION 3. Default – system tuned to maintain visually lossless compression while increasing the compression level during periods of network congestion to reduce frame loss. This balances visual quality with frame loss in periods of congestion (for example,.
- Page 32 NEED HELP? LEAVE THE TECH TO US LIVE 24/7 CHAPTER 3: APPLICATION TECHNICAL SUPPORT 1.877.877.2269 TABLE 3-7. TRANSMITTER SETTINGS (CONTINUED) ITEM DESCRIPTION This is a progressive algorithm which helps to reduce unwanted noise coming from a GPU or video converters. The transmitter can be configured to handle different applications by changing the way it handles the video signal if it natively has embedded noise, such as from a VGA to DVI converter.
- Page 33 NEED HELP? LEAVE THE TECH TO US LIVE 24/7 CHAPTER 3: APPLICATION TECHNICAL SUPPORT 1.877.877.2269 TABLE 3-7. TRANSMITTER SETTINGS (CONTINUED) ITEM DESCRIPTION This setting applies to all transmitters. It changes the USB communication between the Emerald transmitter and the target computer/device. ®...
- Page 34 The diagnostics file is encrypted to protect your information, and only authorized Black Box personnel are able to view the log file. An example containing a diagnostic file is shown in Figure 3-36 below:...
-
Page 35: Connections Tab
NEED HELP? LEAVE THE TECH TO US LIVE 24/7 CHAPTER 3: APPLICATION TECHNICAL SUPPORT 1.877.877.2269 3.7 CONNECTIONS TAB When the “Connections” tab is selected, the system displays the “Connections List” screen, as shown in Figure 3-37 below: FIGURE 3-37: CONNECTIONS LIST SCREEN When at least one connection has been added, the page will show the available connection(s), as shown in Figure 3-38 below: FIGURE 3-38: AVAILABLE CONNECTIONS EXAMPLE... - Page 36 NEED HELP? LEAVE THE TECH TO US LIVE 24/7 CHAPTER 3: APPLICATION TECHNICAL SUPPORT 1.877.877.2269 NOTE: The items shown in the connection list are provided for example only; the list shown on your screen is dependent upon connections made with your DESKVUE unit or connections configured in Boxilla if the DESKVUE unit is managed.
-
Page 37: Add New Connection
NEED HELP? LEAVE THE TECH TO US LIVE 24/7 CHAPTER 3: APPLICATION TECHNICAL SUPPORT 1.877.877.2269 Each connection type is indicated by an icon, as shown in Figure 3-41 below: FIGURE 3-41: ICONS FOR DIFFERENT CONNECTION TYPES 3.7.1 ADD NEW CONNECTION After you click on the “Add New”... - Page 38 NEED HELP? LEAVE THE TECH TO US LIVE 24/7 CHAPTER 3: APPLICATION TECHNICAL SUPPORT 1.877.877.2269 FIGURE 3-23: NEW CONNECTION SCREEN FOR TX CONNECTION TYPE FIGURE 3-43: NEW CONNECTION SCREEN FOR RDP CONNECTION TYPE 1.877.877.2269 BLACKBOX.COM...
- Page 39 NEED HELP? LEAVE THE TECH TO US LIVE 24/7 CHAPTER 3: APPLICATION TECHNICAL SUPPORT 1.877.877.2269 FIGURE 3-44: NEW CONNECTION SCREEN FOR PCOIP CONNECTION TYPE FIGURE 3-45: NEW CONNECTION SCREEN FOR H.264 CONNECTION TYPE 1.877.877.2269 BLACKBOX.COM...
- Page 40 NEED HELP? LEAVE THE TECH TO US LIVE 24/7 CHAPTER 3: APPLICATION TECHNICAL SUPPORT 1.877.877.2269 Table 3-9 explains the options on the “New Connection” screen. TABLE 3-9. NEW CONNECTION OPTIONS ITEM DESCRIPTION Enter a name for the connection. The Emerald DESKVUE unit will use this ®...
- Page 41 NEED HELP? LEAVE THE TECH TO US LIVE 24/7 CHAPTER 3: APPLICATION TECHNICAL SUPPORT 1.877.877.2269 TABLE 3-9. NEW CONNECTION OPTIONS (CONTINUED) ITEM DESCRIPTION Use this drop-down list box to select the audio source. You can choose “OFF,” “3.5mm/ DP Audio,” or “HID Audio” from the list, as shown in Figure 3-50 below. “OFF” disables audio for the device.
- Page 42 NEED HELP? LEAVE THE TECH TO US LIVE 24/7 CHAPTER 3: APPLICATION TECHNICAL SUPPORT 1.877.877.2269 TABLE 3-9. NEW CONNECTION OPTIONS (CONTINUED) ITEM DESCRIPTION When the slider bar is in the “ON” position, the connection will be in view only mode, which means that keyboard and mouse activity will not be passed to the target device.
- Page 43 NEED HELP? LEAVE THE TECH TO US LIVE 24/7 CHAPTER 3: APPLICATION TECHNICAL SUPPORT 1.877.877.2269 TABLE 3-9. NEW CONNECTION OPTIONS (CONTINUED) ITEM DESCRIPTION The slider is shown below in the “ON” position in Figure 3-56 and in the “OFF” position in Figure 3-57: Mouse Sector (Transmitter Options)
-
Page 44: Templates Tab
NEED HELP? LEAVE THE TECH TO US LIVE 24/7 CHAPTER 3: APPLICATION TECHNICAL SUPPORT 1.877.877.2269 3.8 TEMPLATES TAB When the “Templates” tab is selected, the system displays the “Templates List” screen, as shown in Figure 3-59 below: FIGURE 3-59: TEMPLATES LIST SCREEN This screen displays 13 predefined layout templates. -
Page 45: One Tile On One Display
NEED HELP? LEAVE THE TECH TO US LIVE 24/7 CHAPTER 3: APPLICATION TECHNICAL SUPPORT 1.877.877.2269 3.8.1 ONE TILE ON ONE DISPLAY The “One Tile on one display” template contains one tile, which represents one connection, on one display unit. That connection uses the entire screen. -
Page 46: Four Tiles On One Display
NEED HELP? LEAVE THE TECH TO US LIVE 24/7 CHAPTER 3: APPLICATION TECHNICAL SUPPORT 1.877.877.2269 3.8.2 FOUR TILES ON ONE DISPLAY The “Four Tiles on one display” template contains four tiles, which each represent one connection, on one display unit. Each tile fills 1/4 of the screen. -
Page 47: One Tile Across All Displays
NEED HELP? LEAVE THE TECH TO US LIVE 24/7 CHAPTER 3: APPLICATION TECHNICAL SUPPORT 1.877.877.2269 3.8.3 ONE TILE ACROSS ALL DISPLAYS The “One Tile across all displays” template displays a single target across all screens of the DESKVUE output. This mode is similar to the AV video wall functions when using the Boxilla manager. This template will take a single video signal and stretch/scale it across all connected displays. -
Page 48: Four Tiles - Pip Right On One Display
NEED HELP? LEAVE THE TECH TO US LIVE 24/7 CHAPTER 3: APPLICATION TECHNICAL SUPPORT 1.877.877.2269 3.8.4 FOUR TILES - PIP RIGHT ON ONE DISPLAY The “four Tiles - Pip Right on one display” template contains four tiles, which each represent one connection, on one display unit. -
Page 49: Four Tiles - Pip Left On One Display
NEED HELP? LEAVE THE TECH TO US LIVE 24/7 CHAPTER 3: APPLICATION TECHNICAL SUPPORT 1.877.877.2269 3.8.5 FOUR TILES - PIP LEFT ON ONE DISPLAY The “Four Tiles - Pip Left on one display” template contains four tiles, which each represent one connection, on one display unit. -
Page 50: Seven Tiles Across 2 Displays
NEED HELP? LEAVE THE TECH TO US LIVE 24/7 CHAPTER 3: APPLICATION TECHNICAL SUPPORT 1.877.877.2269 3.8.6 SEVEN TILES ACROSS 2 DISPLAYS The “Seven Tiles Across 2 Displays” template enables you to use multiple screens with Picture-in-Picture options spread across two displays. When you click on the “Preview”... -
Page 51: Eight Tiles On One Display
NEED HELP? LEAVE THE TECH TO US LIVE 24/7 CHAPTER 3: APPLICATION TECHNICAL SUPPORT 1.877.877.2269 3.8.7 EIGHT TILES ON ONE DISPLAY The “Eight Tiles on one display” template contains eight tiles, which each represent one connection, on one display unit. Each tile fills 1/8 of the screen. NOTE: The tile numbers shown in the template are important, since you map a connection to a specific tile location when you create a workspace. -
Page 52: Two Horizontal Tiles On One Display
NEED HELP? LEAVE THE TECH TO US LIVE 24/7 CHAPTER 3: APPLICATION TECHNICAL SUPPORT 1.877.877.2269 3.8.8 TWO HORIZONTAL TILES ON ONE DISPLAY The “Two Horizontal Tiles on one display” template takes two targets and stacks them on top of each other. When you click on the “Preview”... -
Page 53: Two Vertical Tiles On One Display
NEED HELP? LEAVE THE TECH TO US LIVE 24/7 CHAPTER 3: APPLICATION TECHNICAL SUPPORT 1.877.877.2269 3.8.9 TWO VERTICAL TILES ON ONE DISPLAY The “Two Vertical Tiles on one display” template takes two targets and places them side-by-side on one screen. When you click on the “Preview”... -
Page 54: Three Tiles On One Display
NEED HELP? LEAVE THE TECH TO US LIVE 24/7 CHAPTER 3: APPLICATION TECHNICAL SUPPORT 1.877.877.2269 3.8.10 THREE TILES ON ONE DISPLAY The “Three Tiles on one display” template shows three targets on a single screens using the layout displayed in the template. -
Page 55: Three Vertical Tiles On One Display
NEED HELP? LEAVE THE TECH TO US LIVE 24/7 CHAPTER 3: APPLICATION TECHNICAL SUPPORT 1.877.877.2269 3.8.11 THREE VERTICAL TILES ON ONE DISPLAY The “Three Vertical Tiles on one display” template shows three targets on a single display in a vertical view. When you click on the “Preview”... -
Page 56: Six Tiles On One Display
NEED HELP? LEAVE THE TECH TO US LIVE 24/7 CHAPTER 3: APPLICATION TECHNICAL SUPPORT 1.877.877.2269 3.8.12 SIX TILES ON ONE DISPLAY The “Six Tiles on one display” template shows up to six targets on a single display with two rows and three columns.. When you click on the “Preview”... -
Page 57: Sixteen Tiles On One Display
NEED HELP? LEAVE THE TECH TO US LIVE 24/7 CHAPTER 3: APPLICATION TECHNICAL SUPPORT 1.877.877.2269 3.8.13 SIXTEEN TILES ON ONE DISPLAY The “ Sixteen Tiles on one display” template shows up to 16 targets on a single display with 4 rows and 4 columns.. When you click on the “Preview”... -
Page 58: Workspaces Tab
NEED HELP? LEAVE THE TECH TO US LIVE 24/7 CHAPTER 3: APPLICATION TECHNICAL SUPPORT 1.877.877.2269 3.9 WORKSPACES TAB When the “Workspaces” tab is selected, the system displays the “Workspace List” screen, as shown in Figure 3-73 below: FIGURE 3-73: WORKSPACES TAB Table 3-10 explains the initial options on the “Workspaces”... -
Page 59: Add New Workspace
NEED HELP? LEAVE THE TECH TO US LIVE 24/7 CHAPTER 3: APPLICATION TECHNICAL SUPPORT 1.877.877.2269 TABLE 3-10. WORKSPACES TAB OPTIONS (CONTINUED) ITEM DESCRIPTION Add New button Click on this button to define and configure a new workspace. Each workspace has additional options to edit, clone, or remove that instance. To access these options, click on the ellipsis (...) button next to the workspace. - Page 60 NEED HELP? LEAVE THE TECH TO US LIVE 24/7 CHAPTER 3: APPLICATION TECHNICAL SUPPORT 1.877.877.2269 Table 3-11 explains the options on the “New workspace” screen. TABLE 3.11. ADD NEW WORKSPACE SCREEN OPTIONS ITEM DESCRIPTION Enter a name for the workspace. The Emerald DESKVUE unit will use this name to ®...
- Page 61 NEED HELP? LEAVE THE TECH TO US LIVE 24/7 CHAPTER 3: APPLICATION TECHNICAL SUPPORT 1.877.877.2269 Every connection under Workspace will have additional options to manipulate the video signal, as shown in Figure 3-78 below: FIGURE 3-78: WORKSPACE CONNECTION OPTIONS Table 3-12 explains the workspace connection options. TABLE 3-12.
- Page 62 NEED HELP? LEAVE THE TECH TO US LIVE 24/7 CHAPTER 3: APPLICATION TECHNICAL SUPPORT 1.877.877.2269 When the “Save” button is pressed, the newly added workspace appears in the workspace List. Figure 3-38 shows an example where there was only one created workspace. In this example, the workspace was named “#1 - 1 Tile,” as shown in Figure 3-78 below: FIGURE 3-78: SAMPLE UPDATED WORKSPACE LIST SCREEN 1.877.877.2269...
- Page 63 NEED HELP? LEAVE THE TECH TO US LIVE 24/7 CHAPTER 3: APPLICATION TECHNICAL SUPPORT 1.877.877.2269 Table 3-13 explains options for items in the Workspace List. TABLE 3-13. UPDATED WORKSPACE SCREEN OPTIONS ITEM DESCRIPTION Click on this button to define and configure a new workspace. This button was Add New button explained in “3.9.1: Add New Workspace.”...
- Page 64 NEED HELP? LEAVE THE TECH TO US LIVE 24/7 CHAPTER 3: APPLICATION TECHNICAL SUPPORT 1.877.877.2269 Table 3-14 explains these additional options: TABLE 3-14. ADDITIONAL TILE OPTIONS ITEM DESCRIPTION When this option is active, the tile is unlocked and a user can change it by using a Unlock button keyboard and/or mouse.
-
Page 65: Users Tab
NEED HELP? LEAVE THE TECH TO US LIVE 24/7 CHAPTER 3: APPLICATION TECHNICAL SUPPORT 1.877.877.2269 3.10 USERS TAB When the “Users” tab is selected, the system displays the “User List” screen, as shown in Figure 3-80 below: FIGURE 3-80: USERS TAB NOTE: If the DESKVUE unit is managed by Boxilla, the “Add New”... -
Page 66: Add New User
NEED HELP? LEAVE THE TECH TO US LIVE 24/7 CHAPTER 3: APPLICATION TECHNICAL SUPPORT 1.877.877.2269 3.10.1 ADD NEW USER When you click on the “Add New” button, the system displays the “New User” screen, as shown in Figure 3-81 below: FIGURE 3-81: NEW USER SCREEN 1.877.877.2269 BLACKBOX.COM... - Page 67 NEED HELP? LEAVE THE TECH TO US LIVE 24/7 CHAPTER 3: APPLICATION TECHNICAL SUPPORT 1.877.877.2269 Table 3-15 explains the options on the “New User” screen. TABLE 3-15. NEW USER OPTIONS ITEM DESCRIPTION Enter the name for the user. It should be between 1 and 32 characters and can be User Name any valid username for a Microsoft O/S.
- Page 68 NEED HELP? LEAVE THE TECH TO US LIVE 24/7 CHAPTER 3: APPLICATION TECHNICAL SUPPORT 1.877.877.2269 To add connections to a new user, use the elipsis button (...) next to the user and select “Connections and Workspaces.” On this page, which is shown in Figure 3-84 below, add the targets to the right side window to add that connection to the user list.
-
Page 69: User Menu Options
NEED HELP? LEAVE THE TECH TO US LIVE 24/7 CHAPTER 3: APPLICATION TECHNICAL SUPPORT 1.877.877.2269 3.10.2 USER MENU OPTIONS When you click on the three dots to the right of a user name, another menu appears, as shown in Figure 3-85 below: FIGURE 3-85: USER LIST ADMIN MENU OPTIONS NOTE: When there is only one user with admin access, the system will not allow you to delete that user. - Page 70 NEED HELP? LEAVE THE TECH TO US LIVE 24/7 CHAPTER 3: APPLICATION TECHNICAL SUPPORT 1.877.877.2269 3.10.2.1 EDIT OPTIONS When you choose the “Edit” option for a user, the system displays the “Edit User” screen, as shown in Figure 3-86 below. This screen enables you to edit information associated with the user, including changing the user’s password and changing a user’s description.
- Page 71 NEED HELP? LEAVE THE TECH TO US LIVE 24/7 CHAPTER 3: APPLICATION TECHNICAL SUPPORT 1.877.877.2269 TABLE 3-16. EDIT USER OPTIONS ITEM DESCRIPTION Click on the “Change Password” button to change the user’s password. The system will then display the “Change Password” screen, as shown in Figure 3-87 below: Change Password button FIGURE 3-87: CHANGE PASSWORD SCREEN The new password needs to be entered twice to confirm it.
- Page 72 NEED HELP? LEAVE THE TECH TO US LIVE 24/7 CHAPTER 3: APPLICATION TECHNICAL SUPPORT 1.877.877.2269 After saving the user account, the hot keys can be configured by clicking on the elipsis (...) button next to the user account and selecting “Settings.” When the “Settings” page is displayed, several hot key options will be available to view and edit, as shown in Figure 3-89 below: FIGURE 3-89: USER WORKSPACE AND HOT KEY SELECTION SCREEN NOTE: If DESKVUE is managed by Boxilla and the global hot key of Mouse Left+Right is set for active hot key, the DESKVUE...
- Page 73 NEED HELP? LEAVE THE TECH TO US LIVE 24/7 CHAPTER 3: APPLICATION TECHNICAL SUPPORT 1.877.877.2269 Use the drop-down list boxes to assign hot keys to tiles. There are also predefined hot keys built into the Emerald DESKVUE system, as shown in Figure 3-90. ®...
-
Page 74: System Tab
NEED HELP? LEAVE THE TECH TO US LIVE 24/7 CHAPTER 3: APPLICATION TECHNICAL SUPPORT 1.877.877.2269 3.11 SYSTEM TAB When the “System” tab is selected by a user classified as admin, the system displays the “System Settings” screen, as shown in Figure 3-91 below: FIGURE 3-91: SYSTEM SETTINGS SCREEN 1.877.877.2269 BLACKBOX.COM... - Page 75 NEED HELP? LEAVE THE TECH TO US LIVE 24/7 CHAPTER 3: APPLICATION TECHNICAL SUPPORT 1.877.877.2269 Table 3-17 explains the options on the “System Settings” screen. TABLE 3-17. SYSTEM SETTING OPTIONS ITEM DESCRIPTION When a system update is available, click on the “Select File” button and follow the on-screen directions to complete the update using a file stored on a removable USB drive using a FAT/FAT32 format.
- Page 76 NEED HELP? LEAVE THE TECH TO US LIVE 24/7 CHAPTER 3: APPLICATION TECHNICAL SUPPORT 1.877.877.2269 TABLE 3-17. SYSTEM SETTING OPTIONS (CONTINUED) ITEM DESCRIPTION Click on this button to perform system diagnostics to help troubleshoot a system problem. You typically use this option when working with a technical support team member to resolve an issue.
-
Page 77: Chapter 4: Troubleshooting
NEED HELP? LEAVE THE TECH TO US LIVE 24/7 CHAPTER 4: TROUBLESHOOTING TECHNICAL SUPPORT 1.877.877.2269 TABLE 4-1. TROUBLESHOOTING ISSUE RESOLUTION To resolve this issue: Remove the network cable and attach it to a different network switch. Refresh the page to remove the error message. The network cable is attached to Hot plug the network cable back to the original switch. -
Page 78: Appendix A: Boxilla Discovery
NEED HELP? LEAVE THE TECH TO US LIVE 24/7 APPENDIX A: BOXILLA DISCOVERY TECHNICAL SUPPORT 1.877.877.2269 A.1 BOXILLA DISCOVERY The Emerald DESKVUE unit can be discovered and managed by the Boxilla manager as long as it is using the ® ®... - Page 79 NEED HELP? LEAVE THE TECH TO US LIVE 24/7 APPENDIX A: BOXILLA DISCOVERY TECHNICAL SUPPORT 1.877.877.2269 Change the Emerald DESKVUE network settings, if necessary, through the Boxilla web interface by selecting ® ® “Edit” from the drop-down menu shown in Figure A-2 below: FIGURE A-2: EDIT OPTION 1.877.877.2269 BLACKBOX.COM...
- Page 80 NEED HELP? LEAVE THE TECH TO US LIVE 24/7 APPENDIX A: BOXILLA DISCOVERY TECHNICAL SUPPORT 1.877.877.2269 Configure the network settings for the Emerald DESKVUE unit using the “Edit Device” screen, shown in FIgure ® A-3 below: FIGURE A-3: EDIT DEVICE SCREEN NOTE: Use network settings that allow the DESKVUE unit and Boxilla Manager to be on the same subnet/network.
- Page 81 NEED HELP? LEAVE THE TECH TO US LIVE 24/7 APPENDIX A: BOXILLA DISCOVERY TECHNICAL SUPPORT 1.877.877.2269 After the system returns to the Discovery page in the Boxilla Manager, manage the Emerald DESKVUE unit by using ® ® the “Manage” option in the drop-down menu, as shown in Figure A-4 below: FIGURE A-4: EDIT AND MANAGE OPTIONS ON DROP-DOWN MENU Before the DESKVUE can be managed, a managed name must be assigned to it so it can be referenced.
- Page 82 NEED HELP? LEAVE THE TECH TO US LIVE 24/7 APPENDIX A: BOXILLA DISCOVERY TECHNICAL SUPPORT 1.877.877.2269 Click on the “OK” button shown in Figure A-6 above to enable Boxilla to manage the Emerald DESKVUE unit. ® ® The system should display a confirmation message stating that the operation was successful, as shown in Figure A-7 below: FIGURE A-7: OPERATION SUCCESSFUL CONFIRMATION MESSAGE NOTE: When the DESKVUE unit is on the same network/subnet as the Boxilla Manager, the operation should be...
- Page 83 NEED HELP? LEAVE THE TECH TO US LIVE 24/7 APPENDIX A: BOXILLA DISCOVERY TECHNICAL SUPPORT 1.877.877.2269 The Emerald DESKVUE unit will initially show up in the device list as “Offline” with a “Waiting” status, as shown in Figure ® A-8 below; FIGURE A-8: DESKVUE UNIT SHOWN AS OFFLINE WITH WAITING STATUS The operation will finish in a few minutes, and the system will update the status to “Online”...
- Page 84 NEED HELP? LEAVE THE TECH TO US LIVE 24/7 APPENDIX A: BOXILLA DISCOVERY TECHNICAL SUPPORT 1.877.877.2269 Although the status is updated to online, the system is still updating. Once the operation is complete, the unit’s status will be updated to “Online” and “Configured,” as shown in Figure A-10 below: FIGURE A-10: STATUS UPDATED TO ONLINE AND CONFIGURED 1.877.877.2269 BLACKBOX.COM...
-
Page 85: Appendix B: Workspace Configuration
NEED HELP? LEAVE THE TECH TO US LIVE 24/7 APPENDIX B: WORKSPACE CONFIGURATION TECHNICAL SUPPORT 1.877.877.2269 B.1 WORKSPACE CREATION/ASSIGNMENT When the Emerald DESKVUE unit is managed by a Boxilla Manager, a workspace can be created and assigned to ® ® one or multiple users. - Page 86 NEED HELP? LEAVE THE TECH TO US LIVE 24/7 APPENDIX B: WORKSPACE CONFIGURATION TECHNICAL SUPPORT 1.877.877.2269 If the workspace was configured properly, the system will display a success notification in the top right corner of the screen, as shown in Figure B-3 below: FIGURE B-3: SUCCESS MESSAGE NOTE: If an error occurs, review the error message for information about the problem.
- Page 87 NEED HELP? LEAVE THE TECH TO US LIVE 24/7 APPENDIX B: WORKSPACE CONFIGURATION TECHNICAL SUPPORT 1.877.877.2269 Select a Display Layout Format. Choose from these options: • One Tile on one display • Two Horizontal Tiles on one display • Two Vertical Tiles on one display •...
- Page 88 NEED HELP? LEAVE THE TECH TO US LIVE 24/7 APPENDIX B: WORKSPACE CONFIGURATION TECHNICAL SUPPORT 1.877.877.2269 Enter a Name for the View in the appropriate field. Enter a Description for the View in the appropriate field. Select which display should be used. An example using “Four Tiles on One Display”...
- Page 89 NEED HELP? LEAVE THE TECH TO US LIVE 24/7 APPENDIX B: WORKSPACE CONFIGURATION TECHNICAL SUPPORT 1.877.877.2269 Click on the “Save” button. If the workspace and view were configured properly without any errors, the system will display a success notification in the top right corner of the screen, as shown in Figure B-7 below: FIGURE B-7: SUCCESS MESSAGE NOTE: If there was an error, such as a missing view name, it will be displayed in the top right corner of the screen.
- Page 90 NEED HELP? LEAVE THE TECH TO US LIVE 24/7 APPENDIX B: WORKSPACE CONFIGURATION TECHNICAL SUPPORT 1.877.877.2269 Every connection under Workspace will have additional options to manipulate the video signal, as shown in Table B-1 below. TABLE B-1. TARGET PROPERTIES ITEM DESCRIPTION Choose the resolution that the target should use.
-
Page 91: Custom Workspace
NEED HELP? LEAVE THE TECH TO US LIVE 24/7 APPENDIX B: WORKSPACE CONFIGURATION TECHNICAL SUPPORT 1.877.877.2269 B.2 CUSTOM WORKSPACE Custom workspaces can be configured by clicking on the “Custom Workspace” button located on the workspaces main page, as shown in Figure B-9 below.. Custom workspaces are user generated templates that can be configured. Since most of the options for custom templates are explained in the previous steps, only the additional buttons are described in this section. -
Page 92: Assigning A User To A Workspace
NEED HELP? LEAVE THE TECH TO US LIVE 24/7 APPENDIX B: WORKSPACE CONFIGURATION TECHNICAL SUPPORT 1.877.877.2269 B.2.1 ASSIGNING A USER TO A WORKSPACE After the workspace and views are configured, a user must be assigned so that the user can access the workspace and views when logging into the Emerald DESKVUE unit. -
Page 93: Editing A Workspace
NEED HELP? LEAVE THE TECH TO US LIVE 24/7 APPENDIX B: WORKSPACE CONFIGURATION TECHNICAL SUPPORT 1.877.877.2269 B.2.2 EDITING A WORKSPACE Once the workspace is created, the Boxilla administrator can edit it at any time by using the edit (wrench) icon. The ®... -
Page 94: Additional Configuration Options
NEED HELP? LEAVE THE TECH TO US LIVE 24/7 APPENDIX B: WORKSPACE CONFIGURATION TECHNICAL SUPPORT 1.877.877.2269 B.2.4 ADDITIONAL CONFIGURATION OPTIONS Within the Boxilla web interface in the “Users” section, additional parameters can be configured for each user. “Manage ® Workspace Favorites” and “Manage Workspaces” are available through the ellipsis icon next to a user name, and these options can be used to adjust user configurations. - Page 95 NEED HELP? LEAVE THE TECH TO US LIVE 24/7 APPENDIX B: WORKSPACE CONFIGURATION TECHNICAL SUPPORT 1.877.877.2269 To change Workspace favorites, click in the empty text box for a hotkey that needs to be configured and link the workspace to the corresponding hotkey using the screen shown in Figure B-14 below: FIGURE B-14: HOTKEY CONFIGURATION SCREEN TIP: When configuring user workspace favorites, use the “User Manage Workspaces”...
- Page 96 NEED HELP? LEAVE THE TECH TO US LIVE 24/7 APPENDIX B: WORKSPACE CONFIGURATION TECHNICAL SUPPORT 1.877.877.2269 An example of assigning the first hotkey to a workspace appears in Figure B-15 below: FIGURE B-15: EXAMPLE OF HOTKEY ASSIGNMENT 1.877.877.2269 BLACKBOX.COM...
-
Page 97: Configurating User Access Through Boxilla
NEED HELP? LEAVE THE TECH TO US LIVE 24/7 APPENDIX B: WORKSPACE CONFIGURATION TECHNICAL SUPPORT 1.877.877.2269 B.2.5. CONFIGURATING USER ACCESS THROUGH BOXILLA User access to a Workspace can also be configured under the Boxilla Users Management page by selecting “Manage ®... -
Page 98: Appendix C: Deskvue Api
NEED HELP? LEAVE THE TECH TO US LIVE 24/7 APPENDIX C: DESKVUE API TECHNICAL SUPPORT 1.877.877.2269 C.1 DESKVUE API C.1.1 /workspace/detailed GET DESKVUE Receiver’s detailed workspace status Secure/Unsecure IMPLEMENTATION NOTES Respond with a json object with a detailed snapshot of the currently active workspace. This function can be used from control bridge to determine the status of active connections in an active workspace or to determine the current workspace structure and layout inorder to present a representation on the Control Bridge screen. - Page 99 NEED HELP? LEAVE THE TECH TO US LIVE 24/7 APPENDIX C: DESKVUE API TECHNICAL SUPPORT 1.877.877.2269 “connection_id”: “973”, “status”: “active”, “target”: “10.211.129.190”, “tile_height”: “50.0”, “tile_id”: “1032”, “tile_location”: “50.0,50.0”, “tile_name”: “TX_190_Optimized_Shared”, “tile_width”: “50.0” “connection_id”: “1330”, “status”: “active”, “target”: “rtsp://10.211.131.162:554/stream1”, “tile_height”: “50.0”, “tile_id”: “1031”, “tile_location”: “50.0,0.0”, “tile_name”: “VS-2101X_H264”,...
- Page 100 NEED HELP? LEAVE THE TECH TO US LIVE 24/7 APPENDIX C: DESKVUE API TECHNICAL SUPPORT 1.877.877.2269 When there is no active workspace the server will return the last active workspace with the connections shown as inactive: ```json “views”: [ “head”: “2”, “tiles”: [ “connection_id”: “1272”, “status”: “inactive”,...
-
Page 101: C1.2 /Workspace/Connection_Status
NEED HELP? LEAVE THE TECH TO US LIVE 24/7 APPENDIX C: DESKVUE API TECHNICAL SUPPORT 1.877.877.2269 “connection_id”: “1330”, “status”: “active”, “target”: “rtsp://10.211.131.162:554/stream1”, “tile_height”: “50.0”, “tile_id”: “1031”, “tile_location”: “50.0,0.0”, “tile_name”: “VS-2101X_H264”, “tile_width”: “50.0” “view_description”: “”, “view_name”: “View Name 1” “workspace_description”: “Johnos Quad workspace”, “workspace_id”: “142”, “workspace_name”: “johnosquad”... - Page 102 NEED HELP? LEAVE THE TECH TO US LIVE 24/7 APPENDIX C: DESKVUE API TECHNICAL SUPPORT 1.877.877.2269 TABLE C-3. SUPPORTED TABLE DESKVUE RESPONSE CLASS JSON STRUCTURE “workspace_connections”: [ “associated_workspace”: “124”, “bitrate”: 38788172.0, “connection_id”: “1260”, “connection_type”: “TX”, “connection_uid”: “C8E3B4BB43”, “fps”: 59.016597747802734, “status”: “active”, “target”: “10.211.130.228”, “tile_id”: “955”...
-
Page 103: C1.3 Users/Workspaces/List
NEED HELP? LEAVE THE TECH TO US LIVE 24/7 APPENDIX C: DESKVUE API TECHNICAL SUPPORT 1.877.877.2269 RESPONSE CLASS FORMATS TABLE C-4. RESPONSE CLASS FORMATS TABLE PARAMETER FORMAT workspace_id 32 byte char array max workspace_status 32 byte char array max workspace_connections an array of json workspace_connection objects RESPONSE Http status code. - Page 104 NEED HELP? LEAVE THE TECH TO US LIVE 24/7 APPENDIX C: DESKVUE API TECHNICAL SUPPORT 1.877.877.2269 “user_name”: “test3”, “workspaces”: [] “user_name”: “test4”, “workspaces”: [] “user_name”: “test5”, “workspaces”: [] “user_name”: “test6”, “workspaces”: [] “user_name”: “test7”, “workspaces”: [] “user_name”: “thiru”, “workspaces”: [] “user_name”: “thirup”, “workspaces”: [] “user_name”: “admin”,...
-
Page 105: C1.4 Control/Tiles
NEED HELP? LEAVE THE TECH TO US LIVE 24/7 APPENDIX C: DESKVUE API TECHNICAL SUPPORT 1.877.877.2269 TABLE C-6. RESPONSE CLASS FORMATS TABLE PARAMETER FORMAT user_name 32 byte char array max workspaces workspace_id, workspace_name Http status code 400 “message”: “users_files_not_exist” Http status code 500 Server error C1.4 control/tiles PUT Replace a Tile Connection (Secure and Unsecure) IMPLEMENTATION NOTES... -
Page 106: C1.5 Control/Workspaces
NEED HELP? LEAVE THE TECH TO US LIVE 24/7 APPENDIX C: DESKVUE API TECHNICAL SUPPORT 1.877.877.2269 REQUEST CLASS JSON STRUCTURE “action”: “force_tile_change”, “connection_id”: “connection-id”, “tile_id”: “tile-id”, “user”: “cb-user”, REQUEST CLASS FORMATS TABLE C-8. REQUEST CLASS FORMATS TABLE PARAMETER FORMAT action force_tile_change connection_id 32 byte char array... - Page 107 NEED HELP? LEAVE THE TECH TO US LIVE 24/7 APPENDIX C: DESKVUE API TECHNICAL SUPPORT 1.877.877.2269 REQUEST CLASS JSON STRUCTURE “action”: “force_workspace”, “workspace”: “workspace-id”, “user”: “cb-user”, TABLE C-10. REQUEST CLASS FORMATS TABLE PARAMETER FORMAT action force_workspace workspace 32 byte char array user 32 byte char array RESPONSE...
- Page 108 NEED HELP? LEAVE THE TECH TO US LIVE 24/7 APPENDIX C: DESKVUE API TECHNICAL SUPPORT 1.877.877.2269 TABLE C-12. REQUEST CLASS FORMATS TABLE PARAMETER FORMAT action terminate_workspace workspace 32 byte char array user 32 byte char array RESPONSE Http status code. 1.877.877.2269 BLACKBOX.COM...
-
Page 109: Appendix D: Regulatory Information
NEED HELP? LEAVE THE TECH TO US LIVE 24/7 APPENDIX D: REGULATORY INFORMATION TECHNICAL SUPPORT 1.877.877.2269 D.1 FCC STATEMENT This equipment has been tested and found to comply with the regulations for a Class B digital device, pursuant to Part 15 of the FCC Rules. These limits are designed to provide reasonable protection against harmful interference when the equipment is operated in a commercial environment. -
Page 110: Nom Statement
NEED HELP? LEAVE THE TECH TO US LIVE 24/7 APPENDIX D: REGULATORY INFORMATION TECHNICAL SUPPORT 1.877.877.2269 D.6 NOM STATEMENT 1. Todas las instrucciones de seguridad y operación deberán ser leídas antes de que el aparato eléctrico sea operado. 2. Las instrucciones de seguridad y operación deberán ser guardadas para referencia futura. 3. -
Page 111: Appendix E: Disclaimer/Trademarks
E.1 DISCLAIMERS Black Box Corporation shall not be liable for damages of any kind, including, but not limited to, punitive, consequential or cost of cover damages, resulting from any errors in the product information or specifications set forth in this document and Black Box Corporation may revise this document at any time without notice. - Page 112 NEED HELP? LEAVE THE TECH TO US LIVE 24/7 TECHNICAL SUPPORT 1.877.877.2269 © COPYRIGHT 2023, 2024. BLACK BOX CORPORATION. ALL RIGHTS RESERVED. EN_KVM_MANUAL_EMD5104-R_REV1_2407.PDF...
Need help?
Do you have a question about the EMERALD DESKVUE and is the answer not in the manual?
Questions and answers