Table of Contents
Advertisement
Advertisement
Table of Contents

Subscribe to Our Youtube Channel
Related Manuals for Weinmann ACCUVAC Pro


Summary of Contents for Weinmann ACCUVAC Pro
- Page 1 ACCUVAC Pro/ACCUVAC Lite Suction device Instructions for Use...
- Page 2 Designed by: WEINMANN Emergency Medical Technology GmbH + Co. KG Frohbösestrasse 12 22525 Hamburg GERMANY E: kundenservice@weinmann-emt.de www.weinmann-emergency.com T: +49 40 88 18 96-120 F: +49 40 88 18 96-481 Manufacturer: ATMOS MedizinTechnik GmbH & Co. KG Ludwig-Kegel-Straße 16 79853 Lenzkirch...
-
Page 3: Table Of Contents
Performing suction ..............62 Emptying the canister system ............65 4.10 Changing the canister system ............71 4.11 Transporting the device ............... 72 4.12 After use ..................73 Hygienic reprocessing General instructions ..............74 Intervals ..................74 ACCUVAC Pro/ACCUVAC Lite... - Page 4 Disposable canister system ............103 10.5 Suction material ................ 103 10.6 Bags/cases ................103 10.7 Contaminated parts ..............103 Appendix 11.1 Technical data ................104 11.2 Scope of supply ................. 110 11.3 Warranty ................... 122 11.4 Declaration of conformity ............122 ACCUVAC Pro/ACCUVAC Lite...
-
Page 5: Introduction
You will find a warning preceding any action that entails a hazard for persons or equipment. Warnings consist of • the warning symbol (pictogram), • a signal word designating the hazard level, • information about the hazard and • instructions for avoiding the hazard. ACCUVAC Pro/ACCUVAC Lite... -
Page 6: Function
During suction, a vacuum pump in the device generates a vacuum in the hoses/tubes and the canister system. This vacuum suctions the suction material (e.g., secretions, blood, bodily fluids, or food particles) into the canister system. The vacuum can be regulated. ACCUVAC Pro/ACCUVAC Lite... - Page 7 The suction material is conveyed to the Serres suction bag via a disposable suction hose. The disposable suction hose and Serres suction bag are single-use devices and should be disposed of after use. ACCUVAC Pro/ACCUVAC Lite...
-
Page 8: Safety
Suctioning the upper and lower airways Intended users/user profiles: • Physicians • Medical personnel • EMS field providers • Non-medical users, e.g. patients and/or relatives (after receiving instruction in the use of the device from a medical professional) ACCUVAC Pro/ACCUVAC Lite... - Page 9 - Suction in cases of obstruction of respiratory function Not suitable for: Medical contraindications: • Continuous operation when carrying out drainage in the low-vacuum range (e.g. thoracic drains or wound drains) • Long-term endoscopic applications • Vacuum extraction • Smoke extraction • Liposuction ACCUVAC Pro/ACCUVAC Lite...
- Page 10 Sterility / specific microbial state: Not a sterile product Disposable product/reprocessing: The device is intended for multiple use. The device and some accessories can be reused. For information on reprocessing, cleaning and disinfection, see instructions for use. ACCUVAC Pro/ACCUVAC Lite...
-
Page 11: Safety Information
If the device is dropped or falls: Do not use the damaged device. Risk of injury due to long hoses, tubes and power cords! Children can strangle themselves with long hoses and/or tubes. Keep hoses, tubes and power cords out of the reach of children. ACCUVAC Pro/ACCUVAC Lite... - Page 12 Do not rinse off the device and power-supplying accessories under running water. Do not wipe the device and power-supplying accessories with a wet cloth. Do not immerse the device and power-supplying accessories in disinfectant. ACCUVAC Pro/ACCUVAC Lite...
- Page 13 -0.8 bar! If the device is switched on with an existing vacuum of -0.8 bar, the device may be damaged. Do not switch on the device with a maximum vacuum of -0.8 bar. ACCUVAC Pro/ACCUVAC Lite...
- Page 14 During line operation, position the power cord so that there is no danger of tripping over it. During 12 V operation, position the connection cable so that there is no danger of tripping over it. ACCUVAC Pro/ACCUVAC Lite...
- Page 15 Keep an alternative means of suction available at all times. Do not use the device in short-term operation for longer than 60 minutes (ACCUVAC Pro) or 45 minutes (ACCUVAC Lite). Check the battery status repeatedly and charge the battery if necessary.
- Page 16 Always stand the device with disposable canister system upright on a solid surface during suction. If suction material enters the bacteria filter: Replace the Serres suction bag. ACCUVAC Pro/ACCUVAC Lite...
-
Page 17: General Instructions
(see „5 Hygienic reprocessing“, page 74). • Also observe the respective instructions for use for the accessories and the other parts. • Observe the ambient conditions for operation, charging, transportation, and storage of the device (see „11.1 Technical data“, page 104). ACCUVAC Pro/ACCUVAC Lite... - Page 18 (see „6 Function check“, page 89). • Do not operate the device if you identify damage. Clean the device and send it to WEINMANN Emergency, authorized by ATMOS MedizinTechnik GmbH & Co. KG, or another authorized technician for repair. • Before deflating vacuum mattresses, check the connection compatibility with the adapter for vacuum mattresses (not included).
-
Page 19: Description
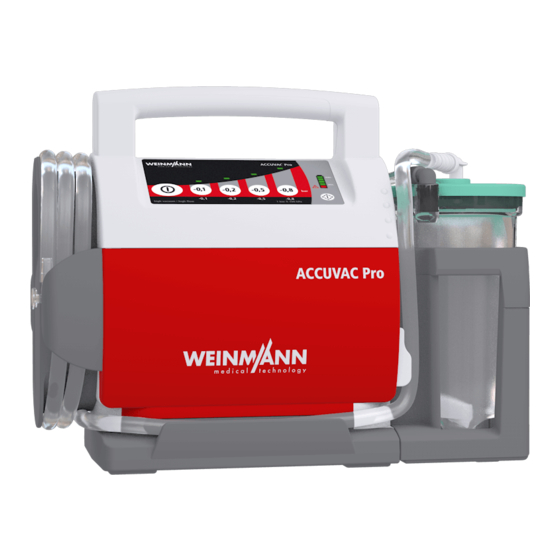
Power supply unit and charger Release catch Disconnects the device from the wall mounting Device inlet (covered) Connects the device to the canister system Holds the disposable canister system and keeps it in Holder for disposable canister system position ACCUVAC Pro/ACCUVAC Lite... - Page 20 Used to store the suction hose if not required Hose holder Used to insert the suction hose Control panel Used to set and operate the device Connects the holder for reusable canister system with Lock (covered) the device inlet ACCUVAC Pro/ACCUVAC Lite...
-
Page 21: Control Panel
3 Description 3.2 Control panel 3.2.1 ACCUVAC Pro 3-2 ACCUVAC Pro controls Designation Description Displays the following vacuum: • Currently set vacuum (vacuum display flashes) Vacuum display • Attained vacuum (vacuum display stays illuminated) Battery status indicator Shows the battery status •... - Page 22 Shows the battery status Vacuum regulator Allows you to select the required vacuum Vacuum display Displays the currently set vacuum On/Off button Switches the device on or off Operation indicator Displays whether the device is switched on/off ACCUVAC Pro/ACCUVAC Lite...
-
Page 23: Accessories
Lower section of secretions canister cover float ball Filters bacteria out of the suction material and protects Bacteria filter against contamination Seals the connection between the filter holder and the O-ring lower section of the secretions canister cover ACCUVAC Pro/ACCUVAC Lite... - Page 24 Used for manual regulation of the vacuum using a Secondary air inlet finger Reusable secretions canister Used to collect the suction material Float ball Serves as protection against overflowing Holds the reusable canister system in the holder for Canister latch reusable canister system ACCUVAC Pro/ACCUVAC Lite...
- Page 25 Seals the Serres suction bag after use Serres suction bag Used to collect the suction material Hygiene filter Used to filter the suction air Connects the device inlet with the Serres secretions Vacuum tube canister or with the hygiene filter ACCUVAC Pro/ACCUVAC Lite...
- Page 26 Connects the Serres secretions canister to the vacuum canister tube Used for manual regulation of the vacuum using a Secondary air inlet finger Disposable suction hose with fingertip Conducts the suction material into the Serres suction control ACCUVAC Pro/ACCUVAC Lite...
-
Page 27: Other Parts
Allows you to carry the device over your shoulder • Protects the device from damage Protective bag • Allows you to carry accessories Connects the device’s charging interface with a 12 V connection cable 12 V DC power source ACCUVAC Pro/ACCUVAC Lite... -
Page 28: Labels
UKCA mark (confirms that the device complies with the regulations of the United Kingdom) EAC mark (confirms that the product complies with the applicable safety requirements specified in the Technical Regulations of the Eurasian Economic Union (Eurasian Conformity)) ACCUVAC Pro/ACCUVAC Lite... - Page 29 China RoHS label (confirms that the product does not emit toxic substances for the number of years indicated) Disposable, do not reuse Short-term operation For indoor use only Storage temperature range limits Storage humidity range limits Air pressure range limits Maximum weight Do not iron ACCUVAC Pro/ACCUVAC Lite...
- Page 30 Do not dispose of device in household waste Contains lead, do not dispose of in household waste Contains lead, recycle European Recycling Platform Type BF applied part Direct current AC voltage Type of protection against electric shock: Protection class II device ACCUVAC Pro/ACCUVAC Lite...
- Page 31 Indicates the side of the hygiene filter that has to face the angled connector for Serres secretions canister Indicates the correct installation direction of the battery Do not throw the battery into fire. Connect the battery Notice: The label is located beneath the battery cover. ACCUVAC Pro/ACCUVAC Lite...
-
Page 32: Preparation And Operation
1. Connect the charging interface on the device to a 12 V DC power source via the 12 V connection cable Connect the charging interface of the device to the line power via the power supply unit and charger. Result The device is ready for use. ACCUVAC Pro/ACCUVAC Lite... -
Page 33: Using The Rechargeable Battery
Replace the battery if its runtime becomes noticeably reduced. • The service life of the ACCUVAC Pro battery is exhausted after approx. 500 charging cycles in approx. 4 years. The battery of the ACCUVAC Lite is designed for 400 charging cycles in approx. - Page 34 Charge the battery at the latest when an audible signal sounds or the red status LED of the battery status indicator flashes quickly (ACCUVAC Pro). Charge the battery at the latest when the red status LED of the battery status indicator lights up (ACCUVAC Lite).
- Page 35 Battery status indicator with LEDs Test button 4-1 ACCUVAC Pro battery status indicator Battery status Explanation Meaning indicator 4 green status LEDs light Battery status < 100 % 3 green status LEDs light Battery status <...
- Page 36 You can read the battery status off the battery status indicator on the control panel. The battery status is indicated by 3 green status LEDs and 1 red status LED. Battery status indicator with LEDs 4-2 ACCUVAC Lite battery status indicator ACCUVAC Pro/ACCUVAC Lite...
- Page 37 (see „4.7 Switching off the device“, page 62). • The device is disconnected from the power supply. 1. Press the two wings of the suction hose reel apart with your thumbs and pull the reel off the device. ACCUVAC Pro/ACCUVAC Lite...
- Page 38 4. Lay the device down on the lower part of the housing. The opened battery compartment faces upward. Result Preparations for battery replacement are complete. 4.3.5 Changing the battery (ACCUVAC Pro) Requirement Preparations for the battery replacement are complete (see „4.3.4 Preparing for a battery replacement“, page 37).
- Page 39 2. Pull the battery connector out of the socket in the battery compartment. 3. Pull the battery out of the device. 4. Insert a new battery. When doing so, note: The symbol must point toward the socket in the battery compartment. ACCUVAC Pro/ACCUVAC Lite...
- Page 40 4.3.6 Changing the battery (ACCUVAC Lite) Requirement Preparations for the battery replacement are complete (see „4.3.4 Preparing for a battery replacement“, page 37). 1. Detach the red and black cables from the contacts on the battery. 2. Stand the device up. ACCUVAC Pro/ACCUVAC Lite...
- Page 41 8. Connect the red cable to the plus contact on the left of the battery. 9. Connect the black cable to the minus contact on the right of the battery. 10. Install the battery compartment cover (see „4.4.2 Installing the battery compartment cover“, page 44). ACCUVAC Pro/ACCUVAC Lite...
-
Page 42: Connecting Parts
The canister system is removed. • The holder for canister system is removed. • The suction hose reel is removed. • The battery compartment cover is removed. 1. Lay the device on the upper part of housing. ACCUVAC Pro/ACCUVAC Lite... - Page 43 3. Press the device base into the guide along the suction hose reel side and along the bottom. 4. Hook the device base into the top corner on the canister system side. Result The device base is installed. ACCUVAC Pro/ACCUVAC Lite...
- Page 44 1. Insert the battery compartment cover in the upper guide of the battery compartment. 2. Fold down the battery compartment cover into the lower guide of the battery compartment. 3. Push the battery compartment cover to the right until it audibly clicks into place. ACCUVAC Pro/ACCUVAC Lite...
- Page 45 The holder is installed in the same way for both devices. There are two types of holders: • Holder for reusable canister system • Holder for disposable canister system Requirement The device base is installed (see „4.4.1 Installing the device base“, page 42). ACCUVAC Pro/ACCUVAC Lite...
- Page 46 2. Push the holder to the end of the guides. When doing so, note: • The holder must be flush with the device base and the lower part of the housing. • The device inlet must be freely accessible. ACCUVAC Pro/ACCUVAC Lite...
- Page 47 Replace the bacteria filter after every patient. Replace the bacteria filter after a maximum of two weeks if no patient change has occurred. Requirement The holder for reusable canister system is installed (see „4.4.4 Installing the holder for canister system“, page 45). ACCUVAC Pro/ACCUVAC Lite...
- Page 48 The float ball must be able to move freely. 3. Push the upper section of the secretions canister cover onto the lower section of the secretions canister cover. 4. Place the reusable secretions canister on a stable surface. ACCUVAC Pro/ACCUVAC Lite...
- Page 49 5. Place the secretions canister cover on the reusable secretions canister. 6. Press the cover onto the canister with both hands. 7. If necessary: Push the O-ring onto the filter holder. 8. Place the new bacteria filter on the filter holder. ACCUVAC Pro/ACCUVAC Lite...
- Page 50 When doing so, note: The filter holder must be in a vertical position and click into place in the detent lug on the reusable secretions canister. 11. Connect the reusable suction hose to the reusable secretions canister. ACCUVAC Pro/ACCUVAC Lite...
- Page 51 15. If necessary: Coil the reusable suction hose on the suction hose reel. 16. If necessary: Clamp the reusable suction hose in the hose holder. 17. Perform a function check (see „6.2 Performing a function check“, page 89). ACCUVAC Pro/ACCUVAC Lite...
- Page 52 Only use sterile packed parts if the packaging is undamaged. Requirement The holder for disposable canister system is installed (see „4.4.4 Installing the holder for canister system“, page 45). 1. Connect the vacuum tube on the right side of the device to the device inlet. ACCUVAC Pro/ACCUVAC Lite...
- Page 53 4 Preparation and operation 2. Insert the Serres secretions canister into the holder for disposable canister system from above. 3. Connect the vacuum tube to the angled connector for Serres secretions canister. 4. Unfold the Serres suction bag. ACCUVAC Pro/ACCUVAC Lite...
- Page 54 Serres secretions canister. 9. Connect the disposable suction hose to the elbow connector on the Serres suction bag. 10. If necessary: Switch off the device (see „4.7 Switching off the device“, page 62). ACCUVAC Pro/ACCUVAC Lite...
-
Page 55: Connecting Accessories And Other Parts
The disposable canister system is installed in the holder for disposable canister system. 4.5 Connecting accessories and other parts 4.5.1 Connecting the hygiene filter for disposable canister system 1. Remove the vacuum tube from the angled connector for Serres secretions canister. ACCUVAC Pro/ACCUVAC Lite... - Page 56 1. Connect the 12 V connection cable to a 12 V DC power source Connect the power supply unit and charger to the line power. ACCUVAC Pro/ACCUVAC Lite...
- Page 57 Hold the device firmly by the handle while removing. 1. Press the release catch on the device. 2. Pull the device upwards out of the wall mounting. Result The device is removed from the wall mounting. ACCUVAC Pro/ACCUVAC Lite...
- Page 58 1. Insert the suction hose reel end of the device sideways into the protective bag from above. 2. Push the device as far as possible to the left into the protective bag. 3. Adjust the canister system on the bottom of the protective bag. ACCUVAC Pro/ACCUVAC Lite...
- Page 59 1. Pass the hook and loop fasteners of the accessories bag through the eyelets on the battery compartment cover. 2. Affix the hook and loop fasteners on the bottom of the accessories bag. Result The accessories bag is attached. ACCUVAC Pro/ACCUVAC Lite...
- Page 60 Observe the maximum load of the shoulder strap. 1. Wrap the hook and loop fastener of the shoulder strap around the device’s handle tightly and close it. Result The shoulder strap is attached. ACCUVAC Pro/ACCUVAC Lite...
-
Page 61: Switching On The Device
• The background illumination and the LEDs of the On/Off button light up. ACCUVAC Lite • The battery status indicator displays the battery status. • The operation indicator lights up. Result The device is ready for use. ACCUVAC Pro/ACCUVAC Lite... -
Page 62: Switching Off The Device
Keep an alternative means of suction available at all times. Do not use the device in short-term operation for longer than 60 minutes (ACCUVAC Pro) or 45 minutes (ACCUVAC Lite). Check the battery status repeatedly and charge the battery if necessary. - Page 63 5. Select the required vacuum: ACCUVAC Pro Press the vacuum button for the required vacuum. • The vacuum display of the selected vacuum button flashes green. • The vacuum display of the attained vacuum lights up green. ACCUVAC Pro/ACCUVAC Lite...
- Page 64 Replace the Serres suction bag (see „4.9.2 Changing the Serres suction bag“, page 68). If the Serres suction bag is too full, suction material may enter the device or the bacteria filter swells and the device stops suctioning. ACCUVAC Pro/ACCUVAC Lite...
-
Page 65: Emptying The Canister System
Requirement • The device is switched off (see „4.7 Switching off the device“, page 62). • The reusable suction hose is uncoiled from the suction hose reel and removed from the hose guide. ACCUVAC Pro/ACCUVAC Lite... - Page 66 Tilt the secretions canister cover to the right-hand side or backwards. 4. Dispose of the contents of the reusable secretions canister (see „10 Disposal“, page 102). 5. Place the secretions canister cover on the reusable secretions canister. ACCUVAC Pro/ACCUVAC Lite...
- Page 67 8. Place the new bacteria filter on the filter holder. 9. Insert the filter holder into the lower section of the secretions canister cover. When doing so, note: The filter holder must be in a horizontal position. ACCUVAC Pro/ACCUVAC Lite...
- Page 68 Observe the instructions for use from the manufacturer, Serres. Risk of infection from escaping suction material! Suction material can escape the canister system and infect the patient or user. Always wear suitable gloves. Remove the canister system carefully. ACCUVAC Pro/ACCUVAC Lite...
- Page 69 (see „4.7 Switching off the device“, page 62). 4. Pull the Serres suction bag out of the Serres secretions canister using the handle and dispose of it (see „10 Disposal“, page 102). 5. Unfold the new Serres suction bag. ACCUVAC Pro/ACCUVAC Lite...
- Page 70 The Serres suction bag must unfurl completely until it rests on the base and against the sides of the Serres secretions canister. 10. Connect the disposable suction hose to the elbow connector on the Serres suction bag. 11. Continue suction (see „4.8 Performing suction“, page 62). ACCUVAC Pro/ACCUVAC Lite...
-
Page 71: Changing The Canister System
The disposable canister system is removed from the holder for disposable canister system. 1. On the reusable canister system: Release the lock from the device inlet On the disposable canister system: Remove the vacuum tube from the device inlet. ACCUVAC Pro/ACCUVAC Lite... -
Page 72: Transporting The Device
The canister system is changed. 4.11 Transporting the device 4-3 Using the handle or shoulder strap You can carry the device in the following ways: • With the handle on the device • With the shoulder strap ACCUVAC Pro/ACCUVAC Lite... -
Page 73: After Use
(see „4.7 Switching off the device“, page 62). 2. Reprocess the device hygienically (see „5 Hygienic reprocessing“, page 74). 3. Perform a function check (see „6.2 Performing a function check“, page 89). Result The device is ready for use again. ACCUVAC Pro/ACCUVAC Lite... -
Page 74: Hygienic Reprocessing
Immediately in the case of discoloration, soiling or oversuction Hygiene filter for • If the vacuum is > -0.2 bar while at maximum disposable canister suction power with an open suction hose system • Every 30 days ACCUVAC Pro/ACCUVAC Lite... -
Page 75: Hygienic Reprocessing Of The Device
Do not immerse the device and power-supplying accessories in disinfectant. 1. Switch off the device (see „4.7 Switching off the device“, page 62). 2. Disconnect the device from the power supply. 3. If necessary: Disconnect the power supply accessories from the device. ACCUVAC Pro/ACCUVAC Lite... - Page 76 7. On the reusable canister system: Use your finger to release the latch on the secretions canister cover and remove the reusable canister system from its holder ACCUVAC Pro/ACCUVAC Lite...
- Page 77 Disconnect the vacuum tube and the connection hose from the hygiene filter. 9. Reprocess the reusable canister system hygienically (see „5.5 Hygienic reprocessing of the reusable canister system“, page 82) Reprocess the disposable canister system hygienically (see „5.6 Hygienic reprocessing of the disposable canister system“, page 86). ACCUVAC Pro/ACCUVAC Lite...
- Page 78 11. Push the holder for canister system to the center and remove it from the device. 12. If the device base requires immersion disinfection: Remove the device base (see „5.4 Removing the device base“, page 81). ACCUVAC Pro/ACCUVAC Lite...
- Page 79 (Recommendation: system GIGASEPT FF (new)) and rinse off with distilled water Reusable canister Siehe „5.5 Hygienic reprocessing of the reusable canister system“, Seite 82. system Disposable canister Siehe „5.6 Hygienic reprocessing of the disposable canister system“, Seite 86. system ACCUVAC Pro/ACCUVAC Lite...
- Page 80 (see „4.4.2 Installing the battery compartment cover“, page 44). 16. Install the holder for canister system (see „4.4.4 Installing the holder for canister system“, page 45). 17. Install the suction hose reel (see „4.4.3 Installing the suction hose reel“, page 45). ACCUVAC Pro/ACCUVAC Lite...
-
Page 81: Removing The Device Base
Hygienically reprocess the device, accessories and other parts. 5.4 Removing the device base Requirement • The canister system is removed. • The holder for canister system is removed. • The suction hose reel is removed. • The battery compartment cover is removed. ACCUVAC Pro/ACCUVAC Lite... -
Page 82: Hygienic Reprocessing Of The Reusable Canister System
5.5 Hygienic reprocessing of the reusable canister system Risk of infection from escaping suction material! Suction material can escape the canister system and infect the patient or user. Always wear suitable gloves. Remove the canister system carefully. ACCUVAC Pro/ACCUVAC Lite... - Page 83 8. Pull the bacteria filter off the filter holder and dispose of it (see „10 Disposal“, page 102). 9. Pull the O-ring off the filter holder. 10. Remove the float ball from the lower section of the secretions canister cover. ACCUVAC Pro/ACCUVAC Lite...
- Page 84 5 mins with devices according to EN 285 immersion Wipe with a damp disinfection Disinfect at 93 °C in O-ring Not permitted cloth: Use water (Recommendation: a washer-disinfector GIGASEPT FF (new)) Bacteria filter Disposable, do not reuse ACCUVAC Pro/ACCUVAC Lite...
- Page 85 Thermally disinfect for 5 minutes at 93 °C with demineralized water ** Sterilization:* The service life of reusable elements is designed for a maximum of 50 reprocessing cycles. 13. Allow the individual components of the reusable canister system to dry. ACCUVAC Pro/ACCUVAC Lite...
-
Page 86: Hygienic Reprocessing Of The Disposable Canister System
Suction material can escape the canister system and infect the patient or user. Always wear suitable gloves. Remove the canister system carefully. 1. Detach the disposable suction hose with fingertip control and elbow connector from the Serres suction bag. ACCUVAC Pro/ACCUVAC Lite... - Page 87 Serres secretions water with a mild disinfection Rinse at up to 95 °C 20 mins with canister cleaning agent (Recommendation: devices which GIGASEPT FF (new) comply with and rinse off with EN 285) distilled water ACCUVAC Pro/ACCUVAC Lite...
- Page 88 Disposable suction hose with fingertip control Disposable, do not reuse Hygiene filter Connection hose 6. Allow the individual components of the Serres secretions canister to dry. Result The Serres secretions canister is hygienically reprocessed. ACCUVAC Pro/ACCUVAC Lite...
-
Page 89: Function Check
Only use undamaged devices. Only operate the device after it passes the function check. Have the damaged device repaired. Requirement • There is a canister system installed. • There is a suction hose connected to the canister system. ACCUVAC Pro/ACCUVAC Lite... - Page 90 If the hook and loop fastener is damaged or contaminated with lint: Replace the shoulder strap. Result The function check is ready. 6.2.2 Performing a function check (ACCUVAC Pro) Requirement The function check is ready (see „6.2.1 Preparing for the function check“,...
- Page 91 The red status LED lights up Take action (see „6.2.3 Failed and one or more green status Function check failed function check (ACCUVAC Pro)“, LEDs of the failed tests flash. page 92). • The green status LEDs of the passed tests light up.
- Page 92 6 Function check 6.2.3 Failed function check (ACCUVAC Pro) Risk of injury due to device which is damaged or not ready for use! Operation of a device which is damaged or has failed a function check may result in injury to the patient.
- Page 93 9. If the device still does not satisfy the requirements: Have the device repaired. 10. Switch off the device (see „4.7 Switching off the device“, page 62). Result The manual function check is complete and the device is ready for use. ACCUVAC Pro/ACCUVAC Lite...
-
Page 94: Faults
7.1 Device The following faults apply for both devices. Faults or causes of faults which only apply for one device are marked with “(ACCUVAC Pro only)” or “(ACCUVAC Lite only)”. Fault Cause Remedy Battery not connected Check the battery connection. - Page 95 Canister system is leaking or is not Check the canister system and correctly connected hoses. Device operated at high altitude or No remedy possible, as problem is low ambient pressure due to physical laws. Device leaking Have the device repaired. ACCUVAC Pro/ACCUVAC Lite...
- Page 96 Battery temperature too high due Device switches off after to operation at high ambient Allow the device to cool and select < 60 mins (ACCUVAC Pro only) temperatures and at the highest a lower suction level. suction level Battery not inserted Insert battery.
-
Page 97: Power Supply Unit And Charger
LED flash for 5 seconds and its service life p. 89). a recurring audible signal sounds for 5 seconds (ACCUVAC Pro only) Battery fails to charge fully despite Unsuitable power supply unit and Use the WM 2620 power supply a charging time of > 14 hours (top charger unit and charger. -
Page 98: Maintenance
Recommended: Inspection according to the manufacturer’s specifications. • Maintenance work such as inspections and repairs must only be carried out by WEINMANN Emergency, authorized by ATMOS MedizinTechnik GmbH & Co. KG, or other expressly authorized technician. 8.2 Sending parts for inspection and... -
Page 99: Changing The Release Catch
When doing so, note: Take care not to lose the springs below the release catch. 2. Place the new release catch on the springs. 3. Push the release catch down until it audibly clicks into place. Result The release catch is replaced. ACCUVAC Pro/ACCUVAC Lite... -
Page 100: Replacing The Cap For Adjusting Knob Of The Vacuum Regulator
(3). 2. Place the cap (1) on the adjusting knob (2) of the vacuum regulator. When doing so, note: The black line on the cap must line up with the white line on the adjusting knob. ACCUVAC Pro/ACCUVAC Lite... -
Page 101: Storage
2. If necessary: Disconnect the device from the power supply. 3. Clean and disinfect the device (see „5.3 Hygienic reprocessing of the device“, page 75). 4. Store the device with the battery in a dry place. Result The device and battery are stored in a dry place. ACCUVAC Pro/ACCUVAC Lite... -
Page 102: Disposal
Electronic waste poses an environmental hazard and must be disposed of properly. Do not dispose of electronic waste in household waste. Contact WEINMANN Emergency, authorized by ATMOS MedizinTechnik GmbH & Co. KG, or an authorized, certified electronic waste company for proper disposal. -
Page 103: Disposable Canister System
10.6 Bags/cases Reprocess the bags/cases hygienically. Dispose of them as household waste. 10.7 Contaminated parts Do not dispose of contaminated parts in household waste. Use an approved, certified special waste disposal company for proper disposal of contaminated parts. ACCUVAC Pro/ACCUVAC Lite... -
Page 104: Appendix
(red status LED) LED) Short-term operation Short-term operation Operating mode 60 mins on, 120 mins off 45 mins on, 90 mins off < 60 dB(A) Volume Average sound pressure level 1 m away and at -0.8 bar ACCUVAC Pro/ACCUVAC Lite... - Page 105 Protection class against electric shock II (line power and battery operation) (according to EN 60601-1) Applied part Type BF Applied part classification Classification as per EN ISO 10079-1 High vacuum/high flow Type of protection IP34D CE marking ACCUVAC Pro/ACCUVAC Lite...
- Page 106 3 years Display Battery status indicator during operation and charging -0.2 bar: 200 mins -0.2 bar: 40 mins Typical battery life* -0.5 bar: 140 mins -0.5 bar: 40 mins -0.8 bar: 85 mins -0.8 bar: 40 mins ACCUVAC Pro/ACCUVAC Lite...
- Page 107 Protection class against electric shock (according to EN 60601-1) Applied part Type BF Applied part classification Type of protection IP40 Length of output line 1.8 m Length of power supply cable Approx. 2 m Subject to alterations in design ACCUVAC Pro/ACCUVAC Lite...
- Page 108 Viral filtration efficiency (VFE) 99.73 % Total efficiency > 99.95 % Filter class H13 (High-Efficiency Particulate Air/Arrestance) Reduction in suction capacity 3 l/min to 4 l/min 11.1.6 Technical data for shoulder strap Specification Shoulder strap Maximum weight 7 kg ACCUVAC Pro/ACCUVAC Lite...
- Page 109 Recommended separation distances between portable and mobile RF communications equipment and ACCUVAC Pro/ACCUVAC Lite ACCUVAC Pro/ACCUVAC Lite are intended for use in an electromagnetic environment in which the radiated RF disturbances are controlled. The customer or user of the ACCUVAC Pro/ACCUVAC Lite can avoid...
-
Page 110: Scope Of Supply
11 Appendix 11.2 Scope of supply 11.2.1 Standard scope of supply ACCUVAC Pro ACCUVAC Pro without canister system WM 11601 Article Designation number ACCUVAC Pro WM 11602 Rechargeable battery, lithium-ion WM 11603 Battery compartment cover WM 11604 ACCUVAC Pro/ACCUVAC Lite instructions for use EN... - Page 111 Suction hose with fingertip control WM 10778 Serres suction bag, 1000 ml, with bacteria filter and WM 10774 solidifying agent ACCUVAC Pro/ACCUVAC Lite instructions for use EN WM 68161 ACCUVAC Pro with disposable canister system WM 11645 and accessories bag...
- Page 112 11 Appendix ACCUVAC Pro with reusable canister system and WM 11630 power supply unit and charger for 100–240 V Article Designation number ACCUVAC Pro WM 11602 Rechargeable battery, lithium-ion WM 11603 Battery compartment cover WM 11604 Reusable canister system, 1000 ml, with canister holder...
- Page 113 WM 15935 comprising: Suction hose with fingertip control WM 10778 12 V connection cable WM 10650 ACCUVAC Pro/ACCUVAC Lite instructions for use EN WM 68161 11.2.2 Standard scope of supply ACCUVAC Lite ACCUVAC Lite without canister system WM 11701 Article...
- Page 114 WM 10778 Serres suction bag, 1000 ml, with bacteria filter and WM 10774 solidifying agent ACCUVAC Pro/ACCUVAC Lite instructions for use EN WM 68161 ACCUVAC Lite with disposable canister system WM 11735 and power supply unit and charger for 100–240 V...
- Page 115 Serres suction bag, 1000 ml, with bacteria filter and WM 10774 solidifying agent Power supply unit and charger WM 2620 Accessories bag WM 11690 ACCUVAC Pro/ACCUVAC Lite instructions for use EN WM 68161 ACCUVAC Lite with reusable canister system WM 11700 Article Designation number...
- Page 116 WM 10666 Accessories bag WM 11690 ACCUVAC Pro/ACCUVAC Lite instructions for use EN WM 68161 11.2.3 Accessories and other parts A current list of accessories is available at www.weinmann- emergency.com or from your authorized dealer. Additional Article Designation information number...
- Page 117 Set of 50, VH-AV reusable suction hose WM 15309 ACCUVAC Lite Set of 10, bacteria filter for reusable ACCUVAC Pro, WM 17830 secretions canister ACCUVAC Lite ACCUVAC Pro, Reusable secretions canister 1000 ml WM 11653 ACCUVAC Lite ACCUVAC Pro/ACCUVAC Lite...
- Page 118 Disposable canister system Kit, disposable canister system ACCUVAC Pro, WM 17826 ACCUVAC Lite comprising: ACCUVAC Pro, Vacuum tube for disposable canister system WM 11761 ACCUVAC Lite ACCUVAC Pro, Serres secretions canister, 1000 ml WM 10775 ACCUVAC Lite ACCUVAC Pro/ACCUVAC Lite...
- Page 119 WM 10815 comprising: ACCUVAC Pro, Suction hose with fingertip control WM 10778 ACCUVAC Lite Set of 50, suction hose for disposable canister system – WM 15937 comprising: ACCUVAC Pro, Suction hose with fingertip control WM 10778 ACCUVAC Lite ACCUVAC Pro/ACCUVAC Lite...
- Page 120 ACCUVAC Lite Battery compartment cover for accessories ACCUVAC Pro WM 11614 Conversion kit, accessories bag ACCUVAC Lite WM 17839 comprising: ACCUVAC Pro, Accessories bag WM 11690 ACCUVAC Lite Battery compartment cover for accessories ACCUVAC Lite WM 11714 ACCUVAC Pro/ACCUVAC Lite...
- Page 121 Elbow for device inlet WM 10798 ACCUVAC Lite Kit, secretions canister cover ACCUVAC Pro, WM 17822 ACCUVAC Lite comprising: ACCUVAC Pro, Upper section of secretions canister cover WM 11657 ACCUVAC Lite Cap for adjusting knob ACCUVAC Lite WM 11724 ACCUVAC Pro/ACCUVAC Lite...
-
Page 122: Warranty
11 Appendix 11.3 Warranty Starting from the date of purchase, WEINMANN Emergency offers the customer a limited warranty on a new original WEINMANN Emergency product or spare parts installed by WEINMANN Emergency in accordance with applicable warranty terms and conditions for the particular product and the warranty periods listed below. - Page 124 Designed by Manufacturer WEINMANN Emergency ATMOS MedizinTechnik GmbH & Co. KG Medical Technology GmbH + Co. KG Ludwig-Kegel-Straße 16 Frohbösestraße 12 79853 Lenzkirch 22525 Hamburg GERMANY GERMANY T: +49 40 88 18 96-120 E: customerservice@weinmann-emt.de...
Need help?
Do you have a question about the ACCUVAC Pro and is the answer not in the manual?
Questions and answers