Chapters
Table of Contents

Related Manuals for Weinmann Homecare CPAP 20e


Summary of Contents for Weinmann Homecare CPAP 20e
- Page 1 CPAP 20e CLICK 2 CPAP unit Aparato CPAP CPAP 20e WM 27320 CLICK 2 WM 27330 Description of the equipment and instructions for use Descripción del aparato e instrucciones de manejo...
- Page 2 English Español...
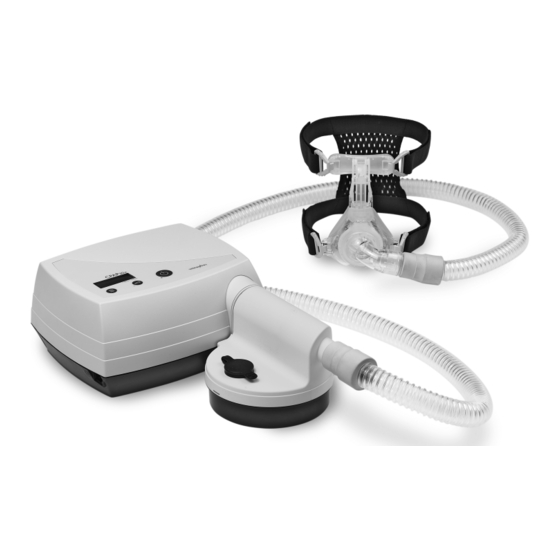
- Page 4 Overview English CPAP 20e 1 Head gear 2 Mask 8 Air inlet 7 Serial interface 9 Supply connection 10 Unit plaque 3 Exhalation system 4 Breathing hose 11 Power supply 5 Unit outlet 6 Humidifier connection 12 Power supply cable 13 Humidifier activated 15 Maintenance symbol 14 Softstart time...
- Page 5 Legend 1 Head gear (Accessories) 14 Softstart time Helps locate the mask correctly and securely. This symbol appears when the softstart time is set or the softstart is activated. 2 Mask (Accessories) 15 Maintenance symbol The mask is used to provide the patient with air at the required therapy pressure.
- Page 6 CLICK 2 (optional) 26 Filling cap 27 Upper part 32 Inlet connections 28 Outlet connections 31 Heater 29 Lower part 33 Bellows 30 Closures Legend 26 Filling cap 30 Closures For filling the humidifier. Used to shut off the pressure gland during preparatory hygienic operations.
- Page 7 Special markings on the unit CPAP 20e CLICK 2 Symbol Meaning CPAP 20e: Unit outlet: air escapes with 4 - 20 hPa Please use the appropriate User Guide! Connector for respiratory humidifier CLICK 2 WM 27330. Please use the appropriate User Guide! Connection for power supply WM 24480 or DC adapter WM 24469, to operate the therapy units using a DC socket (12 - 24 V) DC voltage...
- Page 8 Symbol Meaning Do not use the humidifier on patients whose airways have been bypassed Unit plaques Year built Level of protection from electric shock: Unit type B Do not dispose of the unit as household waste Please use the appropriate User Guide! Unit serial number Type of protection from electric shock: Unit of protection class II Markings on the packaging...
-
Page 9: Table Of Contents
Contents Description of unit ... . . 10 Disinfection CLICK 2 ..30 Multiple patient use CPAP 20e . . . 30 Intended use CPAP 20e . -
Page 10: Description Of Unit
Only use the unit for the purposes described below. 1.2 Intended use CLICK 2 The CLICK 2 humidifier is an optional accessory for the Weinmann CPAP 20e therapy unit. The CLICK 2 humidifier is used to heat the air flow created by the CPAP 20e and to increase its humidity. -
Page 11: Functional Description Cpap 20E
The amount of humidity released can be adjusted us- ing the buttons on the Weinmann therapy unit. The output of the heater rods and conse- quently the temperature of the water in the humidifier chamber is controlled electronically by the Weinmann unit. -
Page 12: Safety Instructions
2. Safety Instructions Please read these operating instructions through carefully. They form part of the equip- ment and should be available at all times. For your own safety, the safety of your patients, and to comply with the requirements of EU Directive 93/42 EEC, please observe the following points. - Page 13 CPAP 20e and damage it. • Only have checks and repair work carried out by Weinmann or specialist staff. • Malfunctions and a lack of biocompatibility may result if third-party arti- cles are used.
-
Page 14: Contraindications
2.2 Contraindications The CPAP 20e should not be used with certain diseases or only with particular caution. In each case the decision whether to use CPAP 20e for therapy lies with the doctor in charge. These include: • cardiac decompensation •... -
Page 15: Side Effects
2.3 Side effects When using CPAP 20e the following undesirable side effects may occur during short-term and long-term usage: • pressure points on the face caused by the mask and the forehead pad- ding • reddening of facial skin • nasal congestion •... -
Page 16: Set Up Of Equipment
3. Set up of equipment 3.1 Setting up and connecting the CPAP 20e 1. Set up the unit on a flat surface, e.g. a bedside cabinet or on the floor next to the bed. Caution! Do not cover the unit or power supply. Do not use in the vicinity of a heater or in direct sunlight. -
Page 17: Filling And Connecting The Click 2
3.2 Filling and connecting the CLICK 2 Before using for the first time Before using for the first time, rinse the humidifier with copious amounts of water (see "5. Hygienic preparation" on page 25). Filling the humidifier Caution! • Do not fill the humidifier when it is connected to the therapy unit and do not overfill above the maximum level, otherwise water may enter the therapy unit. -
Page 18: Breathing Mask
Adapting the humidifier 1. If necessary, release the corrugated tubing from the therapy unit. 2. Click the humidifier into position from the front onto the sleep apnea unit. The inlet connection and the heat- ing rod must be directed towards to the sleep apnea unit. -
Page 19: Connect Other Accessories
Warning! Without an exhalation system the CO concentration would rise to critical values in the mask and hose, thus hindering your breathing. Risk of suffocation! – Fit the external exhalation system between the breath- ing mask and the breathing tube. 3.4 Connect other accessories Bacteria filter If the CPAP 20e is to be used by several patients (e.g. -
Page 20: Operation
4. Operation 4.1 CPAP 20e startup Put on the mask 1. Put on the mask as described in Section “3.3 Breathing mask” on page 18. 2. Connect the breathing hose to the mask (plug cone). 3. Feed the breathing hose away from your head. Warning! Risk of injury! Never place the breathing hose around your neck. -
Page 21: Click 2 Setting
4.2 CLICK 2 setting Switching on the humidifier 1. Fill up the humidifier and set up as described in “3.2 Filling and connecting the CLICK 2” on page 17. 2. Switch on the therapy unit. 3. Press the humidifier button of the therapy unit. -
Page 22: Softstart Setting
Switching off the humidifier There are two ways of switching off the humidifier: • Press the humidifier button of the sleep apnea unit. The humidifier symbol in the display of the sleep apnea unit goes out. The therapy unit remains switched on. •... -
Page 23: After Usage
4.4 After usage 1. Remove the headgear with the mask. 2. Push the on/off switch to switch the device off. The daily therapy duration of the last session is shown on the display. Then “0“ appears. 3. Remove the tube connection and the exhalation system from the mask. -
Page 24: Traveling With Therapy Units
1. When switching off the unit hold down the on/off switch for approx. 4 seconds until the average therapy duration per day is displayed. 2. Release the on/off switch. The average therapy duration per day and the total therapy duration are each displayed for 5 seconds. The current date and the therapy duration for the day then flash up alternately. -
Page 25: Hygienic Preparation
5. Hygienic preparation 5.1 Intervals • Clean the mask and exhalation system every day in accordance with the operating instructions. • Check the filters regularly: – clean the coarse dust filter once a week and replace it at least every 6 months. –... - Page 26 You can interrupt the process at any time by pressing the on/off switch. If the breathing hose is still damp in places after drying, start the drying process again. Cleaning the CPAP 20e housing Warning! • Electric shock! Before cleaning, remove the power supply cable from the supply connection of the therapy unit.
-
Page 27: Cleaning Click 2
Reset the hours meter If the fine filter was changed due to soiling before 250 operating hours, the hours meter must be reset to zero. Proceed as follows: 1. When switching on the unit, press and hold the on/off switch. The filter change indicator will come on after about five seconds before going off again after another three seconds. - Page 28 To seal the pressure line at the inlet connections, push the thin end of the closure by a slight rotational move- ment into the seal of the pressure line. Clean the upper and lower parts with lukewarm water to which a little detergent has been added. We recom- mend cleaning the housing parts once a week in the upper tray of the dishwasher at a maximum tempera- ture of 65 °C.
-
Page 29: Descaling Click 2
Caution! Keep the bellows pressed in so that moisture is not sucked back in again. 3. Remove the bellows. 4. Repeat steps 1. to 3. two or three times. 5.4 Descaling CLICK 2 If the lower part of the housing and the heater rod are covered in scale: 1. -
Page 30: Disinfection Click 2
If the unit is to be utilized for another patient without using a bacteria filter, it must under- go a hygiene treatment beforehand. This has to be carried out by Weinmann or a dealer. The procedure used for the hygiene treatment is described in the inspection sheet and the service and repair instructions for CPAP 20e. -
Page 31: Multiple Patient Use Click 2
5.8 Multiple patient use CLICK 2 If CLICK 2 is to be utilized for another patient without using a bacteria filter, it must under- go a hygiene treatment beforehand. This should be carried out by an authorized dealer. The procedure used for the hygiene treatment when there is a change in patient is described in the service and repair instructions for the CPAP 20e. -
Page 32: Functional Check
6. Functional check 6.1 Intervals Carry out a functional check on the CPAP 20e and the CLICK 2 at least every 6 months. If you find a defect during the functional check, do not use the unit until the defect has been remedied. -
Page 33: Function Check Of Click 2
6.3 Function check of CLICK 2 1. Carry out a visual inspection of the plastic housing. If cracks/damage or severe soiling is evident, the plastic parts or seals must be replaced. 2. Fill the humidifier up to the mark with water. 3. -
Page 34: Malfunctions And Rectification
7. Malfunctions and Rectification If there are defects that cannot be rectified at once, please contact Weinmann or your deal- er immediately to have the unit repaired. To prevent greater damage, stop using the unit. 7.1 CPAP 20e Malfunction Cause Rectification... -
Page 35: Click 2
7.2 CLICK 2 Malfunction Cause Rectification Humidifier is not Switch on the air humidifier, see 4.2, page 21. activated. Humidifier does not warm Send the humidifier and the therapy unit to Electronics defect your dealer for repair. The heater rod seal is Replace the seal, see page 35. - Page 36 Replacing seal of housing base 1. Open the breath humidifier by turning the base and top section anticlockwise against each other. 2. Take a small clean screwdriver and carefully remove the Sealing ring sealing ring from the groove of the housing base. Important! Make absolutely sure that the groove containing the sealing ring is not damaged when doing so.
-
Page 37: Maintenance
8. Maintenance Regular maintenance should be carried out as a preventive measure. Please adhere to the stipulated intervals. 8.1 Intervals • Every 10,000 operating hours (maintenance symbol appears in display) • Every 4 years at the latest (see maintenance sticker on rear of unit) 8.2 Maintenance includes the following: •... -
Page 38: Scope Of Supply
10. Scope of supply 10.1 Standard scope of supply CPAP 20e WM 27320 Parts Order number CPAP 20e basic unit 27321 Breathing hose 24445 Power supply 24480 Power supply cable 24133 Instructions for use CPAP 20e + CLICK 2 GB 66101 CLICK 2 WM 27330... - Page 39 Parts Order number Sound absorber, complete (alternative exhalation system) 23685 SOMNOmask, size S 25110 SOMNOmask, size M 25120 SOMNOmask, size L 25130 SOMNOmask, size S, blue 25210 SOMNOmask, size M, blue 25220 SOMNOmask, size L, blue 25230 SOMNOplus, size S 25710 SOMNOplus, size M 25720...
- Page 40 Parts Order number JOYCE non vented, size M 26170 JOYCE non vented, size L 26180 JOYCE non vented, size XL 26190 JOYCE non vented 40 hPa, size S 26161 JOYCE non vented 40 hPa, size M 26171 JOYCE non vented 40 hPa, size L 26181 JOYCE non vented 40 hPa, size XL 26191...
-
Page 41: Replacement Parts Cpap 20E
10.3 Replacement parts CPAP 20e Parts Order number Breathing hose 24445 Set of 10 breathing hoses 15689 Coarse dust filter 24481 Set of 2 coarse dust filters 15321 Fine dust filter packed 24401 Set of 12 fine filters 15668 Power supply 24480 Power supply cable 24133... -
Page 42: Technical Data
11. Technical data 11.1 Specifications CPAP 20e CPAP 20e with CLICK 2 Product class as per 93/42/EEC Dimensions WxHxD in 21 x 9.8 x 18.5 21 x 14 x 31.3 Weight approx. 1.25 kg approx. 1.5 kg (without water) Temperature range –... - Page 43 CPAP 20e CPAP 20e with CLICK 2 Electromagnetic Test parameters and limit values can be obtained from the manufacturer if compatibility (EMC) as required. per EN 60601-1-2 – radio shielding EN 55011 B – radio interference EN 61000-4 parts 2 to 6, part 11 suppression Mean sound pressure level/operation at...
- Page 44 CPAP 20e CPAP 20e with CLICK 2 Short-term constant pressure level measured as per prEN ISO 17510:2004 when therapeutic pressure is applied: 20 hPa Δp ≤ 1.3 hPa 15 hPa Δp ≤ 1.1 hPa 10 hPa Δp ≤ 0.8 hPa 5 hPa Δp ≤...
-
Page 45: Pneumatic Diagram
CLICK 2 Max. permitted flow (free-flowing) 160 l/min Max. mask temperature 37 °C Gas leakage at 30 hPa negligible Humidifier output at heating level 6: Flowrate = 20 l/min 14.1 mg/l Flowrate = 30 l/min 10.3 mg/l Flowrate = 40 l/min 8.0 mg/l at 23 °C and 65 % relative humidity Subject to design modifications. -
Page 46: Safety Distances
11.3 Safety distances Recommended safety distances between portable and mobile HF telecommunications equipment (e.g. mobile phones) and CPAP 20e or CLICK 2 Safety distance dependent on transmission frequency Nominal output of HF equipment in m in W 150 kHz - 80 MHz 80 MHz - 800 MHz 800 MHz –... -
Page 47: Warranty
– Failure to use original spare parts. • Weinmann is not liable for consequential harm caused by a defect if it is not based on intention or gross negligence. Weinmann is also not liable for minor physical injury to life or limb resulting from negligence. -
Page 48: Index
13. Index Keyword: page: Accessories Cleaning CLICK 2 17, 21, 42 Disinfection 25, 29 Drying Exhalation system: 18, 23, 25, 32, 39 Filter 25, 34, 41, 44 Functional check Humidifier 13, 19, 29, 38, 42 Inspection Malfunctions Mask 18, 20, 23 Replacement parts Safety instructions 12, 13... -
Page 49: Declaration Of Conformity
14. Declaration of Conformity Declaration of Conformity... - Page 50 Declaration of Conformity...
- Page 52 Vista general Español CPAP 20e 1 Cintas para la cabeza 2 Máscara de 8 Entrada de aire respiración 7 Interfaz serial 9 Entrada de tensión 3 Sistema de 10 Placa de características espiración del aparato 4 Tubo de 11 Fuente de alimentación respiración 5 Salida del aparato 6 Conexión humidificador...
- Page 53 Leyenda 1 Cintas para la cabeza (Accesorios) 12 Cable de alimentación Sirve para colocar la máscara de respiración de Sirve para conectar la fuente de alimentación a la forma correcta y segura. red eléctrica. 2 Máscara de respiración (Accesorios) 13 Humidificador activado A través de la máscara de respiración se suministra Este símbolo se indica cuando el humidificador al paciente el aire de respiración con la presión de...
- Page 54 23 Adaptador CC 12 - 24 V (Accesorios) 25 Válvula de emergencia de O (Accesorios) Sirve para que el aparato de terapia funcione a Sirve para proporcionar oxígeno a la máscara de través de una toma de corriente continua (12 - respiración.
- Page 55 Señalización especial en el aparato CPAP 20e CLICK 2 Símbolo Significado CPAP 20e: Salida del aparato: Salida del aire ambiental a 4 - 20 hPa ¡Tenga en cuenta el manual de instrucciones! Conexión para el humidificador del aire de respiración CLICK 2 WM 27330.
- Page 56 Símbolo Significado CLICK 2 (opcional): ¡El aparato se ha calentado! No toque la barra calentadora. No utilizar el humidificador del aire de respiración con pacientes a los que se haya practicado una derivación coronaria. Placa identificativa del aparato Símbolo Significado Año de fabricación Grado de protección contra descarga eléctrica: Aparato del tipo B No elimine el aparato tirándolo a la basura doméstica...
- Page 57 Indice Descripción del aparato ..58 Desinfección CLICK 2 ..80 Cambio de paciente CPAP 20e . . . 80 Finalidad de uso CPAP 20e ..58 Cambio de paciente CLICK 2 .
-
Page 58: Descripción Del Aparato
1.2 Finalidad de uso CLICK 2 El humidificador del aire de respiración CLICK 2 es un accesorio opcional del aparato de te- rapia Weinmann CPAP 20e. El humidificador del aire de respiración CLICK 2 se emplea para CPAP 20e calentar el flujo de aire generado y concentrar la humedad. -
Page 59: Descripción Del Funcionamiento Cpap 20E
La emisión de humedad se puede regular individualmente por medio de las teclas del aparato de terapia Weinmann. El rendimiento de la barra calentadora, y en consecuencia la temperatura del agua en la cámara del humidificador, se regula electrónicamente desde el aparato de terapia Weinmann. -
Page 60: Disposiciones De Seguridad
2. Disposiciones de seguridad Lea con atención este manual de instrucciones. Forma parte del aparato que se describe y debe estar disponible en todo momento. Por su propia seguridad personal, así como por la de sus pacientes, y para cumplir con los requisitos estipulados en la Directiva 93/42 CEE, debe cumplir las siguientes indicaciones de seguridad: 2.1 Indicaciones de seguridad... - Page 61 No está permitido modificar el CPAP 20e ni el CLICK 2. • Sólo pueden utilizarse máscaras de otros fabricantes con la autorización previa del fabricante Weinmann. Si se utilizan máscaras no autorizadas se pone en peligro el éxito de la terapia. •...
-
Page 62: Contraindicaciones
¡Precaución! • La introducción de oxígeno sólo está permitida utilizando la válvula de emergencia de O WM 24042. • Referente al oxígeno, observe detenidamente las indicaciones de seguri- dad contenidas en el manual de utilización su sistema de introducción de oxígeno. -
Page 63: Efectos Secundarios
2.3 Efectos secundarios Si se utiliza el CPAP 20e durante periodos cortos y largos pueden aparecer los siguientes efectos secundarios no deseados: • zonas de presión de la máscara de respiración y de la almohadilla frontal en la cara; • enrojecimientos de la piel de la cara;... -
Page 64: Montaje Del Aparato
3. Montaje del aparato 3.1 Instalación y conexión de CPAP 20e 1. Coloque el aparato sobre una superficie plana, p. ej. sobre la mesita de noche o sobre el suelo, junto a la cama. ¡Precaución! No coloque el aparato ni la fuente de alimentación sobre colchas o telas. No lo emplee en zonas cercanas a la calefacción o en zonas expuestas a la radiación solar. -
Page 65: Llenado Y Conexión De Click 2
3.2 Llenado y conexión de CLICK 2 Antes del primer uso Antes del primer uso, se debe lavar una vez el humidificador del aire de respiración con abundante agua (vea “5. Acondicionamiento higiénico“ en la página 74). Llenado del humidificador del aire de respiración ¡Precaución! •... -
Page 66: Máscara De Respiración
Adaptación del humidificador del aire de respiración 1. Si se da el caso, extraiga el tubo flexible ondulado del aparato de terapia. 2. Una el humidificador del aire de respiración al aparato para la apnea del sueño por la parte delantera. A la vez, el racor de empalme de entrada y la barra ca- lentadora deben estar orientadas al aparato para la ap- nea del sueño. -
Page 67: Conexión De Otros Accesorios
¡Advertencia! Sin un sistema de espiración, la concentración de CO en la máscara y en el tubo flexi- ble podría aumentar hasta alcanzar valores críticos, dificultando con ello su respira- ción. ¡Existe peligro de asfixia! – Instale el sistema de espiración externo entre la máscara de respiración y el tubo flexible. -
Page 68: Manejo
4. Manejo 4.1 Puesta en marcha del CPAP 20e Aplicación de la máscara 1. Coloque la máscara como se describe en el apartado „3.3 Máscara de respiración“ en la página 66. 2. Una el tubo flexible a la máscara de respiración (cono de conexión). -
Page 69: Click 2 Ajuste
4.2 CLICK 2 ajuste Conexión del humidificador del aire de respiración 1. Llene el humidificador y ajústelo según descrito en el apartado „3.2 Llenado y conexión de CLICK 2“ en la página 65. 2. Encienda el aparato de terapia. 3. Pulse la tecla del humidificador del aparato de tera- pia. -
Page 70: Ajuste Del Arranque Suave
Desconexión el humidificador del aire de respiración Existen dos posibilidades para apagar el humidificador del aire de respiración : • Presione la tecla del humidificador del aparato para la apnea del sue- ño. El símbolo del humidificador desaparece del display del aparato para la apnea del sueño. -
Page 71: Después Del Uso
4.4 Después del uso 1. Guarde la capucha y las cintas para la cabeza con la máscara de respiración. 2. Pulse la tecla de conexión/desconexión para desconectar el aparato. En el display se indica la duración de la terapia diaria de la última utilización. -
Page 72: Consulta De La Duración Del Tratamiento
4.5 Consulta de la duración del tratamiento El CPAP 20e almacena los datos de 366 días y la correspondiente duración del tratamiento. Puede consultar los siguientes valores: • duración total de la terapia en horas • duración media diaria de la terapia •... -
Page 73: Transporte Del Aparato De Terapia
4.6 Transporte del aparato de terapia Para transportar el aparato de terapia durante un trayecto prolongado, se debería guardar en la bolsa de transporte (disponible como accesorio). 1. Guarde en la bolsa de transporte el aparato, el cable de conexión, el tubo flexible, la máscara de respiración, el sistema de espiración y, en su caso, el humidificador del aire de respiración. -
Page 74: Acondicionamiento Higiénico
5. Acondicionamiento higiénico 5.1 Plazos • Limpie la máscara de respiración y el sistema de espiración diariamente como se describe en el manual de instrucciones. • Revise regularmente los filtros: – debe limpiar el filtro contra polvo grueso una vez a la semana y sustituirlo como mínimo cada 6 meses. - Page 75 7. Para iniciar el proceso de secado, pulse al mismo tiempo la tecla de arranque suave CPAP 20e y la tecla de apagado/encendido. El aparato se encenderá y secará el tubo flexible (duración: 30 minutos). El tiempo res- tante se visualizará en el display. Al finalizar el proceso de secado el aparato se apaga automáticamente.
-
Page 76: Limpieza Click 2
Para apagar el indicador de sustitución de filtro Mantenga pulsada la tecla de encendido/apagado para encender el aparato: – En primer lugar, se indicará la duración total de la terapia. – A continuación, aparece el indicador de sustitución de filtro. –... - Page 77 2. Durante la limpieza no debe penetrar agua en el con- ducto de medición de la presión, ya que de lo contrario podrían producirse mediciones erróneas. Para evitarlo, se debe cerrar el conducto de medición de la presión: Para cerrar el conducto de medición de la presión en el racor de empalme de salida , inserte por el extremo del conducto de medición de la presión el tubo flexible de silicona del tapón de cierre (incluido en el volumen de...
-
Page 78: Descalcificación De Click 2
1. Coloque el fuelle suministrado en el extremo del con- ducto de medición de la presión, en el racor de empal- me de salida, como ilustra la figura. ¡Advertencia! El fuelle debe usarse exclusivamente para secar el humidificador del aire de respira- ción. - Page 79 Aparato ¡Advertencia! • Existe peligro de shock eléctrico. Antes de la limpieza no olvide desco- nectar el cable de conexión de la fuente de alimentación de la toma de entrada de tensión del aparato de terapia. • Preste atención a que no penetre ningún líquido en el aparato. No su- merja nunca el aparato en un desinfectante ni en ningún otro líquido.
-
Page 80: Desinfección Click 2
En caso de que deba utilizarse el aparato para otro paciente sin filtro de bacterias, previa- mente será preciso acondicionarlo higiénicamente. Esta operación deberá ser realizada por el fabricante Weinmann o por un distribuidor especializado. El procedimiento para el acondicionamiento higiénico se describe tanto en la hoja de inspección como en el manual de mantenimiento del CPAP 20e. -
Page 81: Control Del Funcionamiento
6. Control del funcionamiento 6.1 Plazos Tanto para CPAP 20e como para CLICK 2 realice un control de funcionamiento cada seis meses como mínimo. Si se descubrieran fallos en el control de funcionamiento, no utilice el aparato hasta que las averías se hayan reparado. 6.2 Controles de funcionamiento CPAP 20e 1. -
Page 82: Controles De Funcionamiento Click 2
6.3 Controles de funcionamiento CLICK 2 1. Realice una comprobación visual de la carcasa de plástico. En caso de fisuras/desperfectos y suciedad intensa, será preciso sustituir las piezas de plástico. 2. Llene el humidificador del aire de respiración hasta la marca con agua. 3. -
Page 83: Averías Y Soluciones
En caso de que se produzcan fallos que no se puedan subsanar inmediatamente, póngase en contacto enseguida con el fabricante Weinmann o con su distribuidor especializado, para la reparación del aparato. No siga utilizando el aparato, a fin de evitar daños más graves. -
Page 84: Click 2
7.2 CLICK 2 Avería Causa del fallo Subsanación del fallo El humidificador del aire Conexión del humidificador del aire de de respiración no está respiración, véase 4.2, página 69. El humidificador del aire activado. de respiración no se Envíe el humidificador del aire de respiración calienta. - Page 85 Sustituya la junta de la parte inferior de la carcasa 1. Abra el humidificador del aire de respiración, girando la parte superior contra la inferior en sentido contrario al de las agujas del reloj. 2. Saque cuidadosamente el anillo obturador de la ranura de la parte inferior del aparato.
-
Page 86: Mantenimiento
8. Mantenimiento Como medida preventiva se debe realizar un mantenimiento regular. Observe para ello los plazos que se citan. 8.1 Plazos • Cada 10.000 horas de servicio (aparece en el display el símbolo de mantenimiento) • Cada cuatro años como máximo (consulte las etiquetas de mantenimien- to colocadas en la parte trasera del aparato) 8.2 Extensión del mantenimiento •... -
Page 87: Volumen De Suministro
10. Volumen de suministro 10.1 Volumen de suministro de serie CPAP 20e WM 27320 Piezas Número de pedido CPAP 20e aparato básico 27321 Tubo flexible de respiración (tubo flexible ondulado) 24445 Fuente de alimentación 24480 Cable de alimentación de red 24133 Manual de instrucciones CPAP 20e + CLICK 2 66101... - Page 88 Piezas Número de pedido SOMNOmask, talla S 25110 SOMNOmask, talla M 25120 SOMNOmask, talla L 25130 SOMNOmask, talla S, azul 25210 SOMNOmask, talla M, azul 25220 SOMNOmask, talla L, azul 25230 SOMNOplus, talla S 25710 SOMNOplus, talla M 25720 SOMNOplus, talla L 25730 SOMNOcap‚...
- Page 89 Piezas Número de pedido JOYCE non vented, talla L 26180 JOYCE non vented, talla XL 26190 JOYCE non vented 40 hPa, talla S 26161 JOYCE non vented 40 hPa, talla M 26171 JOYCE non vented 40 hPa, talla L 26181 JOYCE non vented 40 hPa, talla XL 26191 JOYCE GEL non vented, talla S...
-
Page 90: Piezas De Repuesto Cpap 20E
10.3 Piezas de repuesto CPAP 20e Piezas Número de pedido Tubo flexible de respiración 24445 Conjunto de 10 tubos flexibles de respiración 15689 Filtro contra polvo grueso 24481 Set 2 filtros contra polvo grueso 15321 Filtro contra polvo fino envasado 24401 Conjunto de 12 filtroscontra polvo fino 15668... -
Page 91: Datos Técnicos
11. Datos técnicos 11.1 Especificaciones CPAP 20e CPAP 20e con CLICK 2 Clase de producto según 93/42/CEE Dimensiones AnxAlxP en 21 x 9,8 x 18,5 21 x 14 x 31,3 Peso aprox. 1,25 kg 1,5 kg aprox. (sin agua) Margen de temperatura –... - Page 92 CPAP 20e CPAP 20e con CLICK 2 Clasificación según prEN 60601-1:2004 – Clase de protección Clase de protección II contra descarga eléctrica – Grado de protección Tipo B contra descarga eléctrica – Protección contra la IPX1 penetración perjudicial de agua –...
- Page 93 CPAP 20e CPAP 20e con CLICK 2 Estabilidad de presión a corto plazo medida según prEN ISO 17510:2004 para presión de terapia: 20 hPa Δp ≤ 1,3 hPa 15 hPa Δp ≤ 1,1 hPa 10 hPa Δp ≤ 0,8 hPa 5 hPa Δp ≤...
-
Page 94: Esquema Neumático
CLICK 2 Flujo máximo admisible (con flujo de salida libre) 160 l/min Temperatura máxima de la máscara 37 ˚C Escape de gas a 30 hPa no mensurable Emisión del humidificador en el nivel de calentamiento 6: Caudal = 20 l/min 14,1 mg/l Caudal = 30 l/min 10,3 mg/l... -
Page 95: Distancias De Protección
11.3 Distancias de protección Distancias de seguridad recomendadas entre aparatos de telecomunicación de AF portátiles y móviles (por ejemplo, teléfono móvil) y el CPAP 20e y el CLICK 2 Distancia de seguridad en función de la frecuencia de emisión Potencia nominal del aparato de AF en m en W... -
Page 96: Garantía
• Weinmann se reserva el derecho, a su discreción, de optar por reparar el de- fecto, suministrar un artículo libre de defectos o rebajar proporcionalmente el precio de compra. -
Page 97: Índice Alfabético
13. Índice alfabético Palabra clave: Página: Accesorios Arranque suave 59, 68, 70, 81 Averías CLICK 2 65, 69, 91 Control del funcionamiento Desinfección 74, 78 Efectos secundarios Filtros 74, 83, 90, 93 Garantía Humidificador del aire de respiración 61, 67, 78, 87, 91 Indicaciones de seguridad 60, 62 Inspección... -
Page 98: Declaración De Conformidad
14. Declaración de conformidad Declaración de conformidad... - Page 99 Declaración de conformidad...
- Page 100 Weinmann Geräte für Medizin GmbH+Co.KG P.O. Box 540268 • D-22502 Hamburg Kronsaalsweg 40 • D-22525 Hamburg E: info@weinmann.de www.weinmann.de T: +49-(0)40-5 47 02-0 F: +49-(0)40-5 47 02-461 Center for Production, Logistics, Service Weinmann Geräte für Medizin GmbH+Co.KG Siebenstücken 14 D-24558 Henstedt-Ulzburg...
Need help?
Do you have a question about the Homecare CPAP 20e and is the answer not in the manual?
Questions and answers