Table of Contents
Advertisement
Quick Links
Servicing and
repair instructions
SOMNOsmart 2
smart PAP-device WM 24900
SOMNOsmart 2 with SOMNOclick WM 24950
SOMNOsmart 2 with SOMNOclick 300
WM 24975
SOMNOset
Titration Device WM 23200
SOMNOset with SOMNOsupport WM 23210
SOMNOsoft +
CPAP device with softPAP exhalation relief and
therapy monitoring WM 24600
SOMNOsoft + with SOMNOclick WM 24610
SOMNOsoft + with SOMNOclick 300 WM 24675
Advertisement
Table of Contents

Related Manuals for Weinmann SOMNOsmart 2 WM 24900


Summary of Contents for Weinmann SOMNOsmart 2 WM 24900
- Page 1 Servicing and repair instructions SOMNOsmart 2 smart PAP-device WM 24900 SOMNOsmart 2 with SOMNOclick WM 24950 SOMNOsmart 2 with SOMNOclick 300 WM 24975 SOMNOset Titration Device WM 23200 SOMNOset with SOMNOsupport WM 23210 SOMNOsoft + CPAP device with softPAP exhalation relief and therapy monitoring WM 24600 SOMNOsoft + with SOMNOclick WM 24610 SOMNOsoft + with SOMNOclick 300 WM 24675...
-
Page 2: Table Of Contents
© Copyright Weinmann GmbH & Co. KG. The content and presentation are copyright protected and may only be used by authorised Weinmann Service Partners in the course of their service operations. The content must not be reproduced or passed on to third parties. The complete documents... -
Page 3: Introduction
Repairs or servicing work may be performed only global respiratory insufficiency. by Weinmann or by trained specialist staff. The aim of these service and repair instructions is You are responsible for repairs carried out yourself... -
Page 4: Overview
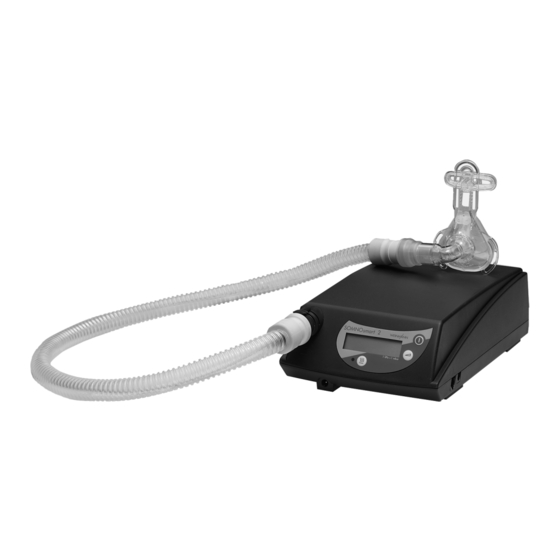
1. Overview SOMNOsmart , SOMNOset and SOMNOsoft 9 Drying adapter 2 Bacteria filter 15 Cap 3 Power cord 14 Mask 8 Stopper (2x) 1 Therapy device 13 Exhalation system 7 Device outlet port 10 Adapter 12 Hose system 11 Pressure measurement tube 6 Humidifier connection 5 Control panel 4 Ports... - Page 5 Device combinations 32 Carrying bag 29 Filter cover 33 Power inverter 34 O switching valve LE R W AN D D C -A C TE R IN VE R D C -A C 35 SOMNOclick/ O U T SOMNOclick 300 30 Power connection 31 Rating plate Overview...
-
Page 6: Description
2. Description Note: SOMNOsmart 2, SOMNOset and SOMNOsoft + are of largely identical basic design. They differ only in the software, display and fascia film. SOMNOsoft + has no oscillation generator and no microphone. 2.1 Purpose of SOMNOsmart 2 SOMNOsmart 2 is a smartPAP device for treating SOMNOsmart 2 from software version 6.0;... -
Page 7: Uses Somnosoft
2.3 Uses SOMNOsoft + SOMNOsoft + is a CPAP device for treating sleep- Airway pressure is administered by means of a related respiratory disorders. mask. SOMNOsoft + generates positive airway pressure SOMNOsoft + can be used both in CPAP mode (PAP). -
Page 8: Function Of Somnoset
In softPAP mode the respiratory flow curve is ana- If apnoea or valid flow limitations occur while the lysed continuously to ensure timely recognition of patient is sleeping, the softPAP mode is automati- the transition between inhalation and exhalation. cally deactivated for the relevant period. If the res- Before the transition to exhalation the therapy pres- piratory frequency is too high, the softPAP mode is sure is reduced to make it easier to breathe out. -
Page 9: Functional Description Of Somnosoft
2.6 Functional description of SOMNOsoft + SOMNOsoft + works on the principle of an elec- The device also records a respiratory flow signal trically powered flow generator delivering an elec- that can be output to a PSG system or read off with tronically controlled constant pressure level. -
Page 10: Servicing
3. Servicing 3.1 Intervals The two filters need to be checked regularly for soiling. • Coarse dust filter must be changed every 6 For hygiene reasons we recommend: months. • replacing the complete mask system every 6 to • Fine filter must be changed at least every 12 months depending on soiling, and 250 operating hours. -
Page 11: Fine Filter
3. Press with your thumb on the underside of the filter cover and lift the cover off. 4. Pull out the coarse dust filter with your finger. 5. You can wash a soiled coarse dust filter in clean water and reuse it after drying thoroughly. -
Page 12: Resetting The Service Symbol
3.4 Resetting the service symbol After every service/repair the service hours counter must be reset to “0”, and the service symbol in the display must be cleared. A new service label (current year + 2 years) must also be affixed to the back of the device. -
Page 13: Hygienic Preparation
4. Hygienic preparation 4.1 Cleaning and disinfecting after use Caution! This point is described in Chapter 5 “Cleaning and Disinfection” of the SOMNOsmart 2, SOMNOset or SOMNOsoft + operating instructions. Hygienic preparation of the device after repairs and for a new patient is described below. 4.2 Cleaning and disinfection after repair In the event of repairs the following work should be performed by the qualified dealer. -
Page 14: Cleaning And Disinfecting The Somnoclick/Somnoclick
• Open box as described in Chapter • Close box again as described in 7.14. Chapter 7.14. • Replace both labyrinths , motor • Alternatively, box can be replaced by frame , box damper insert and cover an exchange box (see “7.13 Replacing damper insert . -
Page 15: Test The Device
5. Test the device 5.1 General Important If the test reveals faults or deviations from the A test is required after every service or repair. specified values, the device must not be used again until the faults are rectified. Please enter the following figures in your service record sheet (see Page 53): To find out what may be causing the faults and how to remedy the malfunction, see Chapter „6. -
Page 16: Checking Display
5.2.3 Checking display 1. Check that the fascia film of the control panel is flat all over and firmly in place. If it is not, replace the fascia film (see “7.5 Replacing the fascia film” on page 26). 2. Now fix up the power supply by connecting one end of the power cord to the device and the other to the wall socket. - Page 17 7. If Softstart is switched on, switch it off by pressing button . The radial fan delivers air through the hose system to the mask, and the current pressure in hPa is shown in the LC display 8. Compare the pressure shown in the LC display with the prescribed minimum pressure limit.
-
Page 18: Checking Op Signal
5.2.5 Checking OP signal (SOMNOsmart 2 and SOMNOset) Measuring equipment required: • ESD workplace, • Multimeter, • PSG connecting cable, WM 23976, • Operating instructions for PSG connecting cable, WM 16250. Important Auto switch-on must be deactivated. 1. Use SOMNOsupport to assign the OP signal to channel 1. -
Page 19: Checking Function Of Humidifier
5.2.6 Checking function of humidifier 1. Make a visual inspection of the plastic housing: If there are any cracks/damage or heavy soiling, the plastic parts or seals must be replaced. 2. Fill the humidifier up to the mark with water. 3. -
Page 20: Troubleshooting
Filters soiled. Clean or change both filters (Chapter 3.2, page 10). comes on. Service symbol comes Have device serviced as soon as possible by Weinmann or an authorized dealer. Battery on Smartboard/ Softboard run down, Replace battery on Smartboard/Softboard (Chapter 7.9, Internal clock data not page 31) and reset date/time. - Page 21 Data stored in E Prom incorrect (e.g. Error message “Err d” in Replace Smartboard or Softboard (Chapter 7.8, page 30) and compliance counter, display reset date/time. operating hours counter), therapy data are correct Check microphone, replace if necessary. Error message “Err P” in Oscillation pump Replace oscillation pump.
-
Page 22: Repair Information And Instructions
(see “5. Test the device” on page 15). knowledge and observation of the Operating • If you replace components or individual parts, Instructions and the Service and Repair use only genuine Weinmann parts. Instructions. • When ordering the lower part of the •... -
Page 23: Opening The Device
7.2 Opening the device Tools and equipment required: • Allen key 3 mm, • ESD workplace. Caution! Always pull out the mains plug before opening the device. 1. Place the device upside down on a non-slip surface. 2. Slacken and remove the 2 screws and the 2 screws 3. -
Page 24: Closing The Device
If the second connecting cable is damaged, proceed as follows: 1. Replace the connecting cable with connecting Smartboard or Softboard cable Plug for 2. Replace the base of the device (see “7.15 Replac- Smartboard or ing lower part of housing” on page 41). Softboard Plug for Power- board (... -
Page 25: Replace Displayboard
7.4 Replace Displayboard Tools and equipment required: • Allen key 3 mm, • ESD workplace, • Phillips screwdriver size 1. 1. Open the device (see “7.2 Opening the device” on page 23). 2. Pull the connecting cable off the Smartboard/ Softboard. -
Page 26: Replacing The Fascia Film
7.5 Replacing the fascia film Tools and equipment required: • Allen key 3 mm, • ESD workplace, • Phillips screwdriver size 1, • Knife with smooth, flat blade. 1. Open the device (see “7.2 Opening the device” on page 23). 2. -
Page 27: Replacing The Powerboard
3. Check whether one of the fuses ) or ) has blown. 4. Remove the faulty fuse and replace it with a new one. Fuses ) and ) must always be changed at the same time. Caution: Fuses ) have different current ratings! Take care to use the right rating. - Page 28 9. Undo the connector catch and carefully pull out plug X100 10. Remove the defective Powerboard together with Smartboard or Softboard from the device. Catch X100 11. Loosen the screws on the battery holder and remove the spring and the sealing washer from the Smartboard.
- Page 29 21. Run the cable of plug under the X100 Powerboard and insert the plug in the appropriate connection. Catch X100 22. Push plug of connecting cable onto the Guide hole Powerboard. 23. Carefully thread the three cable harnesses for into the guide hole of the Powerboard.
-
Page 30: Replacing The Smartboard/Softboard
7.8 Replacing the Smartboard/Softboard Tools and equipment required: • ESD workplace, • Allen key 3 mm, • Phillips screwdriver size 1. 1. Open the device (see “7.2 Opening the device” on page 23). 2. Carefully remove the Powerboard (see “7.7 Replacing the Powerboard” on page 27, steps 3. -
Page 31: Replacing Battery On Smartboard Or Softboard
7.9 Replacing battery on Smartboard or Softboard 1. Open the device (see “7.2 Opening the device” on page 23). 2. Loosen the screw on the battery holder and remove the spring and the sealing washer from the Smartboard/Softboard. Place the parts on one side. - Page 32 3. Carefully pull the connecting tube out of the device outlet port. Lift the filter holder and filter out of the device. 4. Lift the box together with the connecting tube out of the upper part of the housing Use the SOMNOsmart 2 and SOMNOset only: diagonal cutter to cut open the middle cable binder...
- Page 33 Align the cable harnesses as follows: – On the left the cable harness with the 3 0 m m connector (violet and red), 1 7 m m – in the middle the cable harness with the connector (grey and black), –...
-
Page 34: Replacing The Oscillation Generator (Somnosmart 2 And Somnoset Only)
7.11 Replacing the oscillation generator (SOMNOsmart 2 and SOMNOset only) Tools and equipment required: • ESD workplace • Allen key 3 mm • Cable binder pliers, set to setting 4 • Diagonal cutter 1. Open the device (see “7.2 Opening the device”... -
Page 35: Replacing The Microphone
7.12 Replacing the microphone (SOMNOsmart 2 and SOMNOset only) 1. Open the device (see “7.2 Opening the device” on page 23). 2. Take out the oscillation generator (see “7.11 Replacing the oscillation generator (SOMNOsmart 2 and SOMNOset only)” on page 34). 3. -
Page 36: Replacing The Fan
6. Close the device (see “7.3 Closing the device” on page 24). 7. Perform a test (see “5. Test the device” on page 15). 7.14 Replacing the fan Tools and equipment required: • ESD workplace, • Allen key 3 mm, •... - Page 37 Does not apply to SOMNOsoft +: Take out the oscillation generator (see “7.11 Replacing the oscillation generator (SOMNOsmart 2 and SOMNOset only)” on page 34, steps 7. Place the box to one side with the lid uppermost. 8. Open the lid of the box 9.
- Page 38 Remove the motor frame SOMNOsoft + only: and the two labyrinths from the box and dispose of them. 12. Remove the lid damper insert and the box damper insert from the box and dispose of them. 13. Clean the box with a vacuum cleaner and clean up any extremely soiled parts.
- Page 39 SOMNOsoft + 16. Unscrew the two screws of the fan cap and remove the cap. 17. Clean the fan, then disinfect it with MIKROZID LIQUID (follow manufacturer’s instructions). 18. Refit the fan cap with two new screws from the service pack. 19.
- Page 40 25. Fit the third cable binder. Caution! The head of the first cable binder must rest on the supporting surface of the oscillation generator. The heads of the second and third cable binders must be located on the upper left side of the box. Align the cable harnesses as follows: –...
-
Page 41: Replacing Lower Part Of Housing
32. Now fit Powerboard and Smartboard or Softboard (see “7.7 Replacing the Powerboard”, steps 33. Close the device (see “7.3 Closing the device” on page 24). Make sure that the transformer cable is not jammed under the front plate of the box. 34. -
Page 42: Replacing Upper Part Of Housing
7.16 Replacing upper part of housing Tools and equipment required: • Allen key 3 mm, • ESD workplace, • Phillips screwdriver size 1. 1. Open the device (see “7.2 Opening the device” on page 23). 2. Disconnect the display connector from Smartboard or Softboard 3. - Page 43 9. Place box and then Powerboard Smartboard or Softboard in the upper part of the housing. Display 10. Fit the connecting tube to the device outlet connector port. Apply a little 70%-strength isopropanol to the outside of the tube, to make it easier to insert the tube in the hole.
-
Page 44: Tools, Testing Equipment And Disinfectants
• Hand pressure gauge, obtainable under No. WM 23930 accuracy ±0.25% from the manufacturer, Weinmann. e.g. type Digima premo SR Note: with pressure sensor 0–50 hPa The pressure can also be set by means of the obtainable from: control buttons on the fascia panel. -
Page 45: Disinfectant
8.3 Disinfectant • TERRALIN obtainable from: Schülke & Mayr GmbH • Mikrozid Liquid Robert-Koch-Str. 2 • GIGASEPT FF D-22851 Norderstedt Tel.: +49 40 / 52 100 - 0 Fax: +49 40 / 52 100 - 318 internet: www.schuelkemayr.de Tools, testing equipment and disinfectants... -
Page 46: Spare Parts
9. Spare parts 9.1 Spare parts list Note: The item numbers in the following table are identical to the numbers in the text of these Service and Repair Instructions. Item No. Description Order No. Power cord WM 24133 Stopper for pressure measurement tube WM 24115 Hose system WM 24130... - Page 47 Distance piece WM 24513 Fillister head screw M 3 x 6 WM 53020 Clamp WM 24086 Spring for battery WM 24953 Sealing washer WM 1145/32 Connecting tube WM 24064 Pressure measurement tube, silicone 2.5 x 1.5, 100 mm long WM 23953 Tube, silicone 3/6, length 80 mm WM 24036 Smartbox, new, preassembled...
-
Page 48: Spare Parts Required For Servicing
Fuse F2, F3; F4; 500 mA TH 250 V WM 24637 Operating instructions, SOMNOsmart 2 WM 16812 Operating Instructions, SOMNOclick/SOMNOclick 300 WM 16719 Short guide, SOMNOsmart 2 WM 16821 Patient pass, sleep apnoea WM 16162 Setting instructions, SOMNOsmart 2 WM 16826 Operating instructions, SOMNOset WM 16970 Manual for medical staff, SOMNOset... - Page 49 Service pack, 10,000 operating hours or 4 years (SOMNOsoft +) WM 15439 comprising: • 1 Coarse dust filter • 1 Fine filter • 1 Damper insert for box • 1 Damper insert for cover • 1 Motor frame, stuck • 2 labyrinth, stuck •...
-
Page 50: Technical Data
10. Technical data 10.1 Specifications SOMNOsmart 2 SOMNOset SOMNOsoft + Product category according to 93/42/EEC Dimensions W x H x D in cm 18 x 9 x 32 Weight approx. 4.0 kg approx. 3.4 kg Temperature range Operation +5 °C to +35 °C Storage –20 °C to +70 °C 600 - 1100 hPa (automatic altitude compensation) -
Page 51: Pressure-Volume Curve
SOMNOsmart 2 SOMNOset SOMNOsoft + Flow at max. speed at: 18 hPa 120 l/min 100 l/min 12 hPa 150 l/min 130 l/min 6 hPa 175 l/min 160 l/min 0 hPa 195 l/min 185 l/min Tolerance ±10 l/min ±10 l/min Respiration air heating acc. to 2.5°C EN ISO 17510 Respiratory pressure... -
Page 52: Safety Distances
SOMNOsoft + p-V-curve at AV = 0.5l and f = 20/min Volume/l Pressure/hPa 10.3 Safety distances Recommended safe distances between portable or mobile HF telecommunication devices (e.g. mobile phones) and the SOMNOset/SOMNOsmart 2 Safe distance depending on transmission frequency Rated output of HF device in m in W... -
Page 53: Repair And Service Record
11. Repair and service record Repair and service record... - Page 56 For decades Weinmann has been developing, producing and marketing medical devices for markets around the world. In cooperation with our partners we design economic health systems for diagnosis and therapy in Sleep Medicine, Home Mechanical Ventilation, Oxygen Medicine and Emergency Medicine.
Need help?
Do you have a question about the SOMNOsmart 2 WM 24900 and is the answer not in the manual?
Questions and answers