
Related Manuals for Weinmann LIFE-BASE Series


Summary of Contents for Weinmann LIFE-BASE Series
- Page 1 LIFE-BASE Portable system / LIFE-BASE Sistema de transporte LIFE-BASE 1 NG, LIFE-BASE 1 NG XL, LIFE-BASE 1 NG XS Instructions for use Instrucciones de manejo...
- Page 2 English Español...
-
Page 3: Table Of Contents
Contents English Overview ....4 Function check ....25 LIFE-BASE 1 NG/ Visual inspection. -
Page 4: Overview
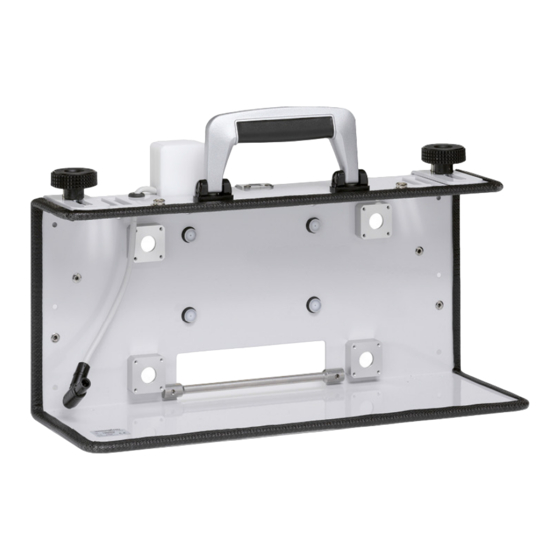
1. Overview 1.1 LIFE-BASE 1 NG/LIFE-BASE 1 NG XL LIFE-BASE 1 NG 4 Push-button 5 Handle 6 Lug for strap 3 Knurled screw 2 Hanger 1 Portable system LIFE-BASE 1 NG XL Handle Push-button Lug for strap Knurled screw Portable system Hanger 7 Adapter plate 1 Portable system... - Page 5 4 Push-button 6 Lug for strap The push-buttons are used to fix the protective The strap for the portable system can be attached bag to the portable system. to this lug. 5 Handle 7 Adapter plate Use the handle to lift and carry the portable sys- The devices can be attached to the portable tem.
- Page 6 Protective bag Rear view LIFE-BASE 1 NG Protective bag Rear view LIFE-BASE 1 NG XL 1 Cable duct for charger interface 7 Velcro tab to access the control panel 2 Vibration dampers (only with 8 Reflective strip MEDUMAT Transport) 9 Opening for passing through a patient 3 Hinge for bottom rail tube system 4 Push-button to fix protective bag in...
-
Page 7: Life-Base 1 Ng Xs
1.2 LIFE-BASE 1 NG XS Rear view Front view 4 Handle 5 Charger interface 3 Lug for tensioning belt (short) 2 Adapter plate 6 Lug for tensioning belt (long) 1 Portable system 7 Hinge for bottom rail Protective bag for Protective bag for MEDUCORE Standard ventilator 8 Viewing window... - Page 8 1 Portable system ventilator, the left-hand side compartment pro- vides access to the compressed gas connection The portable system is for storing a device and its and space for the pressure tube, and the right- components. hand side compartment provides access to the 2 Adapter plate device inlet filter.
-
Page 9: Wall Mounting
1.3 Wall mounting BASE-STATION 1 NG Catch for wall mounting 6 Control pin 1 Catch 2 Bore 3 Guide pin 4 Charger interface 7 Catch housing 8 Catch cross-bar 5 Bottom rail BASE-STATION Mini II Catch Bore Guide pin Charger interface Bottom rail 1 Catch 6 Control pin... -
Page 10: Special Markings On The Device
1.4 Special markings on the device Markings on the portable system Symbol Significance Information plate for portable system Year of manufacture Serial number of portable system CE symbol (confirms that the product conforms to applicable European directives) Portable system Do not dispose of the portable system in domestic waste. Markings on the wall mounting Symbol Significance... -
Page 11: Safety Information In These Instructions
Markings on the carrying strap Symbol Significance Do not iron Wash at 30 °C Do not dry in a tumble-dryer Follow instructions for use Maximum load Markings on the packaging Symbol Significance Permitted temperature for storage: -40 °C to +70 °C rh % 0-95 Permitted humidity for storage: max. -
Page 12: Description Of Device
2. Description of device 2.1 Intended use The portable system is for storing a combination of devices from the MEDUMAT, MODUL and MEDUCORE series, together with the required components (charger interface, tubes, accessories bag, protective bag and electrical cables). This provides a user with mobile units for treating respiratory disorders, for monitoring cardiovascular parameters and for resus- citation support. - Page 13 • supplementary attachment set for standard hospital rail (BASE-STATION Mini II): for attaching the wall mounting to a standard hospital rail in vehicles You can remove the portable system from the wall mounting in just one maneuver. Description of device...
-
Page 14: Safety Instructions
3. Safety instructions 3.1 Safety information Read these instructions for use carefully. It is a component part of the following portable systems: – LIFE-BASE 1 NG – LIFE-BASE 1 NG XL – LIFE-BASE 1 NG XS The instructions for use must be available at all times. Use the portable system exclusively for the intended purpose described (see “2.1 Intended use”... - Page 15 Maintenance Caution! Have servicing and maintenance work carried out only by the manufacturer, WEINMANN Emergency, or by trained staff. Safety instructions...
-
Page 16: Assembly
4. Assembly 4.1 Wall mounting The wall mounting for the portable system is ready for fitting to a wall. Using a suitable attachment set (see Section 9.2 on page 28), you can also fit the wall mounting to a stan- dard hospital rail or an ordinary rail (Ø... -
Page 17: Protective Bag (Life-Base 1 Ng Xs)
4. If there is a ventilator on the portable system: Route the patient tube system through the front opening in the protective bag. 5. Close the magnetic closures and hook and loop fasteners on the front and rear. Remove protective bag 1. - Page 18 4. Close the Velcro tab on the rear of the portable system. 5. Place the protective bag around the handle and close the Velcro tabs under and next to the handle. 6. Connect all components to the device. 7. On the defibrillator: stow the electrodes under the defibrillator.
-
Page 19: Accessories Bag (Life-Base 1 Ng/ Life-Base 1 Ng Xl)
6. Take the portable system out of the protective bag backwards. 4.5 Accessories bag (LIFE-BASE 1 NG/ LIFE-BASE 1 NG XL) There are four types of accessories bag: – accessories bag for ventilators (can be fitted to the front) – accessories bag for defibrillation (MEDUCORE Standard)/ventilation (can be fitted to the side) –... -
Page 20: Life-Base 1 Ng Xs Carrying Strap
Fit accessories bag for defibrillation (MEDUCORE Standard)/ventilation 1. Hook the zip on the accessories bag into the zip on the protective bag. 2. Close the zip. Note The accessories bag for defibrillation is attached to the left of the protective bag, the accessories bag for ventilation to the right of the protective bag. -
Page 21: Operation
5. Operation 5.1 Hang portable system in wall mounting Hang portable system Note If you are using a protective bag, ensure that the protective bag is properly located first. 1. To hang the portable system in the wall mounting, place the portable system in the bottom rail. Bottom rail Warning! –... -
Page 22: Hang Portable System From Stretcher Or Hospital Bed (Life- Base 1 Ng/Life-Base 1 Ng Xl)
Remove portable system 1. For unlatching, it is essential to grasp through the han- dle so that the portable system does not fall out of the wall mounting and injure someone. 2. To unlatch, push the catch cross-bar upwards. 3. Swivel the portable system forwards a little way and lift the portable system up off the bottom rail. -
Page 23: Hang Portable System From Stretcher Or Hospital Bed (Life-Base 1 Ng Xs)
5.3 Hang portable system from stretcher or hospital bed (LIFE-BASE 1 NG XS) You can only hang the portable system from a stretcher or a hospital bed if you use a protective bag. Caution! Note that the portable system may not be loaded with an additional weight, e.g. -
Page 24: Hygiene Treatment
6. Hygiene treatment The portable system must be cleaned and disinfected after every use. Always perform a function check afterwards (see “7. Function check” on page 25). 6.1 Portable system The portable system is cleaned without its devices by simple disinfecting by wiping. You can take all the devices off the portable system for this purpose. -
Page 25: Function Check
7. Function check You must subject the portable system to a function check before it is used each time and every time it has been dismantled, but in any case at least every 6 months. If you discover faults during the function check, you may not use the portable system again until the faults have been rectified. -
Page 26: Servicing
If necessary, send components and accessories to WEINMANN Emergency or to technicians expressly so authorized by WEINMANN Emergency. Notice If you send in obviously contaminated parts, these will be disposed of by WEINMANN Emergency or by technicians so authorized by WEINMANN Emergency at your expense. -
Page 27: Disposal
8.2 Disposal Portable systems and wall mountings without a charging interface: • LIFE-BASE 1 NG • BASE-STATION 1 NG • BASE-STATION Mini II Do not dispose of the device in domestic waste. To dispose of the device properly, contact a licensed, certified disposal company. You can find an address from your en- vironment officer or from your municipal authorities. -
Page 28: Scope Of Supply
(see “9.2 Accessories and spare parts” on page 28). 9.2 Accessories and spare parts You can order accessories and spare parts separately if required. A current list of accessories and spare parts can be ordered on the Internet at www.weinmann-emergency.com or via your dealer. Scope of supply... -
Page 29: Technical Data
10. Technical data LIFE-BASE 1 NG Product class Class I to 93/42/EEC Standards applied EN 1789 Dimensions (without 415 x 240 x 140 (LIFE-BASE 1 NG) protective bag) 427 x 240 x 140 (LIFE-BASE 1 NG XL) W x H x D in mm 220 x 230 x 136 (LIFE-BASE 1 NG XS) Empty: LIFE-BASE 1 NG: approx. -
Page 30: Warranty
11. Warranty WEINMANN Emergency gives the customer a limited man- ufacturer warranty on new genuine WEINMANN Emergency products and any replacement part fitted by WEINMANN Emergency in accordance with the warranty conditions applicable to the product in question and in ac- cordance with the warranty periods from date of purchase as listed below. -
Page 31: Declaration Of Conformity
12. Declaration of conformity WEINMANN Emergency Medical Technology GmbH + Co. KG declares herewith that the product complies fully with the respective regulations of the Medical Device Directive 93/42/ EEC. The unabridged text of the Declaration of Conformity can be found on our website at www.weinmann-emergency.com... - Page 32 Indice Español Vista general ....33 Acondicionamiento higiénico . . . 53 LIFE-BASE 1 NG/ Sistema de transporte..53 LIFE-BASE 1 NG XL .
-
Page 33: Vista General
1. Vista general 1.1 LIFE-BASE 1 NG/LIFE-BASE 1 NG XL LIFE-BASE 1 NG 4 Botón a presión 5 Asa de transporte 6 Ojal para correa 3 Tornillo moleteado 2 Ángulo de 1 Sistema de sujeción transporte LIFE-BASE 1 NG XL Asa de transporte Botón a presión Ojal para correa... - Page 34 4 Botón a presión Con los botones a presión puede fijar la bolsa de protección al sistema de transporte. 5 Asa de transporte Con el asa de transporte puede levantar y llevar el sistema de transporte. 6 Ojal para correa En este ojal puede fijar la correa para el sistema de transporte.
- Page 35 Bolsa de protección Vista posterior LIFE-BASE 1 NG Bolsa de protección Vista posterior LIFE-BASE 1 NG XL Leyenda 1 Paso de cable para la interfaz de carga 7 Cierre de velcro para abrir el panel de mando frontal 2 Amortiguadores (exclusivamente en MEDUMAT Transport) 8 Tiras reflectantes 3 Eje para la guía de asiento inferior...
-
Page 36: Life-Base 1 Ng Xs
1.2 LIFE-BASE 1 NG XS Vista posterior Vista frontal 4 Asa de transporte 5 Interfaz de carga 3 Ojal para la correa tensora (corta) 2 Placa adaptadora 6 Ojal para la correa tenso- ra (larga) 1 Sistema de transporte 7 Eje para el riel de sujeción inferior Bolsa de protección para Bolsa de protección para... - Page 37 1 Sistema de transporte de presión, y el compartimento de la derecha per- mite acceder a la batería y al filtro de entrada del El sistema de transporte sirve para alojar un aparato. Para el desfibrilador, el compartimento aparato y sus componentes. de la izquierda permite acceder a la batería y el 2 Placa adaptadora compartimento de la derecha ofrece espacio para...
-
Page 38: Soporte Mural
1.3 Soporte mural BASE-STATION 1 NG Bloqueo soporte mural 6 Pasador de 1 Bloqueo control 2 Agujero 3 Pasador de guía 4 Interfaz de carga 7 Carcasa de 8 Eje de enclavamiento enclavamiento 5 Guía de asiento inferior BASE-STATION Mini II Bloqueo Agujero Pasador de guía... -
Page 39: Señalización Especial En El Aparato
1.4 Señalización especial en el aparato Señalización en el sistema de transporte N.º Símbolo Significado Letrero del aparato, sistema de transporte Año de fabricación Número de serie del sistema de transporte Marca CE (confirma que el producto cumple las directivas europeas vigentes) Sistema de transporte No elimine el sistema de transporte tirándolo a la basura doméstica. -
Page 40: Indicaciones De Seguridad En Estas Instrucciones
Indicaciones en la correa Símbolo Significado No planchar Lavar a 30 ºC No secar en secadora Tener en cuenta el manual de instrucciones Carga máxima Señalización en el embalaje Símbolo Significado Temperatura admisible de almacenamiento: - 40 °C a +70 °C Humedad atmosférica admisible de almacenamiento: 95 % máximo de de hum. -
Page 41: Descripción Del Aparato
2. Descripción del aparato 2.1 Uso conforme a lo dispuesto El sistema de transporte sirve para alojar una combinación de aparatos de las series MEDUMAT, MODUL y MEDUCORE, así como los componentes necesarios (interfaz de car- ga, tubos, bolsa de accesorios y de protección, cables eléctricos). De este modo, el usuario dispone de unidades móviles para el tratamiento de trastornos respiratorios, el seguimiento de los parámetros cardiovasculares y de asistencia en la reanimación. - Page 42 • Juego de montaje para montaje en barra (BASE-STATION 1 NG): Fijación del soporte mural a una barra (Ø 19 mm - 38 mm) en el hospital. La barra puede estar orientada horizontal o vertical. • Juego de montaje complementario para riel normalizado de hospital (BASE-STATION Mini II): Fijación del soporte mural a un riel normalizado de hospital en vehículos Puede retirar el sistema de transporte del soporte mural con un asidero.
-
Page 43: Indicaciones De Seguridad
3. Indicaciones de seguridad 3.1 Disposiciones de seguridad Lea con atención estas instrucciones de uso. Forman parte de los siguientes sistemas de transporte: – LIFE-BASE 1 NG – LIFE-BASE 1 NG XL – LIFE-BASE 1 NG XS Las instrucciones de uso deben estar disponibles en todo momento. Utilice el sistema de transporte exclusivamente para el fin descrito (véase “2.1 Uso conforme a lo dispuesto”... - Page 44 Reparación ¡Precaución! Únicamente debe dejar que realicen las inspecciones y los trabajos de reparación el fabricante WEINMANN Emergency o el personal experto. Indicaciones de seguridad...
-
Page 45: Montaje
4. Montaje 4.1 Soporte mural El soporte mural para el sistema de transporte está confeccionado para su montaje a la pa- red. Con un juego de montaje adecuado (ver capítulo 9.2 en la página 58) puede montar también el apoyo mural en un riel normalizado de hospital o en una barra (Ø 19 mm - 38 mm). -
Page 46: Bolsa De Protección (Life-Base 1 Ng Xs)
4. Si se aloja un aparato de respiración en el sistema de transporte: Pase el sistema de mangueras para pacien- tes a través del orificio situado delante en la bolsa de protección. 5. Cierre los cierres magnéticos y de velcro en la parte delantera y trasera. - Page 47 4. Cierre la cinta de velcro situada en la parte trasera del sistema de transporte. 5. Coloque la bolsa de protección alrededor del asa de transporte y cierre las cintas de velcro de debajo y al lado del asa. 6. Conecte todos los componentes al aparato. 7.
-
Page 48: Bolsa De Accesorios (Life-Base 1 Ng/ Life-Base 1 Ng Xl)
7. Tire del sistema de transporte hacia atrás para retirarlo de la bolsa de protección. 4.5 Bolsa de accesorios (LIFE-BASE 1 NG/ LIFE-BASE 1 NG XL) Hay cuatro tipos de bolsas de accesorios: – bolsa de accesorios para aparatos de respiración artificial (montaje delantero) –... -
Page 49: Correa Life-Base 1 Ng Xs
Montar bolsa de accesorios para desfibrilación (MEDUCORE Standard)/ respiración 1. Enganche la cremallera de la bolsa de accesorios en la cremallera de la bolsa de protección. 2. Cierre la cremallera. Nota: la bolsa de accesorios para la desfibrilación se suje- ta a la izquierda de la bolsa de protección, la bolsa de accesorios para la respiración, a la derecha de la bolsa de protección. -
Page 50: Manejo
5. Manejo 5.1 Enganchar el sistema de transporte en el soporte mural Enganchar el sistema de transporte Nota: Si utiliza una bolsa de protección, antes de la utili- zación preste atención a que la bolsa de protección esté correctamente sujeta. 1. -
Page 51: Enganchar El Sistema De Transporte A La Camilla O La Cama De Hospital (Life-Base 1 Ng/Life-Base 1 Ng Xl)
Sacar el sistema de transporte 1. Al desenclavar el sistema, es absolutamente necesario pasar la mano a través del asidero, con el fin de evitar que el sistema de transporte pueda caerse del soporte mural y causar lesiones a alguien. 2. -
Page 52: Enganchar El Sistema De Transporte A La Camilla O La Cama De Hospital (Life-Base 1 Ng Xs)
5.3 Enganchar el sistema de transporte a la camilla o la cama de hospital (LIFE-BASE 1 NG XS) Si utiliza una bolsa de protección, sólo puede enganchar el sistema de transporte a una camilla o cama de hospital. ¡Precaución! Observe que el sistema de transporte, incluso cuando está... -
Page 53: Acondicionamiento Higiénico
6. Acondicionamiento higiénico Después de cada uso es preciso limpiar y desinfectar el sistema de transporte. A continuación, debe llevar a cabo un control del funcionamiento (véase “7. Control del funcionamiento” en la página 54). 6.1 Sistema de transporte El sistema de transporte sin aparatos simplemente se desinfecta mediante frotado. Para este fin, puede quitar todos los aparatos del sistema de transporte. -
Page 54: Control Del Funcionamiento
7. Control del funcionamiento El sistema de transporte se tiene que someter a un control de funcionamiento antes de cada uso y después de cada desmontaje, pero como mínimo cada 6 meses. Si se descubrie- ran anomalías en el control de funcionamiento, no debe utilizar el sistema de transporte hasta que hayan sido eliminadas las anomalías. -
Page 55: Comprobar La Bolsa De Protección (Si Dispone De Ella)
7.3 Comprobar la bolsa de protección (si dispone de ella) Comprobar los botones a presión Abra y cierre los botones a presión. – Los botones a presión no se deben abrir de nuevo. Comprobar los cierres de velcro Abra los cierres de velcro. –... -
Page 56: Mantenimiento
Desmonte los componentes y accesorios. Limpie y desinfecte los componentes y accesorios (véase "6. Acondicionamiento higiénico" en la página 53). Si es necesario, enviar los componentes y accesorios a WEINMANN Emergency o a personal especializado autorizado expresamente por WEINMANN Emergency. Indicación Si envía piezas evidentemente contaminadas, la eliminación de las piezas por parte... -
Page 57: Eliminación
8.2 Eliminación Sistema de transporte y soporte de pared sin interfaz de carga: • LIFE-BASE 1 NG • BASE-STATION 1 NG • BASE-STATION Mini II No elimine el aparato tirándolo a la basura doméstica. Para la eliminación correcta del aparato, diríjase a una empresa de eliminación de residuos autorizada y certifica- da. -
Page 58: Volumen De Suministro
9.2 Accesorios y piezas de repuesto En caso necesario puede pedir accesorios y piezas de repuesto por separado. Puede obtener una lista actualizada de los accesorios y las piezas de repuesto en Internet en www.weinmann-emergency.com o a través de su distribuidor especializado. Volumen de suministro... -
Page 59: Datos Técnicos
10. Datos técnicos LIFE-BASE 1 NG Clase de aparato Clase I según 93/42/CEE Normas aplicadas EN 1789 Dimensiones (sin bolsa 415 x 240 x 140 (LIFE-BASE 1 NG) de protección) 427 x 240 x 140 (LIFE-BASE 1 NG XL) L x A x A en mm 220 x 230 x 136 (LIFE-BASE 1 NG XS) Vacío: LIFE-BASE 1 NG: aprox. -
Page 60: Garantía
11. Garantía WEINMANN Emergency otorga al comprador de un produc- to original WEINMANN Emergency o una pieza de repuesto montada por WEINMANN Emergency una garantía del fabri- cante limitada según las condiciones de garantía válidas para los distintos productos y las duraciones de la garantía a partir de la fecha de compra que se indican a continuación. -
Page 61: Declaración De Conformidad
12. Declaración de conformidad Por la presente, WEINMANN Emergency Medical Technology GmbH + Co. KG declara que el producto cumple las disposiciones pertinentes de la directiva 93/42/CEE para productos sanitarios. El texto completo de la declaración de conformidad se encuentra en: www.weinmann-emergency.com... - Page 64 Manufacturer Center for Production, Logistics, Service WEINMANN Emergency WEINMANN Emergency Medical Technology GmbH + Co. KG Medical Technology GmbH + Co. KG Frohbösestraße 12 Siebenstücken 14 22525 Hamburg 24558 Henstedt-Ulzburg GERMANY GERMANY T: +49 40 88 18 96-120 E: customerservice@weinmann-emt.de...
Need help?
Do you have a question about the LIFE-BASE Series and is the answer not in the manual?
Questions and answers