Hach sc1000 User Manual
Hide thumbs
Also See for sc1000:
- User manual (150 pages) ,
- Instruction sheet (4 pages) ,
- Quick manual (2 pages)
Table of Contents
Advertisement
Quick Links
Advertisement
Table of Contents

Subscribe to Our Youtube Channel
Related Manuals for Hach sc1000


Summary of Contents for Hach sc1000
- Page 1 客服:400 688 9809 Visit http://www.hach.com 网址:www.mamots.com 电话:0431-85178766...
- Page 2 客服:400 688 9809 Catalog Number DOC023.54.03260 sc1000 Controller USER MANUAL February 2005 Edition 1 ©Hach Company, 2005. All rights reserved. Printed in the U.S.A. 02/05 eac/dp 网址:www.mamots.com 电话:0431-85178766...
-
Page 3: Table Of Contents
3.8 Modbus Card Connections..........................28 3.9 Profibus DP Card Connections ......................... 29 3.10 Removing an Expansion Card ........................30 3.11 Installing the sc1000 Network System ......................30 3.11.1 sc1000 Network Connections........................ 30 3.12 Connecting Sensors to the sc1000 ......................... 35 3.12.1 Connecting the Sensor Data Cable ....................... - Page 4 5.5.6 Display Info .............................. 52 5.6 Service Interface..............................53 5.6.1 Data Logger Option..........................53 5.6.2 Erasing Loggers ............................53 5.6.3 Connecting a PC to the sc1000 ....................... 53 5.7 Configuring New Components........................... 54 Section 6 Maintenance............................55 6.1 General Maintenance ............................55 6.1.1 Fuse Replacement ...........................
-
Page 5: Section 1 Specifications
Outer sheath of the cable is UV and water resistant External diameter of cable is 3.5–5 mm When installing additional sensors, observe the maximum total power of the system. Only two 1720E Turbidity instruments can be used simultaneously on an sc1000 probe module. 网址:www.mamots.com 电话:0431-85178766... - Page 6 Storage Temperature –20 to 70 °C (–4 to 158 °F); 95% relative humidity, non-condensing Supply of expansion modules with 24 VDC and connection to the sc1000 network Setting terminating resistor (with DIP switch) for the sc1000 network Provision of connection for a display module (LXV402) for the configuration of the system Base Module (LZX915) Current Consumption: Max.
-
Page 7: Section 2 General Information
This symbol, when noted on the product, identifies the location of a fuse or current limiting device. 2.2 General Product Information The sc1000 is a multi-parameter controller designed to function with any of the digital sensor family. A stand-alone sc1000 controller consists of one display module and one probe module. -
Page 8: Controller Storage
客服:400 688 9809 2.3 Controller Storage When storing the sc1000 controller, ensure that all important data is saved. Remove power and disconnect all connections from the system. Remove the probe module from its mounting. Store the probe module and display module in a protective film or dry cloth in a dry place. -
Page 9: Section 3 Installation
Section 3 Installation 客服:400 688 9809 DANGER Only qualified personnel should conduct the tasks described in this section of the manual. 3.1 Mechanical Installation Figure 1 Probe Module with Display Module Probe module Display module LED Indicator Connector, Display Module to Probe Module 网址:www.mamots.com 电话:0431-85178766... -
Page 10: Controller Dimensions
Installation 客服:400 688 9809 3.1.1 Controller Dimensions Figure 2 sc1000 Controller Dimensions sc1000 242 mm (9.50 inches) 150 mm (5.85 inches) 120 mm (4.68 inches) 315 mm (12.28 inches) sc1000 242 mm (9.50 inches) 50 mm (2.00 inches) 200 mm (7.80 inches) 网址:www.mamots.com... -
Page 11: Mounting The Controller
Figure 3 for proper wall mounting dimensions. 1. Install the four supplied bolts into the wall. 2. Hang the sc1000 controller system over the bolts and attach the supplied washers and hand-tighten the two bottom bolts. Figure 3 sc1000 Controller Mounting Features 50 mm (2.0 inches) - Page 12 (Cat. No. LZY001) (Cat. No. LZX948) (Cat. No. LZX948) 30 mm (Cat. No. LZX948) Figure 5 Pipe Mounting the sc1000 Controller Probe module Bracket, pipe mounting Horizontal Pipe (customer-supplied, size may vary) Hex head screw and flat washer Vertical Pipe (customer-supplied, size may vary) Rubber pads, (apply to the bracket and/or sun shield) 网址:www.mamots.com...
-
Page 13: Wiring Safety Information
DANGER Always disconnect power to the instrument when making electrical connections. When making any wiring connections to the sc1000 Controller, the following warnings and notes must be adhered to, as well as any warnings and notes found throughout the individual installation sections. For more safety information refer to... -
Page 14: Electrical Installation
Figure 11 on page 16 and for suggested local disconnect configurations. Do not connect the electrical power supply to the AC power until the sc1000 controller system has been fully wired, fused, and the high voltage barrier and probe module cover have been replaced. - Page 15 Installation 客服:400 688 9809 Figure 8 Housing Breakouts Multimedia MMC Card Slot Relay connection—2.19 mm for conduit or strain relief M20x1.5 with union mount (9–13.5 mm cable diameter) GSM antenna connection (Unavailable with this release) sc sensor connection (from Display module) Cable assembly for connection to Probe module Network Interface Ethernet Service Port...
- Page 16 Installation 客服:400 688 9809 Figure 10 Local Disconnect for Hard-wired Line Power Ferrite Core (Electromagnetic Interference Device) Earth Ground Connection AC Power Connections Conduit Hub Figure 11 Local Disconnect for Power Cord Ferrite Core (Electromagnetic Interference Device) Earth Ground Connection AC Power Connections Strain Relief 网址:www.mamots.com...
-
Page 17: Wiring For Ac Power At The Controller
Installation 客服:400 688 9809 3.4.3 Wiring for AC Power at the Controller DANGER Failure to connect to a good low impedance Protective Earth ground can result in both a shock hazard and poor performance against electro-magnetic interferences. 1. Obtain appropriate fittings with IP65 environmental rating. 2. - Page 18 Installation 客服:400 688 9809 Figure 13 Removing the Probe Module Cover Ground Screw Probe Module Cover Ground Wire Figure 14 Wiring for Power AC Power Connections Ferrite will fit snugly in this area. Earth Ground Connections Barrier should fit easily into position. 网址:www.mamots.com 电话:0431-85178766...
-
Page 19: Installing Power Outlets
Fuse (2), F3 and F4: T 8A; 100–240 V 3.4.4 Installing Power Outlets Important Note: The AC power outlets cannot be used with the 24 VDC power supply. AC power outlets can be installed to connect AC powered sc-sensors to the sc1000. Refer to Figure 16 and the following directions for proper power socket installation. - Page 20 Installation 客服:400 688 9809 4. Thread the cable once through the ferrite core (Figure 12) and wire the power socket cable. Tug gently after each insertion to ensure the connection is secure. 5. Firmly screw the power socket to the housing with the supplied screws. To prevent losing the AC power outlet cover, attach the retaining strap for the cover to the AC power outlet.
-
Page 21: Wiring For 24 Vdc Power At The Controller
Installation 客服:400 688 9809 3.4.5 Wiring for 24 VDC Power at the Controller Important Note: The AC power outlets cannot be used with the 24 VDC power supply. Figure 17 Inside the 24 VDC Probe Module Fuse, T 6.3A, slow-blow Main circuit board 24 VDC power connections Connector for expansion Slot #2... -
Page 22: Din-Rail Expansion Modules
Green 3.5 DIN-Rail Expansion Modules The sc1000 controller system can be expanded with DIN-Rail expansion modules. Each expansion module has an address on the sc1000 network and can be programmed as required. The following DIN-Rail Module options can be installed: •... -
Page 23: Expansion Card Connections
3.6 Expansion Card Connections The sc1000 controller system can be expanded with internal plug-in expansion cards. Each expansion component has an address on the sc1000 network and can be programmed as required. The address number is located on the card. -
Page 24: Relay Card Connections
Installation 客服:400 688 9809 Figure 20 Expansion Card Ports Relay Module YAB022 Input Module YAB018 Output Module YAB019 PROFIBUS-DP YAB020 Analog or Digital R=180 0...20mA Analog Analog Relay 1 +5 V max 500 Output 1 Output 1 0...20mA SPST-NC 0...20mA Analog Analog max 500... - Page 25 Installation 客服:400 688 9809 3. Properly prepare each wire and insert each wire (Figure 21) into the terminal according to Figure 22 Table 8. Tug gently after each insertion to ensure the connection is secure. 4. Reinstall the relay and probe module covers. 5.
-
Page 26: Input Card Connections
客服:400 688 9809 3.6.2 Input Card Connections If the sc1000 is equipped with the input card option, instruments with (0–20 mA / 4–20 mA) signals can be connected to the input card. The signals can be scaled as required and given names and units. Digital signals (i.e. open/closed or on/off) can also be connected to the input card. -
Page 27: Output Card Connections
If the instrument is equipped with the output card option, the mA output card supplies up to 4 analog (0–20 mA/4–20 mA) signals into an impedance of max. 500 Ohm. Note: The sc1000 mA output card cannot be used to provide power to a 2-wire (loop-powered) transmitter. -
Page 28: Modbus Card Connections
Installation 客服:400 688 9809 3.8 Modbus Card Connections Refer to the documentation supplied with the Modbus Card for more information. 1. Remove power from the instrument. 2. Make the connections as shown in Figure 25 Table 11. Make sure that the shield is connected to a threaded spacer on the board. -
Page 29: Profibus Dp Card Connections
Installation 客服:400 688 9809 3.9 Profibus DP Card Connections Refer to the documentation supplied with the Profibus DP card for more information. Refer to the appropriate sensor manual for operating instructions, instrument profiles, and GSD files. 1. Remove power from the instrument. 2. -
Page 30: Removing An Expansion Card
3. Disconnect all cable connections to the card. 4. Remove the screws securing the card and remove the card. 3.11 Installing the sc1000 Network System Use the sc1000 network cable to set up a network. Suitable cable is available from the manufacturer. 3.11.1 sc1000 Network Connections Each probe module has a network interface. - Page 31 Installation 客服:400 688 9809 13. Tighten the union nut. 14. Set a terminating resistor at the last network connector to the ON position (see Figure 30 Table 15 on page 34). 15. Plug the connector into the probe module (Figure 31 on page 34).
- Page 32 Installation 客服:400 688 9809 Figure 28 Network Connector Components Housing, Network Connector Screw, pan head Network Connector Printed Circuit Board Insert, plastic label (network connector housing) Shell, bottom Cord Grip (2) Shell, top 10. Seal, cord grip (2) Screws, self-tapping (2) 11.
- Page 33 Installation 客服:400 688 9809 Figure 29 Connecting the Communication Connector to the sc1000 Network Terminating Resistor 网址:www.mamots.com 电话:0431-85178766...
- Page 34 Installation 客服:400 688 9809 Figure 30 Setting a Terminating Resistor (DIP switch in the connector) = ON = OFF Housing, Network Connector Dip Switch (note position assignments as shown) Cap, rubber Insert, plastic label Table 15 Communication Connector Terminating Resistor (Communication Termination) Switch setting Terminating resistors Connection 2...
-
Page 35: Connecting Sensors To The Sc1000
Removing the Protective Cover 3.12.2 Adding Sensor Connections When all sensor connectors on the sc1000 controller systems are already in use for sensors, more sensor connectors can be added (max. 8 sensor connectors). It may be necessary to remove an existing expansion card if accessibility to sensor connectors is... -
Page 36: Connecting Ac Powered Sc-Sensors
100–240 VAC power (e.g., to run pumps or heating elements). These AC powered sc-sensors have two cables that connect to an sc1000 probe module: a standard sc-sensor connector and a special connector for drawing AC power from the probe module. -
Page 37: Section 4 Commissioning
Note: Touch screen calibration is required for each user/operator. 3. Select the appropriate language and select OK. 4. The sc1000 automatically scans for connected sensors, then switches to display mode and is ready for use. For more information on using the display module, refer to Section 5 on page 网址:www.mamots.com... - Page 38 客服:400 688 9809 网址:www.mamots.com 电话:0431-85178766 Visit us at www.hach.com...
-
Page 39: Section 5 Operation
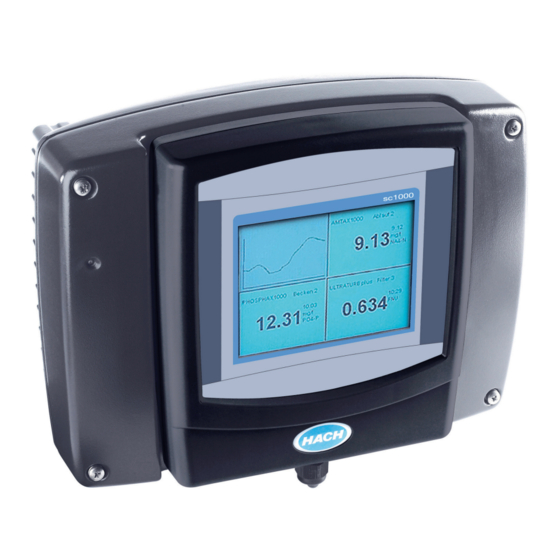
客服:400 688 9809 5.1 Using the Display Module The sc1000 display module is a color graphical user interface that uses touch screen technology. The touch screen is a 5.5” (14 cm) LCD monitor. The touch screen display must be calibrated prior to configuring or viewing data (refer to section 5.1.5 on page... -
Page 40: Display Features
Operation 客服:400 688 9809 Figure 34 Installing the Display Module to the Probe Module . 5.1.2 Display Features 5.1.2.1 Using the Pop-up Toolbar The pop-up toolbar provides access to the controller and sensor settings. The toolbar is normally hidden from view. To view the toolbar, touch the bottom-left of the screen. Figure 35 Pop-up Toolbar Functions –displays the Main Menu Structure... -
Page 41: Using The Device List
DEVICE LIST MEASUREMENT VALUE DISPLAY Device List (shows all sensors and devices connected to the sc1000 network) Measurement Value Display List (shows the sensor and device output values selected for display on the main screen) Confirms a selection and returns to the device list. -
Page 42: Using The Menu Windows
Operation 客服:400 688 9809 5.1.3 Using the Menu Windows If the Menu button (from the pop-up toolbar) is selected, the Main Menu screen is opened. The Main Menu screen allows the user to view the sensor status, configure the sensor setup, system setup, and perform diagnostics. - Page 43 Operation 客服:400 688 9809 If an entry is incorrect, repeat the entry with the correct values. If the entry is outside the working range, a correction to the entry is made automatically. Figure 39 Changing a Menu Item DATE/TIME FORMAT JJJJ/MM/TT DATE 2004/11/27...
-
Page 44: Adjusting The Measured Value Display
Operation 客服:400 688 9809 Figure 41 List Box mg/l Scrolls up or down –cancels the selection CANCEL –confirms a selection ENTER Figure 42 Message window COMMUNICATION ERROR Ph [11f20030007] Scrolls up or down Displays the messages or warnings Displays the messages or warnings Displays details on the selected entry –confirms an entry ENTER... -
Page 45: Select Sensors For The Measured Value Display
Operation 客服:400 688 9809 Figure 43 Measured Value Display Sensor 1 Sensor 2 Sensor X.XX Uhrzeit X.XX Uhrzeit Einheit Einheit Parameter Parameter Time X.XX Unit Sensor 3 Sensor 4 Parameter X.XX Uhrzeit X.XX Uhrzeit Einheit Einheit Parameter Parameter 5.1.4.1 Select Sensors for the Measured Value Display 1. -
Page 46: Setting The Displayed Language
Operation 客服:400 688 9809 5.1.6 Setting the Displayed Language To configure the displayed language: 1. From the System Setup Menu, select Display Settings and Language. 2. Select the highlighted language. From the list box, highlight the Language to display on the screen and select the button to confirm the selection or select the ENTER button. -
Page 47: System Setup Menu
Select 0 mA or 4 mA for minimum current (outputs will be set to 0–20 mA or 4–20 mA). SET LOW VALUE This value is to be displayed by the sc1000 controller system at the lowest measured value (in the unit for the measured value for the probe). Sets the measurement associated with the low mA value. -
Page 48: Current Inputs Setup
Select 0 mA or 4 mA for minimum current (outputs will be set to 0–20 mA or 4–20 mA). SET LOW VALUE This value is to be displayed by the sc1000 controller system at the lowest measured value (in the unit for the measured value for the probe). This is the 0mA or 4 mA value. -
Page 49: Relay Setup
Operation 客服:400 688 9809 5.4.3 Relay Setup Select RELAY MODULE Select RELAY 1–4 SELECT SOURCE Select the signal source. SET PARAMETER Select the appropriate parameter. SET UNITS Select the units of measurement. SET FUNCTION Select the source set to the Sensor. Menu options depend on the parameter selected. Alarm: Operates relays in response to the measured parameter. -
Page 50: Network Modules
Operation 客服:400 688 9809 5.4.3 Relay Setup (continued) Function set to 2 POINT CONTROL PHASE—High phase assigns the relay setpoint to respond to an increasing measured value. Low phase assigns the relay setpoint to respond to a decreasing measured value. HIGH ALARM—Relay turns on in response to the increasing value. -
Page 51: Device Management
Operation 客服:400 688 9809 5.4.5 Device Management Device Management—used to display installed devices, scan for new devices, and delete devices. DEVICE LIST Lists all the devices and expansion cards installed and registered in controller. SCANNING FOR NEW DEVICES Scans for newly installed sensors and expansion cards. DELETE DEVICES Deletes devices or sensors from the controller configuration. -
Page 52: Test/Maint Menu
Tests the relays on the selected module. 5.5.5 Network Modules Network Modules—Choose Network Module STATUS—Displays the attached communication modules and automatically runs a status check 5.5.6 Display Info Display Info SOFTWARE VERSION Displays the software version for the sc1000 display. 网址:www.mamots.com 电话:0431-85178766... -
Page 53: Service Interface
Note: The following instructions apply to Windows 2000. 1. Set the sc1000 to the main measurement screen. 2. Connect the PC to the sc1000 using the Ethernet Cross-over Cable (LZX998). 3. On the PC desktop, right-click on “My Network Places” and select properties. -
Page 54: Configuring New Components
13. Transfer one of the three files to the browser and continue to upload the file until complete. Repeat for the other files (always upload files one at a time). 14. Reboot the sc1000 by disconnecting and reconnecting the display module from the probe module, or by cycling power to the probe module. -
Page 55: Section 6 Maintenance
Section 6 Maintenance 客服:400 688 9809 DANGER Only qualified personnel should conduct the installation tasks described in this section of the manual. 6.1 General Maintenance • Regularly check the probe module and the display module for mechanical damage. • Regularly check all connections for leaks and corrosion. •... - Page 56 Maintenance 客服:400 688 9809 Figure 45 Fuse Replacement (AC version) Fuse (2), F1 and F2: M 3.5A medium slow-blow Remove fuse from holder as shown. Fuse (2), F3 and F4: T 8A; 100–240 VDC Fuse holder Figure 46 Fuse Replacement (24 VDC version) Fuse, T 6.3A, slow-blow Fuse holder Remove fuse from holder as shown.
-
Page 57: Section 7 Replacement Parts And Accessories
Input module, analog/digital with 2x (0–20/4–20 mA) or 2 x 10 with inputs LZX921 7.3 Internal Network Components Description Catalog Number sc1000 internal network connector LZX918 100 m (330 ft) internal network cable LZX988 500 m (1650 ft) internal network cable LZX989 7.4 Accessories... - Page 58 客服:400 688 9809 网址:www.mamots.com 电话:0431-85178766 Visit us at www.hach.com...
-
Page 59: Section 8 How To Order
Brief description or model number • Quantity International Customers Hach maintains a worldwide network of dealers and distributors. To locate the representative nearest you, send an e-mail to: intl@hach.com or contact: Hach Company World Headquarters; Loveland, Colorado, U.S.A. Telephone: (970) 669-3050; Fax: (970) 669-2932 Technical and Customer Service (U.S.A. -
Page 60: Section 9 Repair Service
Section 9 Repair Service 客服:400 688 9809 Authorization must be obtained from Hach Company before sending any items for repair. Please contact the Hach Service Center serving your location. In the United States: Hach Company Ames Service 100 Dayton Avenue Ames, Iowa 50010 (800) 227-4224 (U.S.A. -
Page 61: Section 10 Limited Warranty
In the event that a defect is discovered during the warranty period, Hach Company agrees that, at its option, it will repair or replace the defective product or refund the purchase price, excluding original shipping and handling charges. - Page 62 客服:400 688 9809 网址:www.mamots.com 电话:0431-85178766 Visit us at www.hach.com...
-
Page 63: Section 11 Compliance Information
Hach Co. certifies this instrument was tested thoroughly, inspected and found to meet its published specifications when it was shipped from the factory. The Model sc1000 Probe and Display Modules have been tested and is certified as indicated to the following instrumentation standards: Product Safety UL 61010A-1 (cTUVus Certificate No. - Page 64 1. Disconnect the Model sc1000 Probe and Display Modules from it's power source to verify that it is or is not the source of the interference. 2. If the Model Model sc1000 Probe and Display Modules is connected into the same outlet as the device with which it is interfering, try another outlet.
Need help?
Do you have a question about the sc1000 and is the answer not in the manual?
Questions and answers