Table of Contents
Advertisement
Advertisement
Table of Contents

Related Manuals for Mocon AMETEK Dansensor MAP Check 3 Vacuum

Summary of Contents for Mocon AMETEK Dansensor MAP Check 3 Vacuum
- Page 1 User Guide P/N 320598-G 11/2019...
- Page 2 This blank page has been inserted to enable double sided printing of the document!
- Page 3 Dansensor MAP Check 3 Vacuum User Guide ® User Guide Published by: MOCON Europe A/S Rønnedevej 18 4100 Ringsted, Denmark Tel +45 57 66 00 88 info.dk.mocon@ametek.com www.dansensor.com P/N 320598-G 11/2019...
- Page 4 User Guide Dansensor MAP Check 3 Vacuum ® P/N 320598-G 11/2019...
-
Page 5: Table Of Contents
Dansensor MAP Check 3 Vacuum User Guide ® Table of Contents 1. General Information ........7 About this Manual . - Page 6 User Guide Dansensor MAP Check 3 Vacuum ® 4. Operation and Maintenance ......31 General .
- Page 7 Dansensor MAP Check 3 Vacuum User Guide ® General setup ..........60 External mixer settings.
- Page 8 User Guide Dansensor MAP Check 3 Vacuum ® P/N 320598-G 11/2019...
-
Page 9: General Information
Dansensor MAP Check 3 Vacuum User Guide ® 1. General Information About this Manual Intended Use of this Manual This manual describes the common use and maintenance procedures of the Dansensor® MAP Check 3 Vacuum device. It is intended for the daily users and should be kept with the equipment for reference at all times. -
Page 10: Notes, Cautions, Warnings And Tips
User Guide Dansensor MAP Check 3 Vacuum ® Notes, cautions, warnings and tips! Throughout the manual notes, cautions, and warnings are indicated with various icons and written in bold like the example below: CAUTION! Never use hard tools or abrasive materials when cleaning any part of the device.... -
Page 11: Safety Instructions
Dansensor MAP Check 3 Vacuum User Guide ® Safety Instructions Personnel operating and maintaining the device must be familiar with all aspects of its operation and be proficient in maintenance. Such personnel should review the following precautions to promote safety awareness. General Always refer to the manual before operating or maintaining the equipment. - Page 12 User Guide Dansensor MAP Check 3 Vacuum ® P/N 320598-G 11/2019...
-
Page 13: Introduction
Dansensor MAP Check 3 Vacuum User Guide ® 2. Introduction Dansensor® MAP Check 3 Vacuum The Dansensor® MAP Check 3 Vacuum Vacuum is a gas analyser designed for measurement of O or O concentrations on packaging machines that flushes gas in cycles controlled by the packaging machine. - Page 14 User Guide Dansensor MAP Check 3 Vacuum ® “Stand-Alone” or “Black-Box” The “Stand-Alone” devices features a 5” colour touch screen from which device settings are made and measuring results are continuously displayed. The “Black-Box” version without user interface is especially designed for cost effective automated machine control.
-
Page 15: Flow System
Dansensor MAP Check 3 Vacuum User Guide ® Flow System The figures below show the internal flow system of the various device versions. Fig. 2 shows a standard version with O sensor Fig. 3 shows a standard version with both O and CO sensors.... -
Page 16: Buffer" Version
User Guide Dansensor MAP Check 3 Vacuum ® PROPORTIONAL BUFFER GAS VALVE INLET CAL. GAS INLET AIR INLET SAMPLE LOOP sensor sensor SAMPLE GAS (Zr) (IR) 5 l/min INLET GASSING EVACUATION ml/min VALVE VALVE sample boost sample boost VACUUM BUFFER VACUUM Packaging Machine Fig. -
Page 17: Overview
Dansensor MAP Check 3 Vacuum User Guide ® Overview 5" touch panel color display (“Stand-Alone” versions only) For intuitive operation of the device by use of explanatory icons and easy understandable text messages and buttons. USB host For connection of a memory stick (“Stand-Alone”... - Page 18 User Guide Dansensor MAP Check 3 Vacuum ® ”POWER” Power supply connector Cooling air inlet grille With dust filter and a fan inside the device Cooling air outlet grille With dust filter “I/O CONTROL” Communication port (D-SUB 25) for packaging machine control signals ...
-
Page 19: Gas Connections
Dansensor MAP Check 3 Vacuum User Guide ® Gas connections “VACUUM” Vacuum connector “SAMPLE GAS INLET” Connector for sample gas from packaging machine die “AIR INLET” For pressure equalisation with atmospheric air or for exhaust of bypass flow when measuring on the buffer tank and when calibrating ... - Page 20 User Guide Dansensor MAP Check 3 Vacuum ® P/N 320598-G 11/2019...
-
Page 21: Connections
Dansensor MAP Check 3 Vacuum User Guide ® 3. Connections Gas Connections Correct mounting/dismounting of fittings CAUTION! When mounting/dismounting fittings it is very important that you hold against on the already mounted fittings to avoid damaging the existing assemblies. P/N 320598-G 11/2019... -
Page 22: Device Connections
User Guide Dansensor MAP Check 3 Vacuum ® Device connections Connect the long hose of the sample gas probe to the “SAMPLE GAS INLET” connector. "Sample gas probe" on page 21 for further details. Connect the vacuum hose to the “VACUUM”... -
Page 23: Sample Gas Probe
CAUTION! The performance of the device depends very much on the gas extraction point on the packaging machine. Contact MOCON Europe A/S for help to positioning the gas extraction point. If the filter or hoses are blocked, the device will indicate an error in the display. -
Page 24: Connection To Buffer Tank
User Guide Dansensor MAP Check 3 Vacuum ® Connection to buffer tank (“Buffer”versions only) The device is delivered with a hose and fittings for making a proper connection to the buffer tank. There are various ways to make the connection but we recommend any of the methods described below. -
Page 25: Electrical Connections
Dansensor MAP Check 3 Vacuum User Guide ® Electrical connections Connect the power supply cable between a power outlet and the “POWER” connector. (The power cable is delivered with the device). See pin connections for the power connector in "Power connector"... -
Page 26: Power Connector
User Guide Dansensor MAP Check 3 Vacuum ® Power connector The device’s power connector should have the following pin connections: Not in use AC Power DC Power I/O Cable The 25-pole communication cable between the “I/O CONTROL” connector and the appropriate port on the packaging machine has the following pin connections: Pins/Colours/ Description... - Page 27 Dansensor MAP Check 3 Vacuum User Guide ® Pins/Colours/ Description Function 5 - Grey Alarm relay output. Activated if product or buffer alarm limit for O is exceeded. 6 - Pink Relay contacts: max. 48 VDC/VAC. Load: max. 1A "ALARM", NO Normally Open (NO) - Contacts closed during power OFF.
-
Page 28: Relay Signalling
User Guide Dansensor MAP Check 3 Vacuum ® Relay signalling The following describes how relays act during power OFF, normal and fault states: READY Relay State of device Device OFF DSUB pin 11 connected to pin 12 “Not ready” (OFF) Device ON - Ready DSUB pin 11 connected to pin 13 “Ready”... -
Page 29: I/O Signals For Machine Control
Dansensor MAP Check 3 Vacuum User Guide ® I/O signals for machine control “EVAC” signal “GAS” signal “READY” relay “ALARM” relay “WARNING” relay "SIMPLE INSTALLATION" Packaging Uses only "ALARM" signal to Machine control the packaging machine I/O Cable White "GAS"... - Page 30 User Guide Dansensor MAP Check 3 Vacuum ® Simplified schematic of control inputs Simplified schematic of relay outputs Isolation barrier Isolation barrier Normally Normally Closed (NC) Closed (NC) Bipolar input Bipolar input Relay output Relay output 10-32 VDC 10-32 VDC Common 48 VDC 48 VDC...
-
Page 31: Com-1/Com-2 Cables
Dansensor MAP Check 3 Vacuum User Guide ® COM-1/COM-2 Cables The 9-pole communication cables should have the following pin connections (female connectors): COM-1 Main (MASTER) RS232 communication port (DTE Male) Pins/text Description Receive data, serial data input from packaging machine / PLC "RxD"... -
Page 32: Mixer Control
User Guide Dansensor MAP Check 3 Vacuum ® Mixer Control The Dansensor® MAP Check 3 Vacuum can control a Dansensor® MAP Mix Provectus gas mixer. The illustration below shows how to connect the devices. Make following parameter settings: 1. In General setup select External mixer settings and set External mixer connected to Yes.... -
Page 33: Operation And Maintenance
Dansensor MAP Check 3 Vacuum User Guide ® 4. Operation and Maintenance General The illustration below shows an overview of the various control options for the Dansensor® MAP Check 3 Vacuum. Use the PuTTY Terminal Server program for device configuration. It can be used with all models but especially applies to the “Black Box”... -
Page 34: Start Up
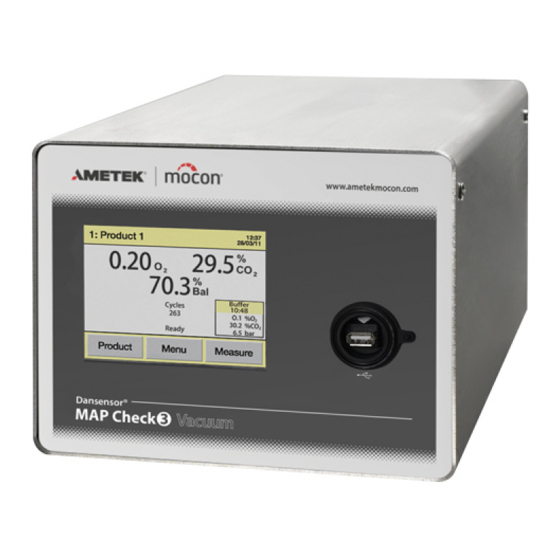
User Guide Dansensor MAP Check 3 Vacuum ® Start up “Black Box” models When power is applied to the unit, the indicator on the front will be lit. After a short internal self diagnosis the device will start heating up the sensors. During this ... - Page 35 Dansensor MAP Check 3 Vacuum User Guide ® When heating period has finished the display will say “Ready” and the device is now ready for use. 12:37 25: Meat Mix 1000gr. 28/03/11 Buffer Product Menu Measure If device is set up to perform buffer measurements, the “Buffer” window is displayed in the lower right corner of the display....
-
Page 36: Measuring
User Guide Dansensor MAP Check 3 Vacuum ® Measuring "Black Box" models The “BlackBox” models are as default set to "Autostart". When heating period has finished the device starts automatically and checks for the “Evacuation” and “Gassing” signals. When receiving a signal the device starts a cycle. A new signal is required to start the next cycle and so on. - Page 37 Dansensor MAP Check 3 Vacuum User Guide ® Text colors indicate the following: Black indicates that the result is within limit or that no limit has been defined for this gas. Orange indicates that the gas concentration has exceeded the set warning value. The arrow symbol to the right of the value indicates...
-
Page 38: Selecting A Product For Measuring
User Guide Dansensor MAP Check 3 Vacuum ® Selecting a product for measuring "Black Box" models Products are selected via the packaging machine’s control software. Display models A product is selected from the Products list as described below: 1. From the measuring screen press the Product key to bring up the Products screen. Products All products: 103 25 :... - Page 39 Dansensor MAP Check 3 Vacuum User Guide ® 6. Selecting one of the Product..methods (ex. Product name) brings up an appropriate touch screen keyboard for keying in the product data. Enter product name Sausages 7. Key in the product name (ex. Sausages) and confirm by pressing the OK key. Now a list will appear showing all products with the name starting with Sausages.
-
Page 40: Errors/Warnings
User Guide Dansensor MAP Check 3 Vacuum ® Errors/Warnings Error/Warning messages In case a device error or warning occurs, a pop-up window appears on the display. Warning 8 Error adding product - product with this name already exists Close The window shows the type (error or warning), the error/warning number and a brief description of the error/warning.... -
Page 41: Error/Warning List
Dansensor MAP Check 3 Vacuum User Guide ® Error/Warning list Please note that messages marked with an asterisk (*) does not pop up on the screen. These messages only appear as entries in the Error log - see "Diagnostics menu" on page 59 for details. - Page 42 User Guide Dansensor MAP Check 3 Vacuum ® Type Message User action Error Import/Export: no data found User information Error Import/Export: corrupted data User information Error Import/Export failed User information Warning sensor needs calibration. Measuring values Contact service may not be valid. for sensor calibration Warning...
- Page 43 Dansensor MAP Check 3 Vacuum User Guide ® Type Message User action Error sensor is disabled because of hardware fail. Contact service Please call service. Warning Error in O sensor calibration data. Check if the gas Contact service concentration and span is correct. for sensor calibration Warning...
- Page 44 User Guide Dansensor MAP Check 3 Vacuum ® Type Message User action Warning Device temperature very low Place unit in temperature above 0 °C Allow unit to heat up Error Device temperature too low Place unit in temperature above 0 °C Allow unit to heat up Warning...
- Page 45 Dansensor MAP Check 3 Vacuum User Guide ® Type Message User action Error Ir CO2 sensor temperature too low, shutting down Check ambient CO2 sensor. temperature - must be within range If problem persists, contact service Warning Ir CO2 sensor temperature high Check ambient temperature - must be within...
- Page 46 User Guide Dansensor MAP Check 3 Vacuum ® Type Message User action Error Too high bypass flow (V2,V4 Problem ?) Check flow system hoses Error Too low bypass flow (V2,V4 Problem ?) Check flow system hoses Error Too high bypass flow (V1,V4 Problem ?) Check flow system hoses Error...
-
Page 47: Cleaning And Maintenance
Dansensor MAP Check 3 Vacuum User Guide ® Cleaning and Maintenance General Performing cleaning and maintenance regularly reduces the chances of equipment failure. CAUTION! Personnel performing any maintenance or cleaning must familiarize themselves with the "Safety Instructions" on page 9 before attempting any of these procedures. -
Page 48: Replacing Buffer Gas Filter
User Guide Dansensor MAP Check 3 Vacuum ® Replacing buffer gas filter (“Buffer”versions only) Disconnect the gas inlet hose from the push-in fitting Unscrew the push-in fitting Replace the filter Connect fitting and hose again. -
Page 49: Replacing Air Inlet And Outlet Dust Filters
Dansensor MAP Check 3 Vacuum User Guide ® Replacing air inlet and outlet dust filters CAUTION! Clogged air inlet and outlet filters can lead to overheating of the device. Therefore they should be replaced or cleaned regularly, especially when device is used in a dusty environment.... -
Page 50: Test Modes In Diagnostics
User Guide Dansensor MAP Check 3 Vacuum ® Test modes in Diagnostics Test measuring - Cal inlet This test is used for calibration of the sensors in the system. It is normally used for servicing purposes. Remove the blind plug from the input labelled “CAL. GAS IN” and connect a suitable M5 ... -
Page 51: Test Measuring - Buffer Inlet
Dansensor MAP Check 3 Vacuum User Guide ® Test measuring - Buffer inlet This test is used for a manual continuous measurement of the buffer tank contents. It is normally used for servicing purposes or to check the tank after installation. Apply vacuum to the device and stop the packaging machine. -
Page 52: System Leak Test
User Guide Dansensor MAP Check 3 Vacuum ® System leak test This test is used to verify system tightness in sensor and flow parts. A leak is fatal for measurements and the test should therefore be done periodically or in case of strange readings. - Page 53 Dansensor MAP Check 3 Vacuum User Guide ® In case of good result the following screen is shown. Close In case of a failed result the following screen is shown. Close NOTE! Devices with CO sensor installed will have separate results for this sensor, named "Leak limit IR"...
- Page 54 User Guide Dansensor MAP Check 3 Vacuum ® P/N 320598-G 11/2019...
-
Page 55: Menus And Settings
Dansensor MAP Check 3 Vacuum User Guide ® 5. Menus and Settings General When device is switched on (after power off ) it is locked in User access level. In User access level the operator has access to a limited number of functions only and is not allowed to perform parameter setup. -
Page 56: Product Menu
User Guide Dansensor MAP Check 3 Vacuum ® Export / Import Export of product log data, export/import of products, users and device settings. Requires connection of a USB memory key. "Export/Import" on page 72 for details. Language Change language of screens and menus. "Language"... - Page 57 Dansensor MAP Check 3 Vacuum User Guide ® Alarm settings Setting of the sample gas measurement warning and alarm values. Product alarm settings Product alarm settings 28,5 27,0 23,0 21,5 You have the following options for each alarm: • Off Disables all alarms...
-
Page 58: New Product
User Guide Dansensor MAP Check 3 Vacuum ® External mixer (Only available if “External mixer” is enabled in “General setup”) NOTE! On the device it is possible to create products with mixer settings that do not match the connected mixer. These products can only be used if mixer settings are changed. -
Page 59: View Collected Data
Dansensor MAP Check 3 Vacuum User Guide ® View collected data This function enables the operator to display logged data for any of the existing products. (Selecting Data log from the main menu displays logged data for the currently selected product only.) Delete collected data Use function to delete the logged data for an existing product.... -
Page 60: Data Log
User Guide Dansensor MAP Check 3 Vacuum ® Data log Selecting Data log from the Main menu will display a screen with a list of all the logged data for the currently selected product. Data log Product: Sausages 100 gr. Data collection: 3 Cycle Sample time... -
Page 61: Diagnostics Menu
Dansensor MAP Check 3 Vacuum User Guide ® Diagnostics menu Selecting Diagnostics menu from the Main menu will take you to the device’s Diagnostics pages. The Diagnostics section consists of 3 pages. Use the arrow keys in the headline area to go to next or previous page: The first page shows the internal parameters of the device. -
Page 62: General Setup
User Guide Dansensor MAP Check 3 Vacuum ® General setup Selecting General setup from the Main menu will display a menu with available setup parameters. “Supervisor” access level is required for this menu, as the parameters in this menu control the basic functionality of the device. -
Page 63: External Mixer Settings
Dansensor MAP Check 3 Vacuum User Guide ® Request ID when changing When set to “Yes” the operator will be prompted to enter product some kind of information ex. product batch no. when selecting a new product. The text will be part of the logged data for each measurement. Backlight Adjust display background light (1-10) Contrast... -
Page 64: Buffer Measure Setup
User Guide Dansensor MAP Check 3 Vacuum ® Buffer measure setup Selecting Buffer measuring setup from the General setup menu will display a screen showing the setup parameters for the buffer measuring. Measure on buffer No automatic buffer measurement is performed. Start up An automatic buffer measurement is performed... -
Page 65: Data Log Setup
Dansensor MAP Check 3 Vacuum User Guide ® Data log setup Selecting Data log setup from the General setup menu will display a screen showing the parameters for the data logging function. Log interval Set the number of cycles for which the device should log data. If set to 1, data is logged for all cycles. - Page 66 User Guide Dansensor MAP Check 3 Vacuum ® Server Port See above. Acknowledge Acknowledge byte can be used if a “handshake” is required for each measurement between device and server, each to be set up to same value. Disable network Select whether or not network errors should...
- Page 67 Dansensor MAP Check 3 Vacuum User Guide ® “Compatible” network logging data format Parameter Type Value Log version Device serial number Text Device software version Text Cycle counter Product name Text Product number Product barcode Text Timestamp Time <yyyy-MM-dd HH:mm:ss> O2 measurement Float O2 alarm state...
- Page 68 User Guide Dansensor MAP Check 3 Vacuum ® “Advanced” network logging data format Unavailable/ Parameter Type Value Error value Log version Device serial number Text Device software version Text Date Time <yyyy-MM-dd> <yyyy-MM-dd> Time Time <HH:mm:ss> <HH:mm:ss> Product name Text "-"...
- Page 69 Dansensor MAP Check 3 Vacuum User Guide ® Unavailable/ Parameter Type Value Error value Buffer CO2 Float 0.00 Buffer CO2 alarm state Text "Inactive", "High", "Low ""-" Buffer CO2 warning state Text "Inactive", "High", "Low ""-" Buffer CO2 alarm limit low Float 0.00 Buffer CO2 alarm limit high...
-
Page 70: Network Setup
User Guide Dansensor MAP Check 3 Vacuum ® Network setup Selecting Network setup from the General setup menu will display a screen showing the parameters for the Ethernet/LAN connection. Network setup DHCP Using DHCP network address automatically received from a DHCP server on the network (default setting). -
Page 71: Formats/Units/Time
Dansensor MAP Check 3 Vacuum User Guide ® Formats/Units/Time Selecting Format/Units/Time from the General setup menu will display a screen showing the various setup parameters for output formats and units. Time Setting of current time (hh:mm) Date Setting of current date (using “Date format”) Date format Setting of date format (DD/MM/YY or MM/DD/YY) "Time", "Date"... -
Page 72: Access Level
User Guide Dansensor MAP Check 3 Vacuum ® Access level When device is switched on (after power off ) it is locked in User access level. In User access level you have only access to a limited number of functions and is not allowed to perform parameter setup. - Page 73 Dansensor MAP Check 3 Vacuum User Guide ® Enter current PIN code and press OK. Enter new access PIN code Enter new PIN code and press OK. Confirm new access PIN code Confirm new PIN code and press OK. ...
-
Page 74: Export/Import
User Guide Dansensor MAP Check 3 Vacuum ® Export/Import Selecting Export/Import from the Main menu will display a screen listing the various functions for exporting and importing of data. The export and import functions requires for a USB memory key to be connected to either of the USB connectors (labelled ) at the front or back of the device - see "Connections"... -
Page 75: Language
Dansensor MAP Check 3 Vacuum User Guide ® Language Selecting Language from the Main menu will display a screen listing the available languages. Select language English standard Dansk Español Francais Deutsch Italiano Pусский язык When selecting a language all text throughout the menus will be displayed in this language. P/N 320598-G 11/2019... - Page 76 User Guide Dansensor MAP Check 3 Vacuum ® P/N 320598-G 11/2019...
-
Page 77: Putty Terminal Server
Dansensor MAP Check 3 Vacuum User Guide ® 6. PuTTY Terminal Server The PuTTY Terminal Server program enables you to change the device’s configuration parameters. Even though the program can be used with any Dansensor® MAP Check 3 Vacuum model, it especially applies to the “Black Box”... - Page 78 User Guide Dansensor MAP Check 3 Vacuum ® 1. Select Serial connection type and specify the number of your computer’s COM-port to which the device is connected. In the Speed field type 115200. 2. Select the Keyboard entry in the Category list. 3.
- Page 79 Dansensor MAP Check 3 Vacuum User Guide ® 7. To save the current setting we recommend that you give the session a name ex. MC 3 Vac and click Save. The next time you start the program you can easily retrieve the settings by loading the saved session.
-
Page 80: Using Putty
User Guide Dansensor MAP Check 3 Vacuum ® Using PuTTY When the program starts... ...press F1 several times to establish a connection to the device by changing it’s COM2-port protocol to Terminal Server. When connection has been established the window will change to show the Main menu. ... - Page 81 Dansensor MAP Check 3 Vacuum User Guide ® To do so select Change access level item... ... and press Enter. P/N 320598-G 11/2019...
- Page 82 User Guide Dansensor MAP Check 3 Vacuum ® From the factory the access code has been set to “0000”. Type in code and press Enter. Now access level has been changed to supervisor. The access code can be changed to one of your own selection using the Change ...
- Page 83 Dansensor MAP Check 3 Vacuum User Guide ® In the General setup section you have access to the various settings in the device. For information about the various settings and their influence please see "General setup" on page To disable the connection to the device select Close terminal server from the Main menu ...
- Page 84 User Guide Dansensor MAP Check 3 Vacuum ® P/N 320598-G 11/2019...
-
Page 85: Technical Information
Dansensor MAP Check 3 Vacuum User Guide ® 7. Technical Information Technical specifications Electrical connections Mains 100-264 VAC, 47-63 Hz DC models 24V DC available, range 19-36V DC input Power consumption 25 - 50 W (depending on model) Mechanical data Analyser size 192 x 230 x 375 mm (H x W x D) Analyser weight... -
Page 86: Gas Connection
User Guide Dansensor MAP Check 3 Vacuum ® Gas connection Measurement gas inlet Hose Ø5/3 mm, sample hose l=3m Vacuum connection Hose Ø8/6 mm Buffer gas inlet Push-in, OD=3 mm Calibration gas inlet M5 female (normally plugged) Air inlet/Cal. gas overflow M5 female (normally fitted with filter) Basic specifications Warm-up time... -
Page 87: Co 2 Sensor
Dansensor MAP Check 3 Vacuum User Guide ® sensor Sensor type Infrared, NDIR, temperature controlled to +60 °C Measure gas temperature +0 to +35 °C Measure flow Measure input: Typically 5 l/min. ± 0.5 l/min. Sensor flow: 75 ml/min. ± 5 ml/min. Buffer measurement: 75 ml/min. -
Page 88: Standard Calibration Specification
User Guide Dansensor MAP Check 3 Vacuum ® Standard calibration specification Calibration gasses (Zr O 1000 ppm, 1%, 80% (balance N ) 20.9% (Compressed dried atmosphere air) Calibration gasses (CO 0%, 25%, 60%, 100% (balance N Calibration gas accuracy < 3% System diffusion <... -
Page 89: Spare Parts, Consumables And Accessories
Dansensor MAP Check 3 Vacuum User Guide ® Spare parts, consumables and accessories Ordering items When ordering any of the below listed items please state carefully the item number, the item specification and the number of items wanted and send the order to your spare parts dealer. Spare parts Cable, mains AC, ser. - Page 90 User Guide Dansensor MAP Check 3 Vacuum ® P/N 320598-G 11/2019...
- Page 91 This blank page has been inserted to enable double sided printing of the document!
- Page 92 MOCON Europe A/S Rønnedevej 18 4100 Ringsted, Denmark Tel +45 57 66 00 88 info. dk.mocon ametek .com www.dansensor.com...
Need help?
Do you have a question about the AMETEK Dansensor MAP Check 3 Vacuum and is the answer not in the manual?
Questions and answers