
Related Manuals for Otto Bock 743A250 Bionic Pro


Summary of Contents for Otto Bock 743A250 Bionic Pro
- Page 1 743A250 Bionic Pro Instructions for use ....................
- Page 2 743A250 Bionic Pro...
-
Page 3: Table Of Contents
..........................5.5.9.2 New customer ............................ 5.5.9.3 Neurological status ..........................5.5.9.4 Assessment preparation ........................5.5.9.5 Sensor setup when measuring without an orthosis .................. 5.5.9.6 Measuring without an orthosis ......................5.5.9.7 Sensor setup when measuring with an orthosis ..................743A250 Bionic Pro... - Page 4 Resetting frozen user interface (timeout) ....................5.7.4 Replacing faulty product components ....................Switching off ............................Cleaning ................................Disposal ................................Legal information .............................. Liability .............................. CE conformity ............................. Trademarks ............................Local Legal Information ........................Symbols Used ..............................Technical data ..............................743A250 Bionic Pro...
-
Page 5: Notes Regarding The Document
100 % 1234567.bionicpro.local 1234567.bionicpro.local User Guide Inhaltsverzeichnis 1. Die Anwendung 1.1 Das Schnellmenü Startseite Bionic Pro Willkommen! Starten Sie Ihre Anwendung: 743A250 Bionic Pro (For clinical study) 743A250 Bionic Pro Kurzanleitung Quick reference guide Einrichtung Fallfuß Outcome und Hilfe Versorgung Measurement Gebrauchsanweisung................... -
Page 6: Explanation Of Warning Symbols
► Make sure that solid particles (e.g. dust), moisture (e.g. water vapour) and liquids cannot penetrate into the product during transport, storage and use. ► Refer to the specifications regarding the ambient conditions in the “Technical data” (see Page 49) section under the “Ambient conditions” heading. 743A250 Bionic Pro... -
Page 7: Product Description
: To carry out the measurement, the 743A250 Bionic Pro requires five sensors (one in the pelvic region, one each in the heel region on both feet and one each on the lateral side of the thigh and lower leg of the leg to be fit... -
Page 8: Scope Of Delivery
► Lift and transport the case by the handle. ► Use the supplied packaging material or an equivalent for shipping. ► Remove the product components from the case to check the scope of delivery. 743A250 Bionic Pro... -
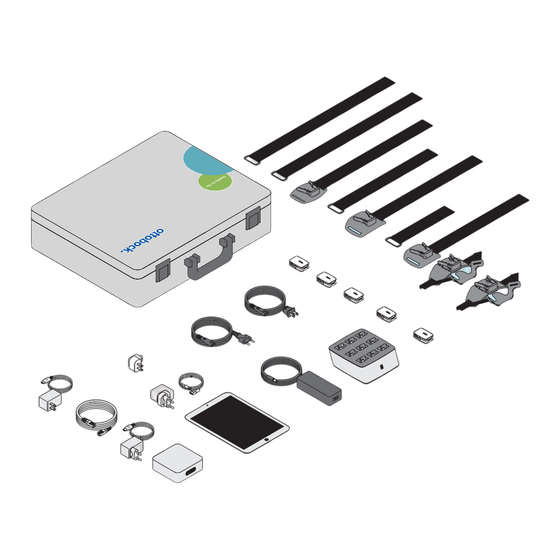
Page 9: Checking The Scope Of Delivery
US universal power supply for 743Y827=V1 : 1x 743Y832=V1 : 1x 646D1448=ALL_INT Plastic card with access data for Bionic Pro Bionic Pro “Kurzanleitung/Quick reference guide” : 1x : 1x 647G1361=DE_INT Supplier documentation (iPad, Ubiquiti Amplifi Instant Router) Instructions for use (German) : 1x 647G1361=EN_INT Instructions for use (English) 743A250 Bionic Pro... -
Page 10: Preparing Product For Use
The “Setting up the tablet” (Setting up the iPad) section is needed when preparing the product for use for the first time. ► Follow the sections in order so the product components can connect with one another properly via WLAN. 743A250 Bionic Pro... -
Page 11: Connecting The Ipad To The Power Supply
(type A (NEMA-1)) for outlets of type A (NEMA-1) and type B (NEMA-5). ► For other types of outlets, use an adapter from a specialist shop which is suitable for the connected loads of the power supply (100–240 V/50–60 Hz). ► Connect the iPad to the power supply for charging. 743A250 Bionic Pro... -
Page 12: Connecting The Router To The Power Supply
→ The WLAN is ready for the iPad, the base station and the sensors after a few minutes (approx. 10 min). INFORMATION The router has a touch screen. Various information on the router can be displayed by tapping the touch screen. It cannot be used to modify settings. 743A250 Bionic Pro... -
Page 13: Connecting The Router To The Internet
The display on the router’s screen changes from “Plug in cable” to the time and date when the LAN cable is plugged in. “No Internet access” screen is displayed. ► Check the customer’s Internet connection if the 743A250 Bionic Pro... -
Page 14: Connecting The Base Station To The Power Supply
► For other types of outlets, use an adapter from a specialist shop which is suitable for the connected loads of the power supply (100–240 V/50–60 Hz). ► Connect the base station to the power supply. → The base station is ready after a few minutes (approx. 5 min) when the three status LEDs on the front are illuminated continuously. 743A250 Bionic Pro... -
Page 15: Charging Switched Off Sensors In The Base Station And Switching Them On Prior To Measuring
Sensor switched off or completely discharged Illuminated (white) No WLAN connection Modulating (blue) Charging and connected to base station via WLAN Flashing (yellow) Update being installed – do not switch off and do not remove from base station! 743A250 Bionic Pro... -
Page 16: Switching On The Ipad
QR codes: : DE (German) – https://support.apple.com/de-de/guide/ipad/ipad995bb83d/ios : EN (English) – https://support.apple.com/guide/ipad/turn-on-and-set-up-ipad995bb83d/ios ► Refer to the “Scanning the QR code” (see Page 21) section to use the QR code. ► Follow the instructions on the iPad screen when setting it up. 743A250 Bionic Pro... -
Page 17: Use
→ If this does not remedy the faults, switch off all other high-frequency devices. → If this does not remedy the faults, use the product in a different room. → If this does not remedy the faults, contact the manufacturer. 743A250 Bionic Pro... -
Page 18: General Information On The Use Of The Ipad
Apps and links that cannot be displayed on the home screen are shown on other pages which can be reached by swiping horizontally. Apps and links that are found in the dock are displayed on both the home screen and the additional pages. 743A250 Bionic Pro... -
Page 19: Important Apps
: Bionic Pro – tapping the link opens the Safari browser and displays the login page for the Bionic Pro user inter face. : Router update – tapping the link opens the Safari browser and displays the update page for the user interface of the router. 743A250 Bionic Pro... -
Page 20: Taking Screenshots
: The app toggle displays all the open apps. → Tapping an app switches to the selected app. → Swiping up closes the relevant app. → You can switch to the home screen by clicking the home button. 743A250 Bionic Pro... -
Page 21: Scanning Qr Codes
: Start the “Camera” app. ► ► : Position the camera so the website QR code is in the viewfinder . ► : Tap the “Website QR code – open ‘1234567.bionicpro.local‘ in Safari” button to open the link in the Safari browser. 743A250 Bionic Pro... -
Page 22: Attaching The Sensors To The Patient
Reuse on other persons and improper cleaning, disinfection Skin irritation, formation of eczema or infections due to contamination with germs ► The product may only be used on another person after thorough cleaning and disinfection. ► Clean the product regularly. 743A250 Bionic Pro... - Page 23 : NOTICE! Start by attaching all the sensor holders to the patient and then insert each sensor in the prop er sensor holder. : If the orthosis prevents a sensor from being attached in the ideal location, attach it as closely as pos → sible to the ideal location. 743A250 Bionic Pro...
-
Page 24: Using The User Interface
Zustimmen The user interface is opened in the Safari browser after tapping the “Bionic Pro” link. The “Privacy notice” section must be read and the “Agree” button tapped to use the user interface for the first time. 743A250 Bionic Pro... -
Page 25: Accessing The User Interface
: “Homepage” – this icon can be used to jump back to the homepage from any page in the user interface. If a measurement for a drop foot fitting is being performed, it must be discontinued to return to the homepage. : “Settings” (see Page 26) : “Customer overview” (see Page 29) : “Creating and selecting users” (see Page 29) 743A250 Bionic Pro... -
Page 26: Setup And Help
The “Settings” area includes the following buttons which are explained in the sections of the same names on the indicated pages: : “Instructions for use” (see Page 27) : “System information” (see Page 27) : “Adjusting the settings” (see Page 28) : “Imprint” (see Page 28) : “Privacy notice” (see Page 28) : “Contact and service” (see Page 29) 743A250 Bionic Pro... -
Page 27: Instructions For Use
: Battery icon displays the charge level. : Version number of the sensor firmware. : Button – tapping this button causes the LED of the corresponding sensor to flash in the colour pink for several seconds. : Internal number of the sensor. 743A250 Bionic Pro... -
Page 28: Adjusting The Settings
IBAN: DE82 2604 0030 0628 3741 00 BIC: COBADEFFXXX Benutzername eingeben Tapping the “Imprint” button displays the “Imprint” window. 5.5.6.5 Privacy notice 100 % 1234567.bionicpro.local Datenschutzhinweis Datenschutz- hinweis Datenschutzhinweis Benutzername eingeben Tapping the “Privacy notice” button displays the “Privacy notice” window. 743A250 Bionic Pro... -
Page 29: Contact And Service
The user displayed next to the icon is used in the application and report. For this reason, it is important to use the correct first name and surname rather than a pseudonym. : Enter and select a user name when “Enter user name” is displayed prior to starting a drop foot fitting. ► 743A250 Bionic Pro... -
Page 30: Drop Foot Fitting
Patienten ID Geburtsjahr Weiter Weiblich Männlich Divers Gewicht Weiter Benutzername eingeben ► Enter the information (* = mandatory field) on the “New customer” page and then tap the “Next” button. → The “Neurological status” page subsequently opens (see Page 31). 743A250 Bionic Pro... -
Page 31: Neurological Status
(refer to the “Attaching sensors to the patient” section – see Page 22). ► Then tap the “Start measurement” button. → The “Measuring without an orthosis” page subsequently opens (see Page 32). 743A250 Bionic Pro... -
Page 32: Measuring Without An Orthosis
→ : “Repeat” if the progress was not satisfactory and the measurement should be repeated. : “Go to result” if the progress was satisfactory and the result should be displayed on the “Drop foot fit → ting assessment” page. 743A250 Bionic Pro... -
Page 33: Sensor Setup When Measuring With An Orthosis
Tapping the “Camera off” button switches the camera off. You can jump back to the “Sensor setup” page by tapping the “Repeat sensor setup” button (“Sensor setup when measuring with an orthosis” section – see Page 33). 743A250 Bionic Pro... - Page 34 ► Tap the “New measurement” button on the “Drop foot fitting assessment” page if an additional measure ment with an orthosis needs to be performed. ► Tap the “Complete assessment” button when you want to complete the drop foot fitting assessment. (“Com pleting the drop foot fitting assessment” section – see Page 35). 743A250 Bionic Pro...
-
Page 35: Completing The Drop Foot Fitting Assessment
The PDF file is displayed in the browser after it is generated. ► Refer to the “Making assessment files available” section (see Page 36) to make the PDF file available for send ing via e-mail and transferring via USB. 743A250 Bionic Pro... -
Page 36: Creating A Pdf Report
PDF file as an attachment. Alternatively, the PDF file can be saved on the iPad by tapping the “Save to files” icon and forwarded with the iTunes program (e.g. via USB cable). 743A250 Bionic Pro... - Page 37 Alternatively, the mp4 file can be saved on the iPad by tapping the “Save to files” icon and forwarded with the iTunes program (e.g. via USB cable). 743A250 Bionic Pro...
-
Page 38: Updating Product Components
The operating system and the iPad apps should be updated to the latest version when updates are available to ensure the best possible security and functionality. Further information on the updates is available in the iPad user manual. 743A250 Bionic Pro... -
Page 39: Installing The User Interface Certificate
– see Page 15). ► Check whether the battery level is too low (“System information” section – see Page 27). ► Once the sensor is charged and is detected by the base station, tap the “OK” button. 743A250 Bionic Pro... -
Page 40: Low Sensor Battery Level" Error Message
Take the following steps for the “New firmware for sensor” error message: ► Insert all switched on sensors in the base station. ► Tap the “Update now” and “OK” buttons. ► Wait until the sensor firmware has been updated. 743A250 Bionic Pro... -
Page 41: Fault Table
Sensor not illuminated despite previous steps Sensor is not being charged USB port dirty Carefully clean USB port with compressed air (at 20 cm dis Identified by: tance) or a vacuum cleaner Dirt in USB port USB port defective Contact service 743A250 Bionic Pro... - Page 42 PROBABLE CAUSE SUGGESTED REMEDY Identified by: Sensor not charged despite pre vious steps User interface working at slower Interference due to other HF Refer to the instructions in the pace devices “Preventing electromagnetic interference” section (see Page 17) 743A250 Bionic Pro...
-
Page 43: Measures
If the user interface does not respond despite tapping various buttons a number of times, it has timed out due to inactivity (user interface has not been used for approx. 60 minutes). The login screen opens when the “Reload” icon is tapped. You can continue working after logging in with the PIN. 743A250 Bionic Pro... -
Page 44: Replacing Faulty Product Components
If product components are defective, it is important to contact the service team to determine which product com ponents should be sent in for repair. This applies to the interdependent components of the product (base station, router, iPad and sensors) in particular. 5.8 Switching off Switch off the product components according to the illustration. 743A250 Bionic Pro... -
Page 45: Cleaning
Please observe the information provided by the responsible authorities in the country of use regarding return, collection and disposal procedures. 743A250 Bionic Pro... -
Page 46: Legal Information
8.2 CE conformity With the exception of the iPad and the router, the following directive applies to all other product components of the 743A250 Bionic Pro: This product meets the requirements of the European Directive 93/42/EEC for medical devices. This product has been classified as class I accessories according to the classification criteria outlined in Annex IX of the directive. - Page 47 Legal information Otto Bock Health Care, LP 3820 West Great Lakes Drive Salt Lake City, Utah 84120-7205 USA Phone + 1-801-956-2400 Fax + 1-801-956-2401 This device complies with RSS 210 of Industry Canada. Operation is subject to the following two conditions:...
-
Page 48: Symbols Used
Please observe the instructions of your national authority pertaining to return and collection. Please note the instructions for use Non-ionising radiation Compliance with the requirements under "FCC Part 15" (USA) Class II Electrical device Type BF applied part 743A250 Bionic Pro... -
Page 49: Technical Data
Directives and manufacturer’s declaration – electromagnetic interference The 743A250 Bionic Pro product is designed for operation in an electromagnetic environment as specified below. The customer or user of the 743A250 Bionic Pro product must ensure that the device is operated in such an environment. - Page 50 Directives and manufacturer’s declaration – electromagnetic interference immunity The 743A250 Bionic Pro product is designed for operation in the electromagnetic environment specified below. The customer or user of the product must ensure that it is operated in such an environment.
- Page 51 743A250 Bionic Pro product is used exceeds the above compliance level, the 743A250 Bionic Pro product should be monitored to confirm it is functioning as intended. If unusual performance characteristics are observed, additional measures may be required such as repositioning the 743A250 Bionic Pro product or moving it to a dif ferent location.
- Page 52 1,700–1,990 GSM 1900; 217 Hz DECT; LTE band 1, 3, 4, 25; UMTS 2,450 2,400–2,570 Bluetooth, Pulse modula WLAN, tion 802.11 b/g/n, 217 Hz RFID 2450, LTE band 7 5,240 5,100–2,570 WLAN 802.11 Pulse modula tion 5,500 217 Hz 5,785 743A250 Bionic Pro...
- Page 53 743A250 Bionic Pro...
- Page 54 743A250 Bionic Pro...
- Page 55 743A250 Bionic Pro...
- Page 56 Ottobock SE & Co. KGaA Max-Näder-Straße 15 · 37115 Duderstadt · Germany T +49 5527 848-0 · F +49 5527 848-3360 healthcare@ottobock.de · www.ottobock.com...
Need help?
Do you have a question about the 743A250 Bionic Pro and is the answer not in the manual?
Questions and answers