Advertisement
Available languages
Available languages
Quick Links
Gebrauchsanleitung (Benutzer / Techniker) .............................................................
3
Instructions for use (user / technician) .................................................................... 21
Mode d'emploi (Utilisateur / Technicien) ................................................................. 39
Instrucciones de uso (usuario / técnico) .................................................................. 57
Kullanım kılavuzu (Kullanıcı / Teknisyen) .................................................................. 75
Руководство по применению (для пользователей / технического персонала) ........... 93
Advertisement
Chapters

Related Manuals for Otto Bock 743A211


Summary of Contents for Otto Bock 743A211
-
Page 1: Table Of Contents
743A211 Gebrauchsanleitung (Benutzer / Techniker) ............. Instructions for use (user / technician) ..............21 Mode d'emploi (Utilisateur / Technicien) ..............39 Instrucciones de uso (usuario / técnico) ..............57 Kullanım kılavuzu (Kullanıcı / Teknisyen) ..............75 Руководство по применению (для пользователей / технического персонала) ... 93... - Page 2 2 | Ottobock 743A211...
- Page 3 Instandhaltung ..............................12.1 Inspektion ............................12.1.1 Prüfung der Laser ..........................12.2 Wartung ............................12.3 Instandsetzung ........................... Entsorgung ................................ Rechtliche Hinweise ............................14.1 Haftung ............................. Anhänge ................................15.1 Kurzanleitung Linienlaser ........................15.2 Verzeichnis der verwendeten Piktogramme .................... 743A211 Ottobock | 3...
-
Page 4: 743A211
Zusammenhang mit der auszuführenden Arbeit stehen. ► Bewahren Sie die Gebrauchsanleitung immer bei dem Produkt auf. 1.1 Gültigkeitsbereich des Dokuments Dieses Dokument ist für das folgende Produkt gültig: Kennzeichen Benennung Ab Fabrik-Nr. 743A211 Aufsatzgestell mit Laserhalterung 2016200001 743A211 743A211 XXXXXXXXXX Legende zum Typenschild ... -
Page 5: Aufbau Des Dokuments
Auspacken (siehe Seite 9) • • Aufstellen (siehe Seite 10) Montage (siehe Seite 10) • Inbetriebnahme (siehe Seite 12) • Gebrauch (siehe Seite 16) • Instandhaltung (siehe Seite 18) • Entsorgung (siehe Seite 18) • Hauptkapitel mit allgemeinen Informationen Anhänge (siehe Seite 19) • 743A211 Ottobock | 5... -
Page 6: Bedeutung Der Sicherheitshinweise Und Piktogramme
In diesem Dokument werden Symbole und Piktogramme verwendet, die entweder selbsterklärend sind oder deren Bedeutung aus dem Zusammenhang hervorgeht. Das Hauptkapitel „Anhang“ enthält im Unterkapitel „Verzeichnis der verwendeten Piktogramme“ eine Erklärung zur Bedeutung der Symbole und Piktogramme (siehe Seite 20). 6 | Ottobock 743A211... -
Page 7: Produktbeschreibung
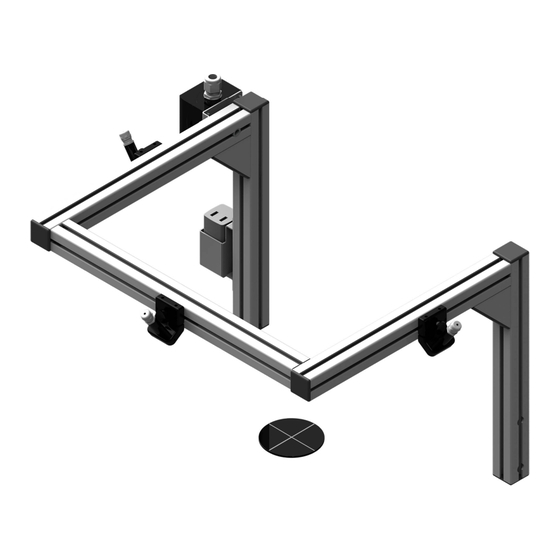
(743A200/743A220) für den Aufbau von Modular-Beinprothesen durch ausgebildete Orthopädietechniker (erfor derliche Fachkenntnisse: Prothetik Untere Extremität) vorgesehen. Das Aufsatzgestell mit Laserhalterung 743A211 verfügt über 3 Laser. Es wird an dem Gestell des PROS.A. As semblys montiert. Die Laser projizieren die Aufbaulinie auf der Prothese und ermöglichen so eine genaue Positio... -
Page 8: Technische Daten
Höhe (Aufsatzgestell) [mm] Gewicht (ohne Verpackung) [kg] 4.2 Umgebungsbedingungen Zulässiger Temperaturbereich (Lagerung) -10 – +60 °C Zulässiger Temperaturbereich (Betrieb) +5 – +40 °C Empfohlene maximal Temperatur (Betrieb) +22 °C Zulässige relative Luftfeuchtigkeit (Lagerung und Betrieb) 70%, nicht kondensierend unzulässige Umgebungsbedingungen explosionsgefährdete Bereiche, feuchte Um gebung 8 | Ottobock 743A211... -
Page 9: Transport
Instructions for use (user / technician) ..............Mode d'emploi (Utilisateur / Technicien) ..............Instrucciones de uso (usuario / técnico) ..............Kullanım kılavuzu (Kullanıcı / Teknisyen) ..............Руководство по применению (для пользователей / технического персонала) ... ► Den Lieferumfang auf Vollständigkeit prüfen. 743A211 Ottobock | 9... -
Page 10: Aufstellen
► Die Nutensteine von der Seite in die Profile einfädeln. ► Auf die richtige Ausrichtung der Nutensteinen im Profil achten. ► Die Nutensteine in den Profile durch Verschieben so positionieren, dass sie auf die Positionen der Schrauben im Aufsatzgestell abgestimmt sind. 10 | Ottobock 743A211... - Page 11 ► HINWEIS! Das Grundgestell muss auf einem ebenen Untergrund stehen und mit einer Wasserwaage ausgerichtet sein. Das Aufsatzgestell mit einer Wasserwaage ausrichten. ► Die Schrauben in den Nutensteinen festschrauben. : Laden; : Gebrauch - Power-Bank; : Gebrauch - Netzteil/Ladegerät (USB) 743A211 Ottobock | 11...
-
Page 12: Inbetriebnahme
10.1 Montieren der Laser-Lehre Mit dem Klemmhebel die Arretierung des Schaftspanners lösen. ► ► Den Schaftspanner aus der Halterung entnehmen. ► Die Spannzange aus der Halterung entnehmen. ► Den Sterngriff herausschrauben. ► Den Sterngriff aus der Fußplattenhalterung entnehmen. 12 | Ottobock 743A211... -
Page 13: Justieren Der Laser
10.2 Justieren der Laser ► Den Laser einschalten. ► Die Rändelschraube lösen. Den vorderen Laser so justieren, dass die Laserlinie durch die 0-Linie der Skala und die Markierung der La ► ser-Lehre verläuft. ► Die Rändelschraube fest drehen. 743A211 Ottobock | 13... - Page 14 Inbetriebnahme Die Rändelschraube lösen. ► ► Den rechten Laser so justieren, dass die Laserlinie durch die Markierung der Laser-Lehre verläuft. ► Die Rändelschraube fest drehen. 14 | Ottobock 743A211...
-
Page 15: Demontieren Der Laser-Lehre
Den linken Laser so justieren, dass die Laserlinie durch die Markierung der Laser-Lehre verläuft. ► Die Rändelschraube fest drehen. Den Laser ausschalten. ► 10.3 Demontieren der Laser-Lehre ► Die Laser-Lehre von der Fußplattenhalterung abnehmen. ► Die Fußplatte auf die Fußplattenhalterung aufsetzen. 743A211 Ottobock | 15... -
Page 16: Gebrauch
► Für den Gebrauch des Produkts auch die Gebrauchsanleitung des PROS.A. Assembly beachten (743A200: 647H534, 743A220: 647G1000). ► Für den Gebrauch des Produkts auch die Kurzanleitung des Linienlasers beachten (Kapitel "Kurzanleitung Li nienlaser" - siehe Seite 19. 16 | Ottobock 743A211... -
Page 17: Reinigung
> Benötigte Materialien: Reinigungstuch, Isopropylalkohol 634A58, weiches Tuch 1) HINWEIS! Auf Materialverträglichkeit achten! Lagerstellen darf nicht der Schmierstoff entzogen wer den! Das Produkt mit einem Reinigungstuch und Isopropylalkohol reinigen. 2) Das Produkt mit dem Tuch abtrocknen. 743A211 Ottobock | 17... -
Page 18: Instandhaltung
14 Rechtliche Hinweise 14.1 Haftung Der Hersteller haftet nur, wenn das Produkt gemäß den Beschreibungen und Anweisungen in diesem Dokument (Gebrauchsanleitung) verwendet wird. Für Schäden, die durch die Nichtbeachtung dieses Dokuments verursacht werden, haftet der Hersteller nicht. 18 | Ottobock 743A211... -
Page 19: Anhänge
Rudolf-Diesel-Str. 2a 56070 Koblenz Germany Der Hersteller erklärt in alleiniger Verantwortung, dass dieses Produkt (LFL635-5-6(9x20)90 - 70108484) konform zu den nachstehenden Standards oder standardisierten Dokumenten ist: EN 61000-6-3: 2007 +A1: 2011, EN 61000-6-1: 2007, EN 60825-1: 2007 743A211 Ottobock | 19... -
Page 20: Verzeichnis Der Verwendeten Piktogramme
Altgeräte müssen die Komponenten einer geordneten Entsorgung zugeführt werden. Sie können das Produkt an jeder öffentli chen Sammelstelle Ihrer Stadt oder Gemeinde abgeben. 15.2 Verzeichnis der verwendeten Piktogramme • Dokument lesen und beachten • Vor Nässe schützen • Warnung vor Laserstrahlung 20 | Ottobock 743A211... -
Page 21: Instructions For Use (User / Technician)
Inspection ............................12.1.1 Checking the lasers ..........................12.2 Maintenance ............................12.3 Repair ............................... Disposal ................................Legal Information .............................. 14.1 Liability .............................. Appendices ................................ 15.1 Quick reference guide line laser ......................15.2 List of pictograms used ........................743A211 Ottobock | 21... -
Page 22: Important Information On This Document
► Please always keep these instructions for use by the product. 1.1 Scope of this document This document is valid for the following product: Reference number Designation From factory no. 743A211 Mounting frame with laser holder 2016200001 743A211 743A211 XXXXXXXXXX Nameplate legend ... -
Page 23: Structure Of This Document
Unpacking (see Page 27) • Positioning (see Page 28) • Installation (see Page 28) • Initial Operation (see Page 30) • Use (see Page 34) • Servicing (see Page 36) • Disposal (see Page 36) • Chapter containing general information Appendices (see Page 37) • 743A211 Ottobock | 23... -
Page 24: Meanings Of Safety Instructions And Pictograms
In this document symbols and pictograms which are either self-explanatory or whose meaning can be deduced from the context are used. The chapter "Appendix" contains an explanation of the symbols and pictograms in the section "List of pictograms used" (see Page 38). 24 | Ottobock 743A211... -
Page 25: Product Description
The 743A211 mounting frame with laser holder has 3 lasers. It is installed on the PROS.A. Assembly. The lasers project the alignment reference line on to the prosthesis and thereby enable an exact positioning of the prosthetic components to the alignment reference line. -
Page 26: Technical Data
Weight (without packaging) [kg] 4.2 Environmental conditions Admissible temperature range (storage) -10 – +60 °C Admissible temperature range (operation) +5 – +40 °C Recommended maximum temperature (operation) +22 °C Allowable relative humidity (storage and operation) 70%, non-condensing Unallowable environmental conditions Potentially explosive atmospheres, humid environment 26 | Ottobock 743A211... -
Page 27: Transport
Instructions for use (user / technician) ..............Mode d'emploi (Utilisateur / Technicien) ..............Instrucciones de uso (usuario / técnico) ..............Kullanım kılavuzu (Kullanıcı / Teknisyen) ..............Руководство по применению (для пользователей / технического персонала) ... ► Check the delivery for completeness. 743A211 Ottobock | 27... -
Page 28: Positioning
► Ensure the correct alignment of the slot nuts in the profile. ► Position the slot nuts in the profiles by moving them so that they are aligned with the positions of the screws in the mounting frame. 28 | Ottobock 743A211... - Page 29 ► NOTICE! The base frame must stand on a level surface and be aligned with a spirit level. Align the mounting frame with a spirit level. ► Tighten the screws in the slot nuts. : Charging; : Use - Power bank; : Use - Power supply/Battery charger (USB) 743A211 Ottobock | 29...
-
Page 30: Initial Operation
Loosen the locking mechanism of the socket clamping fixture with the clamping lever. ► ► Remove the socket clamping fixture from the holder. ► Remove the knee bracket from the holder. ► Unscrew the star handle. ► Remove the star handle from the footplate holder. 30 | Ottobock 743A211... -
Page 31: Adjusting The Lasers
► Switch on the laser. ► Loosen the knurled screw. Adjust the anterior laser so that the laser line runs through the 0-line of the scale and the marking of the laser ► gauge. ► Tighten the knurled screw. 743A211 Ottobock | 31... - Page 32 Initial operation Loosen the knurled screw. ► ► Adjust the right laser so that the laser line runs through the marking of the laser gauge. ► Tighten the knurled screw. 32 | Ottobock 743A211...
-
Page 33: Removing The Laser Gauge
Adjust the left laser so that the laser line runs through the marking of the laser gauge. ► Tighten the knurled screw. Switch off the laser. ► 10.3 Removing the laser gauge ► Remove the laser gauge from the footplate holder. ► Place the footplate on the footplate holder. 743A211 Ottobock | 33... -
Page 34: Use
► For use of the product, also observe the instructions for use of the PROS.A. Assembly (743A200: 647H534, 743A220: 647G1000). ► For use of the product, also observe the quick reference guide of the line laser (chapter "Quick reference guide line laser" - see Page 37). 34 | Ottobock 743A211... -
Page 35: Cleaning
Required materials: Cleaning cloth, 634A58 Isopropyl Alcohol, soft cloth 1) NOTICE! Verify material compatibility! Do not remove lubricant from bearing points! Clean the product with a cleaning cloth and isopropyl alcohol. 2) Dry the product with a cloth. 743A211 Ottobock | 35... -
Page 36: Maintenance
The manufacturer will only assume liability if the product is used in accordance with the descriptions and instruc tions provided in this document (Instructions for Use). The manufacturer will not assume liability for damage caused by disregard of this document. 36 | Ottobock 743A211... -
Page 37: Appendices
Rudolf-Diesel-Str. 2a 56070 Koblenz Germany The manufacturer declares under sole responsibility that this product (LFL635-5-6(9x20)90 - 70108484) conforms to the fol lowing standards or standardised documents: EN 61000-6-3: 2007 +A1: 2011, EN 61000-6-1: 2007, EN 60825-1: 2007 743A211 Ottobock | 37... -
Page 38: List Of Pictograms Used
You can dispose of the product at any public collecting point of your town or municipality. 15.2 List of pictograms used • Read and observe this document • Protect from moisture • Laser radiation warning 38 | Ottobock 743A211... - Page 39 12.1.1 Contrôler les lasers ..........................12.2 Maintenance ............................12.3 Réparation ............................Mise au rebut ..............................Informations légales ............................14.1 Responsabilité ............................ Annexes ................................15.1 Notice abrégée Laser à ligne ........................ 15.2 Relevé des pictogrammes utilisés ......................743A211 Ottobock | 39...
-
Page 40: Mode D'emploi (Utilisateur / Technicien)
► Conservez toujours le mode d’emploi à proximité du produit. 1.1 Validité du document Ce document est valable pour le produit suivant : Référence Désignation À partir du n° de fabrication 743A211 Monture supérieure avec support pour laser 2016200001 743A211 743A211 XXXXXXXXXX Légende de la plaque signalétique ... -
Page 41: Structure Du Document
• Mise en service (consulter la page 48) • Utilisation (consulter la page 52) • Entretien (consulter la page 54) • Mise au rebut (consulter la page 54) • Chapitres principaux contenant des informations générales Annexes (consulter la page 55) • 743A211 Ottobock | 41... -
Page 42: Signification Des Consignes De Sécurité Et Des Pictogrammes
Dans ce document, des symboles et pictogrammes compréhensibles intuitivement ou à l’aide du contexte sont uti lisés. Le chapitre principal « Annexe » comporte, dans le sous-chapitre « Relevé des pictogrammes utilisés », une expli cation sur la signification des symboles et pictogrammes (consulter la page 56). 42 | Ottobock 743A211... -
Page 43: Description Du Produit
(connaissances spécifiques requises : prothétique des extrémités inférieures). La monture supérieure avec support pour laser 743A211 dispose de 3 lasers et se monte sur le châssis du PROS.A. Assembly. Les lasers projettent la ligne d’alignement sur la prothèse et permettent ainsi un positionne... -
Page 44: Caractéristiques Techniques
Plage de températures autorisées (stockage) -10 – +60 °C Plage de températures autorisées (exploitation) +5 – +40 °C Température maximum recommandée (exploitation) +22 °C Humidité relative de l’air autorisée (stockage et exploitation) 70 %, sans condensation Conditions d’environnement non autorisées Zones explosibles, environnement humide 44 | Ottobock 743A211... -
Page 45: Transport
Instructions for use (user / technician) ..............Mode d'emploi (Utilisateur / Technicien) ..............Instrucciones de uso (usuario / técnico) ..............Kullanım kılavuzu (Kullanıcı / Teknisyen) ..............Руководство по применению (для пользователей / технического персонала) ... ► Vérifiez que la livraison est complète. 743A211 Ottobock | 45... -
Page 46: Mise En Place
► Insérez, par le côté, les coulisseaux dans les profilés. ► Veillez à ce que les coulisseaux soient correctement dirigés dans les profilés. ► Déplacez les coulisseaux dans les profilés de telle sorte que leur position concorde avec celle des vis de la monture supérieure. 46 | Ottobock 743A211... - Page 47 ► AVIS! Le châssis de base doit se trouver sur un sol plat et sa position doit être ajustée avec un niveau. Ajustez la position de la monture supérieure avec un niveau. ► Vissez les vis à fond dans les coulisseaux. : Charge; : Utilisation - Power bank; : Utilisation - Bloc d’alimentation/Chargeur (USB) 743A211 Ottobock | 47...
-
Page 48: Mise En Service
Retirez le dispositif de serrage de l’emboîture du support. ► Retirez la pince de serrage du support. ► Dévissez la poignée en étoile. ► Retirez la poignée en étoile du support de la plaque de pied. 48 | Ottobock 743A211... -
Page 49: Ajuster Les Lasers
Dévissez la vis moletée. Ajustez le laser avant de telle sorte que la ligne du laser passe par la ligne 0 de l’échelle et le repère du ga ► barit pour laser. ► Vissez à fond la vis moletée. 743A211 Ottobock | 49... - Page 50 Mise en service Dévissez la vis moletée. ► ► Ajustez le laser droit de telle sorte que la ligne du laser passe par le repère du gabarit pour laser. ► Vissez à fond la vis moletée. 50 | Ottobock 743A211...
-
Page 51: Démonter Le Gabarit Pour Laser
Éteignez le laser. ► 10.3 Démonter le gabarit pour laser ► Retirez le gabarit pour laser du support de la plaque de pied. ► Posez la plaque de pied sur le support de la plaque de pied. 743A211 Ottobock | 51... -
Page 52: Utilisation
► Pour utiliser le produit, veuillez également tenir compte du mode d’emploi du PROS.A. Assembly (743A200 : 647H534, 743A220 : 647G1000). ► Pour utiliser le produit, veuillez en outre tenir compte de la notice abrégée du laser à ligne (chapitre « Notice abrégée Laser à ligne » - consulter la page 55). 52 | Ottobock 743A211... -
Page 53: Nettoyage
1) AVIS! Faites attention à la tolérance des matériaux ! Veillez impérativement à ne pas enlever le lubri fiant des roulements ! Nettoyez le produit avec un chiffon de nettoyage et de l’alcool isopropylique. 2) Séchez le produit à l’aide du chiffon. 743A211 Ottobock | 53... -
Page 54: Entretien
14.1 Responsabilité Le fabricant est responsable uniquement si le produit est utilisé conformément aux descriptions et instructions de ce document (Mode d’emploi). Le fabricant décline toute responsabilité pour les dommages découlant d’un non- respect de ce document. 54 | Ottobock 743A211... -
Page 55: Annexes
Rudolf-Diesel-Str. 2a 56070 Coblence Allemagne Le fabricant déclare sous sa seule responsabilité que le produit (LFL635-5-6(9x20)90 - 70108484) satisfait aux normes ou do cuments normatifs suivants : EN 61000-6-3: 2007 +A1: 2011, EN 61000-6-1: 2007, EN 60825-1: 2007 743A211 Ottobock | 55... -
Page 56: Relevé Des Pictogrammes Utilisés
Vous pouvez apporter le produit à chaque point de collecte public de votre ville ou commune. 15.2 Relevé des pictogrammes utilisés • Lire et respecter le document • Protéger de l'humidité • Avertissement relatif au rayon du laser 56 | Ottobock 743A211... - Page 57 Revisión de los láseres ........................12.2 Mantenimiento ............................ 12.3 Reparación ............................Eliminación ................................ Aviso legal ................................. 14.1 Responsabilidad ..........................Anexos ................................15.1 Guía breve del láser de líneas ....................... 15.2 Lista de los pictogramas utilizados ......................743A211 Ottobock | 57...
-
Page 58: Instrucciones De Uso (Usuario / Técnico)
► Guarde siempre las instrucciones de uso junto al producto. 1.1 Ámbito de aplicación del documento Este documento se aplica al siguiente producto: Referencia Denominación A partir del n.º de fábrica 743A211 Bastidor sobrepuesto con soporte de láser 2016200001 743A211 743A211 XXXXXXXXXX Leyenda de la placa de identificación... -
Page 59: Estructura Del Documento
Montaje (véase la página 64) • Puesta en marcha (véase la página 66) • Uso (véase la página 70) • Puesta a punto (véase la página 72) • Eliminación (véase la página 72) • Capítulos principales de información general Anexos (véase la página 73) • 743A211 Ottobock | 59... -
Page 60: Significado De Las Indicaciones De Seguridad Y De Los Pictogramas
En este documento se emplean símbolos y pictogramas que se entienden por sí solos o cuyo significado se infiere por el contexto. En el apartado "Lista de los pictogramas utilizados" del capítulo principal "Anexo" se incluye una explicación del significado de los símbolos y de los pictogramas (véase la página 74). 60 | Ottobock 743A211... -
Page 61: Descripción Del Producto
(conocimientos técnicos necesarios: protésica de la extremidad inferior). El bastidor sobrepuesto con soporte de láser 743A211 dispone de 3 láseres y va montado al armazón de PROS.A. Assembly. Los láseres proyectan la línea de alineamiento sobre la prótesis, permitiendo así el posicionamiento exacto de los componentes protésicos con respecto a la línea de alineamiento. -
Page 62: Datos Técnicos
Intervalo de temperaturas permitido para el funcionamiento +5 – +40 °C Temperatura máxima recomendada para el funcionamiento +22 °C Humedad del aire relativa permitida para el almacenamiento y el 70 %, sin condensación funcionamiento Condiciones ambientales no permitidas zonas potencialmente explosivas, entorno húmedo 62 | Ottobock 743A211... -
Page 63: Transporte
Mode d'emploi (Utilisateur / Technicien) ..............Instrucciones de uso (usuario / técnico) ..............Kullanım kılavuzu (Kullanıcı / Teknisyen) ..............Руководство по применению (для пользователей / технического персонала) ... ► Compruebe que el contenido incluido en el suministro esté completo. 743A211 Ottobock | 63... -
Page 64: Instalación
► Cerciórese de colocar las tuercas correderas con la orientación correcta dentro del perfil. ► Deslice las tuercas correderas por los perfiles hasta situarlas de tal manera que coincidan con las posiciones de los tornillos del bastidor sobrepuesto. 64 | Ottobock 743A211... - Page 65 ► ¡AVISO! El bastidor principal debe estar colocado sobre una base plana y nivelado con un nivel de burbuja. Nivele el bastidor sobrepuesto con un nivel de burbuja. ► Atornille los tornillos en las tuercas correderas. : Carga; : Uso - Power Bank; : Uso - Fuente de alimentación/Cargador (USB) 743A211 Ottobock | 65...
-
Page 66: Puesta En Marcha
► Saque el tensor de encajes del soporte. ► Saque la pinza de sujeción del soporte. ► Desenrosque el pomo de estrella. ► Saque el pomo de estrella del soporte de la placa para el pie. 66 | Ottobock 743A211... -
Page 67: Ajustar Los Láseres
Afloje el tornillo moleteado. Ajuste el láser delantero de tal forma que la línea del láser pase por la línea 0 de la escala y por la marca del ► calibrador del láser. ► Apriete el tornillo moleteado. 743A211 Ottobock | 67... - Page 68 Puesta en marcha Afloje el tornillo moleteado. ► ► Ajuste el láser derecho de tal forma que la línea del láser pase por la marca del calibrador del láser. ► Apriete el tornillo moleteado. 68 | Ottobock 743A211...
-
Page 69: Desmontar El Calibrador Del Láser
Apriete el tornillo moleteado. Apague el láser. ► 10.3 Desmontar el calibrador del láser ► Retire el calibrador del láser del soporte de la placa para el pie. ► Coloque la placa para el pie sobre su soporte. 743A211 Ottobock | 69... -
Page 70: Uso
► A la hora de utilizar el producto, tenga también en cuenta las instrucciones de uso de PROS.A. Assembly (743A200: 647H534, 743A220: 647G1000). ► A la hora de utilizar el producto, tenga también en cuenta la guía breve del láser de líneas (capítulo "Guía bre ve del láser de líneas" - véase la página 73). 70 | Ottobock 743A211... -
Page 71: Limpieza
1) ¡AVISO! Tenga en cuenta la compatibilidad de los materiales. No se puede eliminar el lubricante de los cojinetes. Limpie el producto con un paño de limpieza y alcohol isopropílico. 2) Seque el producto con el paño. 743A211 Ottobock | 71... -
Page 72: Puesta A Punto
El fabricante solo se hace responsable si este producto es utilizado conforme a lo descrito e indicado en este do cumento (Instrucciones de uso). El fabricante no se responsabiliza de los daños causados debido al incumplimien to de las advertencias indicadas en este documento. 72 | Ottobock 743A211... -
Page 73: Anexos
56070 Koblenz Germany El fabricante declara bajo su exclusiva responsabilidad que este producto (LFL635-5-6(9x20)90 - 70108484) cumple los requi sitos de los siguientes estándares o documentos normalizados: EN 61000-6-3: 2007 +A1: 2011, EN 61000-6-1: 2007, EN 60825-1: 2007 743A211 Ottobock | 73... -
Page 74: Lista De Los Pictogramas Utilizados
Puede entregar el producto en cualquier punto de recogida público de su ciudad o municipio. 15.2 Lista de los pictogramas utilizados • Leer y respetar el documento • Protéjase de la humedad • Aviso de rayo láser 74 | Ottobock 743A211... - Page 75 Inspektion ............................12.1.1 Prüfung der Laser ..........................12.2 Bakım ..............................12.3 Instandsetzung ........................... İmha etme ................................Rechtliche Hinweise ............................14.1 Sorumluluk ............................Ekler ..................................15.1 Lazer Hızlı Başlangıç Kılavuzu ....................... 15.2 Verzeichnis der verwendeten Piktogramme .................... 743A211 Ottobock | 75...
-
Page 76: Bu Dökümandaki Önemli Bilgiler
► Özellikle çalışma sırasında takip edilmesi gereken Güvenlik (bkz. Sayfa 79) ve Güvenlik Talimatı bölümlerini okuyunuz ► Ürünü kullanırken lütfen bu talimatı takip ediniz. 1.1 Döküman Kapsamı Bu döküman aşağıdaki ürünler için geçerlidir: Ürün kodu Tanımlama Üretim no 743A211 Lazer Ayaklı Tutacak 2016200001 743A211 743A211 XXXXXXXXXX Etiket ... -
Page 77: Dökümanın Yapısı
Ambalajdan Çıkartmak (bkz. Sayfa 81) • Konumlandırma (bkz. Sayfa 82) • • Montaj (bkz. Sayfa 82) İşletime Açma (bkz. Sayfa 84) • Kullanım (bkz. Sayfa 88) • Bakım (bkz. Sayfa 90) • İmha (bkz. Sayfa 90) • Genel Bilgileri içeren Bölüm Ek Bölüm (bkz. Sayfa 91) • 743A211 Ottobock | 77... -
Page 78: Güvenlik Talimatlarının Ve Piktogramların Anlamı
2. kısım etiketteki güvenlik talimatı ile doğrudan ilişkili olan kullanım talimatını içerir. 1.4.2 Piktogramların Anlamı Bu dökümanda kendinden açıklayıcı veya anlamları içerikten ortaya çıkan semboller ve piktogramlar kullanılır. "Ek Bölüm" "Kullanılan Piktogram Listesi" bölümünde açıklanan semboller ve piktogramları (bkz. Sayfa 92) içerir. 78 | Ottobock 743A211... -
Page 79: Ürün Açıklaması
Lazer Postür Kurulum Cihazı (743A200 /743A220), ile kullanılmak üzere tasarlanmıştır. 743A211 laser ayaklı tutacak 3 lasere sahiptir. Laser Postür Kurulum Cihazına monte edilir. Laserler, protez üzerin de kurulum referans çizgisini yansıtır böylece protez komponentlerinin kurulum referans çizgisine doğru yerleştiril... -
Page 80: Teknik Veriler
4.2 Çevre şartları İzin verilen sıcaklık aralığı (depolama) -10 – +60 °C İzin verilen sıcaklık aralığı (İşletim) +5 – +40 °C Önerilen maksimum sıcaklık (işletim) +22 °C İzin verilen bağıl nem (depolama ve işletim) 70%, donmayan izin verilmeyen çevre koşulları Potansiyel patlayıcı atmosfer, nemli ortam 80 | Ottobock 743A211... -
Page 81: Nakliye
Instructions for use (user / technician) ..............Mode d'emploi (Utilisateur / Technicien) ..............Instrucciones de uso (usuario / técnico) ..............Kullanım kılavuzu (Kullanıcı / Teknisyen) ..............Руководство по применению (для пользователей / технического персонала) ... ► Tamamlık için sevkiyatı kontrol ediniz. 743A211 Ottobock | 81... -
Page 82: Konumlandırma
► Ana gövdeye tutacağın kurulumu için gerekli malzemeleri hazırlayınız. ► Kanal sürgeçlerini bir yandan diğer yana profillerin içine geçiriniz. ► Profil içinde kanal sürgeçlerinin doğru ayarlandığından emin olunuz. ► Kanal sürgeçlerini hareket ettirerek profil içinde konumlandırınız. 82 | Ottobock 743A211... - Page 83 ► DUYURU! Ana gövde düz zemin üzerinde durmalıdır ve su terazisi ile ayarlanmalıdır. Tutacak su terazisi ile ayarlanmalıdır. ► Kanal sürgeci vidalarını sıkınız. : Şarjı; : Kullanım - Güç Deposu; : Kullanım - Adaptör parçası/Şarj cihazı (USB) 743A211 Ottobock | 83...
-
Page 84: İşletime Açma
10.1 Lazer ölçü aparatının montajı Soket tutucusunu kilit mekanizmasını sıkma kolu ile gevşetiniz. ► ► Soket tutucusunu, tutamaçtan çıkartınız. ► Diz kıskacını tutucudan çıkartınız. ► Yıldız kolunun vidalarını açınız. ► Yıldız kolunu ayak plakası tutucusundan çıkartınız. 84 | Ottobock 743A211... -
Page 85: Laserin Ayarlanması
► İşaretlemelere göre laser ölçü aparatını ayarlayınız. 10.2 Laserin Ayarlanması ► Laser'i açınız. ► Tırtıllı vidayı açınız. Anterior lazeri ayarlayınız böylece lazer çizgisi skalanın 0 noktasından ve laser ölçü aparatının işaretinden ► geçecektir. ► Tırtıllı vidayı sıkınız. 743A211 Ottobock | 85... - Page 86 İşletime Açma Tırtıllı vidayı açınız. ► ► Sağ lazeri ayarlayınız böylece lazer çizgisi lazer ölçü aparatının işaretinden geçecektir. ► Tırtıllı vidayı sıkınız. 86 | Ottobock 743A211...
-
Page 87: Lazer Ölçü Aparatının Çıkartılması
Sol lazeri ayarlayınız böylece lazer çizgisi lazer ölçü aparatının işaretinden geçecektir. ► Tırtıllı vidayı sıkınız. Lazeri kapatınız. ► 10.3 Lazer ölçü aparatının çıkartılması ► Ayak plakası tutucusundan lazer ölçü aparatını çıkartınız. ► Ayak plakası tutucusuna ayak plakasını yerleştiriniz. 743A211 Ottobock | 87... -
Page 88: Kullanım
► Lazerleri kullanmadan önce her gün kontrol ediniz ( bölüm "Lazer Kontrolü" - bkz. Sayfa 90) ► Ürünün kullanımı için ayrıca Lazer Postür Kurulum Cihazının kullanım kılavuzunu okuyunuz (743A200: 647H534, 743A220: 647G1000). ► Ürünün kullanımı için ayrıca, lazer hızlı başlangıç kılavuzunu okuyunuz (Bölüm "Lazer Hızlı Başlangıç Kılavuzu" - bkz. Sayfa 91). 88 | Ottobock 743A211... -
Page 89: Temizleme
Gerekli malzemeler: Temizleme bezi, izopropil alkol 634A58, yumuşak bez 1) DUYURU! Malzeme uyumluluğuna dikkat edin! Yatak yerlerinde her zaman yağlama maddesi bulun malıdır! Ürün temizleme bezi ve izopropil alkol ile temizlenmelidir. 2) Ürün bir bez ile kurulanmalıdır. 743A211 Ottobock | 89... -
Page 90: Instandhaltung
ülkesinin yetkili makamlarının kurallarını lütfen dikkate alınız. 14 Rechtliche Hinweise 14.1 Sorumluluk Der Hersteller haftet nur, wenn das Produkt gemäß den Beschreibungen und Anweisungen in diesem Dokument (Gebrauchsanleitung) verwendet wird. Bu dokümanın dikkate alınmamasından kaynaklanan hasarlardan üretici hiç bir sorumluluk yüklenmez. 90 | Ottobock 743A211... -
Page 91: Ekler
CE Uygunluk Açıklaması Picotronic GmbH Rudolf-Diesel-Str. 2a 56070 Koblenz Germany Bu ürünün (LFL635-5-6(9x20)90 - 70108484) aşağıdaki standartlara veya standart belgelerine uygun olduğunu kendi sorumlu luğunda beyan eder. EN 61000-6-3: 2007 +A1: 2011, EN 61000-6-1: 2007, EN 60825-1: 2007 743A211 Ottobock | 91... -
Page 92: Verzeichnis Der Verwendeten Piktogramme
EU Direktiflerine uygun olarak imha edilmelidir. Şehir veya topluluk tarafından işletilen her hangi bir kamu toplama noktasına ürünü teslim edebilirsiniz. 15.2 Verzeichnis der verwendeten Piktogramme • Dokument lesen und beachten • Vor Nässe schützen • Warnung vor Laserstrahlung 92 | Ottobock 743A211... - Page 93 Проверка лазеров ..........................12.2 Техническое обслуживание ....................... 12.3 Поддержание в исправном состоянии ....................Утилизация ..............................Правовые указания ............................14.1 Ответственность ..........................Приложения ..............................15.1 Краткое руководство по применению линейного лазера ..............15.2 Список использованных пиктограмм ....................743A211 Ottobock | 93...
-
Page 94: Важная Информация К Документу
связанные с предстоящими работами. ► Всегда храните руководство по применению рядом с изделием. 1.1 Область применения документа Данный документ распространяется на следующее изделие: Артикул Наименование Начиная с заводского номера 743A211 Дополнительная стойка с креплениями 2016200001 для лазеров 743A211 743A211 XXXXXXXXXX Пояснения... -
Page 95: Структура Документа
Установка (см. стр. 100) • Монтаж (см. стр. 100) • Ввод в эксплуатацию (см. стр. 102) • Эксплуатация (см. стр. 106) • Техническое обслуживание (см. стр. 108) • Утилизация (см. стр. 108) • Основной раздел с общей информацией Приложения (см. стр. 109) • 743A211 Ottobock | 95... -
Page 96: Значения Пиктограмм И Указаний По Технике Безопасности
В данном документе используются символы и пиктограммы, которые либо понятны сами по себе, либо их значение становится понятным из контекста. В основном разделе "Приложение" в подразделе "Перечень использованных пиктограмм" содержится объ яснение значений символов и пиктограмм (см. стр. 110). 96 | Ottobock 743A211... -
Page 97: Описание Изделия
квалифицированными техниками-ортопедами (требуемая квалификация: протезирование нижних конечно стей). Дополнительная стойка с держателями для лазеров 743A211 имеет 3 лазера. Она монтируется на стойке ап парата PROS.A. Assembly. Лазеры проецируют линию сборки на протез и, таким образом, позволяют осуще ствить точное позиционирование компонентов протеза по отношению к линии сборки. -
Page 98: Технические Характеристики
4.2 Условия применения изделия Допустимый диапазон температур (хранение) -10 – +60 °C Допустимый диапазон температур (эксплуатация) +5 – +40 °C Рекомендуемая максимальная температура (эксплуатация) +22 °C Допустимая относительная влажность воздуха (хранение и экс 70%, без конденсации влаги плуатация) Недопустимые условия применения изделия взрывоопасные зоны, влажная среда 98 | Ottobock 743A211... -
Page 99: Транспортировка
Instructions for use (user / technician) ..............Mode d'emploi (Utilisateur / Technicien) ..............Instrucciones de uso (usuario / técnico) ..............Kullanım kılavuzu (Kullanıcı / Teknisyen) ..............Руководство по применению (для пользователей / технического персонала) ... ► Проверить объем поставки на комплектность. 743A211 Ottobock | 99... -
Page 100: Установка
► Вставить установочные шпонки в профили сбоку. ► Обращать внимание на правильное размещение установочных шпонок в профиле. ► Посредством смещения расположить установочные шпонки в профиле так, чтобы их положение соответ ствовало положению болтов в дополнительной стойке. 100 | Ottobock 743A211... - Page 101 ► УВЕДОМЛЕНИЕ Основная стойка должна располагаться на ровном основании, следует отрегу лировать ее положение с помощью уровня. Отрегулировать положение дополнительной стойки с помощью уровня. ► Завинтить болты в установочные шпонки. : Зарядка; : Эксплуатация - Power Bank; : Эксплуатация - Блок питания/Зарядное устройство (USB) 743A211 Ottobock | 101...
-
Page 102: Ввод В Эксплуатацию
10.1 Монтаж лазерного шаблона С помощью зажимного рычага ослабить фиксацию держателя гильзы. ► ► Извлечь держатель гильзы из крепления. ► Извлечь зажимную цангу из крепления. ► Вывернуть ручку-грибок. ► Извлечь ручку-грибок из крепления для подошвенной пластины. 102 | Ottobock 743A211... -
Page 103: Юстировка Лазера
10.2 Юстировка лазера ► Включить лазер. ► Ослабить болт с накатанной головкой. Отрегулировать передний лазер таким образом, чтобы линия лазера проходила через нулевую линию ► шкалы и маркировку лазерного шаблона. ► Закрутить болт с накатанной головкой. 743A211 Ottobock | 103... - Page 104 Ввод в эксплуатацию Ослабить болт с накатанной головкой. ► ► Отрегулировать правый лазер таким образом, чтобы линия лазера проходила через нулевую линию шкалы и маркировку лазерного шаблона. ► Закрутить болт с накатанной головкой. 104 | Ottobock 743A211...
-
Page 105: Демонтаж Лазерного Шаблона
шкалы и маркировку лазерного шаблона. ► Закрутить болт с накатанной головкой. Выключить лазер. ► 10.3 Демонтаж лазерного шаблона ► Снять лазерный шаблон с крепления для подошвенной пластины. ► Установить подошвенную пластину в крепление для подошвенной пластины. 743A211 Ottobock | 105... -
Page 106: Эксплуатация
нию аппарата PROS.A. Assembly (743A200: 647H534, 743A220: 647G1000). ► При использовании изделия следует также обращать внимание на указания, приведенные в кратком ру ководстве по применению линейного лазера (раздел "Краткое руководство по применению линейного ла зера" - см. стр. 109. 106 | Ottobock 743A211... -
Page 107: Очистка
Необходимые материалы: Очищающая салфетка, изопропиловый спирт 634A58, мягкая ткань 1) УВЕДОМЛЕНИЕ Обращать внимание на переносимость материалов! Из мест установки подшип ников не должна вытекать смазка! Очищать изделие с помощью очищающей салфетки и изопропилового спирта. 2) Изделие следует вытирать насухо с помощью ткани. 743A211 Ottobock | 107... -
Page 108: Поддержание В Исправном Состоянии
14.1 Ответственность Производитель несет ответственность в том случае, если изделие используется в соответствии с описаниями и указаниями, приведенными в данном документе (руководство по применению). Производитель не несет от ветственности за ущерб, возникший вследствие пренебрежения положениями данного документа. 108 | Ottobock 743A211... -
Page 109: Приложения
Picotronic GmbH Rudolf-Diesel-Str. 2a 56070 Koblenz Germany (Кобленц/Германия) Производитель заявляет под собственную ответственность, что данный продукт (LFL635-5-6(9x20)90 - 70108484) соот ветствует следующим стандартам или стандартизированным документам: EN 61000-6-3: 2007 +A1: 2011, EN 61000-6-1: 2007, EN 60825-1: 2007 743A211 Ottobock | 109... -
Page 110: Список Использованных Пиктограмм
ния должны быть утилизованы надлежащим образом. Вы можете сдать изделие в любом общественном пункте сбора ва шего города или населенного пункта. 15.2 Список использованных пиктограмм • Прочитать и следовать положениям документа • Беречь от влаги • Предупреждение о лазерном излучении 110 | Ottobock 743A211... - Page 111 743A211 Ottobock | 111...
- Page 112 Legal Manufacturer Jos America Machines B.V. Mandenmaker 14 · 5253 RC Nieuwkuijk · Netherlands T +31 73 511 9123 · F +31 73 511 5097 info@josamerica.com · www.ottobock-josamerica.com Ottobock has a certified Quality Management System in accordance with ISO 13485.
Need help?
Do you have a question about the 743A211 and is the answer not in the manual?
Questions and answers