
Subscribe to Our Youtube Channel
Related Manuals for Image Engineering LED-Panel V5


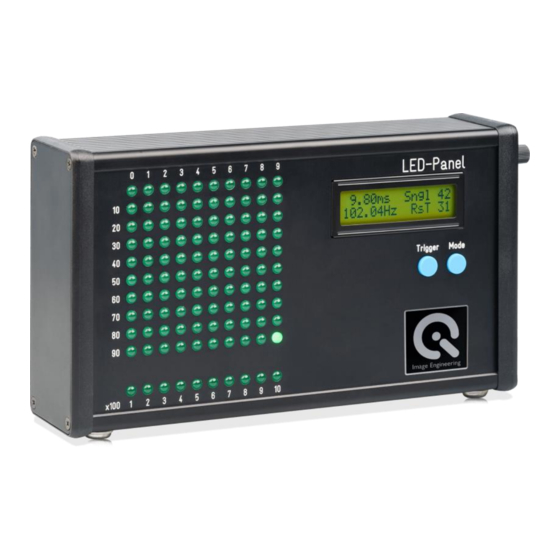
Summary of Contents for Image Engineering LED-Panel V5
- Page 1 LED-Panel V5 User Manual 10. May 2022 Image Engineering GmbH & Co. KG · Im Gleisdreieck 5 · 50169 Kerpen-Horrem · Germany T +49 2273 99991 - 0 · F +49 2273 99991 -10 · www.image-engineering.com...
-
Page 2: Table Of Contents
5.4 Software activation ....................17 5.5 Software description....................18 5.5.1 File list ....................... 19 5.5.2 Control panel ..................... 20 Analysis ..........................20 LED-Panel ..........................20 iQ-Trigger ..........................21 5.5.3 Image view ......................22 5.5.4 Metadata ......................22 5.5.5 Results ......................23 Image Engineering Seite 2 von 45... - Page 3 6.2.30 Set post roll time (LED-Panel V5 and V4 only) ..........42 6.2.31 Set the intensity of the LED array (LED-Panel V5 only) ......... 42 6.2.32 Get the intensity of the LED array (LED-Panel V5 only) ........ 43 ADDITIONAL INFORMATION ..................44 7.1 Disposal instructions ....................
-
Page 4: Introduction
Keep these instructions in a safe place and pass them to any future user. 1.1 Intended use LED-Panel V5 is designed to perform timing measurements on digital cameras. Measurements according to ISO 15739 are possible with LED-Panel V5. •... -
Page 5: Foreseeable Misuse
1.2 Foreseeable missuse 1.2.1 Older LED-Panel verisons Most parts of this manual apply to LED-Panel V4. Please contact Image Engineering to request a manual from a previous version of the LED-Panel. 1.3 General safety information Do not open the device without any instructions from the Image Engineering support or when connected to the power supply. -
Page 6: Operating Instructions Hardware
3 OPERATING INSTRUCTIONS HARDWARE 3.1 Set up hardware Connect the power cord to the power supply on LED-Panel V5. Connect the power supply to electricity. Switch on LED-Panel V5 by setting the power switch to “I.” The power switch is located beside the power supply. -
Page 7: Trigger Mode
LED “600” in the lower row. The LED-Panel V5 can be operated manually or via software (USB interface). Please refer to chapter 3.3 for information about control software. 3.2.1 Trigger mode The LED-Panel V5 can be operated manually using either an external (single) or internal (continuous) trigger. -
Page 8: Setting Mode And Time
The brightness of the display can be modified by using the rotary knob. Press and hold the rotary knob until the message "Set brightness" and "LED xx LCD xx" are shown on the display. Seite 8 von 45 Image Engineering... -
Page 9: Measurement Methods
Due to the two buttons having different release points, a time lag can occur between starting the LED-Panel and releasing the camera. We offer an optional device that is guaranteed to push both buttons (microswitch and camera release button) in less than 5 ms. This device – iQ- Seite 9 von 45 Image Engineering... -
Page 10: Shutter Lag With Autofocus Time
The autofocus time can be calculated as the difference between shutter lag with autofocus time (Figure 4) and shutter lag without autofocus time (Figure 3). Autofocus time = (shutter lag with autofocus time) – (shutter lag without autofocus time) Seite 10 von 45 Image Engineering... -
Page 11: Exposure Time
Exposure times of cameras can be measured with the aid of the LED-Panel. When setting the LED-Panel to CONTINUOUS trigger mode and adjusting the time, a picture of the LED-Panel is taken. The exposure time can be read by analyzing the lit LEDs. Seite 11 von 45 Image Engineering... -
Page 12: Video Recording Rate / Frame Rate
LEDs stops blinking on the camera display. The LED-Panel has now matched the frame rate of the camera. The manual frequency scan should be started at the lowest level because the frame rate frequency harmonics also cause the LEDs to stop blinking. Seite 12 von 45 Image Engineering... -
Page 13: Speed Of Multi-Shot Mode
Afterward, pictures of the LED-Panel are taken in multi-shot mode. The speed of multi- shot mode can be calculated from a distance between the live LEDs in two consecutive images. Figure 8 Figure 7 Seite 13 von 45 Image Engineering... -
Page 14: Rolling Shutter Speed
The time can be read from this offset, which is required to read out the LED-Panel image. For this measurement, we recommend framing the field of the LEDs in the image so that they fill the whole image height. Seite 14 von 45 Image Engineering... - Page 15 Figure 11 Figure 11a In the rolling shutter mode, all ten rows of LEDs In case of a rolling shutter effect an off set of are operated simultaneously the LED rows is visible. Seite 15 von 45 Image Engineering...
- Page 16 For detailed information on setting up two LED-Panels with your device under test, please see the following two infographics. Figure 12: internal wiring Figure 13: setting up for timing measurement Seite 16 von 45 Image Engineering...
-
Page 17: Operating Instructions Software
Unless you changed the default installation path, you will find the directory “Image Engineering\LED-Panel <version number>” in your “Program Files” folder after a successful installation. Additionally a directory “Image Engineering\LED-Panel” is created in <root>\Users\<username>\AppData\Roaming (example: C:\Users\John_Doe\AppData\Roaming\Image Engineering) to store application settings. -
Page 18: Software Description
ISO 15781. The software supports all standard image file formats like JPEG, PNG, TIFF, and BMP. The analysis results can be saved as plain text (*.txt) and/or XML files for further processing. Note: Software-based analysis is only available for LED-Panel V5 and LED-Panel V4. Figure 15 Seite 18 von 45... -
Page 19: File List
The icon next to the file name indicates the current image status. There are three different states: Figure 16 Image not yet processed Image successfully processed Detection failed or an error occurred during analysis (a message box will show up with further details) Seite 19 von 45 Image Engineering... -
Page 20: Control Panel
The set frequency is used to calculate the time shown by the LED-Panel in your images. For further details on measuring different camera timings, please refer to chapter 5 and ISO 15781. Note: Ensure that the frequency setting matches the device setting used when capturing your images. LED-Panel Figure 18 Seite 20 von 45 Image Engineering... -
Page 21: Iq-Trigger
(touch screen or hardware button) precisely and at defined moments. Seite 21 von 45 Image Engineering... -
Page 22: Image View
The metadata panel (Figure 21) gives a quick overview of important camera and lens settings such as ISO speed or focal length. The metadata of each image will also be written into the results file. Seite 22 von 45 Image Engineering... -
Page 23: Results
Image preview: shows a thumbnail image when the mouse hovers over the file list Figure 23 (Figure 23) Expand/Collapse: expands or collapses file list and results Help About…: shows general information about the application Seite 23 von 45 Image Engineering... -
Page 24: Export Results
LEDs due to noise or other artifacts in the image. • Align the LED-Panel device properly. Images with rotated or tilted devices may result in a false or failed detection. • Please ensure that the whole device is visible in the image. Seite 24 von 45 Image Engineering... - Page 25 Now you can see the detected LEDs in the image view (Figure 15, ③). On the right side, the results will appear, and they will be written into result files in the selected folder. Seite 25 von 45 Image Engineering...
-
Page 26: Command Line Interface (Cli)
PC via USB. The commands are command-line based, and the command-line consists of an executable file along with the function and, if applicable, a parameter, all separated by white spaces. The executable file is always LED-Panel.exe and can be used without file extension .exe. Seite 26 von 45 Image Engineering... -
Page 27: Operation Functions
Examples (addressing an LED-Panel with the serial number LP40001): LED-Panel.exe –serial LP40001 LED-Panel –serial LP40001 6.2 Operation Functions 6.2.1 Set Operation Mode Function setMode <mode> Description “LED-Panel.exe -setMode <mode>” sets the operation mode Seite 27 von 45 Image Engineering... -
Page 28: Get Operation Mode
6.2.2 Get Operat on Mode Function getMode Description “LED-Panel.exe -getMode” returns the current operation mode. Return parameters Return value Description Response time measurement Exposure time measurement Frame rate measurement Rolling shutter mode All LEDs on Seite 28 von 45 Image Engineering... -
Page 29: Set Trigger Mode
Example LED-Panel.exe -setTriggerMode 1 After the execution of this command, the LED-Panel will change into the internal (continuous) trigger mode. 6.2.4 Get Trigger Mode Function getTriggerMode Description “LED-Panel.exe -getTriggerMode” returns the current trigger mode Seite 29 von 45 Image Engineering... -
Page 30: Set Leds Switching Time
0.01[s] 1.0 - 9.9 steps of 0.1[s] Frame Rate Mode Value range LED-Panel V5: 1.0 - 200.0[Hz] steps of 0.1[Hz] steps of 0.1 – 0.2 – 0.5[Hz] Value range LED-Panel V4: 1.0 - 100.0[Hz] Seite 30 von 45... -
Page 31: Get Leds Switching Time
6.2.7 Start Measurement Function start Description “LED-Panel.exe -start” starts the measurement, ignoring the camera trigger input from the camera microswitch. 6.2.8 Stop Measurement Function stop Description “LED-Panel.exe -stop” stops the measurement without resetting the LEDs. Seite 31 von 45 Image Engineering... -
Page 32: Get Running State
After the execution of the command, the device will return the value 0 or 1, representing the current measurement state. 6.2.10 Reset Measurement Function reset Description “LED-Panel.exe -reset” clears all the lighting LEDs and prepares the device for a new measurement. 6.2.11 Get Camera Trigger Input State Function getCameraTrigger Seite 32 von 45 Image Engineering... -
Page 33: Get Stop Trigger Input State
6.2.13 Get the Number of Currently Activated LED Function getCurrentLED Description With the function “LED-Panel.exe -getCurrentLED,” it is possible to read which LED is currently turned on. The number of switching periods occurred after activating the “Camera Trigger” input. Seite 33 von 45 Image Engineering... -
Page 34: Put The Led-Panel In Sleep Mode, Wake From Sleep Mode
“LED-Panel.exe -setSleepMode 0” wakes the device from sleep mode. 6.2.15 Enable / Disable the external input “Camera Trigger” Function setCameraTrigger <enable> Description With the function “LED-Panel.exe setcamtriggeren <enable>,” it is possible to activate or deactivate the external (wired) input “Camera Trigger.” Seite 34 von 45 Image Engineering... -
Page 35: Get The Enabled / Disabled State Of The External Input "Camera Trigger
“Camera Trigger.” Return parameters Return value Description digital input “Camera Trigger” disabled digital input “Camera Trigger” enabled Table 5 6.2.17 Enable / Disable the external input “Stop Trigger” Function setStopTrigger <enable> Description Seite 35 von 45 Image Engineering... -
Page 36: Get The Enabled / Disabled State Of The External Input "Stop Trigger
6.2.19 Set the Intensity of the Display Backlight Function setDisplayBrightness <XXX> Description With the function “LED-Panel.exe -setDisplayBrightness <XXX>,” the backlight illumination of the LCD display light can be changed in 1% steps from 0% to 100%. Seite 36 von 45 Image Engineering... -
Page 37: Get The Intensity Of The Display Backlight
There are eight possible directions. Parameters <X> Description Starting from the top left, run from left to right and to the bottom Starting from the top right, run from right to left and to the bottom Seite 37 von 45 Image Engineering... -
Page 38: Get The Direction Of The Leds For "Response Time" And "Exposure Time" Modes
(each one consisting of ten LEDs). There are four possible directions. Parameters <value> Description The column moves from left to right The column moves from right to left The column moves from top to bottom Seite 38 von 45 Image Engineering... -
Page 39: Get The Direction Of The Leds For "Rolling Shutter" Mode
[s] 1/100000 1/1600 1/64 0.8s 1/80000 1/1500 1/60 1/64000 1/1300 1/50 1.25s 1/50000 1/1250 1/40 1.3s 1/40000 1/1000 1/32 1.5s 1/32000 1/800 1/30 1.6s 1/25000 1/640 1/25 1/20000 1/600 1/20 2.5s 1/16000 1/500 1/16 Seite 39 von 45 Image Engineering... -
Page 40: Get Leds Switching Time For The "Exposure Time" Mode
XX of the switching time, where XX is the value of the switching time from Table 3. For instance: Return value 17 means that the switching time is 1/3200s. 6.2.27 Trigger iQ-Trigger (LED-Panel V5 and V4 only) Function setTrigger... -
Page 41: Trigger Iq-Defocus (Led-Panel V5 And V4 Only)
If an iQ-Defocus is connected to the LED-Panel, it can be triggered by using “LED-Panel - setDefocus <mode> -setDefocus <duration>.” For the parameters, please see the iQ-Defocus user manual. 6.2.29 Set auto release (LED-Panel V5 and V4 only) Function setAutoRelease... -
Page 42: Set Post Roll Time (Led-Panel V5 And V4 Only)
If “LED-Panel -setAutoRelease 1,” the LED-Panel releases the iQ-Trigger at the 50th LED. <mode> Description 6.2.30 Set post roll time (LED-Panel V5 and V4 only) Function setPostRollTime Description The LED-Panel keeps running for a certain time after triggering the iQ-Trigger using “LED- Panel -setPostRollTime <duration>.”... -
Page 43: Get The Intensity Of The Led Array (Led-Panel V5 Only)
6.2.32 Get the Intensity of the LED-array (LED-Panel V5 only) Function getLedBrightness Description With the function “LED-Panel.exe -getLedBrightness,” it is possible to read the intensity of the LED array. Return Parameters After executing the function “LED-Panel.exe -getLedBrightness,” the device will return a one-, two- or three-digits value of the LED-array brightness in counts. -
Page 44: Additional Information
LED-Panel. Observe your national regulations, and ensure that third parties cannot use the LED-Panel after disposing of it. Contact Image Engineering if assistance for disposal is required. 8 TECHNICAL DATA SHEET See annex for the technical data sheet. It can also be downloaded from the website of Image Engineering at: www.image-engineering.com. -
Page 45: Trademark And Copyright
& CO. KG SHALL HAVE NO LIABILITY, REGARDLESS OF WHETHER SUCH USE IS LAWFUL OR FORSEEABLE. IMAGE ENGINEERING GMBH & CO. KG SHALL HAVE NO LIABILITY FOR ANY DATA OR PROGRAMS STORED BY OR USED WITH THIS SOFTWARE, INCLUDING THE COSTS OF RECOVERING SUCH DATA OR PROGRAMS.
Need help?
Do you have a question about the LED-Panel V5 and is the answer not in the manual?
Questions and answers