
Subscribe to Our Youtube Channel
Related Manuals for Extron electronics PowerCage 401


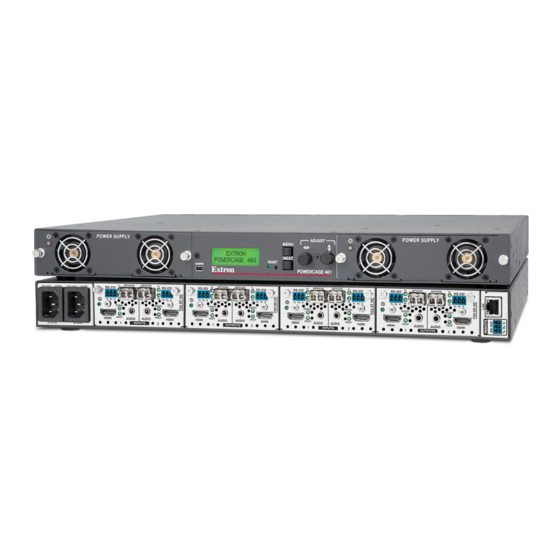
Summary of Contents for Extron electronics PowerCage 401
- Page 1 User Guide Fiber Optic Products PowerCage 401 Enclosure Modular Power Enclosure for Fiber Optic Extenders 68-2640-01 Rev. Ex1 11 21...
- Page 2 Safety Instructions Safety Instructions • English Instructions de sécurité • Français AVERTISSEMENT : Ce pictogramme, , lorsqu’il est utilisé sur le WARNING: This symbol, , when used on the product, is intended to produit, signale à l’utilisateur la présence à l’intérieur du boîtier du alert the user of the presence of uninsulated dangerous voltage within produit d’une tension électrique dangereuse susceptible de provoquer the product’s enclosure that may present a risk of electric shock.
- Page 3 • 安全说明 简体中文 警告: 产品上的这个标志意在警告用户, 该产品机壳内有暴露的危险 电压, 有触电危险。 注意: 产品上的这个标志意在提示用户, 设备随附的用户手册中有重 要的操作和维护(维修)说明。 关于我们产品的安全指南、遵循的规范、EMI/EMF 的兼容性、无障碍使 用的特性等相关内容, 敬请访问 Extron 网站 , www.extron.com,参见 Extron 安全规范指南,产品编号 。 68-290-01 安全記事 • 繁體中文 안전 지침 • 한국어 경고: 이 기호 가 제품에 사용될 경우, 제품의 인클로저 내에 있는 警告: 若產品上使用此符號,...
- Page 4 FCC Class A Notice This equipment has been tested and found to comply with the limits for a Class A digital device, pursuant to part 15 of the FCC rules. The Class A limits provide reasonable protection against harmful interference when the equipment is operated in a commercial environment.
- Page 5 Class 1 Laser Product Any service to this product must be carried out by Extron and its qualified service personnel. CAUTION: Using controls, making adjustments, or performing procedures in a manner other than what is specified herein may result in hazardous radiation exposure. NOTE: For more information on safety guidelines, regulatory compliances, EMI/ EMF compatibility, accessibility, and related topics, see the Extron Safety and...
- Page 6 Conventions Used in this Guide Notifications The following notifications are used in this guide: WARNING: Potential risk of severe injury or death. AVERTISSEMENT : Risque potentiel de blessure grave ou de mort. CAUTION: Risk of minor personal injury. ATTENTION : Risque de blessure mineure.
-
Page 7: Table Of Contents
Captive Screw Insertion (Default)....10 System Overview ........... 38 Ethernet Insertion .......... 11 Communication Settings ........ 39 Resetting the PowerCage 401 Enclosure with the Device Info ............. 40 Reset Button ............ 14 Date/Time Settings ........42 Power-up and Default Cycle ......16 Passwords............. - Page 8 PowerCage 401 Enclosure • Contents viii...
-
Page 9: Introduction
• PowerCage 401, PowerCage 411, and PowerCage 1600 boards and power supplies are not compatible between the two different enclosures. Les alimentations et les cartes PowerCage 411, PowerCage 401, et PowerCage • 1600 ne sont pas compatibles entre les deux différents boîtiers. PowerCage 401 Enclosure • Introduction... -
Page 10: Features
PowerCage 401, PowerCage 411, and PowerCage 1600 enclosures. They are not compatible with each other. • Les composants ne doivent en aucun cas être échangés entre les boîtiers PowerCage 401, PowerCage 411, et PowerCage 1600. Ces unités ne sont pas compatibles. Features PowerCage 401 Enclosure and System ... -
Page 11: Application Example
-S G SWITCHED 12 VDC eBUS 40W MAX TOTAL (18.75 miles) PowerCage 401 FOX DT HD Tx R x G Tx R x G Tx R x G Tx R x G RTS CTS 5A MAX 12 VDC IR/SERIAL RELAYS... -
Page 12: Installation
Installing the Transmitter and Receiver Boards into the Enclosure • Mounting Instructions Mounting the PowerCage 401 Enclosure on page 44 for mounting instructions. Heed the following safety information when installing or servicing the PowerCage system: CAUTION: Shock Hazard. Disconnect both power supply cords before servicing. -
Page 13: Cabling And Testing
Power connector 2 — Connect this port to a 110-240 VAC, 50-60 Hz power source using a standard IEC power cord. Slot 1 — Install a PowerCage 401-compatible board into slot 1. Slot 2 — Install a PowerCage 401-compatible board into slot 2. -
Page 14: Installing The Transmitter And Receiver Boards Into The Enclosure
Push the board completely into the slot and finger-tighten the two top screws while pushing in the screws to secure the board in place. PowerCage 401 Enclosure • Installation... - Page 15 Figure 3. Inserting Boards into the PowerCage Enclosure Repeat step 2 for all boards needing installation. NOTE: Cover all empty board slots. Do not leave them open. Securely fasten the screws for boards and blank panels. PowerCage 401 Enclosure • Installation...
-
Page 16: Operation
Operation The following topics are covered in this section of the guide: Front Panel Features • • Resetting the PowerCage 401 Enclosure with the Reset Button RS-232 Insertion • • Power-up and Default Cycle • Menus, Configuration, and Adjustments Front Panel Features The front panel of the PowerCage 401 provides a variety of light emitting diode (LED) status... - Page 17 In the event of a complete system reset, the Passwords passwords convert to the default, which is no password (see page 43 to change a password). Menu navigation button — Press Menu to access the PowerCage 401 menu system (see Menus, Configuration, and Adjustments). Next navigation button —...
-
Page 18: Insertion
RS-232 Insertion A user can connect a control system to the PowerCage 401 to send and receive RS-232 data over the fiber or the captive screw port of the installed transmitter and receiver cards. The frame has two UARTs per slot and when a dual transmitter or receiver module is installed, the RS-232 signal from each UART is routed to one of the fiber or captive screw ports on the card. -
Page 19: Ethernet Insertion
Bidirectional Fiber System Diagram Ethernet Insertion A user can have a LAN connection from a control system to the PowerCage 401 enclosure LAN port and send RS-232 signals to the connected endpoint for control of a source or display. The user must configure the endpoint for Ethernet to Fiber RS-232 Insertion via PCS. - Page 20 Ethernet to fiber insertion Use a LAN connection from a control system to the PowerCage 401 enclosure LAN port to send RS-232 signals to the connected endpoint for control of a source or display. The user must configure the endpoint for Ethernet to Fiber RS-232 Insertion via PCS.
- Page 21 Open an associated UART port to send serial data to its captive screw connector. The control system connects via LAN port to the PowerCage 401 enclosure LAN port. The device being controlled connects to the selected RS-232 captive screw port of that same unit.
-
Page 22: Resetting The Powercage 401 Enclosure With The Reset Button
Figure 9. Resetting the PowerCage 401 NOTES: After a mode 1 reset is performed, update the firmware for the PowerCage 401 to • the latest version. Do not operate the firmware version that results from the mode 1 reset. If the factory default firmware is to be used, that version must be uploaded again. - Page 23 PowerCage 401 Reset Mode Summary Mode Activation Result Purpose/Notes Hold down the recessed Reset The PowerCage 401 reverts to Use mode 1 to revert back the factory default firmware for button for 30 seconds while applying to factory default firmware a single power cycle.
-
Page 24: Power-Up And Default Cycle
Power-up and Default Cycle When you first plug the Powercage 401 into a power source, the LCD screen displays an initial screen, which contains the product name, model, and firmware version. This is followed by the default cycle of screens showing the current configuration of the four slots. -
Page 25: Main Menu
Your adjustments remain in effect until you change them or reset the unit to factory defaults (see Resetting the PowerCage 401 Enclosure with the Reset Button on page 14). NOTE: The menus time out and the default cycle displays after 30 seconds of inactivity. -
Page 26: Slot Menu
Rotate the horizontal Adjust ([) knob to select an input or output, and the vertical Adjust knob ({) to adjust the setting. NOTE: From any menu or submenu, the Powercage 401 saves all adjustment settings and times out to the default screens after 30 seconds of inactivity. -
Page 27: Frame Status Menu
°F and °C. RESETTING HOLD MENU if reset See the Note below. Next Factory reset To reset the PowerCage 401 Figure 13. Frame Status Menu Flowchart enclosure to the factory defaults, press down the button for 5 Menu seconds. -
Page 28: View Comm Settings Menu
EXIT MENU SETTINGS gateway address. Next Serial port SERIAL PORT Menu The baud rate and communication 9600 RS232 type of the PowerCage 401 Next enclosure. MAC ADDRESS MAC address Menu 0005A6003C24 The MAC address of the Next enclosure. DHCP MODE... -
Page 29: Exit Menu
Exit Menu Exit menu allows you to return to the slot menu or to the default cycle. Exit Menu EXIT MENU? Menu SLOT MENU PRESS NEXT Next DEFAULT CYCLE Figure 15. Exit Menu Flowchart PowerCage 401 Enclosure • Operation... -
Page 30: Sis Configuration And Control
When the PowerCage 401 determines that a command is valid, it executes the command and sends a response to the host device. All responses from the PowerCage 401 to the host end with a carriage return and a line feed (CR/LF = ), indicating the end of the response character string (one or more characters). -
Page 31: Error Responses
Error Responses When the PowerCage 401 enclosure receives an SIS command and determines that it is valid, it performs the command and sends the corresponding response to the host device. If the command is determined invalid or contains invalid parameters, the Powercage 401 enclosure returns an error response to the host. -
Page 32: Sis Overview
ASCII to Hexadecimal Conversion Verbose Mode The connection to a PowerCage 401 can be used to monitor for changes that occur on the switcher, such as front panel operations and SIS commands from a TCP/IP connection or the RS-232 serial port. To receive change notices from the PowerCage 401, you must... -
Page 33: Command And Response Tables For Sis Commands
= Subnet mask (xxx.xxx.xxx.xxx). Leading zeros in each of 4 fields are optional in setting values and are suppressed in returned values. = Gateway address ( xxx.xxx.xxx.xxx). Default is 0.0.0.0. = Hardware (MAC) address (00-05-A6-xx-xx-xx) • = Space PowerCage 401 Enclosure • SIS Configuration and Control... - Page 34 KEY: = IP address (xxx.xxx.xxx.xxx). Leading zeros in each of 4 fields are optional in setting values and are suppressed in returned values. Factory Default IP address (when DHCP is off): 192.168.254.254 PowerCage 401 Enclosure • SIS Configuration and Control...
- Page 35 = SNMP contact name text, up to 64 characters (default = Not Specified) KEY: X1& = SNMP location, up to 64 characters (default = Not Specified) = SNMP public password, up to 64 characters (default = public) PowerCage 401 Enclosure • SIS Configuration and Control...
- Page 36 Combination of model name and last 3 pairs of MAC address. X2& 0 = clear/none, 1 = verbose mode, 2 = tagged response for queries = Verbose/response mode 3 = verbose mode and tagged responses for queries PowerCage 401 Enclosure • SIS Configuration and Control...
- Page 37 = Internal temperature in degrees Fahrenheit and Celsius: xxxF•xxC KEY: Query model name PowerCage • Verbose mode 2/3 Inf01*PowerCage • Query model description 2I Modular PowerCage • • Enclosure PowerCage Enclosure Inf02*Modular • • Verbose mode 2/3 PowerCage 401 Enclosure • SIS Configuration and Control...
- Page 38 A blinking green LED means the power supply is functioning, but either fan is not functioning. • • A blinking red LED means the power supply failed, but either fan is not functioning. PowerCage 401 Enclosure • SIS Configuration and Control...
- Page 39 NOTE: Changes made to IP Address, Subnet Mask, DHCP, and/or Gateway Address do not take effect until the 2BOOT command is issued, except for changes made via the CISG command (which takes place immediately and does not require rebooting). PowerCage 401 Enclosure • SIS Configuration and Control...
-
Page 40: Configuration Software
SIS commands. This section describes the software installation and communication. For detailed information about configuring the device with PCS, see the PowerCage 401 Help file. Topics in this section include: •... -
Page 41: Software Connection
Open the Product Configuration Software program from the Start menu or desktop shortcut. The Extron PCS window (see figure 20) opens to the Device Discovery panel. Connect to the device using the Device Discovery panel or the TCP/IP panel. Figure 20. PCS Window PowerCage 401 Enclosure • Configuration Software... -
Page 42: Device Discovery Panel
• Verify the current version of PCS supports the desired device by reviewing the software Release Notes, also available on the Extron website. Offline device configuration is not supported with the PowerCage 401, but the configuration screens and panels can still be viewed. -
Page 43: Tcp/Ip Panel
However, settings cannot be changed. To open a device tab: In the Start-up drop-down list, select New Configuration File. The New Configuration File dialog box opens (see figure 24 on the next page). Figure 23. Start-up Drop-Down List PowerCage 401 Enclosure • Configuration Software... -
Page 44: Help File Access
Figure 24. New Configuration File Dialog Box (PowerCage 401 Selected) Select the desired device model from the Device Models list (see figure 24, Click the Configure button ( ). A new offline device configuration tab opens. Help File Access PCS (Product Configuration Software) contains two help files: one for PCS and one for the connected device. -
Page 45: Internal Web Page
Web Page Access To access the internal web page, perform the following: Connect the PowerCage 401 to a LAN or WAN through the rear panel LAN (RJ-45) port using a web browser. NOTE: If the Ethernet connection to the PowerCage 401 is unstable, try turning off the proxy server in the browser. -
Page 46: Web Page Overview
There are four card slots: slot 1, slot 2, slot 3, and slot 4. The status of each card slot is either the card model name of the installed card or (-) if no card is installed. PowerCage 401 Enclosure • Internal Web Page... -
Page 47: Communication Settings
The IP address is set to 192.168.254.254. • The subnet mask is set to 255.255.0.0. • The default gateway is set to 0.0.0.0. • To cancel pending changes: Click the Cancel button. The dialog box closes. PowerCage 401 Enclosure • Internal Web Page... -
Page 48: Device Info
To reset the name to the default value: Click the Reset to Default button. Click the Apply button. The dialog box closes. To cancel pending changes: Click the Cancel button. The dialog box closes. PowerCage 401 Enclosure • Internal Web Page... - Page 49 The File Upload dialog box closes. Click the Upload button. The Card Firmware Update dialog box closes. To cancel pending changes: Click the Cancel button. The dialog box closes. Figure 33. Card Firmware Update Dialog Box PowerCage 401 Enclosure • Internal Web Page...
-
Page 50: Date/Time Settings
To set the time, click the up and down arrow buttons for each field to set the hours, minutes, seconds, and AM or PM as desired. Click the Apply button. The dialog box closes. To cancel pending changes: Click the Cancel button. The dialog box closes. PowerCage 401 Enclosure • Internal Web Page... -
Page 51: Passwords
In the corresponding Confirm Password field, press the <Space> key on the keyboard. Click the Apply button. The dialog box closes. To cancel pending changes: Click the Cancel button. The dialog box closes. PowerCage 401 Enclosure • Internal Web Page... -
Page 52: Reference Information
• Firmware Download Mounting the PowerCage 401 Enclosure The PowerCage 401 enclosure can be mounted on a tabletop, mounted to a rack, or mounted under furniture. Tabletop Mounting Attach the provided rubber feet to the bottom four corners of the enclosure. - Page 53 Mise à la terre — Assurez-vous que l’équipement est correctement mis à la terre. • Accordez une attention particulière aux connexions électriques autres que les connexions directes au circuit de dérivation (ex. : les multiprises). PowerCage 401 Enclosure • Reference Information...
-
Page 54: Rack Mounting
Secure the enclosure to the rack using the supplied bolts and washers. t r o N FI MBD 149 Mounting Bracket Figure 38. Rack Mounting the PowerCage 401 to a 19-inch Rack PowerCage 401 Enclosure • Reference Information... -
Page 55: Under-Furniture Mounting
(see for part numbers). Follow the instructions provided with www.extron.com the kit. t r o N FI MBU 149 Mounting Bracket Figure 39. PowerCage 401 with Optional MBU 149 PowerCage 401 POWER SUPPLY POWER SUPPLY ADJUST MENU NEXT RESET CONFIG... -
Page 56: Firmware Download
Firmware Download If updated firmware is available for the PowerCage 401 enclosure, download it to a computer from the Extron website. Figure 41. Downloading Firmware from the Extron Website On the Extron website, mouse over the Download tab (see figure 41, From the drop-down list, click the Firmware link ( Click the P link from the alphabetic navigation bar (see figure 42 ) . - Page 57 Extron makes no further warranties either expressed or implied with respect to the product and its quality, performance, merchantability, or fitness for any particular use. In no event will Extron Electronics be liable for direct, indirect, or consequential damages resulting from any defect in this product even if Extron Electronics has been advised of such damage.
Need help?
Do you have a question about the PowerCage 401 and is the answer not in the manual?
Questions and answers