Table of Contents
Advertisement
Quick Links
Extron Electronics, USA
Extron Electronics, Europe
1230 South Lewis Street
Beeldschermweg 6C
Anaheim, CA 92805
3821 AH Amersfoort
USA
The Netherlands
714.491.1500
+31.33.453.4040
www.extron.com
Fax 714.491.1517
Fax +31.33.453.4050
© 2005 Extron Electronics. All rights reserved.
Extron Electronics, Asia
Extron Electronics, Japan
135 Joo Seng Road, #04-01
Kyodo Building
PM Industrial Building
16 Ichibancho
Singapore 368363
Chiyoda-ku, Tokyo 102-0082 Japan
+65.6383.4400
+81.3.3511.7655
Fax +65.6383.4664
Fax +81.3.3511.7656
Installation and Maintenance Manual
Motorized Hideaway Surface Access Enclosure
Preliminary
HSA 822MS
68-617-04 Rev. Ax1
03 05
Advertisement
Table of Contents

Subscribe to Our Youtube Channel
Related Manuals for Extron electronics HSA 822MS


Summary of Contents for Extron electronics HSA 822MS
- Page 1 3821 AH Amersfoort PM Industrial Building 16 Ichibancho 68-617-04 Rev. Ax1 The Netherlands Singapore 368363 Chiyoda-ku, Tokyo 102-0082 Japan 714.491.1500 +31.33.453.4040 +65.6383.4400 +81.3.3511.7655 03 05 www.extron.com Fax 714.491.1517 Fax +31.33.453.4050 Fax +65.6383.4664 Fax +81.3.3511.7656 © 2005 Extron Electronics. All rights reserved.
- Page 2 Sie verbrauchte Batterien bitte gemäß den Herstelleranweisungen. Keine Zusatzgeräte • Verwenden Sie keine Werkzeuge oder Zusatzgeräte, particular use. In no event will Extron Electronics be liable for direct, indirect, or die nicht ausdrücklich vom Hersteller empfohlen wurden, da diese eine Gefahrenquelle darstellen können.
-
Page 3: Table Of Contents
Table of Contents Chapter 1 • Introduction ............1-1 About the HSA 822MS Hideaway Enclosures ..1-2 Features ..................1-5 Chapter 2 • Installation ............. 2-1 Installation Overview ............2-2 Preparing the Table .............. 2-4 Preparing the HSA ..............2-5 Mounting the HSA .............. -
Page 4: Chapter 1 • Introduction
Interface accessories ............. A-5 Appendix B • Packaging for Shipment ......B-1 Chapter One Introduction About the HSA 822MS Hideaway Enclosures Features All trademarks mentioned in this manual are the properties of their respective owners. 68-617-04 Rev. Ax1 03 05... -
Page 5: About The Hsa 822Ms Hideaway Enclosures
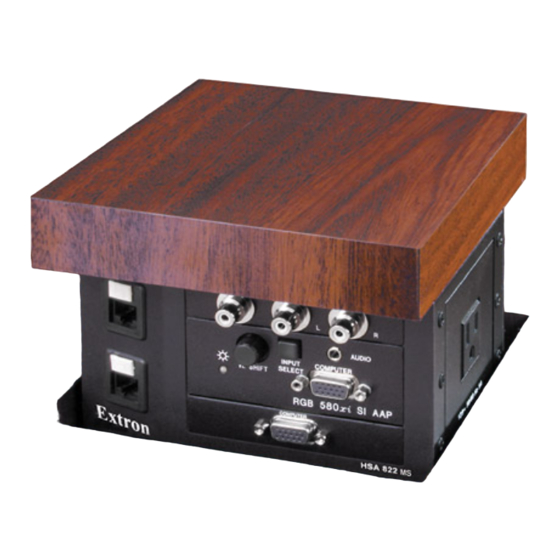
RJ-11 (telephone) line. Open Figure 1-1 — HSA 822MS hideaway enclosure The HSA 822MS provides space for four double space (double- height) or eight single space Extron Architectural Adapter Plates (AAPs), two standard grounded AC power receptacles, and four RJ-45 (Category [CAT] 6) connectors. -
Page 6: Features
INPU VIDE LEVEL O OUTP PEAK SERR DDSP V-SYNC COMP WIDTH SYNC SYNC Extron RGB 580xi Interface Figure 1-2 — HSA 822MS and RGB 580 xi xi xi xi xi configuration HSA 822MS • Introduction HSA 822MS • Introduction... -
Page 7: Chapter 2 • Installation
HSA 822MS Chapter Two Installation Installation Overview Preparing the Table Preparing the HSA Mounting the HSA Mounting the Table Surface Making Final Adjustments Cabling and Installing the AAPs Routing the AAP Cables Cabling the Enclosure Bezels HSA 822MS • Introduction... -
Page 8: Installation Overview
See Cabling the Enclosure on page 2-18. See figure 2-1 and the following steps to install the HSA 822MS: If desired, install optional RJ-45 to RJ-11 conversion kit(s) Connect power cords and turn on the devices that connect to the surface access enclosure. -
Page 9: Preparing The Table
Preparing the HSA surface of the HSA. Set the HSA 822MS on its side on a work surface. For best results, the surface block dimension should be 1/32" to 1/16" (1 mm) smaller on all four sides than the Cut the tie wraps that lock the yellow shipping restraints in place and remove the restraints (figure 2-3). - Page 10 CAT 6 cables to define their installation location (such as top or bottom and side A or B). Also tag the side of the enclosure itself (A or B). Figure 2-6 — Location of the top plate nuts HSA 822MS • Installation HSA 822MS • Installation...
-
Page 11: Mounting The Hsa
Position the plate so that the centerlines that you drew in step 2 cut through the center of each of the four screw holes in the plate (figure 2-8). HSA 822MS • Installation HSA 822MS • Installation... -
Page 12: Making Final Adjustments
Figure 2-10 — Securing the surface block and top plate to the lifting plate Figure 2-11 — Location of level adjustment screws 2-10 HSA 822MS • Installation HSA 822MS • Installation 2-11... - Page 13 1/4" nuts that secure the top plate to the lifting plate (figure 2-6 on page 2-7). Tighten the eight #8-32 wood screws that secure the HSA to the underside of the table (figure 2-7 on page 2-8). 2-12 HSA 822MS • Installation HSA 822MS • Installation 2-13...
-
Page 14: Cabling And Installing The Aaps
Extron’s various single space and double space AAP devices, including the various RGB 580xi AAPs, can be mounted to the Figure 2-13 — Mounting an AAP on the AAP/RJ-45 HSA 822MS. See appendix A, Reference Information, for panel RGB 580xi AAP part numbers. -
Page 15: Routing The Aap Cables
On the underside of the HSA, remove the jumper from the 10 pin control and status captive screw connector. Figure 2-14 — Cable tie-downs inside the HSA (seen from underneath) 2-16 HSA 822MS • Installation HSA 822MS • Installation 2-17... -
Page 16: Cabling The Enclosure
AAP/RJ-45 panel RJ-45 connector A1 with the underside RJ-45 connector A1, match A2 with A2, and so forth. Figure 2-15 — HSA 822MS underside features RJ-45 connectors — See Cabling the RJ-45 connectors on page 2-19. AC power connector — Connect the enclosure to the appropriate AC power source: Figure 2-16 —... -
Page 17: Cabling The Control And Status Connector
When a status condition is not met, the switch opens, floating the status pin. Status pins 6, 7, and 9 can sink +5 VDC to +12 VDC, 500 mA, maximum. 2-20 HSA 822MS • Installation HSA 822MS • Installation 2-21... -
Page 18: Bezels
Installation, cont’d Bezels The HSA 822MS ships with RJ-45/RJ-11 connector bezel plug- ins in a variety of colors and a black, blank bezel. Bezel To change to a different color RJ-45 connector bezel or if an RJ-45 connector is not needed or... -
Page 19: Chapter 3 • Maintenance And Modifications
Setting the Upper Limit Switch (Elevated Platform Height) Setting the Lower Limit Switch (Lowered Platform Height) Setting the Manual Release Switch Safety Switch — Location Only Replacing the Control Board Assembly and Power Supply Assembly 2-24 HSA 822MS • Installation... -
Page 20: Replacing An Aap
RJ-45 connector not scratch the finished surface of the top panel Assembly screws Control and status connector ✝ flange or the furniture in which the HSA 822MS is installed when removing the panels. Cable tie-downs Structural screws — Do not remove. -
Page 21: Replacing The Bezels
AAP cables and network (CAT 6) cables inside the enclosure. The HSA 822MS ships with RJ-45 connector bezel plug-ins in a variety of colors and a black, blank bezel. Replace a bezel as If an AAP cable is no longer required in your system,... -
Page 22: Removing And Replacing The Shroud
Many maintenance procedures require removing the protective platform to the recessed position. Set the platform’s height as enclosure shroud from the HSA 822MS. Remove and replace follows: the shroud as follows: Remove the shroud. -
Page 23: Setting The Lower Limit Switch (Lowered Platform Height)
Reinstall the shroud. See Removing and Replacing the The lower limit switch looks similar to, but not exactly Shroud, on page 3-6, step 3. like the upper limit switch shown on page 3-8. HSA 822MS • Maintenance and Modifications HSA 822MS • Maintenance and Modifications... -
Page 24: Setting The Manual Release Switch
(seen from the side) The manual release switch looks similar to, but not exactly like the upper limit switch shown on page 3-8. Loosen the manual release lock nut. 3-10 HSA 822MS • Maintenance and Modifications HSA 822MS • Maintenance and Modifications 3-11... -
Page 25: Safety Switch - Location Only
Reinstall the shroud. See Removing and Replacing the Shroud, on page 3-6, step 3. Figure 3-9 — Location of the safety switch (seen from the side) The safety switch cannot be adjusted. 3-12 HSA 822MS • Maintenance and Modifications HSA 822MS • Maintenance and Modifications 3-13... -
Page 26: Appendix A • Reference Information
Maintenance and Modifications, cont’d HSA 822MS A ppendix A Reference Information Specifications Part Numbers 3-16 HSA 822MS • Maintenance and Modifications... - Page 27 (15.49 cm W x 16.31 cm D) Surface cutout ........6.220" ±0.0325" W (AAP access from front and back) x 6.500" ±0.0325" D (15.80 ±0.083 cm W x 16.51 ±0.083 cm D) HSA 822MS • Reference Information HSA 822MS • Reference Information...
-
Page 28: Included Parts
HSA 822MS US Enclosure (black anodized) 60-721-0A RGB 580xi AAP 6' 70-129-02 (black) HSA 822MS International Enclosure (black anodized) 60-719-0n RGB 580xi AAP 12' 70-130-02 (black) For the international versions, the n in the part number RGB 580xi I AAP 12'... -
Page 29: Appendix B • Packaging For Shipment
Reference Information, cont’d HSA 822MS A ppendix B Packaging for Shipment HSA 822MS • Reference Information... - Page 30 Disconnect all cables, remove any AAPs, remove the the panels to dangle, supported by their connected HSA 822MS from the table or desk, and remove the surface cables. block as follows: Activate the motor to raise the platform and then disconnect the AC power.
- Page 31 Ensure that the edges of the AAP/RJ-45 panels do CAUTION not scratch the finish of the furniture in which the HSA 822MS is installed when removing the panels. Remove the two bolts and washers that secure the tray to the underside of the HSA and remove the tray.
- Page 32 2c. If you lose an AAP/RJ-45 panel screw, four spare screws are stored in the underside of the enclosure (figure 3-1 on page 3-2, item Figure B-7 — Removing the HSA from the table HSA 822MS • Packaging for Shipment HSA 822MS • Packaging for Shipment...
- Page 33 Packaging for Shipment, Cont’d With the platform extended approximately 1" (2.5 cm), Insert the opposite end of the HSA 822MS into the insert the yellow shipping restraints through the slotted remaining foam shell (figure B-10). Firmly push the foam holes in one side of the enclosure’s shroud (figure B-8) and shells together as far as they will go to completely suspend out the holes in the opposite side.
- Page 34 Figure B-11 — Placing the HSA in the shipping carton Close the shipping carton and seal it with high quality shipping tape. Ship the HSA to Extron using a reputable shipping company. HSA 822MS • Packaging for Shipment B-10 HSA 822MS • Packaging for Shipment B-11...
- Page 35 Packaging for Shipment, Cont’d B-13 HSA 822MS • Packaging for Shipment...
Need help?
Do you have a question about the HSA 822MS and is the answer not in the manual?
Questions and answers