Table of Contents
Advertisement
Quick Links
im Vertrieb von
Extron Electronics, USA
Extron Electronics, Europe
1230 South Lewis Street
Beeldschermweg 6C
Anaheim, CA 92805
3821 AH Amersfoort
USA
The Netherlands
714.491.1500
+31.33.453.4040
www.extron.com
Fax 714.491.1517
Fax +31.33.453.4050
www.camboard.de
© 2004 Extron Electronics. All rights reserved.
CAMBOARD Electronics
Extron Electronics, Asia
Extron Electronics, Japan
135 Joo Seng Road, #04-01
Daisan DMJ Building 6F
PM Industrial Building
3-9-1 Kudan Minami
Singapore 368363
Chiyoda-ku, Tokyo 102-0074 Japan
+65.6383.4400
+81.3.3511.7655
Fax +65.6383.4664
Fax +81.3.3511.7656
Tel. 07131 911201
Fax 07131 911203
User's Manual
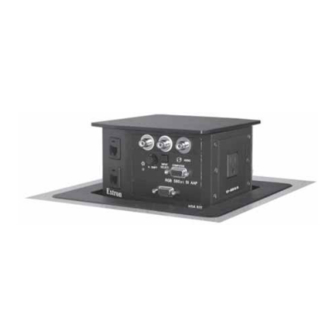
Motorized Hideaway Surface Access Enclosure
ce-info@camboard.de
HSA 822M
68-617-03 Rev. A
Printed in the USA
10 04
Advertisement
Table of Contents

Subscribe to Our Youtube Channel
Related Manuals for Extron electronics HSA 822M


Summary of Contents for Extron electronics HSA 822M
- Page 1 Singapore 368363 Chiyoda-ku, Tokyo 102-0074 Japan 714.491.1500 +31.33.453.4040 +65.6383.4400 +81.3.3511.7655 Printed in the USA www.extron.com Fax 714.491.1517 Fax +31.33.453.4050 Fax +65.6383.4664 Fax +81.3.3511.7656 www.camboard.de Tel. 07131 911201 ce-info@camboard.de 10 04 © 2004 Extron Electronics. All rights reserved. Fax 07131 911203...
- Page 2 Keine Zusatzgeräte • Verwenden Sie keine Werkzeuge oder Zusatzgeräte, die nicht ausdrücklich vom Hersteller empfohlen wurden, da diese eine particular use. In no event will Extron Electronics be liable for direct, indirect, or Gefahrenquelle darstellen können. consequential damages resulting from any defect in this product even if Extron Instrucciones de seguridad •...
-
Page 3: Table Of Contents
Vertrieb von CAMBOARD Electronics Table of Contents Chapter 1 • Introduction ............1-1 About the HSA 822M Hideaway Enclosures .... 1-2 Features ..................1-4 Chapter 2 • Installation ............. 2-1 Installation Overview ............2-2 Preparing the Routing Template ........2-4 Preparing the Table .............. -
Page 4: Chapter 1 • Introduction
Included parts ............... A-4 Template, replacement parts, and accessories ....A-4 Interface accessories ............. A-5 Top Plate Dimensions ............A-6 HSA 822M cut-out template ..........A-7 Appendix B • Packaging for Shipment ......B-1 Chapter One Introduction About the HSA 822M Hideaway Enclosures Features All trademarks mentioned in this manual are the properties of their respective owners. -
Page 5: About The Hsa 822M Hideaway Enclosures
RGB 580xi The AAP spaces and RJ-45 connectors are arranged back-to back, while the AC receptacles are back-to-back on the sides Figure 1-2 — HSA 822M and RGB 580 xi xi xi xi xi perpendicular to the AAPs. configuration A cable inside the enclosure connects the user AC receptacles to The HSA 822M is available in a variety of surface finishes, an IEC connector on the underside of the enclosure. -
Page 6: Features
Grounded AC plugs Installation Installation Overview Preparing the Routing Template Preparing the Table Cabling and Installing the AAPs Routing the AAP Cables and Installing the Clamshell Cabling the Enclosure Bezels www.camboard.de Tel. 07131 911201 ce-info@camboard.de HSA 822M • Introduction Fax 07131 911203... -
Page 7: Installation Overview
Vertrieb von CAMBOARD Electronics Installation Installation Overview See figure 2-1 and the following steps to install the HSA 822M: HSA 822 If desired, install the optional RJ-45 to RJ-11 conversion Enclosure kit(s) to replace one or more RJ-45 connectors with RJ-11... -
Page 8: Preparing The Routing Template
4" / 10.2 cm this template when the installation is complete. Save it for future HSA 822M or HSA 822 installations. The HSA 822M mounts in exactly the same size hole as Routing Template Mounting the HSA 822 and uses the same metal mounting... -
Page 9: Cabling And Installing The Aaps
Extron’s various single space and double space AAP devices, including the various RGB 580xi AAPs, can be mounted to the HSA 822M. See appendix A, Reference Information, for RGB 580xi AAP part numbers. The screws for installing an AAP are built into its AAP/RJ-45 panel, so no additional screws are needed. -
Page 10: Routing The Aap Cables And Installing The Clamshell
(figure 2-8 on page 2-11, item Figure 2-6 — Cable tie-downs inside the HSA (seen from underneath) www.camboard.de Tel. 07131 911201 ce-info@camboard.de HSA 822M • Installation HSA 822M • Installation Fax 07131 911203... -
Page 11: Cabling The Enclosure
Figure 2-7 shows the cables routed to the side, which proved effective in tests at Extron. Secure the AAP cables at the circled location. Figure 2-7 — HSA 822M AAP cable routing in the clamshell Figure 2-8 — HSA 822M underside features Use tie wraps to secure the AAP cables to the tie-down holes in the clamshell shown on figure 2-7. -
Page 12: Cabling The Rj-45 Connectors
Momentary Short to ground to stop contact closure the top panel's motion. Ground Figure 2-9 — HSA 822M RJ-45 connectors Enable Contact closure Short to ground to enable activating the motor by If necessary, have a qualified service person replace the pressing on the top panel. - Page 13 The flex I/O port on an Extron IP Link™ Ethernet Control Interface can be used in place of the MLC 226 and its digital input port. www.camboard.de Tel. 07131 911201 ce-info@camboard.de 2-14 HSA 822M • Installation HSA 822M • Installation 2-15 Fax 07131 911203...
-
Page 14: Bezels
CAMBOARD Electronics Installation, cont’d Bezels HSA 822M The HSA 822M ships with RJ-45/RJ-11 connector bezel plug-ins in a variety of colors and a black, blank bezel. Bezel To change to a different color RJ-45 connector bezel or if an RJ-45 connector is not needed or... -
Page 15: Replacing An Aap
Ensure that the edges of the AAP/RJ-45 panels do CAUTION Cable access holes RJ-45 connector not scratch the finished surface of the top panel flange or the furniture in which the HSA 822M is Assembly screws* Control and status connector installed when removing the panels. Cable tie-downs Structural screws —... -
Page 16: Replacing The Bezels
) that route the AAP cables and network (CAT 6) cables inside the enclosure. The HSA 822M ships with RJ-45 connector bezel plug-ins in a variety of colors and a black, blank bezel. Replace a bezel as If an AAP cable is no longer required in your system,... -
Page 17: Removing And Replacing The Enclosure
AAP/RJ-45 panel screw, four spare screws are stored in not scratch the finished surface of the top panel the underside of the enclosure (figure 3-1 on page 3-2, flange or the furniture in which the HSA 822M is item installed when removing the panels. - Page 18 RJ-45 Connectors Flat Washer Full Thread Mounting Bolts Figure 3-6 — Removing the shroud Figure 3-5 — Removing the HSA 822M from the table www.camboard.de Tel. 07131 911201 ce-info@camboard.de HSA 822M • Maintenance and Modifications HSA 822M • Maintenance and Modifications...
-
Page 19: Setting The Upper Limit Switch (Elevated Platform Height)
HSA. Power Control Supply Board Figure 3-7 — Location of upper limit switch assembly (seen from the side) www.camboard.de Tel. 07131 911201 ce-info@camboard.de 3-10 HSA 822M • Maintenance and Modifications HSA 822M • Maintenance and Modifications 3-11 Fax 07131 911203... -
Page 20: Setting The Lower Limit Switch (Lowered Platform Height)
Disconnect the power and control and status connectors. Reinstall the surface mount enclosure. See Removing and Replacing the Enclosure, steps 14 through 20. www.camboard.de Tel. 07131 911201 ce-info@camboard.de 3-12 HSA 822M • Maintenance and Modifications HSA 822M • Maintenance and Modifications 3-13 Fax 07131 911203... -
Page 21: Setting The Manual Release Switch
Disconnect the power and control and status connectors. Reinstall the surface mount enclosure. See Removing and Replacing the Enclosure, steps 14 through 20. www.camboard.de Tel. 07131 911201 ce-info@camboard.de 3-14 HSA 822M • Maintenance and Modifications HSA 822M • Maintenance and Modifications 3-15 Fax 07131 911203... -
Page 22: Safety Switch - Location Only
Figure 3-10 — Location of the safety switch Replacing the Enclosure, steps 14 through 20. (seen from the side) The safety switch cannot be adjusted. www.camboard.de Tel. 07131 911201 ce-info@camboard.de 3-16 HSA 822M • Maintenance and Modifications HSA 822M • Maintenance and Modifications 3-17 Fax 07131 911203... -
Page 23: Appendix A • Reference Information
Vertrieb von CAMBOARD Electronics Maintenance and Modifications, cont’d HSA 822M A ppendix A Reference Information Specifications Part Numbers Top Plate Dimensions www.camboard.de Tel. 07131 911201 ce-info@camboard.de 3-18 HSA 822M • Maintenance and Modifications Fax 07131 911203... - Page 24 (20.07 ±0.083 cm W x 20.96 ±0.083 cm D) Clamshell (figure A-1) ......A = 7.24" (18.39 cm) B = 8.25" (21.0 cm) C = 10.98" (27.89 cm) www.camboard.de Tel. 07131 911201 ce-info@camboard.de HSA 822M • Reference Information HSA 822M • Reference Information Fax 07131 911203...
-
Page 25: Included Parts
HSA 822M International Enclosure (black anodized) 60-719-nn RGB 580xi AAP 12' 70-130-02 (black) The USA version of the HSA 822M is also available in RGB 580xi I AAP 12' (black) 70-133-02 brushed aluminum, polished aluminum, and brushed brass finishes. Visit the Extron web site,... -
Page 26: Top Plate Dimensions
(16.51 cm) USER ACCESS USER ACCESS EXTRON ELECTRONICS Figure A-2 — HSA 822 metal routing template The HSA 822M mounts in exactly the same size hole as 0.5" the HSA 822 and uses the same metal mounting (1.3 cm) template. - Page 27 Vertrieb von CAMBOARD Electronics Reference Information, cont’d HSA 822M A ppendix B Packaging for Shipment www.camboard.de Tel. 07131 911201 ce-info@camboard.de HSA 822M • Reference Information Fax 07131 911203...
- Page 28 Disconnect all cables, remove any AAPs, and remove the make them vulnerable to damage caused by mishandling HSA 822M from the table or desk. See Removing and during shipment if they are improperly packaged. If, for any Replacing the Enclosure, steps 1 through 11, in chapter 3, reason, you need to return an HSA to Extron, first contact Maintenance and Modifications.
- Page 29 (figure B-4). Figure B-4 — Installing protective strips Insert the HSA 822M and the clamshell into one of the foam shells (figure B-5). Either open end of the clamshell and the open top panel will fit into the recesses in the foam.
- Page 30 Vertrieb von CAMBOARD Electronics Packaging for Shipment, Cont’d Insert the opposite end of the HSA 822M and the clamshell Lower the foam-protected HSA into the shipping carton into the remaining foam shell (figure B-6). Firmly push the (figure B-7).
- Page 31 Vertrieb von CAMBOARD Electronics Packaging for Shipment, Cont’d www.camboard.de Tel. 07131 911201 ce-info@camboard.de HSA 822M • Packaging for Shipment Fax 07131 911203...
Need help?
Do you have a question about the HSA 822M and is the answer not in the manual?
Questions and answers