Table of Contents
Advertisement
Quick Links
NBP 1200C Cable Cubby Enclosure with
Network Button Panel • Setup Guide
Overview
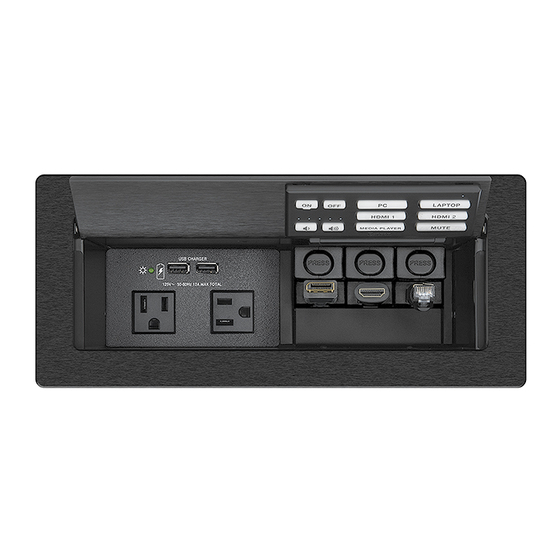
The Extron NBP 1200C is a furniture-mountable Cable Cubby
is a fully customizable AV system control interface for use with Extron IPCP Pro Series and IPL Pro Series Control Processors,
and with Extron meeting space collaboration system products. Each NBP button panel has a single LAN port, which supports
both power and communications between the IPCP Pro control processor and the button panel. The flip-up button panel has ten
customizable, soft-touch buttons that are backlit for easy operation in low-light environments.
Use Extron Toolbelt software to discover and manage NBP button panels and assign each one a unique IP address. Then use
Extron Global Configurator
system, including the buttons on NBPs. Once configured, the AV system can be controlled from any of the NBPs.
This guide provides basic installation instructions. For more details on the entire line of NBPs, see the Network Button Panels
User Guide, available on www.extron.com. For details on configuration, see the software help files.
Installation
Installation includes the following steps:
Step 1: Get Ready
•
Step 2: Prepare the Installation Site, Cut the Table or
•
Furniture
Step 3: Assemble AAP, Pass-through, and Power Modules
•
Step 4: Install Modules and a Retractor Bracket
•
Step 5: Change Buttons (optional)
•
Step 6: Mount the NBP 1200C to the Table
•
Step 1: Get Ready
Preparation checklist
Use the following checklist to prepare for the installation.
…
Download and install the latest versions of the software, firmware, and device drivers needed to configure or program the
control processor or HCR receiver to interact with the NBPs and control the connected AV products. See the IPCP Pro Series
User Guide, IPL Pro Series User Guide, or HC 400 Series User Guide (available at www.extron.com) for details on software
and drivers.
…
Obtain network information for the unit from the network administrator. You need the following details for each IP Link Pro
device, including the IPCP Pro and each NBP:
…
DHCP setting (on or off)
…
Device (NBP) IP address
NOTE:
If DHCP is on, you do not need the IP addresses and subnet mask.
…
Write down the MAC address of each IP Link Pro device (such as the NBP) to be used.
…
Obtain model names and setup information for the AV devices to be controlled in the system.
…
Each NBP button panel comes with a factory-installed Secure Sockets Layer (SSL) security certificate. If you intend to install
a different SSL certificate, contact your IT department to obtain the certificate or for instructions on how to obtain one. See
"Secure Sockets Layer (SSL) Certificates" in the Network Button Panels User Guide for requirements and guidelines regarding
SSL certificates.
…
Verify that you have all the included parts (see
the Cable Cubby.
…
Before cutting a hole in any furniture, select the best location for the NBP 1200C.
Ensure that the product is oriented so that the lid opens in the desired direction.
•
Ensure there is enough space for all the system cables and components, including cable retractors, if they are to be
•
installed.
…
Check all relevant regulations.
(GC) Plus and Professional software, or Global Scripter
®
Included parts
enclosure with a Network Button Panel integrated into the lid. It
®
programming to configure the control
®
Step 7: Install Retractors
•
Step 8: Install Cables in the Cable Cubby
•
Step 9: Cable the NBP 1200C and Other Devices in the
•
System
Step 10: Set up the NBP for Network Communication
•
Step 11: Configure the System
•
Step 12: Test and Troubleshoot
•
…
Subnet mask
…
Gateway IP address
on the next page) and have all the necessary tools for installing
…
User name
…
Passwords
1
Advertisement
Table of Contents

Related Manuals for Extron electronics NBP 1200C


Summary of Contents for Extron electronics NBP 1200C
- Page 1 NBP 1200C Cable Cubby Enclosure with Network Button Panel • Setup Guide Overview The Extron NBP 1200C is a furniture-mountable Cable Cubby enclosure with a Network Button Panel integrated into the lid. It ® is a fully customizable AV system control interface for use with Extron IPCP Pro Series and IPL Pro Series Control Processors, and with Extron meeting space collaboration system products.
-
Page 2: Included Parts
NBP 1200C • Setup Guide (Continued) Americans with Disabilities Act (ADA) compliance When planning where to install the NBP button panels, you may need to consider factors affecting accessibility of the button panels such as height from the floor, distance from obstructions, and how far a user must reach to press the buttons. For guidelines, see sections 307 (“Protruding Objects”) and 308 (“Reach Ranges”) of the 2010 ADA Standards for Accessible Design... - Page 3 Cut the table CAUTION: Wear safety glasses when operating power equipment. Failure to comply can result in eye injury. ATTENTION : Portez des lunettes de sécurité lorsque vous utilisez l’équipement électrique. Ne pas respecter cela peut conduire à une blessure à l’oeil. ATTENTION: The opening in the table for the Cable Cubby should be cut only by licensed and bonded craftspeople.
- Page 4 NBP 1200C • Setup Guide (Continued) Step 3: Assemble AAP, Pass-through, and Power Modules A variety of modules allow you to populate the Cable Cubby enclosure with a combination of AAPs, cable pass-through plates, retractors, or power modules. The NBP 1200C accommodates your choice of any two modules, allowing you to customize the device to meet your needs.
-
Page 5: Retractor Bracket
Step 4: Install Modules and a Retractor Bracket Determine where the modules are to be installed in the Cable Cubby. Any combination of two modules can be installed. The modules can be installed on either side of the enclosure and at various heights. NOTES: Ensure that there is enough room above the modules for the Cable Cubby lid to close completely. - Page 6 NBP 1200C • Setup Guide (Continued) Step 5: Change Buttons (optional) If desired, replace one or more buttons using available additional buttons. Optional button kits are available in various languages. NOTE: https://www.extron.com/article/custombuttonbuilder A custom button builder tool is available at where you can order custom-labeled buttons for the NBP.
- Page 7 Step 6: Mount the NBP 1200C to the Table Insert the NBP 1200C enclosure into the table CAUTION: The flanged edges of the top Remove the plastic plastic of the surface enclosure are sharp. strips and lm on m on the surface of the...
-
Page 8: Horizontal Mounting
NBP 1200C • Setup Guide (Continued) Step 7: Install Retractors Retractors can be installed in a vertical, angular, or horizontal orientation. No adjustment of the enclosure screws is needed if the retractors are mounted vertically. To mount at an angle or horizontally, adjust the enclosure screws as shown below. When the Retractors are mounted horizontally, the retractor mechanism must be secured to the underside of the table (see the Cable Retractor Setup Guide, available at www.extron.com). - Page 9 Step 9: Cable the NBP 1200C and Other Devices in the System Run a network cable to the NBP 1200C. Connect the NBP to the network via the LAN/PoE port on the bottom panel of the NBP 1200C (shown in figure 11).
-
Page 10: Network Communication Setup
NBP 1200C • Setup Guide (Continued) Step 10: Set Up the NBP for Network Communication Ensure that the PC you will use for setup and the Network Communication Setup NBP button panel are connected to the same Ethernet subnetwork. Connect the NBP and PC to the same network. -
Page 11: Front Panel Features
E E E E D D D D I I I I NBP 1200C Front Panel Figure 14. Function buttons — Configure these buttons to light and function as desired. Power buttons — These buttons (labelled “On” and “Off”) are usually used to control the power to the display device. The On button has a nub that can be felt with fingertips. - Page 12 NBP 1200C • Setup Guide (Continued) Reset Modes: a Brief Summary The NBP Series button panels offer the following reset modes: Use Factory Firmware: Press and hold the Reset button while applying power to the unit. Keep holding the button •...
- Page 13 This page is intentionally left blank.
- Page 14 Get ready. NBP 1200C • Setup Guide (Continued) Prepare the installation site. Overall Configuration Procedure Change buttons or faceplates, if desired Cable the NBPs and the control processor or HCR receiver, then apply power. Within Global Configurator (GC Professional or...
Need help?
Do you have a question about the NBP 1200C and is the answer not in the manual?
Questions and answers