Extron electronics Cable Cubby 300S Setup Manual
Hide thumbs
Also See for Cable Cubby 300S:
- User manual (62 pages) ,
- User manual (27 pages) ,
- User manual (33 pages)
Advertisement
Quick Links
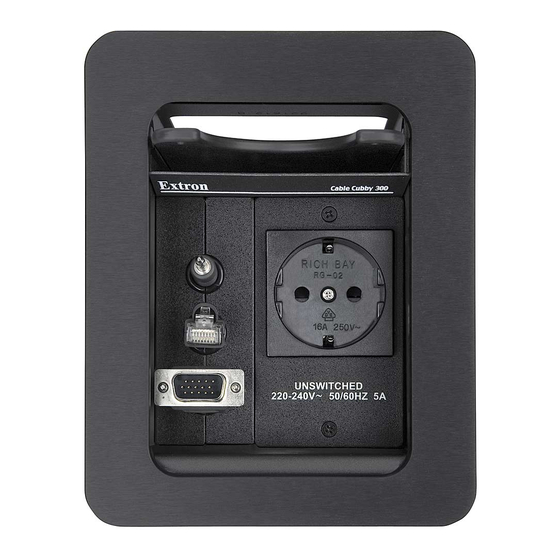
Cable Cubby • Setup Guide
This guide provides instructions for an experienced installer to
install and connect the Extron Cable Cubby
The Cable Cubby units are furniture-mounted enclosures for cable access,
connections, and AC power. Cables that are not in use can be stored
out of the way while remaining connected to the presentation system.
Planning
Determine the best location for the enclosure. Before making any cuts:
Ensure that the location where the Cable Cubby is to be installed is
c
convenient for as many users as possible.
Ensure that the edge on which the lid opens is oriented correctly.
c
Ensure that there is ample space under the table for cables.
c
Ensure that the correct template or dimensions are used.
c
Decide on the method for cutting the hole in the table.
Hand router and template
c
CNC wood router
c
Jigsaw and paper template
c
Before starting the installation, check with local and state regulations:
Ensure that the planned installation complies with building and
c
electrical codes.
Ensure that the planned installation complies with the Americans with Disabilities Act or other accessibility requirements.
c
Tools and Equipment Required for Installation
Included Parts
300S
600
Cable Cubby Enclosure (1)
300, 600, and 800.
®
Phillips Screw Driver
Tape Measure
1/4" Hex Nut Driver
Screw Clamps (2)
#4−40 Screws & Nuts
300C
AC Power Module
(quantity is optional,
800
depending on model)
Square
Safety Glasses
Marking Pen
Zip Ties
Tweeker (1)
AAP Shelf Brackets
Model
2 Pos
3 Pos
CC 300 US/Int'l
0/2
2/0
CC 600 US/Int'l
0/2
4/2
CC 800 US/Int'l
0/0
0/2
* L = left, L-M = left-middle, R-M = right middle, R = right
Cable Cubby 600
Vacuum Cleaner
Grommet and
hole plug kit
Pass through AAPs*
4 Pos
L
L-M
R-M
R
0/0
1/1
0/0
1/0
2/1
0/0
2/3
2/2
2/1
2/1
4/2
2/3
3/3
3/2
2/1
1
Advertisement

Related Manuals for Extron electronics Cable Cubby 300S


Summary of Contents for Extron electronics Cable Cubby 300S
- Page 1 Cable Cubby • Setup Guide This guide provides instructions for an experienced installer to install and connect the Extron Cable Cubby 300, 600, and 800. ® The Cable Cubby units are furniture-mounted enclosures for cable access, connections, and AC power. Cables that are not in use can be stored out of the way while remaining connected to the presentation system.
- Page 2 The underlined dimension in the table below is the side on which the lid opens. Cut-out Dimensions Routing Template Product Part Number Width Depth Cable Cubby 300S 70-237-01 4.65 inches (11.81 cm) 6.00 inches (15.24 cm) Cable Cubby 300C 70-237-01 6.03 inches (15.32 cm) diameter Cable Cubby 600 70-239-01 6.49 inches (16.48 cm)
- Page 3 Mounting the Cable Cubby in the Table ATTENTION: Be careful when handling and mounting the enclosure. Mishandling can damage the appearance of the enclosure. Remove the plastic strips that protect the corners of the enclosure and the plastic film on the finished surfaces. Carefully lower the Cable Cubby into the hole to test the fit.
- Page 4 +1.919.850.1000 +31.33.453.4040 +65.6383.4400 +91.80.3055.3777 68-1558-50 +86.21.3760.1568 +1.714.491.1517 FAX +1.919.850.1001 FAX +31.33.453.4050 FAX +65.6383.4664 FAX +91.80.3055.3737 FAX Rev B +86.21.3760.1566 FAX 05 12 www.extron.com © 2012 Extron Electronics All rights reserved. All trademarks mentioned are the property of their respective owners.
Need help?
Do you have a question about the Cable Cubby 300S and is the answer not in the manual?
Questions and answers