Extron electronics AXI 22 AT User Manual
Audio expansion interfaces
Hide thumbs
Also See for AXI 22 AT:
- User manual (45 pages) ,
- Setup manual (8 pages) ,
- User manual (41 pages)

Subscribe to Our Youtube Channel
Related Manuals for Extron electronics AXI 22 AT


Summary of Contents for Extron electronics AXI 22 AT
- Page 1 User Guide Audio Products Mixers and Processors AXI 22 AT and AXI 44 AT Audio Expansion Interfaces 68-2972-01 Rev. E 06 21...
- Page 3 Copyright © 2017-2021 Extron. All rights reserved. www.extron.com Trademarks All trademarks mentioned in this guide are the properties of their respective owners. The following registered trademarks ( ® ), registered service marks ( ), and trademarks ( ) are the property of RGB Systems, Inc. or Extron (see the current list of trademarks on the Terms of Use page at www.extron.com):...
- Page 4 FCC Class A Notice This equipment has been tested and found to comply with the limits for a Class A digital device, pursuant to part 15 of the FCC rules. The Class A limits provide reasonable protection against harmful interference when the equipment is operated in a commercial environment.
-
Page 5: Table Of Contents
About this Guide ..........1 Downloading and Installing Dante Controller ..19 Configuring the AXI in Dante Controller ....19 About the AXI 22 AT and AXI 44 AT ..... 1 Features .............. 2 Device Name ..........20 Receiver and Transmitter Names ....20 Applications Diagrams ......... - Page 6 Technical Publications Standards and Styles • Contents...
-
Page 7: Introduction
This guide contains installation, configuration, and operation information for the Extron Electronics AXI 22 AT and AXI 44 AT audio expansion interfaces. In this guide, the terms “AXI devices,” “device,” and “AXI” are all used to refer to the AXI 22 AT and AXI 44 AT interchangeably. -
Page 8: Features
Dante Controller. • Power over Ethernet allows the AXI 22 AT and AXI 44 AT to receive power over a single Ethernet cable, eliminating the need for a local power supply. -
Page 9: Applications Diagrams
DMP 128 Plus C AT Digital Matrix Processor Extron ACP 100 SOURCE PROGRAM SOURCE Audio Control VOLUME SOURCE Panel MUTE Extron Dante Ethernet Ethernet Figure 2. AXI 44 AT Application Diagram AXI 22 AT and AXI 44 AT • Introduction... -
Page 10: Installation And Operation
• Reset Modes Mounting The 1U high, quarter rack width, 6 inch deep AXI 22 AT and AXI 44 AT devices mount in the following manners: • Rack mounting — Attach the device to a standard 19 inch rack shelf. The following... -
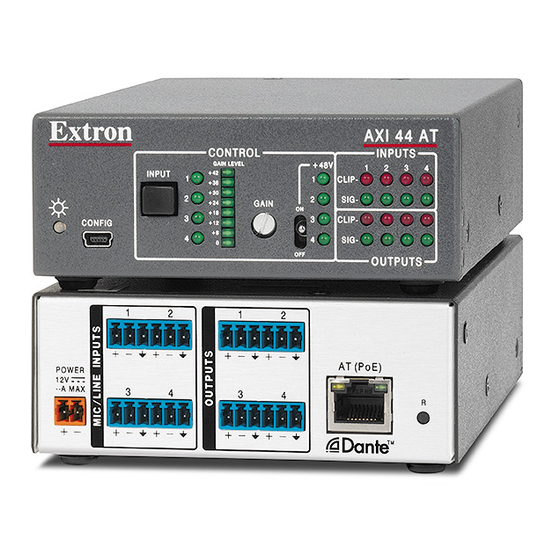
Page 11: Rear Panel Connections
Captive Screw Connector Ridged – Return +12 VDC input Smooth Ground all devices. External Power Supply 12 VDC, 1.5 A max. Figure 4. Rear Panel 12 VDC Power Connector AXI 22 AT and AXI 44 AT • Installation and Operation... - Page 12 If not provided with a power supply, this product is intended to be supplied by a UL Listed power source marked “Class 2” or “LPS” and rated output 12Vdc 0.5 A minimum (for AXI 22 AT) or 12Vdc 0.6 A minimum (for AXI 44 AT), or 48 VDC (PoE), minimum 0.35 A.
- Page 13 6-pole 3.5 mm captive screw connectors (see 3-pole Audio Output Wiring in figure 6). Instead of two or four mono line level devices, one stereo device (AXI 22 AT) or two stereo devices (AXI 44 AT) can be connected using 6-pole captive screw connectors (see 6-pole Audio Output Wiring in figure 6).
-
Page 14: Front Panel Controls
Input Indicator LEDs — These LEDs light to indicate which input is currently selected. Gain and phantom power adjustments are only applied to the currently selected input. AXI 22 AT and AXI 44 AT • Installation and Operation... -
Page 15: Reset Modes
Following this reset, the Dante module will proceed to its normal boot sequence. This reset will: • Set the IP configuration to default settings • Clear all audio channel routing • Set the Dante device name and channel names to default AXI 22 AT and AXI 44 AT • Installation and Operation... -
Page 16: Dsp Configurator Software
DSP Configurator Software In addition to front panel hardware controls, the AXI 22 AT and AXI 44 AT can be configured with a PC running Microsoft Windows 7 or newer and Extron DSP Configurator Software. ® ® This section describes Extron DSP Configurator Software and covers the following topics: •... -
Page 17: Dsp Configurator Software Workspace
DSP Configurator Software Workspace The DSP Configurator Software workspace for the AXI 22 AT and AXI 44 AT contains a menu bar for accessing configuration tools and the main audio workspace for audio configuration (see figure 8). Figure 8. DSP Configurator Software Workspace... -
Page 18: Edit
Re-enable All Dialogs — This option re-enables all dialog boxes that no longer appear based on user selection (certain dialog boxes that appear are user-defeatable by selecting a checkbox that reads Do Not Show This Dialog Again). AXI 22 AT and AXI 44 AT • DSP Configurator Software... -
Page 19: Tools
List of Open Windows — Below the dividing line in the menu is a list of all open windows. Select a window from the list to bring it into focus and to the forefront of the workspace. Windows appear in the order they were opened. AXI 22 AT and AXI 44 AT • DSP Configurator Software... -
Page 20: Help
Creating configuration files in Emulate mode saves time by not requiring a device to be connected or present in order for the bulk of configuration to be completed. AXI 22 AT and AXI 44 AT • DSP Configurator Software... -
Page 21: Connecting Live To A Device
When a connection with the device is established, the Synchronize with Device dialog box opens. From the dialog box, one of two options can be selected: Figure 13. Synchronize with Device Dialog Box AXI 22 AT and AXI 44 AT • DSP Configurator Software... -
Page 22: Disconnecting From A Device
Click the Emulate button in the DSP Configurator Software menu bar (see figure 14, ). Alternatively, select Tools>Disconnect from Device or press <F6> on the keyboard. Figure 14. Emulate Button Click OK to confirm (see figure 15, Figure 15. Confirm Disconnect Dialog Box AXI 22 AT and AXI 44 AT • DSP Configurator Software... -
Page 23: Mic/Line Inputs
Mic/Line Inputs The AXI 22 AT has two mic/line inputs and two AT outputs and the AXI 44 AT has four mic/line inputs and four AT outputs. The AXI mic/line inputs feed the AT outputs which transmit signal to the Dante network and appear on the Dante network as Transmitter channels. -
Page 24: Analog Outputs
Analog Outputs The AXI 22 AT has two AT Inputs and two analog line outputs and the AXI 44 AT has four AT inputs and four analog line outputs. The AXI line outputs are fed by the AT inputs which receive audio from the Dante network and are listed on the Dante network as Receiver channels. -
Page 25: Dante Controller
Configuring the AXI in Dante Controller Use a standard Ethernet cable to connect the AXI 22 AT or AXI 44 AT to a network via the rear panel AT (PoE) port (see figure 3 on page 5) and power the device. -
Page 26: Device Name
Connect devices to the Dante network one at a time. Rename each device before making audio subscriptions in Dante Controller (see • Renaming the AXI 22 AT or AXI 44 AT in Dante Controller on the next page). • Rename each device with a unique and meaningful identifier. - Page 27 Names should be significant identifiers. For example, enter AXI44-ConfRm1 ( Click Apply ( ). A confirmation prompt opens. Figure 19. Device Config Dialog, Rename Device AXI 22 AT and AXI 44 AT • Dante Controller...
-
Page 28: Renaming A Receiver Or Transmitter
The default names shown in the Dante Receivers column are extracted from the ). The AXI Receivers are labelled Analog Out 1 through connected Dante device ( Analog Out 4 because the analog outputs receive signal from the Dante network. AXI 22 AT and AXI 44 AT • Dante Controller... - Page 29 Enter the new name (up to 31 characters) using any combination of letters, numbers, and special characters except for @, =, and . (period). Press <Enter> on the keyboard or click another label field to confirm the new name. AXI 22 AT and AXI 44 AT • Dante Controller...
-
Page 30: Finding A Dante Device Ip Address
To find the IP address of a Dante device, the name of the device is needed (see Renaming the AXI 22 AT or AXI 44 AT in Dante Controller on page 20). NOTE: If the AXI has not been renamed, its default name consists of the product name followed by a hyphen, plus the last 6 characters of the Dante device MAC address (for example, AXI44-0a690b). -
Page 31: Identifying A Physical Dante Device
A physical network is required to share Dante audio channels among Dante-enabled devices like the AXI 22 AT and AXI 44 AT. Other devices capable of sending and receiving audio over a Dante network must be on the same physical network in order to communicate via Dante (see figure 25 for an example of a physical Dante network). -
Page 32: Dante Controller Operation
Once a subscription has been made, the corresponding subscription icon will appear. NOTE: AXI 22 AT and AXI 44 AT support up to two transmit flows (unicast or multicast) and two receive flows (unicast or multicast). Refer to the Dante Controller User Guide for more information on flows. - Page 33 Example: AXI44-ConfRm1 Mic/LineIn-1 is routed to the DMP128Plus-MainRack Exp_IN-01. A check mark at the intersection indicates the subscription is made. A check mark also appears next to the receiver channel. AXI 22 AT and AXI 44 AT • Dante Controller...
-
Page 34: Disconnecting Inputs From Outputs
Check Dante Controller after each step to see if the problem is resolved. Open the Configure Dante Interface dialog box by clicking the Choose a Dante Interface icon (see figure 27, Figure 27. Choose a Dante Interface Icon AXI 22 AT and AXI 44 AT • Dante Controller... -
Page 35: Restarting Dante Controller
Click the Help icon in the upper-right corner of the Dante screen (see figure 29, Select Contents from the Help menu ( • ) on the Dante screen. Press the <Shift+F1> keys on the computer keyboard. • Figure 29. Accessing the Dante Help File AXI 22 AT and AXI 44 AT • Dante Controller... -
Page 36: Remote Control
Remote Control This section discusses the Simple Instruction Set (SIS ) commands that can be issued to ™ the AXI 22 AT and AXI 44 AT via the front panel USB Config port. The following topics are discussed: SIS Commands •... -
Page 37: Verbose Mode
Verbose Mode A USB connection is used to monitor changes that occur on the AXI 22 AT and AXi 44 AT. For a session to receive change notices, the device must be set to verbose mode 1 or 3. In verbose mode 1 or 3, the device reports changes in messages that resemble tagged SIS command responses. -
Page 38: Command And Response Table For Sis Commands
(verbose 2 and 3 response) System reset Resets gain, phantom ZXXX (factory default) power, executive mode, and preset configuration. Network configuration is not affected. NOTE: All variables used on this page are defined on page AXI 22 AT and AXI 44 AT • Remote Control... - Page 39 Front panel features are Exe0 fully accessible (default). View Lock Status (verbose 2 and 3 response) Presets Recall Preset NOTE: All variables used on this page are defined on the next page. AXI 22 AT and AXI 44 AT • Remote Control...
-
Page 40: Dsp Sis Commands
Key: AXI 22 AT = 60-1627-01, AXI 44 AT = 60-1628-01 = Device part number n.nn or n.nn.nnnn (major.minor.patch) = Firmware version = IP address xxx.xxx.xxx.xxx = Subnet mask xxx.xxx.xxx.xxx = Gateway IP xxx.xxx.xxx.xxx = MAC address xx-xx-xx-xx-xx-xx X& = Dante device name Device names follow Domain Name System (DNS) hostname rules. -
Page 41: Command And Response Table For Dsp Sis Commands
60001 0 to -100 Mic/Line Input 3 40002 0 to 42 Output 3 60002 0 to -100 Mic/Line Input 4 40003 0 to 42 Output 4 60003 0 to -100 AXI 22 AT and AXI 44 AT • Remote Control... - Page 42 Extron Warranty Extron warrants this product against defects in materials and workmanship for a period of three years from the date of purchase. In the event of malfunction during the warranty period attributable directly to faulty workmanship and/ or materials, Extron will, at its option, repair or replace said products or components, to whatever extent it shall deem necessary to restore said product to proper operating condition, provided that it is returned within the warranty period, with proof of purchase and description of malfunction to: USA, Canada, South America,...
Need help?
Do you have a question about the AXI 22 AT and is the answer not in the manual?
Questions and answers