Table of Contents
Advertisement
Quick Links
Operation Data
Owner's Man u al
AquaLink
Wired/Wireless Controller
(For use with AquaLink RS for Systems with Rev Q Firmware or later)
FOR INDOOR USE ONLY
FOR YOUR SAFETY - This product must be installed and serviced by a contractor who is licensed and qualified in
pool equipment by the jurisdiction in which the product will be installed where such state or local requirements
exist. In the event no such state or local requirement exists, the maintainer must be a professional with sufficient
experience in pool equipment installation and maintenance so that all of the instructions in this manual can be
followed exactly. Before installing this product, read and follow all warning notices and instructions that accompany
this product. Failure to follow warning notices and instructions may result in property damage, personal injury, or
death. Improper installation and/or operation will void the warranty.
Improper installation and/or operation can create unwanted electrical hazard which can cause serious injury,
property damage, or death.
This device complies with part 15 of the FCC Rules. Operation is subject to the following two conditions: (1) This
device may not cause harmful interference, and (2) this device must accept any interference received, including
interference that may cause undesired operation.
NOTE: This equipment has been tested and found to comply with the limits for a Class B digital device, pursuant to
part 15 of the FCC Rules. These limits are designed to provide reasonable protection against harmful interference
in a residential installation. This equipment generates, uses and can radiate radio frequency energy and, if not
installed and used in accordance with the instructions, may cause harmful interference to radio communications.
However, there is no guarantee that interference will not occur in a particular installation. If this equipment does
cause harmful interference to radio or television reception, which can be determined by turning the equipment off
and on, the user is encouraged to try to correct the interference by one or more of the following measures:
•
Reorient or relocate the receiving antenna.
•
Increase the separation between the equipment and receiver.
•
Connect the equipment to an electrical source on a circuit different from that to which the receiver is
connected.
•
Consult the dealer or an experienced radio/TV technician for help.
Modifi cations made to this equipment, which are not authorized by the manufacturer, may void the user's authority
to operate this equipment.
Touch
®
WARNING
ATTENTION
TM
Advertisement
Table of Contents

Related Manuals for Jandy AquaLink Touch


Summary of Contents for Jandy AquaLink Touch
- Page 1 Operation Data Owner's Man u al AquaLink Touch ® Wired/Wireless Controller (For use with AquaLink RS for Systems with Rev Q Firmware or later) FOR INDOOR USE ONLY WARNING FOR YOUR SAFETY - This product must be installed and serviced by a contractor who is licensed and qualified in pool equipment by the jurisdiction in which the product will be installed where such state or local requirements exist.
-
Page 3: Table Of Contents
NOTE 4.8.5 RF Channel (For wireless units only) ..19 Section 1. Important Safety Instructions ..6 4.8.6 AquaLink Touch J-Box LED Operation ..20 Program Group ..........20 Section 2. Overview of the AquaLink Touch 4.9.1 A and B Groups .........21 Controller ........8 4.9.2... - Page 4 Page 4 AquaLink ® Touch™ Owner's Manual Section 10. System Setup ......32 Section 11. Heat Pump Setup ....... 44 10.1 System Setup Screen ........32 11.1 Solar Priority/Heat Pump Priority ....44 10.1.1 To Access System Setup ......32 11.2 Heat Pump (Heat Mode) .........44 10.2 Label Auxiliary Functions ........32 11.2.1...
- Page 5 15.1 Safety Delays and Lockouts ......62 15.2 Special Auxiliary Labels ........62 15.3 Controller Messages ........63 Section 16. AquaLink Touch Menu Flow Chart ..........64 EQUIPMENT INFORMATION RECORD DATE OF INSTALLATION INSTALLER INFORMATION INITIAL PRESSURE GAUGE READING (WITH CLEAN FILTER) PUMP MODEL...
-
Page 6: Important Safety Instructions
Page 6 AquaLink Touch™ Owner's Manual ® Section 1. Important Safety Instructions READ AND FOLLOW ALL INSTRUCTIONS Lire la notice technique. All electrical work must be performed by a licensed electrician and conform to all national, state, and local codes. When installing and using this electrical equipment, basic safety precautions should always be followed, including the following: DANGER... - Page 7 Page 7 AquaLink ® Touch™ Owner's Manual WARNING People with infectious diseases should not use a spa or hot tub. To avoid injury, exercise care when entering or exiting the spa or hot tub. Do not use drugs or alcohol before or during the use of a spa or hot tub to avoid unconsciousness and possible drowning.
-
Page 8: Overview Of The Aqualink Touch Controller
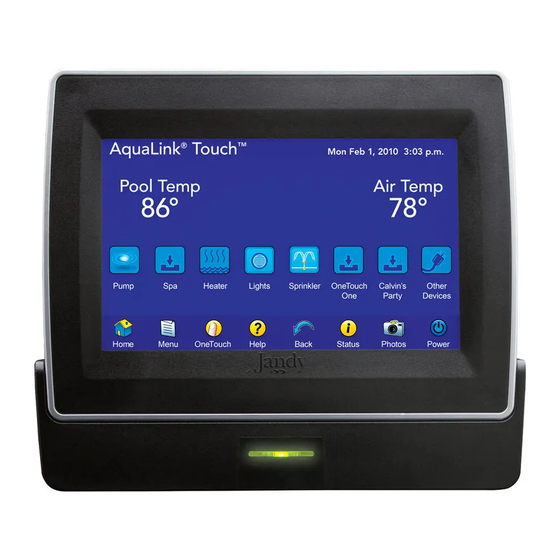
Wall Flush-Mount AquaLink Touch Controller This document gives in struc tions for operating the 8” 2 ¼” Jandy AquaLink Touch Controller. The in struc tions must be fol lowed exactly. Read through the instructions com plete ly before operating the equipment. -
Page 9: Basic Functions
Turning OFF the AquaLink Touch The AquaLink Touch controller is operated by touching To turn off the AquaLink Touch controller, touch the the screen with the tip of your finger or you may POWER button on the bottom navigation bar and a use a stylus pen or similar device. -
Page 10: Maintenance Information
Maintenance Information Section 3. Using the Home Screen Menu The AquaLink Touch screen can be easily scratched and damaged. This type of screen requires special care when Home Screen cleaning. Follow the steps below to safely clean the AquaLink Touch screen: Initially, when the AquaLink Touch controller is turned 1. -
Page 11: Navigation Bar
Page 11 AquaLink ® Touch™ Owner's Manual 3.1.3 Navigation Bar Section 4. Using the Menu Screen The navigation bar displays the following links: Menu Screen Returns the user to HOME screen. HOME Displays the main menu setup and The MENU screen provides access to the main links to MENU programming. -
Page 12: Adding Devices To The Circuit List
Page 12 AquaLink ® Touch™ Owner's Manual 4.2.1 Adding Devices to the Circuit List 4.2.2 ON/OFF Times Adding new devices to the circuit list on the MENU > SCHEDULE SCHEDULE screen is a two-steps procedure. First, you From the SCHEDULE screen, in the circuit schedule select and add the device to the circuit list and then you list, touch the desired equipment to be scheduled. -
Page 13: Set Temperature (For Pool And Spa Only System)
The default TEMP1 temperature is 80°F. The default 4.3.3 Chiller TEMP2 is 60°F. To use this feature, a Jandy AE Heat Pump/ NOTE 4.3.1 Pool Heat Chiller model must be installed. If not installed, the chiller button will not be displayed. -
Page 14: To Set Up Date/Time
Page 14 AquaLink ® Touch™ Owner's Manual To Set Up Date/Time Customize Home The DATE/TIME screen allows to enter the current The CUSTOMIZE HOME screen is used to link the date and time. The correct time and date ensures that icons of the HOME screen to general items, auxiliaries, programming will work properly. -
Page 15: Lockouts Password
Page 15 AquaLink ® Touch™ Owner's Manual Lockouts Password 4.6.2 To Set Lockout Password MENU > LOCKOUTS PASSWORD The LOCKOUTS PASSWORD menu prevents changes to specific AquaLink RS operations. From the MENU screen, touch the LOCKOUTS button When SYSTEM feature is on "LOCK", changes to to display the LOCKOUTS PASSWORD screen. -
Page 16: Aquapure
Page 16 AquaLink ® Touch™ Owner's Manual Once a password has been entered, you can NOTE access the device or menu item. If you do not Set Chlorine Production Thu January 1, 2009 3:03 PM press any keys for 10 minutes, then you will be required to enter the password when you try to Pool access the device or menu item. -
Page 17: To Pause, Restart And Stop Quick Boost
Touch Setup ▪ Touch the STOP button to stop the operation. The TOUCH SETUP screen allows you to set up the This screen will appear on the AquaLink Touch NOTE display features of the AquaLink Touch controller controller when the AquaPure chlorinator starts screen. -
Page 18: Brightness
4.8.1 Brightness CALIBRATE TOUCHSCREEN button. A CONFIRM The AquaLink Touch screen is designed to be lit so dialog box will appear, touch the OK button to proceed that you can use this controller in various lighting and the CALIBRATION screen shown below will conditions. -
Page 19: Address
4.8.4 Address At the J-box, remove the cover to expose the PCB. Up to four (4) AquaLink Touch controllers can be connected to a system, but each device must be set to a unique address. From the TOUCH SETUP screen, toggle the ADDRESS Red LED button to change the address. -
Page 20: Aqualink Touch J-Box Led Operation
RF channel, then press ENTER. Using the to OFF and press the J-Box RESET switch. arrow buttons, select the desired channel then touch 11. After a short time, the AquaLink Touch will return ENTER. to the “waiting for connection…” screen, then to the home screen when connected successfully. -
Page 21: A And B Groups
Page 21 AquaLink ® Touch™ Owner's Manual 4.9.1 A and B Groups 4.9.4 Custom Label Highlight the GROUP A or B button to manually switch The CUSTOM LABEL screen displays a virtual groups. keyboard and allows users to type data by touching the keys. -
Page 22: Using The Onetouch Menu
Page 22 AquaLink ® Touch™ Owner's Manual 4.9.4.2 Using the Numeric Keyboard Section 5. Using the OneTouch Menu From the CUSTOM LABEL screen, touch the ALPHA/ NUMERIC button to display the numeric keyboard. OneTouch The numeric keyboard, besides the number keys, has extra characters available. -
Page 23: All Off
OneTouch 6 Help Thu January 1, 2009 3:03 PM Home Menu OneTouch Help Back Status Power Photos For Service Interface: AquaLink Touch Model: RS-4 Only Call AquaLink: Rev Q.30 CPU p/n: E0280801 TL Rev: TLSim01 Local Service Co JBox Rev: W.in... -
Page 24: Help Remotes
Help Remotes Thu January 1, 2009 3:03 PM display the EQUIPMENT STATUS screen. RS485 Devices For Service OneTouch Use the UP or DOWN arrows to display additional AquaLink Touch 1 Call All Button equipment. Serial Adaptor RS InterLink Local Service Co... -
Page 25: Using The Photos Menu
From the CHOOSE IMAGES screen, touch the photos you wish to use. The selected photos will be The AquaLink Touch case housing has a slot where you highlighted. Touch the SAVE button to save the selected insert the memory card and then import the photos you pictures to the AquaLink Touch memory. -
Page 26: To Enable Slideshow
Page 26 AquaLink ® Touch™ Owner's Manual 8.4.1 To Enable Slideshow 8.4.3 Sleep Mode and Sleep Time The SLIDESHOW button is used to enable or disable When enabled, the SLEEP MODE will turn off the the slideshow. When ENABLED, the slideshow will be screen as set in SLEEP TIME. -
Page 27: Using Other Devices On/Off
(manual or pre-programmed). on if you want to display the pool temperature, or if you want to heat the pool. AquaLink Touch Thu January 1, 2009 3:03 PM HOME > OTHER DEVICES ON / OFF > FILTER PUMP Pool Temp Air Temp 86º... -
Page 28: Spa
Page 28 AquaLink ® Touch™ Owner's Manual Spa Heat (Dual Equipment) The SPA mode switches water circulation from the pool The SPA HEAT enables the heater for the spa. It uses to spa (pool/spa combination models only). Turning on the settings from SET TEMP menu, or you can increase/ the spa also activates the filter pump (after a delay for decrease when enabling. -
Page 29: Auxiliary Equipment
Page 29 AquaLink ® Touch™ Owner's Manual For solar heating to take place, the SOLAR HEAT (in Touch the auxiliary assigned to the color light on the DEVICES ON/OFF) must be enabled, and also the filter DEVICES screen to display the SET COLORS screen pump must be on. -
Page 30: Temp1 / Temp2 (Pool Or Spa Only)
Page 30 AquaLink ® Touch™ Owner's Manual When a pool or spa light is turned ON manually, NOTE by the OneTouch control panel, or by a Set Temperature Thu January 1, 2009 3:03 PM program, the last used color will automatically Set To: be chosen unless you press SELECT to change Temp 1... -
Page 31: Two Speed Operation (*Not Available For Export Models*)
Page 31 AquaLink ® Touch™ Owner's Manual 9.10 Two Speed Operation (*Not 9.10.2 High Speed Filtration Pump Available for Export Models*) HOME > OTHER DEVICES ON / OFF > FILTER PUMP/ SPA This equipment may not be part of your system. NOTE From HOME menu, touch the OTHER DEVICES ON/ Please check with your installer. -
Page 32: Section 10. System Setup
Touch features. This section of the manual provides Clear Memory instructions to set up most of these equipment. Cancel Delay For the following equipment, see their corresponding section. See Section 2, "Overview of the AquaLink Touch Home Menu OneTouch Help Back Status Photos Power Controller". -
Page 33: Color Lights
Color Lights Touch an auxiliary to be assigned to a color light. “JC” will appear next to the AUX if a Jandy Colors has been assigned. “JL” will appear next to the AUX if a Jandy This equipment may not be part of your system. -
Page 34: To Set Up Seasonal Adjust
Page 34 AquaLink ® Touch™ Owner's Manual 10.4.1 To Set Up Seasonal Adjust DECEMBER, OCTOBER, JANUARY, NOVEMBER FEBRUARY MENU > SYSTEM SETUP > ESP LINK > SEASONAL ADJ OFF time is substracted From the SYSTEM SETUP screen, touch the ESP OFF time OFF time LINK button to display the ESP LINK screen. -
Page 35: Onetouch
Page 35 AquaLink ® Touch™ Owner's Manual 10.6 OneTouch 10.6.2 Select Name This screen allows custom configuration of the six (6) Touch the SELECT NAME button on the ONETOUCH OneTouch mood/scene buttons. Each mood setting SETUP menu to display the ONETOUCH SETUP allows for an independent thermostat setting. -
Page 36: Spa Side Switch
Page 36 AquaLink ® Touch™ Owner's Manual 10.7.1 Spa Side Switch 10.7.2 SpaLink Setup ® The 4 Function Spa Switches are spa, spa heat, aux1 The 8 Function SpaLink are spa, spa heat, aux1, aux2, and aux2. Write down the spa side switch button aux3, aux4, aux5, and aux6. -
Page 37: Device Runtime
Page 37 AquaLink ® Touch™ Owner's Manual 10.8 Device Runtime 10.9.1 To Set Up Maintain Temp The DEVICE RUNTIME menu is used to assign a Note that the MAIN TAIN TEMP will run the pump runtime for a device or auxiliary. for the chosen body of water to keep the water at the desired temperature, is this function is ON and the When the device is turned on from the OTHER... -
Page 38: Rs Interlink
During operation, this name will appear on Touch the FREEZE PROTECT button on the SYSTEM the AquaLink Touch Date/Time screen. SETUP menu to display the FREEZE PROTECT menu. The RS InterLink feature must be enabled... -
Page 39: Assign Jvas
10.12 Assign JVAs "To Set Up Date/Time" 4.4, The ASSIGN JVAs menu allows Jandy Valve Actuators MENU > SYSTEM SETUP > DUSK SETUP (JVAs) to be assigned to any auxiliary button. This From the SYSTEM SETUP screen, touch the DUSK means that whenever you press that auxiliary button, SETUP button to display the DUSK SETUP screen. -
Page 40: Dusk Setup Off Time
Page 40 AquaLink ® Touch™ Owner's Manual 10.13.1 Dusk Setup Off Time 10.13.3 Assign Devices From the DUSK SETUP screen, touch the OFF TIME From the DUSK SETUP screen, touch the SET button to display the DUSK SETUP OFF TIME screen DEVICES button to display the screen as shown below. -
Page 41: Pump Lockout
Page 41 AquaLink ® Touch™ Owner's Manual 10.15 Pump Lockout 10.17 Product Information The PUMP LOCKOUT menu allows you to enable The PRODUCT INFO screen is used to enter a custom (pump off) or disable (pump stays on) when valves are product name, local service company name and rotating from pool to spa. -
Page 42: Customize Service Phone
Page 42 AquaLink ® Touch™ Owner's Manual 10.19 Temp Calibration 10.17.2 Customize Service Phone This menu allows adjustment of the temperature that SYSTEM SETUP > PRODUCT INFO is displayed on the AquaLink RS. The temperature can From the PRODUCT INFO screen, touch the only be adjusted up four (4) degrees Fahrenheit or down CUSTOMIZED SERVICE PHONE to view the screen four (4) degrees Fahrenheit. -
Page 43: To Set Up Degrees
This menu is used to enable or disable the automatic in floor cleaning feature. When enabled, the AquaLink RS In-Floor Chemlink Disable rotates the in-floor Jandy valve actuators (JVAs) every 20 minutes. In-floor cleaning only works when the filter Clear Memory pump is on. -
Page 44: Cancel Delay
Page 44 AquaLink ® Touch™ Owner's Manual 10.23 Cancel Delay Section 11. Heat Pump Setup This feature is for use by service personnel NOTE 11.1 Solar Priority/Heat Pump Priority only. The SOLAR PRIORITY/HEAT PUMP menu allows the MENU > SYSTEM SETUP > CANCEL DELAY system to use SOLAR HEAT/HEAT PUMP primarily. -
Page 45: Heat Pumps Controlled By Extra Aux/Solar Boost Relay
Page 45 AquaLink ® Touch™ Owner's Manual 11.2.1 Heat Pumps Controlled by Extra 11.2.3 Heat Mode Aux/Solar Boost Relay MENU > SYSTEM SETUP > HEAT PUMP In order to use the heat pump, the filter pump must be From the SYSTEM SETUP screen, touch the HEAT turned on and the heat pump must be in HEAT MODE, PUMP button to display the HEAT PUMP SETUP and the switch on the heat pump on the equipment pad... -
Page 46: Heat Pump (Chiller Mode)
Page 46 AquaLink ® Touch™ Owner's Manual 11.3 Heat Pump (Chiller Mode) NOTE If SOLAR HEAT is not to be controlled by the system then set the DIP switch S2-1 to ON and connect the HEAT PUMP temperature sensor to NOTE This equipment may not be part of your system. -
Page 47: Section 12. Variable Speed Pump Setup
Page 47 AquaLink ® Touch™ Owner's Manual Section 12. Variable Speed Pump The VAR SPEED PUMP menu is used to select the variable speed pump type (Jandy ePump™, Pentair ® Setup IntelliFlo VF, Pentair IntelliFlo VS, or Pentair ® IntelliPro VS) and to select the various pump settings. -
Page 48: To Set Up The Pump Application
The select each pump (1-4) and configure how the pump(s) SCALE setting is fixed to RPM for the Jandy ePump are to be used. For example if the pump is to be used for and the Pentair ®... -
Page 49: To Set Up The Priming Duration Time
VSP Speed Setup Thu January 1, 2009 3:03 PM time. Pump Model Application Jandy ePump Filtration VSP Set Primming Duration Thu January 1, 2009 3:03 PM Pentair VS Aux Pump Pentair VF... -
Page 50: Default Preset Speed Labels (Rs Combo And Rs Only)
Page 50 AquaLink ® Touch™ Owner's Manual From the GENERAL LABELS list, highlight the Preset 1: desired device and touch the SAVE button. Use PAGE The default label for preset #1 is POOL. This label is UP /PAGE DOWN to scroll though the list. If you want tied to the pool filtration mode. -
Page 51: Default Preset Speed Labels (Dual Equipment)
Page 51 AquaLink ® Touch™ Owner's Manual Preset 7: Preset 2: If the system is in the SOLAR HEAT mode or the On a dual equipment system when a pump is configured HEAT PUMP mode then the pump will run at this preset as a SPA PUMP, the default label for preset #2 is SPA. -
Page 52: Sprinkler System Setup
Page 52 AquaLink ® Touch™ Owner's Manual Section 13. Sprinkler System Setup This feature may also be used to quickly turn off NOTE all sprinkler valves. This equipment may not be part of your system. NOTE OTHER DEVICES ON / OFF > SPRINKLERS > CANCEL TODAY Please check with your installer. -
Page 53: Manually Starting A Sprinkler Program
Programming Sprinkler System are run in succession, in numerical order. The sprinkler system enters ENA state at the end of manually started The AquaLink Touch Controller offers a versatile, easy programs. to use features to program your sprinkler system. Up to... -
Page 54: To Set Up The Water Days
Page 54 AquaLink ® Touch™ Owner's Manual 13.2.3 To Set Up the Sprinkler Valve 13.2.1 To Set Up the Water Days Duration Time You can choose All to run the program all week long, The Sprinkler Control module will control up to eight Even Days, Odd Days or select the desired day(s) to run (8) valves, plus one (1) master valve. -
Page 55: Section 14. Chemlink™ Setup
Page 55 AquaLink ® Touch™ Owner's Manual Section 14. ChemLink™ Setup 14.2 To Confi gure the ORP Controller From the CHEMLINK setup screen, highlight the ORP/ The ChemLink controller automatically monitors and pH SETUP item and then touch SELECT to display the maintains both the sanitizer and the pH balance in CHEMLINK ORP/pH setup screen. -
Page 56: Orp Feeder Type
14.2.1 ORP Feeder Type 14.2.3 ORP Delay On Time Depending on your installation, the AquaLink Touch From the CHEMLINK ORP setup screen, highlight the may display the following feeders: DELAY OT time. Use the UP and DOWN arrows to adjust the delay on time. Touch SAVE when finished. -
Page 57: Orp Alarm - High Alert
Page 57 AquaLink ® Touch™ Owner's Manual 14.2.5 ORP Alarm - High Alert 14.2.7 Wait or Stop pH The high alert alarm sets an alarm to deactivate the From the CHEMLINK ORP setup screen, highlight controller in the event of an ORP reading that is out of the WAIT PH/STOP PH entry. -
Page 58: Orp Next Cleaning
ORP Next Cleaning 14.3.1 pH Feeder Type Manually set reminder to clean the ORP sensor. Enter Depending on your installation, the AquaLink Touch Month, then Year for automatic reminder. may display the following feeders: ▪ Default - JAN 01 (essentially OFF). -
Page 59: Ph Delay On Time
Page 59 AquaLink ® Touch™ Owner's Manual 14.3.3 pH Delay On Time 14.3.5 pH Alarm - High Alert The delay on time sets the amount of time the controller The high alert alarm sets an alarm to deactivate the waits to dose the pool again. controller in the event of a pH reading that is out of high range. -
Page 60: Ph Acid Or Base Feed
Page 60 AquaLink ® Touch™ Owner's Manual 14.3.7 pH Acid or Base Feed 14.3.9 pH Next Calibration From the CHEMLINK pH setup screen, highlight the Manually set reminder to clean the pH sensor. Enter Month, then Year for automatic reminder. ACID/BASE entry. -
Page 61: Manual Feed Activation
These switches are an after-market product and not available through Jandy. There are only provisions for one (1) switch. The switch must be normally closed (NC). -
Page 62: Section 15. Glossaries
Page 62 AquaLink ® Touch™ Owner's Manual Section 15. Glossaries Spillover When Dip Switch S1-3 is in the ON position, the Aux. 3 relay socket is activated and the return valve actuator turns. 15.1 Safety Delays and Lockouts The spillover is disabled while the spa is on. A message is displayed when spillover is turned on while in spa mode (water cir cu la tion is to spa). -
Page 63: Controller Messages
Page 63 AquaLink ® Touch™ Owner's Manual 15.3 Controller Messages PUMP WILL TURN ON AFTER DELAY This message is displayed during pool/spa switching. The AquaLink RS waits 35 seconds while the valves turn from CLEANER CANNOT BE TURNED ON WHILE SPA IS ON pool position to spa position (or vice-versa) before activating This message is displayed if the pool cleaner is activated the fi... -
Page 64: Section 16. Aqualink Touch Menu Flow Chart
Page 64 AquaLink ® Touch™ Owner's Manual Section 16. AquaLink Touch Menu Flow Chart HOME ADD PROGRAM SCHEDULE SELECT EQUIP DELETE POOL HEAT CHANGE SPA HEAT SET TEMP CHILL HEAT MAINTAIN MONTH, DAY, YEAR DATE/TIME HOURS TIME GENERAL CUSTOMIZE HOME JANDY EPUMP™... - Page 65 Page 65 AquaLink ® Touch™ Owner's Manual SYSTEM SETUP HOME HEAT MODE HEAT PUMP HEAT PUMP IS CONTROLLED VIA SOLAR PUMP RELAY CHILL MODE LOW TEMP HEAT PUMP ITEM SEEN IN REVISION “N” OR LATER ENABLED HEAT PUMP PRIORITY (OPTIONAL EQUIPMENT) DISABLED DIP SWITCH S2-1 MUST BE ON.
- Page 66 ENABLED SLEEP MODE 3 MIN DISABLED SLEEP TIME SET TIME TOUCH SETUP NO ACTIVITY BRIGHTNESS ENABLED SOUND DISABLED CALIBRATE AQUALINK TOUCH ADDRESS POOL 100% SET AQUAPURE ® (OPTIONAL EQUIPMENT) START QUICK BOOST GO BACK SET TIME BOOST SET UP POOL...
- Page 67 Page 67 AquaLink ® Touch™ Owner's Manual NOTES...
- Page 68 CONFORMS TO ANSI/UL STD. 60950-1 CERTIFIED TO CAN/CSA STD. C22.2 NO. 60950-1 Zodiac Pool Systems, Inc. 6000 Condor Drive • Moorpark, CA USA 93021 • 800.822.7933 • Fax 877.327.4103 Litho in U.S.A. © Zodiac Pool Systems, Inc. 1001...
Need help?
Do you have a question about the AquaLink Touch and is the answer not in the manual?
Questions and answers