Table of Contents
Advertisement
Quick Links
Advertisement
Table of Contents

Related Manuals for Proceq ZRP 6030+


Summary of Contents for Proceq ZRP 6030+
- Page 1 ZRP 6030+ Retroreflectometer Instruction Manual...
-
Page 2: Table Of Contents
Index Index ............................. 2 Exclusion of liability ......................5 1 Description of device ....................6 2 Safety information ......................7 2.1 Symbols used ......................7 2.2 Safety notes and hints ................... 7 3 Delivery of device ......................9 3.1 Damages during carriage ..................9 3.2 Shipment ......................... - Page 3 Taking average measurements ..............21 Edit, delete and store measurements ............22 9 Quickstart menu ......................23 9.1 Menu ........................23 10 Options .......................... 25 10.1 WAAS GPS-unit ....................25 10.2 Portable USB-printer ..................26 10.3 Built-in thermal printer ..................26 Replacing the thermal paper roll ............
- Page 4 Date and time ................... 39 Power ......................39 Sound ......................39 Database ....................40 Printer ......................40 Calibrate....................40 Units ......................41 Options....................41 Reset settings to factory default ............41 13.7 Diagnostics ......................42 14 Built-in battery and charging ..................42 14.1 Battery .........................
-
Page 5: Exclusion Of Liability
Illustrations, descriptions as well as the technical specifications conform to the instruction manual on hand at the time of publishing or printing. However, Proceq SA policy is one of continuous product development. All changes resulting from technical progress, modified construction or similar are reserved without obligation for Proceq SA to update. -
Page 6: Description Of Device
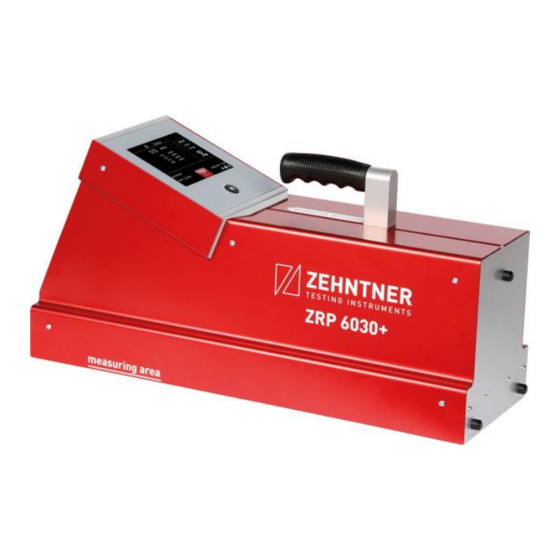
Description of device The ZRP 6030+ is a portable handheld retroreflectometer for determination of the night visibility (coefficient of luminous intensity R and R of road studs, ambient temperature (°C/°F) as well as relative humidity (rH %). In particular, this instrument has the following features •... -
Page 7: Safety Information
All maintenance and repair work which is not explicitly allowed and described in this manual (see chapter 15.1 “Maintenance to be carried out by the user” on page 44 shall only be carried out by Proceq SA or your authorized Proceq agent, failure to comply voids warranty. - Page 8 Make sure that the ZRP 6030+ is unplugged from power supply and turned off before any maintenance. For the operation of the ZRP 6030+ apply all local safety regulations. Page 8...
-
Page 9: Delivery Of Device
7 days. However, the period could vary depending on the courier. Hence, it is recommended to check the exact time limit when receiving the goods. If there are any damages also inform your authorized Proceq agent or Proceq SA immediately. 3.2 Shipment Should the device be transported again, it must be packaged properly. -
Page 10: Standard Delivery
3.3 Standard delivery Following parts are included in the delivery: retroreflectometer with 5.7" colour touchscreen calibration standard universal battery charger (100 - 240 V, 50 - 60 Hz) USB cable for data transfer to computer mapping and data analysis software "MappingTools"... -
Page 11: Carrying Case
3.4 Carrying case The ZRP 6030+ is delivered in a carrying case. Whenever you want to transport the instrument, use the case. Nevertheless, please note that for shipments the case has to be put into an additional cardboard box and protected with filling material. The carrying case is also optimal for storing the instrument. -
Page 12: Zehntner Zrp 6030+ Retroreflectometer R Advanced
All options can be retro-fitted, but some require return to the manufacturer for installation. Proceq SA refuses all warranty and liability claims for damages caused by usage of the ZRP 6030+ in combination with non-original accessories, or accessories from third party suppliers. -
Page 13: Device Overview
Device overview (20) (21) Measuring button Quick start menu button Touchscreen Handle Label incl. serial number (20) Indication of measuring direction (21) Measuring area Page 13... - Page 14 (13) (18) (12) (19) (11) (14) (22) (23) (24) (15) (22) (16) (21) (17) On/off button Quick start menu button Touchscreen Handle (11) Host USB-interface (type A) (12) Mini USB-interface (type B) (13) Current measuring value (14) Single values (15) Average value (16) Ambient temperature and relative humidity...
-
Page 15: Setting Up
Setting up By pressing the on/off button shortly, the instrument is switched on or off. The display will automatically change to the measure mode. Press the measuring button continuously during switching on to get directly into the language settings. After the “auto off time” has been reached or when the battery is completely drained, the instrument will be switched off automatically. -
Page 16: Calibrate
After the expiry date of the calibration standard a factory calibration of the ZRP 6030+ and its corresponding calibration standard is required. Contact either Proceq or your authorized Proceq agent. The factory calibration is valid for 2 years. The calibration standard delivered with the ZRP 6030+ is not interchangeable and is valid only for the instrument with the corresponding serial number. -
Page 17: Cleaning Of The Calibration Standard
7.2 Cleaning of the calibration standard If the calibration standard is soiled or covered by dust, it can be cleaned carefully using window cleaner and a soft tissue. A damaged or a polluted calibration standard may cause incorrect calibration and therefore incorrect measuring results. 7.3 Calibration on calibration standard If the instrument indicates that the calibration is outdated or if it is required by the applicable regulations, the ZRP 6030+ has to be calibrated. - Page 18 15.2 “Cleaning” on page 44 and recalibrate. When repeatedly experiencing a deviation greater than 15%, service or factory calibration might be required. Please contact Proceq or your authorized Proceq agent for further information. The standard settings for R can be seen by...
-
Page 19: Measure
Measure 8.1 Measuring procedure in general • Switch on the device and calibrate it before the first measurement. • Position the device on the road pavement marker (road stud) correctly as described in chapter 8.2 “Important information for a correct positioning” as from page 19. -
Page 20: Taking Measurements
When positioning the reflectometer, please also make sure that it is aligned with the measuring direction. Please note that some countries have regulations regarding the measuring procedure, e.g. about the number of measurements to be taken. 8.3 Taking measurements Taking single measurements Page 20... -
Page 21: Taking Average Measurements
To trigger a measurement press the measuring button .A measurement in progress is indicated by “-“ on the top line and the symbol in the top left corner. After a successful reading the current measurement value will be shown on the first line. -
Page 22: Edit, Delete And Store Measurements
Edit, delete and store measurements To add additional information like location, manufacturer and more to a measuring value, in single measure mode tap the measurement you want to edit. An editing menu will open next to the list. Enter additional information for the measurement by tapping “Comment”. -
Page 23: Quickstart Menu
or the button to open the special characters keyboard. Quickstart menu Press the symbol to get to the quickstart menu. Various functions can be accessed by pressing the respective icons below. 9.1 Menu In the menu different settings can be made. For more information on this please refer to chapter 13 “Menu”... - Page 24 This option allows to calibrate the retroreflectometer, as well as to change the calibration settings. For further information refer to chapter 7 “Calibrate” on page 16. Page 24...
-
Page 25: Options
10 Options 10.1 WAAS GPS-unit If equipped with the optional WAAS GPS unit, the ZRP 6030+ will store the GPS- coordinates of a measurement. If the ZRP 6030+ is switched on, the status of the GPS unit will be indicated next to the battery status symbol. The WAAS GPS-unit is not able to receive a No GPS signal positioning signal. -
Page 26: Portable Usb-Printer
GPS coordinates and device orientation can be viewed by pressing Coordinates will be stored for each measurement in the archive. The WAAS GPS-unit is not able to receive a positioning signal and no GPS coordinates will be stored. After switching on the ZRP 6030+, the WAAS GPS unit can take up to 15 minutes until receiving coordinates. -
Page 27: Replacing The Thermal Paper Roll
Replacing the thermal paper roll For replacing the thermal paper roll, carry out the following steps: cover recessed grip thermal paper roll cover • Position your finger under the recessed grip and open it with a slight pull. • Put the paper roll into the thermal paper roll feeder so that the end of the paper roll is on the top. -
Page 28: Archive
11 Archive All stored data are located in the archive. The archive can be accessed by pressing and selecting If the measurements are not stored automatically, the settings have been changed. This is described in chapter 13.3 “Measure mode” on page 36. 11.1 Sorting of measurements Measurements can be sorted by different criteria. -
Page 29: Overview Measurements (Sorted)
11.2 Overview measurements (sorted) This is an example sorted by job. All measurement files under a certain job are listed. R values are shown, with their respective date, time and job listed in the third column. For average measurements, the total count of measurements is also displayed in the last column. -
Page 30: Input Of Additional Information
11.4 Input of additional information Below the measurement data, additional information such as location, street etc. can be added or changed. To edit a value, tap the entry and press “Edit”, then enter the new value and confirm. 11.5 Printing of a measuring report Select a printer by pressing the symbol The optional internal thermal printer or an external printer connected to the USB-... -
Page 31: Data Export And "Mappingtools" Software
12 Data export and “MappingTools” software 12.1 Interfaces The ZRP 6030+ is equipped with the following interfaces for data export: Host USB-interface (type A) for external units such us USB-stick and keyboard Client USB-interface (type B mini) for connection to a computer. -
Page 32: Evaluation And Mapping Software "Mappingtools
After the device has been recognised, it will be displayed in Windows as a removable device. To create a back-up of the data, copy (the files Store.sdf, Store.zsdf and the folder Pics) to your desired backup volume. The measuring archive on the ZRP 6030+ can be viewed using our free mapping software „MappingTools”. - Page 33 If the ZRP 6030+ is equipped with the optional WAAS GPS-module and there was a valid GPS signal when the measurements have been taken, they will be displayed in the mapping browser. Page 33...
-
Page 34: Data Export To Microsoft Excel
12.4 Data export to Microsoft Excel After opening the measuring data using „MappingTools“ you can export them to Microsoft Excel, as described in the separate „MappingTools” instruction manual. An Excel measuring report may look as follows: Page 34... -
Page 35: Menu
13 Menu 13.1 Menu structure Page 35... -
Page 36: Navigation In The Menu
13.2 Navigation in the menu Press to open the menu. The top bar shows the name of the currently selected option. Most device options can be configured and turned on/off from the menu. Refer to chapter 6 “Navigation” on page 15. 13.3 Measure mode and selecting “Measure mode”... -
Page 37: Timers
13.4 Timers and selecting “Timers” Path: > The interval timer can be used for carrying out specific tests, e.g. in product development. Measurements will be taken continuously until the indicated number of interval counts has been reached. The interval timer can be used to define the performance of the retroreflection of a marking in dependence on the drained water at wet measurements. -
Page 38: Setup
If you want to contribute with a new language or if you have some comments on an existing one, please feel free to contact Proceq. Page 38... -
Page 39: Date And Time
Date and time and selecting “Setup” Path: -> Select “Date and time”. The current date and time as well as the date and time format can be changed in this menu. Top list: Bottom list Power and selecting “Setup” Path: ->... -
Page 40: Database
Database and selecting “Setup” Path: -> Select “Database”. Here it is possible to create a new database or select, rename or delete an existing one. You can export a database to a *.csv (comma separated text) file, which can be edited e.g. in Excel. Before deleting a database, make sure you have selected the correct one and made a backup of it if necessary. -
Page 41: Units
Units and selecting “Setup Path: -> “ Select “Units” from the menu to choose the preferred measurement units. Options and selecting “Setup” Path: -> Select “Options”. Installed options can be activated and deactivated for each user profile. Only installed options are shown. Reset settings to factory default and selecting “Setup”... -
Page 42: Diagnostics
13.7 Diagnostics and selecting “Setup” Path: -> Select “Diagnostics” and “Info” to display diagnostic information. The following information will be displayed: • Device name • Company name • Device serial number • Software version • Measurement counter • Disk space •... -
Page 43: Battery Status Indication On The Display
If the indicator light is green, the battery is fully charged. Always charge the battery completely and only use the supplied charger. The battery may only be replaced by Proceq or by an authorized Proceq- agent. If you have not used your ZRP 6030+ for a longer time, e.g. for several months, the battery should be charged before using. -
Page 44: Maintenance
27. (if your instrument is equipped with the optional thermal printer) All other maintenance and repair work may only be carried out by Proceq SA or your authorized Proceq agent, otherwise all warranty will void. -
Page 45: Status And Error Messages
Clean the standard as described in chapter 7.2 “Cleaning of the calibration standard” on page 17 and recalibrate. When repeatedly experiencing a deviation greater than 15%, service or factory calibration might be required. Please contact Proceq or your Page 45... -
Page 46: Error Message - "Factory Calibration Has Expired
Proceq agent for further information. 16.4 Error message – “Factory calibration has expired” ” Press the warning triangle and afterwards the advice “Factory calibration has expired” to get a more detailed explanation. The date of the last factory calibration dates back more than 2 years. -
Page 47: Technical Specification
18 Technical specification Observation angle: based on EN 1463 : 0.30° ASTM E1696 : 0.20° Illumination angle: based on EN 1463: 1° ASTM E1696: 1° 130 mm x 30 mm (5.12” x 1.18”) Measuring area WxH): Measuring sensor: adapted to V () 0-2’000 mcd∙lx Measuring range: Repeatability:... -
Page 48: Glossary
Glossary Compass ........... 28 Configurations ........11 Accumulator Capacity ......... 41 Charging ........42 Damages during carriage....9 Replacing ........42 Data export ........30, 31 Status indication ......42 Database ........... 39 Apparatus Date and time ........38 Information ........41 Delete Name .......... - Page 49 Cleaning ......... 43 Mapping Tools........31 Factory calibration expired ....45 Mean values ........21 Factory settings Measure mode ........19 Reset ..........40 Measurements Features ..........6 Average .......... 21 Firmware version ......41 Counter .......... 41 Delete ........27, 36 Edit ..........
- Page 50 Printing Storage Measuring report ......29 Temperature ......... 46 Store Database to USB flash drive ..29 Measurements ......22 Quickstart menu ....... 23 Switching off ........15 Reset ..........45 Taking Factory settings ......40 Average measurements ....21 Mean values........
- Page 52 Subject to change. Copyright © 2017 by Proceq SA, Schwerzenbach. All rights reserved. www.proceq.com Version 1.3 dated 02.10.2019...
Need help?
Do you have a question about the ZRP 6030+ and is the answer not in the manual?
Questions and answers