
Subscribe to Our Youtube Channel
Related Manuals for Proceq Zehntner ZRM 6010


Summary of Contents for Proceq Zehntner ZRM 6010
- Page 1 Zehntner ZRM 6010 Retroreflectometer R Firmware as from 2.1.0 Instruction Manual...
-
Page 2: Table Of Contents
3.2 Shipment ....................11 3.3 Standard delivery ..................12 3.4 Carrying case ..................... 13 3.5 Configurations .................... 13 3.5.1 Zehntner ZRM 6010 Retroreflectometer R Basic ......13 This version is without built-in options............13 3.5.2 Zehntner ZRM 6010 Retroreflectometer R Pro ........ - Page 3 8.1.3 Mounting the positioning support ............21 8.2 Measuring area and illumination field ............21 8.3 Measure mode .................... 23 8.3.1 Single measurements ................ 23 8.3.2 Average measurements ..............23 8.3.3 Wet measurements ................24 8.3.4 Measurements with picture ..............25 8.3.5 Edit, delete and store measurements ..........
- Page 4 12.4 Data export to Microsoft Excel ..............44 13 Menu ......................... 45 13.1 Menu structure ..................45 13.2 Navigation in the menu ................46 13.3 Measure mode ..................46 13.4 Timers ....................... 46 13.4.1 Wet timer ..................46 13.4.2 Interval timer ................... 46 13.5 Jobs ......................
- Page 5 16.4 Error message – “Factory calibration has expired” ........60 16.5 Error message – “Camera failed, please retry” .......... 60 16.6 Reset of the Zehntner ZRM 6010 .............. 60 17 Graphical illustration of the measuring principles ..........61 17.1 Night visibility R ..................
-
Page 6: Exclusion Of Liability
The content of this document is intellectual property Proceq SA. Illustrations, descriptions as well as the technical specifications conform to the instruction manual on hand at the time of publishing or printing. However Proceq SA policy is one of continuous product development. All changes resulting from technical progress, modified construction or similar are reserved without obligation for Proceq to update. -
Page 7: Description Of Device
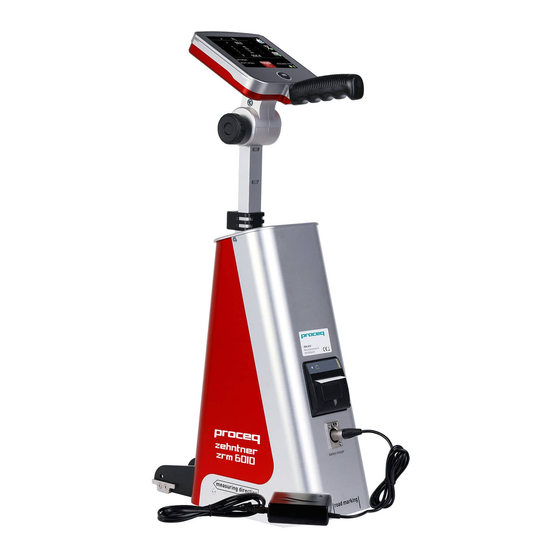
Description of device The Zehntner ZRM 6010 is a portable handheld top class Retroreflectometer for determination of night visibility (R ) for all types of road markings. In particular, this instrument has the following features • 5.7“ high resolution colour touchscreen with excellent visibility under all light conditions •... - Page 8 Features of options: • The integrated 5-megapixel camera takes pictures of the road marking for additional visual evaluation • The data of the compass and level-meter deliver additional information to the retroreflection measuring values • With the GNSS GPS-unit is possible to display the measurement in the included mapping and data analysis software “MappingTools”...
-
Page 9: Safety Information
2.2 Safety notes and hints The Zehntner ZRM 6010 is a high quality, state of the art instrument and is safe to operate. Nevertheless there is always risk when the instrument is handled inappropriately. - Page 10 All maintenance and repair work which is not explicitly allowed and described in this manual (see chapter 15.1 “Maintenance carried out by the user” on page 58) shall only be carried out by Proceq SA or your authorized Proceq agent, failure to comply voids warranty.
-
Page 11: Delivery Of Device
7 days. However, the period could vary depending on the carrier. Hence, it is recommended to check the exact time limit when receiving the goods. If there are any damages also inform your authorized Proceq agent or Proceq SA immediately. 3.2 Shipment Should the device be transported again, it must be packaged properly. -
Page 12: Standard Delivery
3.3 Standard delivery Following parts are included in the delivery: battery operated retroreflectometer with 5.7" colour touchscreen, telescopic handle battery charger (100 - 240 V, 50 - 60 Hz) mapping and data analysis software "MappingTools" USB cable product certificate certificate of calibration calibration standard positioning support Carrying case with wheels... -
Page 13: Carrying Case
The transportation case is an optimal storage case for the equipment. When not in use, the Zehntner ZRM 6010 should be locked into the calibration standard and safely stowed in the carrying case. -
Page 14: Zehntner Zrm 6010 Retroreflectometer R Advanced
• 41020902 voltage converter 150 W to be plugged into the car cigarette lighter Proceq refuses all warranty and liability claims for damages caused by usage of the Zehntner ZRM 6010 in combination with non-original accessories, or accessories from 3 party suppliers. -
Page 15: Device Overview
Device overview (12) (13) On/Off button Measuring button Touchscreen Handle Telescopic handle Release turning knob Height shifting knob Optional built-in thermal printer Host USB-interface (type A) (10) (10) Mini USB-interface (type B) (11) Measuring area (12) Label with serial number (14) (13) Port for battery charger (14) Height lock... - Page 16 (16) (17) (21) (24) (22) (23) (18) (19) (20) (15) (25) (15) Quick start menu button (16) Current measuring value (17) Single values (18) Average value (19) Ambient temperature & relative humidity (20) Battery status (21) Wet timer (22) Multiple measurement with average (23) Optional camera (24) Number of measurements in average mode (25) GPS status...
-
Page 17: Setting Up
Setting up By pressing the On/Off button , you switch on/off the instrument. During startup, the Zehntner-logo will be displayed. Press and hold the measuring button during startup to directly access display for language selection. Navigation 6.1 Activation/deactivation By pressing icons on the display certain functions are activated or deactivated. -
Page 18: Calibrate
The calibration standard has been measured and the calibration value of R been inscribed. Always protect the calibration standard from dust, moisture and other environmental influences and safley store it in the carrying case of the Zehntner ZRM 6010. Calibration standard Label After the expiry date of the calibration standard a factory calibration of the ZRM 6014 and its corresponding calibration standard is required. -
Page 19: Calibration On Calibration Standard
7.3 Calibration on calibration standard When the instrument indicates that the calibration is outdated, or if it is required by the applicable regulations, the instrument should be calibrated. Remove the instrument and the calibration standard from its carrying case. Tilt the instrument slightly forward facing and insert it into the frontal prong support. -
Page 20: Measure
The Zehntner ZRM 6010 has a telescopic handle which grants triggering measurements comfortable at the street and in the laboratory. After removing the Zehntner ZRM 6010 from the carrying case, the length of the telescopic handle can be adjusted to the right length and the handle can be turned into the right angle. -
Page 21: Adjusting The Length Of The Telescopic Handle
8.1.1 Adjusting the length of the telescopic handle 8.1.2 Adjusting the angle of handle and display 8.1.3 Mounting the positioning support Mounting the positioning support is quick and easy. Lay the positioning support to the floor, tilt the instrument slightly to the front and slide it in this position into the frontal prong support. - Page 22 The actual measuring takes place in the area which is concurrently covered by measuring area and illumination field. The positions of measuring area and illumination field shift depending on the measuring height (e.g. profiled markers). h = -1 mm h = 0 mm h = 1 mm h = 2 mm h = 3 mm...
-
Page 23: Measure Mode
8.3 Measure mode For instructions on the correct positioning of the device on the road marking please refer to chapter 8.4 and 8.5 as from page 26 For editing or deleting measurements please refer to chapter 8.3.5 on page 25 For changing the settings of the measure mode, please refer to chapter 13.3 on page 46 8.3.1 Single measurements... -
Page 24: Wet Measurements
8.3.3 Wet measurements The Zehntner ZRM 6010 is perfectly suitable for measuring night visibility on wet road markings according EN 1436 and ASTM E2177 (“bucket” method) or for measuring night visibility under contiouous wetting using a rain simulator according ASTM E2832 or EN 1436. -
Page 25: Measurements With Picture
8.3.4 Measurements with picture If the instrument is equipped with the optional camera pictures to a measurement can be taken. The usage of this option is described more deeply in chapter 10.1.1 “Taking measurements with picture” on page 33. 8.3.5 Edit, delete and store measurements To add location, manufacturer and other info to a measuring value, tap the measurement you want to edit. -
Page 26: Information For A Proper Measuring Procedure
If there is significant unevenness in the road marking use the positioning support. 8.5 Measuring profiled markings The Zehntner ZRM 6010 is capable of measuring profiled road markings with profiles of heights between -1mm up to +15 mm. The measuring geometry is according to the standards EN 1436 and ASTM E1710 within this range. - Page 27 Profiled road markings are not homogenous considering their retroreflection (normally the front side has a higher retroreflection value than the upper side). Cause of that measuring of a profiled road marking means that an average value from several measurements has to be calculated which respects all areas on and between the profiles evenly.
-
Page 28: Procedure Of Measurement
8.5.2 Procedure of measurement Activate the averaging mode by touching the symbol . This is acknowledged by showing the checking mark Place the instrument on the profiled road mark in a way that the first mark on the positioning support lays on the front edge of a specific profile. - Page 29 Repeat the last step n times until you measured a sufficient number of profile sections and the first mark on the positioning support is on the front edge of a profile again. Do not execute a measurement on the last postion! You measured this kind of position with the first measurement already.
-
Page 30: Comments To The Measurement Of Profiled Road Marks
8.5.3 Comments to the measurement of profiled road marks Most oft he profiled road marks have a higher retroreflection value on the front side than on the upper side. By measuring several places of a profile an average value over the whole profile is calculated, which respects front and upper side evenly and therefore integrates the overall impression of the road mark. -
Page 31: Local Regulations
8.6 Local regulations Please observe that some countries have regulations regarding the measuring procedure. E.g. it could be regulated how many measurements must be taken. Please inform about your local regulations. 8.7 Obtain exact measuring values Ensure that the marking to be measured is as flat as possible along the whole measuring range of the device, otherwise the measuring angles would change. -
Page 32: Quickstart Menu
GNSS GPS-unit had been aquiered. Press the icon to get some information about the current positioning of Zehntner ZRM 6010. For further information refer to chapter 10.2 on page 35 or to chapter 11.3 on page 39. -
Page 33: Options
10 Options 10.1 Built-in camera for pictures With the optional camera the Zehntner ZRM 6010 features the possibility to take pictures of the road markings in a resolution of up to 5MP (2592 x 1944). This is very helpful for the interpretation of the measuring data. The pictures are intended for the evaluation of road markings in regard of colour, type (type-I or type-II), embedding and allocation of glass beads, and if there is heavy soiling. - Page 34 Taking single measurements with picture Only the symbol is activated. To trigger a measurement press the measuring button . The picture will be shown for about 5 seconds after the measurement. After this period, pictures can be viewed in the archive, as described in chapter 11 “Archive”...
-
Page 35: Compass And Level-Meter
GPS-unit but a GNSS module particularly, it can also use data from other navigation satellites like Galileo, Glonass and Beidou. If the module is built in, the Zehntner ZRM 6010 indicate left of the battery status the status of the GPS receiption. - Page 36 GPS coordinates will be stored. After switching the Zehntner ZRM 6010 on, it takes up to 15 minutes until the unit is receiving coordinates. The performance of the GPS module can be affected by narrow streets with high buildings that prevent clear view to the sky.
-
Page 37: Built-In Thermal Printer
10.4 Built-in thermal printer The Zehntner ZRM 6010 features the possibility to print out a measuring report using the optional built-in thermal printer. Replacing the thermal paper roll For replacing the thermal paper roll, you have to carry out the following steps:... -
Page 38: Archive
11 Archive All stored files are located in the archive. The archive can be accessed by pressing and selecting In case the measurements are not stored automatically, the settings have been changed. This is described in chapter 13.3 “Measure mode” on page 46. 11.1 Sorting of the measurements Measurements can be sorted by different criteria. -
Page 39: Overview Measurements (Sorted)
11.2 Overview measurements (sorted) This is an example sorted by job. All measurement files under a certain job are listed. R and Qd values are shown, in addition to date, time and job listed in the third column. For average measurements, the total count of measurements is also displayed in the last column. -
Page 40: Input Of Additional Information
PC using the software “MappingTools”. For further information, refer to the separate “MappingTools” instruction manual. 12 Data export and “MappingTools” software 12.1 Interfaces The Zehntner ZRM 6010 is equipped with the following interfaces for data export: • Host USB interface (type A) for external units such as USB drive or keyboard •... -
Page 41: Pc Mode
12.2 PC Mode The Zehntner ZRM 6010 can be connected to a computer using a Mini-USB cable connected to the client interface on the Zehntner ZRM 6010. The message „PC Mode” on the touchscreen of the Zehntner ZRM 6010 indicates a successful connection. - Page 42 Page 42...
- Page 43 If the Zehntner ZRM 6010 is equipped with the optional GNSS GPS-unit and there was signal when the measurements have been taken, then the measurements will be displayed in the mapping browser. Page 43...
-
Page 44: Data Export To Microsoft Excel
12.4 Data export to Microsoft Excel After opening the measuring data using the „MappingTools“ you are able to export them to Microsoft Excel, as described in the instruction manual „MappingTools“. An Excel-Measuring report may look as follows: Page 44... -
Page 45: Menu
13 Menu 13.1 Menu structure Page 45... -
Page 46: Navigation In The Menu
13.4 Timers 13.4.1 Wet timer The Zehntner ZRM 6010 is equipped with a countdown timer to take measurements exactly at the right time after the road marking has been moistened. Select “Timers” and “Wet timer” from the menu to activate the wet timer. - Page 47 Select “Timers” and “Interval timer” from the menu to activate the internal timer. The interval timer takes multiple measurements at the defined interval up to the selected count. “Interval time” sets the time between measurements and can be set from 5 to 1000 seconds. “Interval counts” sets how many measurements will be taken.It can be set to a value from 2 to 500.
- Page 48 USB flash drive as described in chapter 11.6” Storing the measuring data on a USB mass storage device” on page 40 or open the measuring data directly on the Zehntner ZRM 6010 as described in chapter 12 “Data export and “MappingTools” software” as from page 40.
- Page 49 Interval timer measuerements Seconds after start For the interpretation of the measuring data, we give you the following explanation: At the beginning the R -values surge until there is only a slight increase. This is expected from a type-II road marking sample. Page 49...
- Page 50 USB flash drive as described in chapter 11.6 ”Storing the measuring data on a USB mass storage device” on page 40 or open the measuring data directly on the Zehntner ZRM 6010 as described in chapter 12 “Data export and “MappingTools” software” as from page 40.
- Page 51 This can be used to show the developing graphically: Practical sample wet timer and interval timer Measurements For the interpretation of the above measuring data, we give you the following explanation: In the time range between 45 seconds and 60 seconds there is only a slight increase of the R -values.
-
Page 52: Jobs
13.5 Jobs The Zehntner ZRM 6010 features the possibility to relate measurements to a specific job. Depending on the type of your company (contractor, road laboratory, manufacturer of road marking materials) a job could be a specific client, the development of a specific product and so on. -
Page 53: Date And Time
13.6.3 Date and time Select “Setup” and “Date and time” from the menu. The current date and time as well as the date and time format can be changed in this menu. Top list: Bottom list 13.6.4 Power Select “Setup” and “Power” from the menu to set the auto off time. -
Page 54: Camera
13.6.7 Camera Select “Setup” and “Camera” from the menu. “Show pic after measurement” will show the picture after each measurement. It is activated by default. . “Time to show pic after measurement” sets how long the picture will be displayed. If the function “Only one pic in average mode”... -
Page 55: Options
13.6.12 Reset settings to factory default Select “Setup” from the menu. “Reset settings to factory default” will reset all settings of the Zehntner ZRM 6010 to factory defaults. This cannot be undone. If you are sure to carry out the reset to the factory default you need to confirm this message. -
Page 56: Battery Status Indication On The Display
In order to prevent a damage of the battery, the instrument switches off automatically before the battery is completely empty. The Zehntner ZRM 6010 announces this by displaying the symbol of an empty battery and an error message. In order to save power you can set a shorter “Auto off time”. -
Page 57: Charging
14.2 Charging To charge the battery, connect the charger to the Zehntner ZRM 6010 and a wall socket (100 - 240 V, 50 - 60 Hz). The special plug on the battery cable has a reverse polarity protection. The Zehntner ZRM 6010 can be switched on or off while charging. -
Page 58: Maintenance
Replacing the thermal paper roll as described in chapter 10.4 “Built-in thermal printer” on page 37. All other maintenance and repair work may only be carried out by Proceq or your authorized Proceq agent, otherwise all warranty voids. Make sure that the Zehntner ZRM 6010 is unplugged from power supply and turned off before any maintenance, except for charging. -
Page 59: Status And Error Messages
16.1 Status message – “Battery voltage is critical” In order to prevent a damage of the battery, the instrument switches off automatically before the battery is completely empty. The Zehntner ZRM 6010 announces this by displaying the symbol and a status message. -
Page 60: Error Message - "Factory Calibration Has Expired
“Setting up” on page 17. 16.6 Reset of the Zehntner ZRM 6010 If the firmware of the Zehntner ZRM 6010 has a hang-up, you can reset the instrument by shutting of the instrument completely as described in chapter 5 “Setting up” on page 17. -
Page 61: Graphical Illustration Of The Measuring Principles
17 Graphical illustration of the measuring principles 17.1 Night visibility R is the coefficient of retroreflected luminance (night visibility) of road markings. The observation angle of 2.29° corresponds to the viewing distance of a vehicle driver of 32 m from height of 1.20 m. The illumination angle of 1.24°... -
Page 62: Technical Specification
18 Technical specification Observation distance: 30 m, according to CEN geometry Observation angle (R EN 1436: 2.29° ASTM E1710: 1.05° Illumination angle (R EN 1436: 1.24° ASTM E1710: 88.76° Measuring area: 52 mm x 489 mm Illumination field: 50 mm x 100 mm Measuring sensor adaption: V() 0 - 4‘000 mcd⋅m ⋅lx... -
Page 63: Index
Index Compass ......33, 36, 40 Configurations ....... 14 Accumulator Capacity ........56 Charging ........58 Damages during carriage ....12 Replacing ........58 Data export ........42 Status indication ......57 Database ........54 Apparatus Date and time ........ 54 Information ......... - Page 64 Level-meter ......33, 36 Factory calibration ......21 Factory calibration expired .... 61 Maintenance ......... 59 Factory settings Charging ........58 Reset ......... 56 Cleaning ........59 Features .......... 8 Mapping Tools ......42 Firmware version ......56 Mean values........24 Fold-away handle ......
- Page 65 Exit..........18 Software Scrolling ........18 Version ........56 Night visibility R ......62 Sound ..........54 Specifications ........ 63 Standard delivery ......13 Starting up ........18 Operating temperature ....63 Status message ......60 Options .......... 56 Battery voltage ......60 Description .........
- Page 66 Wet timer ........ 25, 47 Wet measurements ....... 25 Page 66...
- Page 68 Subject to change. Copyright © 2017 by Proceq SA, Schwerzenbach. All rights reserved. www.proceq.com Version 1.4 dated 21.11.2019...
Need help?
Do you have a question about the Zehntner ZRM 6010 and is the answer not in the manual?
Questions and answers