Advertisement
Quick Links
OPERATOR'S
MANUAL
W W e e n n d d y y ' ' s s E E v v o o l l u u t t i i o o n n
E E l l i i t t e e ™ ™ ( ( G G a a s s ) )
R R e e d d u u c c e e d d O O i i l l C C a a p p a a c c i i t t y y
O O p p e e n n F F r r y y e e r r
EEG-251
EEG-252
EEG-253
EEG-254
FM05-097F
Advertisement

Related Manuals for Henny Penny Wendy's Evolution Elite EEG-251


Summary of Contents for Henny Penny Wendy's Evolution Elite EEG-251
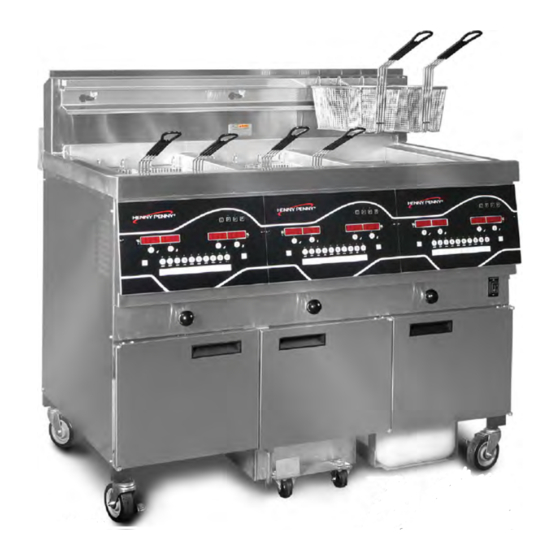
- Page 1 OPERATOR'S MANUAL W W e e n n d d y y ’ ’ s s E E v v o o l l u u t t i i o o n n E E l l i i t t e e ™ ™ ( ( G G a a s s ) ) R R e e d d u u c c e e d d O O i i l l C C a a p p a a c c i i t t y y O O p p e e n n F F r r y y e e r r EEG-251...
- Page 3 Table of Contents Safety and Compliance....................v Chapter 1 Introduction.....................1 1.1 Introduction ......................1 1.2 Features........................1 1.3 Proper Care......................1 1.4 Assistance......................1 Chapter 2 Installation ......................3 2.1 Introduction ......................3 2.2 Unpacking ......................3 2.3 Selecting The Fryer Location ..................4 2.4 Leveling The Fryer ....................4 2.5 Ventilation Of Fryer ....................4 2.6 Gas Supply......................5 2.7 Gas Leak Test......................8...
- Page 4 3.13 Changing The Filter Pad ..................36 3.14 Removing & Cleaning Basket Rest ..............40 3.15 Clean-Out Mode....................41 3.15.1 Smart Touch ....................41 3.16 Cold Soak Procedure ..................43 3.17 Check/Replace Drain Pan O-Rings..............43 3.18 Info & Filter Button Stats ..................45 3.18.1 Info Button Stats ..................45 3.18.2 Filter Button Stats..................45 3.19 Preventative Maintenance ..................46 3.20 Clean Blower &...
- Page 6 List of Tables Table 3-1 Operating Controls & Indicators .................14 Table 3-2 Operating Components ..................16 Table 3-3 Oil Capacities ....................18 Table 3-4 Info Button Stats ....................45 Table 3-5 Filter Button Stats .....................45 Table 3-6 Preventative Maintenance Schedule ..............46 Table 6-1 Special Program Modes ..................59 Table 6-2 Special Programming Procedures ..............61 Table 7-1 Troubleshooting....................69 Table 7-2 Error Codes......................70...
- Page 7 S S a a f f e e t t y y a a n n d d C C o o m m p p l l i i a a n n c c e e Henny Penny fryers have many safety features incorporated. However, the only way to ensure safe operation is to fully understand the proper installation, operation, and maintenance procedures.
- Page 8 These are the original version controlled Henny Penny instructions for Evolution Elite Gas (EEG) model 253, 254 (EEG 25x). This manual is available on the Henny Penny Public website (www.hennypenny.com). Read these instructions completely prior to installation and operation of this appliance to ensure compliance to all required installation, operation and safety standards.
- Page 9 To continue compliance with these directives, this unit must not be disposed as unsorted municipal waste. For proper disposal, please contact your nearest Henny Penny distributor. MAINTENANCE Proper daily, weekly, monthly, quarterly and yearly maintenance must be performed on this appliance to ensure safe and continuous operation.
- Page 10 cfm (56.6 m3/h) of air flow. Read the instructions fully before installing or using the appliance. - For gas appliance installations in South Africa, the installation shall be carried out by a registered installer, and the installation shall comply with requirements of SANS 10087-1 or SANS827 as applicable.
- Page 11 T T e e c c h h n n i i c c a a l l D D a a t t a a F F o o r r C C E E / / A A G G A A M M a a r r k k e e d d P P r r o o d d u u c c t t s s Nominal Heat Input (Net): Natural (I ) = 19.8 KW (67,560 Btu/h)
- Page 12 Injector Size Natural (I ) = 2.08 mm Natural (I ) = 2.08 mm Natural (I +) = 1.70 mm Natural (I ) = 2.30 mm Natural (I ) = 2.30 mm Liquid Propane (I ) = 1.30 mm...
- Page 13 1 1 . . 1 1 I I n n t t r r o o d d u u c c t t i i o o n n The Henny Penny open fryer is a basic unit of food processing equipment designed to cook foods better and easier.
- Page 15 2 2 . . 1 1 I I n n t t r r o o d d u u c c t t i i o o n n This section provides the installation and unpacking instructions for the Henny Penny Evolution Elite®...
- Page 16 2 2 . . 3 3 S S e e l l e e c c t t i i n n g g T T h h e e F F r r y y e e r r L L o o c c a a t t i i o o n n T T o o p p r r e e v v e e n n t t s s e e v v e e r r e e b b u u r r n n s s f f r r o o m m s s p p l l a a s s h h i i n n g g h h o o t t o o i i l l , , p p o o s s i i t t i i o o n n a a n n d d i i n n s s t t a a l l l l f f r r y y e e r r t t o o p p r r e e v v e e n n t t t t i i p p p p i i n n g g o o r r m m o o v v e e m m e e n n t t .
- Page 17 avoid interference with the operation of the fryer. We recommend you consult a local ventilation or heating company to help in designing an adequate system. NOTICE : Ventilation must conform to local, state, and national codes. Consult your local fire department or building authorities. 2 2 .
- Page 18 Provisions should be made for moving the open fryer for cleaning and servicing. This may be accomplished by: 1 1 . . Installing a manual gas shutoff valve and a disconnect or union. 2 2 . . Installing a heavy-duty design CSA certified connector. In order to be able to service this appliance, which is provided with casters, a connector complying with ANSI Z21.69-CAN 6.16 or CAN 1-6.10m88 and a quick-disconnect device, complying with ANSI Z21.41 or CAN 1-6.9m70, must be installed.
- Page 19 Figure 2-1 Flexible Gas Line & Cable Restraint Installation...
- Page 20 • Natural: 3.5 inch water column (0.87 kPa) (8.27 mbar). • Propane: 10 inch water column (2.49 kPa) (24.9 mbar). NOTE: The gas pressure regulator has been set by Henny Penny and is not to be adjusted by the user.
- Page 21 2 2 . . 1 1 2 2 T T e e s s t t i i n n g g T T h h e e F F r r y y e e r r Each Henny Penny open fryer was completely checked and tested prior to shipment.
- Page 22 Figure 2-2, 1 Well Dimensions Figure 2-3, 2 Well Dimensions...
- Page 23 Figure 2-4, 3 Well Dimensions Figure 2-5, 4 Well Dimensions...
- Page 25 C C h h a a p p t t e e r r 3 3 O O p p e e r r a a t t i i o o n n The operating controls and indicators are shown in Figure 3-1 Operating Controls &...
- Page 26 T T a a b b l l e e 3 3 - - 1 1 O O p p e e r r a a t t i i n n g g C C o o n n t t r r o o l l s s & & I I n n d d i i c c a a t t o o r r s s Item No.
- Page 27 Item No. Description Function Right Timer 1 During normal operation, press this button to start and stop cook cycles for the right basket; press to change displayed product; also used for “✓” to indicate yes or to confirm. Right Timer 2 During normal operation, press this button to start and stop cook cycles for the right basket;...
- Page 28 Figure 3-2 Operating Components T T a a b b l l e e 3 3 - - 2 2 O O p p e e r r a a t t i i n n g g C C o o m m p p o o n n e e n n t t s s Item No.
- Page 29 When main power switch is turned on, “OFF” shows in both displays. Press 2 2 ) ) either heat button and “*SETUP* *ENTER CODE*” shows in display. Press 1, 2, 3, and “LANGUAGE” shows on the left display, “ENGLISH” on the right display. Use the up or down arrow to change the operation display to: Greek 3 3 ) ) “EΛΛHNIKA”, Russian “РУССКИИ”, Swedish “SVENSKA”, German...
- Page 30 3 3 . . 3 3 F F i i l l l l i i n n g g O O r r A A d d d d i i n n g g O O i i l l W W e e a a r r g g l l o o v v e e s s t t o o a a v v o o i i d d s s e e v v e e r r e e b b u u r r n n s s w w h h e e n n p p o o u u r r i i n n g g h h o o t t o o i i l l i i n n t t o o v v a a t t .
- Page 31 3 3 . . 3 3 . . 1 1 F F i i l l l l i i n n g g V V a a t t F F r r o o m m B B u u l l k k S S u u p p p p l l y y Fryer must be equipped with optional accessories and controls set to “YES”...
- Page 32 Make sure basket support is in vat and vat is filled with oil to the proper level. 1 1 ) ) Move power switch to the on position then press the heat button to turn on heat 2 2 ) ) for the desired vat.
- Page 33 3 3 . . 7 7 O O I I L L G G U U A A R R D D I I A A N N ™ ™ ( ( A A u u t t o o T T o o p p - - O O f f f f ) ) During normal operation, the control automatically monitors vat oil level.
- Page 34 3.9b Model EEG-251 Oil Reservoir 3.9.1 Filling Oil Reservoir Control displays “JIB IS LOW” and an alarm sounds. 1 1 ) ) Open door and pull reservoir forward and remove reservoir cover. 2 2 ) ) Place reservoir cover on bracket on door. 3 3 ) ) Pour oil into reservoir up to fill lines [13 lbs.
- Page 35 3.9.2 Removing/Cleaning Reservoir Open door and pull reservoir forward. 1 1 ) ) Slide reservoir to the left and lift from fryer. 2 2 ) ) Clean reservoir at a sink with soap and water. 3 3 ) ) NOTE: Before placing the reservoir back into position, lubricate the O-rings on the filter tube with cold oil.
- Page 36 3 3 . . 1 1 0 0 F F i i l l t t e e r r i i n n g g T T h h e e S S h h o o r r t t e e n n i i n n g g 3 3 .
- Page 37 3 3 . . 1 1 0 0 . . 2 2 T T r r o o u u b b l l e e s s h h o o o o t t i i n n g g a a F F i i l l t t e e r r E E r r r r o o r r If the oil has not pumped back to the proper level in the vat during the AIF 1 1 ) ) process, press “X”...
- Page 38 E E n n s s u u r r e e o o i i l l i i s s h h o o t t : : The best results are obtained when the frying oil is filtered at 2 2 ) ) the normal frying temperature.
- Page 39 Do one of the following: 1 1 2 2 ) ) • If another rinse cycle is needed, press “✓” button for yes. “RINSING” displays and fryer automatically rinses the vat. • If another rinse cycle is not needed, press “X” button. “POLISH?”...
- Page 40 3 3 . . 1 1 2 2 D D i i s s c c a a r r d d i i n n g g O O i i l l F F r r o o m m V V a a t t 3 3 .
- Page 41 Display shows “VAT EMPTY” “YES NO”. Verify that vat is empty, and press “✓” 6 6 ) ) button. Display shows “CLEAR OLD OIL FROM OIL LINES” “✓=PUMP” “X=DONE”. 7 7 ) ) Press and hold “✓” button for a few seconds to clear old oil from lines. Once cleared, press “X”...
- Page 42 set to “YES” (If control suspects oil in drain pan “CAUTION IS THERE OIL IN PAN?” “YES NO” may show in display. Make sure drain pan is empty before proceeding). Press “✓” button; “DRAIN VAT?” “YES NO” shows in display. Press “X” button if 4 4 ) ) drain pan has oil in it, skip to step 9.
- Page 43 Release cover latch, and hinge back cover on oil disposal shuttle. Make sure 2 2 ) ) crumb catcher is in place. Roll oil disposal shuttle under fryer until it stops. Make sure drain aligns with 3 3 ) ) opening in shuttle.
- Page 44 T T o o a a v v o o i i d d p p e e r r s s o o n n a a l l i i n n j j u u r r y y , , b b u u r r n n s s , , s s p p i i l l l l s s , , a a n n d d c c o o r r r r o o s s i i o o n n : : •...
- Page 45 Make sure the hose nozzle is pointed into the disposal container and turn pump 1 1 5 5 ) ) handle rapidly (fast) in order to prime the pump and to get oil to flow through pump. U U s s e e c c a a r r e e t t o o p p r r e e v v e e n n t t b b u u r r n n s s c c a a u u s s e e d d b b y y s s p p l l a a s s h h i i n n g g o o f f h h o o t t s s h h o o r r t t e e n n i i n n g g .
- Page 46 Open the door, lift up on the drain pan stop and pull out the drain pan assembly 1 1 ) ) using the handle on the drain pan. Release cover latch, and hinge back cover on oil disposal shuttle. Make sure 2 2 ) ) crumb catcher is in place.
- Page 47 T T o o a a v v o o i i d d p p e e r r s s o o n n a a l l i i n n j j u u r r y y , , b b u u r r n n s s , , s s p p i i l l l l s s , , a a n n d d c c o o r r r r o o s s i i o o n n : : •...
- Page 48 Close and latch the cover and roll oil disposal shuttle to disposal container. 1 1 3 3 ) ) Press down on top of brake to secure unit in place. 1 1 4 4 ) ) Disconnect fitting from top of ODS and connect to disposal container. 1 1 5 5 ) ) Using the power cord on the back of the shuttle handle, plug it into the short 1 1 6 6 ) )
- Page 49 Turn power switch to the on position. 1 1 7 7 ) ) Plug the shuttle electrical cord into the receptacle under the disposal container 1 1 8 8 ) ) control, and then press and hold switch on container controls to pump oil from shuttle to the container.
- Page 50 D D i i s s c c o o n n n n e e c c t t f f i i t t t t i i n n g g c c o o u u l l d d b b e e h h o o t t ! ! U U s s e e p p r r o o t t e e c c t t i i v v e e c c l l o o t t h h o o r r g g l l o o v v e e s s w w h h e e n n d d i i s s c c o o n n n n e e c c t t i i n n g g f f i i t t t t i i n n g g , , o o r r s s e e v v e e r r e e b b u u r r n n s s c c o o u u l l d d r r e e s s u u l l t t .
- Page 52 • T T h h i i s s p p a a n n c c o o u u l l d d b b e e h h o o t t ! ! U U s s e e p p r r o o t t e e c c t t i i v v e e c c l l o o t t h h o o r r g g l l o o v v e e o o r r s s e e v v e e r r e e b b u u r r n n s s c c o o u u l l d d r r e e s s u u l l t t .
- Page 53 Remove the bottom screen from pan and clean thoroughly with soap and water. 7 7 ) ) Rinse thoroughly with hot water. Wipe the oil and crumbs from the drain pan. Clean the drain pan with soap and 8 8 ) ) water, then thoroughly rinse with hot water.
- Page 54 Make sure the drain pan stop is engaged and the fryer is now ready for normal 1 1 1 1 ) ) operation. 3 3 . . 1 1 4 4 R R e e m m o o v v i i n n g g & & C C l l e e a a n n i i n n g g B B a a s s k k e e t t R R e e s s t t The basket rest, on the rear shroud of the fryer, should be removed and cleaned periodically.
- Page 55 3 3 . . 1 1 5 5 C C l l e e a a n n - - O O u u t t M M o o d d e e 3 3 . . 1 1 5 5 . . 1 1 S S m m a a r r t t T T o o u u c c h h •...
- Page 56 Display shows “SOLUTION ADDED?” “YES NO”. Fill vat with hot water to 1 in. 8 8 ) ) (25 mm) above the top fill line, add 4 oz. (0.12 liters) of open fryer cleaner, and mix thoroughly. Press “✓” button and display shows “START CLEAN” “YES NO”.
- Page 57 Thoroughly dry the vat with a towel, and then press “✓” button. Controls return 1 1 8 8 ) ) to normal operations. Make sure drain is closed. 1 1 9 9 ) ) M M a a k k e e s s u u r r e e t t h h e e i i n n s s i i d d e e o o f f t t h h e e v v a a t t , , t t h h e e d d r r a a i i n n v v a a l l v v e e o o p p e e n n i i n n g g , , a a n n d d a a l l l l t t h h e e p p a a r r t t s s t t h h a a t t c c o o m m e e i i n n c c o o n n t t a a c c t t w w i i t t h h t t h h e e n n e e w w o o i i l l a a r r e e a a s s d d r r y y a a s s p p o o s s s s i i b b l l e e .
- Page 58 Open the door, lift up on the drain pan stop and pull out the filter drain pan 1 1 ) ) assembly, using the handle on the drain pan. • T T h h i i s s p p a a n n c c o o u u l l d d b b e e h h o o t t ! ! U U s s e e p p r r o o t t e e c c t t i i v v e e c c l l o o t t h h o o r r g g l l o o v v e e o o r r s s e e v v e e r r e e b b u u r r n n s s c c o o u u l l d d r r e e s s u u l l t t .
- Page 59 3 3 . . 1 1 8 8 I I n n f f o o & & F F i i l l t t e e r r B B u u t t t t o o n n S S t t a a t t s s NOTE: If no buttons are pressed within 5 seconds in any of stats modes, the controls revert back to normal operation.
- Page 60 3 3 . . 1 1 9 9 P P r r e e v v e e n n t t a a t t i i v v e e M M a a i i n n t t e e n n a a n n c c e e As in all food service equipment, the Henny Penny open fryer does require care and proper maintenance.
- Page 61 Using a Philip’s head screwdriver, remove lower, rear panel. 5 5 ) ) Using a cloth or paper towel, clean each blower opening. 6 6 ) ) Clean the vent slots on the inside of rear panel, and then replace panel. 7 7 ) ) Reattach the gas line and turn the shutoff handle counterclockwise to turn on 8 8 ) )
- Page 63 NOTE: • Not all Information Mode functions are discussed in this section. To ensure proper operation of fryer, please consult Henny Penny Corp. before changing any of these settings. For more information on these functions, contact Technical Support at 1- 800-417-8405, or 1-937-456-8405.
- Page 64 Press the down arrow and if an error was recorded, “B. (date, time, and error 3 3 ) ) code information)” shows in display. This is the latest error code that the controls recorded. Sometimes the characters “L:” and “R:” appear in front of the error code on the display which refers to the left or right vat of a split vat.
- Page 65 Press the down arrow to start viewing the cook data. 2 2 ) ) Press right timer 1 to view data for other days of the week. 3 3 ) ) Function Display Example Day for which this data was recorded APR-30 - - - - Number of Hours: Minutes the fryer was on...
- Page 66 Function Display Example Number of filters on this oil (L/R) FILTERED Number of times filter skipped (L/R) SKIPPED Number of cook cycles on this oil (L/R) TOT CK Average number of days per oil change (L/R) AVG DAYS 13.8 DAYS PER OIL CHANGE Average number cook cycles per oil change (L/R) AVG CKS...
- Page 67 Function Display Example Cook Cycles for Product #5 COOK -5- Cook Cycles for Product #6 COOK -6- Cook Cycles for Product #7 COOK -7- Cook Cycles for Product #8 COOK -8- Cook Cycles for Product #9 COOK -9- Cook Cycles for Product #0 COOK -0- R R e e s s e e t t u u s s a a g g e e d d a a t t a a : : Enter the Usage Code - 1, 2, 3 on this step to zero...
- Page 69 C C h h a a p p t t e e r r 5 5 P P r r o o d d u u c c t t P P r r o o g g r r a a m m M M o o d d e e This mode allows you to program the following: •...
- Page 70 Press the right arrow until “ASSIGN BTN” shows in the display, along with the 8 8 ) ) product (ex: NUGGETS). If this product already has a product button assigned to it, that LED will be lit. To assign other product buttons to that product, press and hold the product button for 3 seconds and that LED stays lit.
- Page 71 Press the right arrow until “LCMP REF” shows in the display along with the load 1 1 6 6 ) ) compensation average temperature (if load compensation is set to “OFF”, then “_ _ _” shows in display and setting cannot be programmed). This is the average cooking temperature for each product.
- Page 73 C C h h a a p p t t e e r r 6 6 L L e e v v e e l l 2 2 P P r r o o g g r r a a m m m m i i n n g g Used to access the following: •...
- Page 74 Program Code Description S S P P - - 6 6 Melt Cycle Selection - 1.LIQUID; 2.SOLID S S P P - - 7 7 Idle Mode Enabled - YES or NO S S P P - - 7 7 A A Use “0”...
- Page 75 Program Code Description S S P P - - 2 2 6 6 Change Usage Code - 1 = YES S S P P - - 2 2 7 7 Dispose Requires Code ? - YES or NO S S P P - - 2 2 8 8 Longer Fill Time Enabled - YES or NO S S P P - - 2 2 9 9 Let User Exit Fill? - YES or NO...
- Page 76 Menu Step Description set the time (0 to 60 minutes) fryer stays idle before auto-idle is en- abled. Ex., “30” means, if product is not cooked in that vat for 30 mi- nutes, the control automatically cools the oil down to the idle set-point temperature.
- Page 77 Menu Step Description • S S p p l l i i t t V V a a t t If unit is a split vat, “SP-8A” “LEFT VAT FILTER CYCLES” shows in left display, and the number of cook cycles between filters shows on right display (0 to 99).
- Page 78 Menu Step Description SP-12 Clean-Out Press and release the right arrow until “SP-12 CLEAN-OUT TEMP” Temperature flashes in the left display. Press the up and down arrow, or product buttons, to change the temperature, from 0 to 195°F (90°C). SP-13 Cooking Press and release the right arrow until “SP-13 COOKING USER IO”...
- Page 79 Menu Step Description SP-21 Auto-Lift Press and release the right arrow until “SP-21 AUTOLIFT EN- Enabled ABLED?” flashes in the left display. Press the up or down arrow to choose “YES LIFT” or “NO LIFT”. If fryer is fitted with the auto-lift op- tion, SP-21 must be set to “YES LIFT”, otherwise, set SP-21 to “NO LIFT”.
- Page 80 Menu Step Description SP-27 Dispose Re- Press and release the right arrow and “SP-27 DISPOSE REQUIRES quires Code? CODE?” flashes in the left display. Press the up or down arrow to choose “YES” or “NO”. If set to “YES”, code 1, 2, 3, must be entered to discard the oil from the vat using the Dispose Mode.
- Page 81 Press the program button to move to the next timer period, M-F 2. 8 8 ) ) Repeat steps 5, 6, 7, and 8 for all of the following time periods: 9 9 ) ) M-F 1 XX:XX A XX M-F 2 XX:XX A XX M-F 3...
- Page 82 C C o o n n t t r r o o l l M M o o d d e e s s The Data Logging, Heat Control, Tech, Stat and Filter Control Modes are advanced diagnostic and program modes, mainly for Henny Penny use only. For more information on these modes, contact the Service Department at 1-800-417-8405 or 1-...
- Page 83 C C h h a a p p t t e e r r 7 7 T T r r o o u u b b l l e e s s h h o o o o t t i i n n g g 7 7 .
- Page 84 Problem Cause Correction Bubbles in Filter pan not Make sure filter pan return line is pushed completely into oil during completely the receiver on the fryer. entire filter- engaged. Filter pan Clean pan and change paper or pad. process. clogged. Damaged O-ring Replace O-ring.
- Page 85 Display Cause Panel Board Correction “E-15” Drain switch. Make sure drain knob is completely pushed-in; if “E-15” persists, have drain switch checked. “E-18A” Left level sensor Turn switch to off position, then back to on; if display still open. indicates a failed sensor, have the connections checked on the control board.
- Page 86 Display Cause Panel Board Correction “E-48” Input system Have PC board replaced. error. “E-54C” Temperature in- Turn power switch to off, then back to on; have control PC put error. board replaced if “E-54C” persists. “E-60” AIF PC board not Turn power switch to off, wait 15 seconds, then turn switch communicating back to on.
- Page 89 blank page...
- Page 90 H H e e n n n n y y P P e e n n n n y y C C o o r r p p o o r r a a t t i i o o n n P P .
Need help?
Do you have a question about the Wendy's Evolution Elite EEG-251 and is the answer not in the manual?
Questions and answers