Table of Contents
Advertisement
Quick Links
Advertisement
Table of Contents

Related Manuals for LifeSpan C7000i


Summary of Contents for LifeSpan C7000i
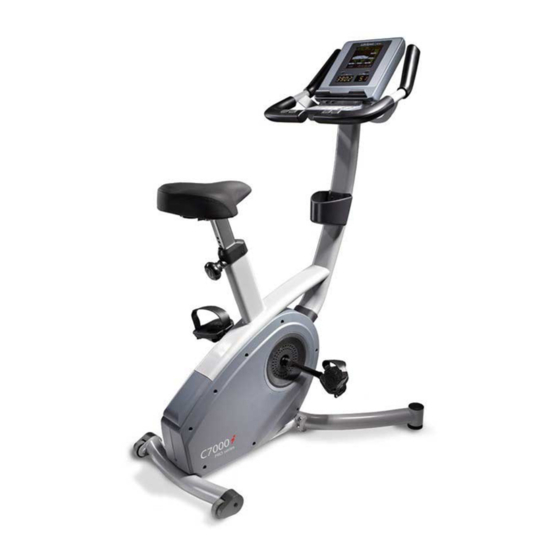
- Page 1 C7000i UPRIGHT CYCLE OWNER’S MANUAL...
- Page 2 Please thoroughly read this manual before you assemble or operate your upright cycle. Neither LifeSpan nor its representatives can accept responsibility for any damages or injury incurred as a result of information presented in this manual except under the terms of the product warranty.
-
Page 3: Table Of Contents
Contents Welcome Safety First ......................Children and Pets Safety Tips Assembling Your Treadmill ..............Exploded View & Hardware Assembly Instructions Console Basics ................... Console Overview Display and Keyboard Operations ....................Starting in Manual Mode Starting a Preset Program Custom User Set-Up Program My Zone Heart Rate Control Programs Using Heart Rate Control Programs Reading Your Heart Rate, Chest Strap... -
Page 4: Safety First
• Use this exercise product for its intended use as described in this Owner’s Manual. Do not use attachments that are not recommended by LifeSpan. • Keep hands away from all moving parts • Keep your bike on a solid, level surface. Do not operate bike on deeply padded, plush or shag carpeting. -
Page 5: Safety Tips
Safety First Safety Tips While in Use • Always consult a physician before beginning an exercise program. • If you experience chest pains, nausea, dizziness or shortness of breath, stop exercising immediately and consult your physician before continuing. Do not wear clothing or jewelry that might catch on any part of the bike. - Page 6 Assembly Assembly: At LifeSpan we strive to make our equipment easy to assemble and start using. Parts that can be pre-assembled are always assembled and tested on the production line. Since your upright bike is a heavy piece of equipment it is recommended you use two people during assembly and follow these assembly instructions to reduce any problems that could occur.
- Page 7 Assembly Hardware Included Item# Part Description Item# Part Description Main Frame Console Front Support Storage Tray Seat Post Right Pedal Seat Left Pedal Lower Console Mast Cover Console Mast Handlebar Assembly Hardware Bag Contents Item # Qty. Hardware M8 x 55L 5mm Allen Description Wrench w/...
- Page 8 Assembly Step 1: Remove Components from Box A. Remove plastic bags and lay all parts out on the floor. Locate the hardware bag. Step 2: Seat Post Assembly. A. Pull the Seat Post Adjustment Knob(M) and insert the Seat Post(3) into Seat Post Tube(L). The holes in the Seat Post should be pointing toward the rear of the bike.
- Page 9 Assembly Step 4: Front Support Assembly A. Adjust the Seat Post so it is at the highest setting. Tilt the bike back until it is resting on the seat and the rear support assembly (as shown below.) C. Align the Front Support Assembly(2) with the Front Main Frame Bracket(B). D.
- Page 10 Assembly Step 5: Console Upright Assembly A. Make sure the Lower Console Mast Cover(5) is installed on the Console Mast(6) prior to making wire connections in step B. Align the Console Mast(6) with the Upper(C) and Lower(D) Console Mast Brackets. C.
- Page 11 Assembly Step 6: Handle Bar Assembly A. Place bike upright on all four feet. Align the Handlebar Assembly(7) with the Handlebar Bracket(H) on the Console Mast(6). Feed the wire harness connector from the top of the Console Mast(6) through the square hole in the middle of the Handlebar Assembly(7). There should be three wire connectors coming out the top of the handlebar assembly.
- Page 12 Assembly Step 7: Console Assembly A. Align the Console(8) with the Console Mounting Bracket(H). Connect the two 2-Pin Connectors(J) coming from the console to the two 2-Pin Connectors (I) coming from the handlebar assembly (7). Push any excess wire into the opening in the back of the Console(8).
- Page 13 Assembly Step 8: Right and Left Pedal Assembly A. Identify which pedal goes on the right side and which goes on the left side by locating the “R” on the bolt of the Right Pedal(10) and the “L” on the bolt of the Left Pedal(11).
- Page 14 Assembly Step 9: Storage Tray Assembly A. Align the with the holes in the Storage Tray(9) Console Mast(6) B. Install two through the and into the #8 screws(22) Storage Tray(9) Console and securely tighten. Mast(6) Step 10: Setting Date and Time To set the date and time of day in your console follow these steps: Press any of the program group buttons for 3 seconds to initiate the date and time set up mode.
- Page 15 Seat Height Adjustments Your C7000i bike allows for 19 positions of height adjustment. To adjust the seat height, pull the Seat Post Adjustment Knob(M) out and adjust the seat height to the desired position.
- Page 16 Console Basics...
- Page 17 Console Basics Readout Display Media Holder USB Charging Program Buttons Resistance Arrows Heart Rate Sensors...
-
Page 18: Console Basics
Console Basics Console Buttons The C7000i comes with our innovative Intelli-Key feature that will prompt you through console operations by using intelligent lights on the buttons that automatically flash when they need to be pressed to continue operations. Main Keyboard... - Page 19 Console Basics consistent with your exercise goals. To quickly select a specific program that matches your workout objective use one of the program buttons. These 4 buttons group the programs into Heart Rate Training, Healthy Living, Sports Training and Weight Loss. Depending on which button you select, there are multiple programs in each.
- Page 20 DATE time speed A. Alpha Numeric Window - The C7000i comes with a 16 character alpha window that is used to show the program name and set user functions like date and time. Workout Feedback: The C7000i display window will simultaneously display the following workout information: C.
- Page 21 Console Basics H. Watts - Exercise workload using this common unit of measure. Misc. Information Display: - The C7000i will also show the following information. This information will be used as part of the USB feature to save your workout information on the date and time of your workout.
-
Page 22: Operations
Operations Starting in Manual Mode The quickest way to get started is to press the START button. Pressing the START button will select the Manual program and the TIME will start counting up form 00:00. You can also press ENTER to select the Manual program. Using the ENTER button will allow you to set a specific workout TIME, and set your WEIGHT. -
Page 23: My Zone Heart Rate Control Programs
Operations My Zone Heart Rate Control Programs The C7000i has 2 MyZone Heart Rate control programs. In each of these programs you will set your target heart rate and the console will automatically adjust the resistance to maintain your heart rate at either a CONSTANT level or at an alternating LOW and HIGH level. -
Page 24: Using Heart Rate Control Programs
Operations Using Heart Rate Control Programs The constant Heart Rate Control program requires that you set a heart rate that the display console will maintain throughout the workout and the Interval requires that you set a LOW and a HIGH heart rate. HRC –... - Page 25 Operations Reading Your Heart Rate Contact Heart Rate Sensors are built into the stationary hand grips of the C7000i to monitor your heart rate during exercise. To use, grasp the sensors with a comfortable grip with the palms of your hands placed over the sensors.
-
Page 26: Heart Rate Monitoring
Operations Heart Rate Monitoring Seeing your heart rate while exercising will help you understand the intensity of your exercise and corresponding heart rate training zone, and predict health benefits found through repeated bouts of exercise. Refer to the information below to understand your heart rate training zones: Zone 5 —... -
Page 27: Program Profiles
Operations Program Profiles The C7000i comes with an assortment of programs that will give you the variety you need to get the maximum results from your exercise program. Each program has 2 preset levels of difficulty that you can select from during the setup process. - Page 28 Operations Long Interval (40 minute default) The smallest resistance alterations of any of the interval workouts, allowing a longer overall duration. Negative Interval 1 (30 minute default) A good choice for someone new to interval training. Resistance levels decrease in the second half of the workout. Negative Interval 2 (30 minute default) A slightly higher-intensity version of...
- Page 29 Operations Plateau Climb (40 minute default) A higher-intensity version of Long Slow Distance, with a steady level of effort comprising the majority of the profile. Ladder (30 minute default) A form of interval training with longer, increasingly-intense intervals. Each unique, altering level is designed to mimic a higher rung on a ladder. This is the most difficult of the preset programs.
- Page 30 Custom User Programs There are two user programs provided on the LifeSpan C7000i bike. These programs provide you with the ability to establish a customized program profile specific to your workout requirements. For each user set-up program you can...
-
Page 31: Maintenance And Tips
Maintenance and Tips Engineering Mode To Enter Engineering Mode, Press and hold the Pause Button and the Up button for 3 seconds. The console will beep and display Engineering Mode. Function Display Engineering Mode 2012/05/21 v1.0 Press Enter. The display will show Roller. This is something Roller that does not need adjustment. -
Page 32: Troubleshooting
Problem: No power at console when pedaling. Solution: Make sure all connections made during assembly are good. Pedal at an RPM of at least 60 for 30 seconds. If no power, contact LifeSpan customer service. Problem: Rough feeling in pedals when in use. -
Page 33: About Your Upright
About Your Upright Cycle Unique Features As a leader in the fitness industry, LifeSpan has developed a number of unique features in our C7000i making them more engaging, safer and easier to use. Learn more about how to use these features in the Saving Your Results and Personal Settings sections of this Owner’s Manual. -
Page 34: Specifications
About Your Upright Cycle Specifications C7000i Seat Molded, contoured seat Seat Adjustment Height - 19 positions Resistance System Hybrid Self Generating Pedals Self balancing Dimensions 43” x 28” x 56” Transport Wheels Rear Mounted Max User Weight 400 lb (181.4 kg) -
Page 35: Warranty
The periods above are based on the date of purchase. During these periods, LifeSpan will repair or replace any defective part. Free labor is included on all parts that are not normally assembled or replaced by the customer within the labor period. - Page 36 C7000i Interactive Upright Cycle LifeSpan Fitness 785 West 1700 South Suite 1 Salt Lake City, UT. 84104 Phone: 877.654.3837 www.LifeSpanFitness.com Version 2019.1NB...
Need help?
Do you have a question about the C7000i and is the answer not in the manual?
Questions and answers