Table of Contents
Advertisement
Advertisement
Table of Contents

Subscribe to Our Youtube Channel
Related Manuals for LifeSpan R3


Summary of Contents for LifeSpan R3
- Page 1 R3 & C3 Exercise Bikes Owners Manual Version 1.3...
- Page 3 Welcome to LifeSpan ......1 Specifications ....... . . 3 Limited Home Use Warranty .
- Page 4 The quality and durability of the drive system is only as good as the weakest component in this system. The drive system on the C3 and R3 starts with a flywheel that is a full 11” in diameter, weighs approximately 24 pounds, and places the conductive ring on the outer circumference of the flywheel.
- Page 5 If service is required, please contact your authorized LifeSpan Retailer. If a question or problem arises that cannot be answered by your retailer, contact us:...
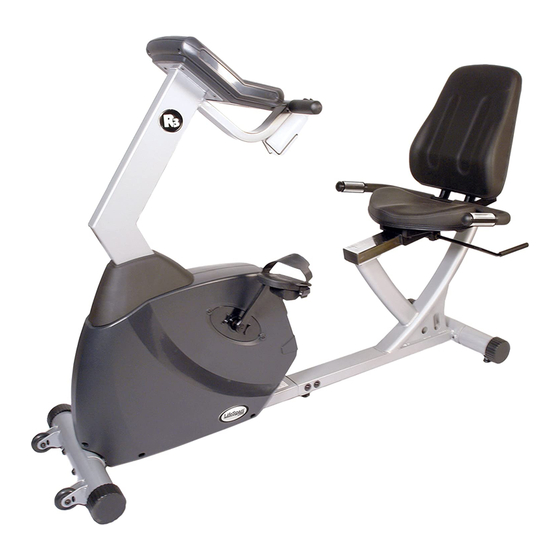
- Page 6 Time, Distance, Speed, RPMS, Watts, Calories, Program Level and Heart Rate. Heart Rate: Contact Grip Pulse and Integrated Chest Strap Receiver. Dimensions: R3: 68 L * 27 W * 45 H C3: 43 H * 23 W * 57 H Product Weight: R3: 133 pounds...
- Page 7 The LifeSpan R3 and C3 come with the following limited warranty, which applies only to the use of these cycles in the home, for residential, non-commercial purposes: • Frame: Lifetime • Parts: 3 years • Labor: 1 year PCE Health and Fitness warrants that the equipment it manufactures is free from defects in mate- rial and workmanship under normal use and service.
- Page 8 • Always consult a physician before beginning this or any exercise program. • If you experience chest pains, nausea, dizziness or shortness of breath, stop exercising immediately and consult your physician before continuing. Note: Read ALL instructions before using your LifeSpan stationary cycle. Save These Instructions...
- Page 9 Cardiovascular endurance is the most important component of physical fitness. There are two types of cardiovascular endurance, these are interval training and steady state training. Interval training varies the amount of effort required to workout. The LifeSpan C3 and R3 come with several programs that automatically change the pedaling resistance during the course of the workout.
- Page 10 In terms of frequency, you should try and exercise at least three times per week. The intensity of each workout refers to how hard you feel your working and can be measured by your heart rate. Depending on your fitness goals, exercise between 55% and 90% of your maximum heart rate.
- Page 11 Prior to starting the assembly process take all of the parts out of the box, cut zip ties, remove all plastic bags, and lay them out on the floor to become familiar with the components. R3 RECUMBENT ASSEMBLY Step 1: Front Base Assembly...
- Page 12 Step 2: Rear Base Assembly Parts Required Rear Base Base Frame Hardware Required Part # Size Description Quantity M10 * 90 Dome Head Allen Screw Curved Washer 1. Locate the hardware bag for Step 2. 2. Place the rear base over the frame aligning the holes in the base with the threaded holes in the frame.
- Page 13 Step 3: Handlebar Post Assembly Parts Required Handlebar Post Rubber Boot Hardware Required Part # Size Description Quantity M10 * 120 Dome Head Allen Screw M10 * 70 Dome Head Allen Screw M8 * 10 Dome Head Allen Screw Flat Washer Spring Washer 1.
- Page 14 Step 4. Frame Assembly Parts Required Seat Rail Base Frame Hardware Required Part # Size Description Quantity M8 * 12 Dome Head Allen Screw M10 * 15 Dome Head Allen Screw Flat Washer Spring Washer Spring Washer 1. Locate the hardware bag for Step 4. 2.
- Page 15 M8 * 1 6 A - 1 0 M 8 * 1 6 ( A 1 0 )
- Page 17 Install Pedals 1. Pay attention to the side the pedals are installed on. The right and left sides are determined while sitting in a normal riding position. The pedals are marked R for right and L for left. 2. The Right side pedal is screwed in the normal clockwise tightening direction. 3.
- Page 18 C3 UPRIGHT ASSEMBLY Step 1: Front Base Assembly Parts Required Main Frame Front Base Hardware Required Part # Size Description Quantity M10 * 90 Dome Head Allen Screw Curved Washer 1. Locate the hardware bag for Step 1. 2. Place the front base over the frame aligning the holes in the base with the threaded holes in the frame.
- Page 19 Step 3: Handlebar Post Parts Required Handlebar Post Rubber Boot Hardware Required Part # Size Description Quantity M10 * 120 Dome Head Allen Screw M10 * 70 Dome Head Allen Screw M5 * 15 Phillips Screw M8 * 10 Dome Head Allen Screw Flat Washer Flat Washer Spring Washer...
- Page 21 Repeat as necessary until the bike is completely stable. On the R3 recumbent, once the unit is stable, you will also need to lower the center foot until it touches the floor and tighten the hex nut to keep it in place.
- Page 22 Seat Adjustment Before working out, make sure that the seat is properly adjusted. Do this by sitting on the seat and placing the balls of your feet on the pedals. Your knee should be slightly bent when the pedal is at its furthest point of rotation relative to your body.
- Page 23 The R3 and C3 console has several unique features including Multi-position Display Adjustment, Spring Loaded Magazine Holder and Smart Light Program Setup™. It also includes programs for Heart Rate Control, Interval training, Weight Loss, Random and Mountain training, plus a Manual mode.
- Page 24 Program Profiles Program 1 - Manual: The Manual program gives you complete control over the resistance level. If you make a change to the resistance, the new resistance level will stay the same until another change is made. The program matrix will show the resistance level history for each segment of the workout. Program 2 - Interval: The Interval program increases the resistance level for one segment to raise the Heart Rate and then lowers the resistance to bring your Heart Rate back down.
- Page 25 Program 4 - Mountain: The Mountain Program is designed to gradually increase the intensity of the workout and then gradually bring the intensity back down for a short cool down. Like the Interval Program this is a good profile for cardiovascular performance. Examples of the Mountain Program are shown below: Mountain Program Profile - Level 1 Mountain Program Profile - Level 5...
- Page 26 Program Setup To Quick Start the Manual program press the Start button. To select and setup a Program complete the following steps: Select Program: Use the buttons to scroll through the list of programs and press Set Level: Use the buttons to scroll to the desired Level and press Set Time: Use the buttons to scroll to the desired workout time...
- Page 28 801-973-9993 www.pcefitness.com P.O. Box 981316 Park City, Utah 84098-1316...
Need help?
Do you have a question about the R3 and is the answer not in the manual?
Questions and answers
Need manual for 3Ci bike
The manual is the "R3 & C3 Exercise Bikes Owners Manual Version 1.3."
This answer is automatically generated
Hello, Is my r3 Lifespan effective as a workout even though I can't turn it on? Does it need to be plugged in for a while to be able to turn on the electrical screen on it? I plugged it in after sitting for about a year and it does not go on. Is there a reset button? Thank you
The LifeSpan R3 requires an external power supply that plugs into a 110 Volt power outlet. If it does not turn on, it may not be receiving power. The manual does not state that it needs to be plugged in for a while before the screen activates, so it should turn on immediately when properly connected. If it does not, checking the power connection and adapter may help resolve the issue. Without power, the electronic features, including resistance control and the screen, will not function, which may limit the effectiveness of the workout. However, the bike may still be used manually if mechanical resistance is available.
This answer is automatically generated