Table of Contents
Advertisement
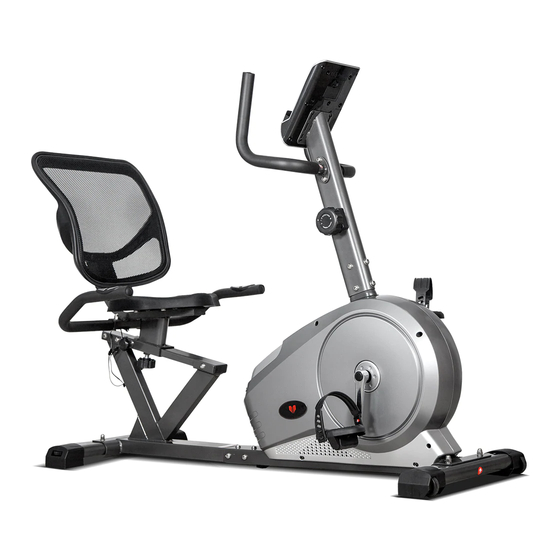
RC-81
OWNER'S MANUAL
Product may vary slightly from the item pictured due to model upgrades
Read all instructions carefully before using this product. Retain this owner's manual for future
reference.
NOTE: This manual may be subject to updates or changes. Up to date manuals are available through our website at www.lifespanfitness.com.au
Advertisement
Table of Contents

Related Manuals for LifeSpan RC-81


Summary of Contents for LifeSpan RC-81
- Page 1 RC-81 OWNER’S MANUAL Product may vary slightly from the item pictured due to model upgrades Read all instructions carefully before using this product. Retain this owner’s manual for future reference. NOTE: This manual may be subject to updates or changes. Up to date manuals are available through our website at www.lifespanfitness.com.au...
-
Page 2: Table Of Contents
TABLE OF CONTENTS IMPORTANT SAFETY INSTRUCTIONS CARE INSTRUCTIONS ASSEMBLY INSTRUCTIONS COMPUTER OPERATION EXERCISE GUIDE WARRANTY RC-81... -
Page 3: Important Safety Instructions
Do not use the equipment until the problem has been rectified. Wear suitable clothing while using the equipment. Avoid wearing loose clothing that may get caught in RC-81... -
Page 4: Care Instructions
Do not attempt to recharge non-rechargeable batteries Batteries are to be inserted with correct polarity g. The supply terminals are not to be short-circuited h. Do not dispose of batteries in fire, batteries may explode or leak RC-81... -
Page 5: Assembly Instructions
PREPARATION: Before assembling, make sure that you will have enough space around the item; Use the present tooling for assembling; before assembling please check whether all needed parts are available. It is strongly recommended this machine to be assembled by two or more people to avoid possible injury. RC-81... - Page 6 RC-81...
-
Page 7: Front Main Frame 1
A: Lock the front stabilizer (8)) to the front main frame (1) with carriage bolt (9), flat washer (10) and acorn nut (11). B: Lock the rear stabilizer (6) to the rear main frame (2) with carriage bolt (9), flat washer (10) and acorn nut (11). RC-81... -
Page 8: Rear Main Frame (
B: Fix the seat (25) to the seat bracket (3) with inner hex screws (21) and flat washers (10). C: Fix the backrest (24) to the seat bracket (3) with inner hex screws (45) and flat washers (44), and then attach cover (46) to seat bracket (3) with cross pan head screw (18). STEP 5 RC-81... -
Page 9: Seat Bracket 1
Attach the pedals (7L/R) to the crank (5L/R) with cross wrench respectively. NOTE: To tighten the LEFT pedal; you must screw counter-clockwise; it is reversed threaded. The RIGHT pedal tightens by screwing clockwise. IMPORTANT: FAILURE TO FOLLOW PROCEDURES MAY RESULT IN PERMANENT DAMAGE TO YOUR BIKE. RC-81... -
Page 10: Handlebar 1
4 (22) respectively. B: Then, connect tension cable (36) and tension controller (26) like below Picture (A). C: Finally, lock handlebar post (41) to the front main frame (1) with inner hex screw (21), arc washer (17) and flat washer (10). RC-81... -
Page 11: Computer
A: Firstly, lock handlebar (42L/R) to handlebar post (41) with inner hex screw (21), flat washer (10). B: Then, connect pulse sensor wire 3 (39), Extension sensor wire (40) and computer (28) accordingly. C: Finally, lock computer (28) to the handlebar post (41) with cross pan head screw (30). RC-81... -
Page 12: Computer Operation
“PULSE RECOVERY” key, all function displays will stop except “TIME”. Time starts counting from 01:00 - 00:59 - - to 00:00. As soon as 00:00 is reached, the computer will show your heart rate recovery status with the grade F1.0 to F6.0. means OUTSTANDING 1.0<F<2.0 means EXCELLENT RC-81... - Page 13 ENTER, UP, DOWN three is one of the key to exit the test results. 6. PULSE RECOVERY key: Press the key to activate heart rate recovery function. Battery: If improper display on monitor, please reinstall the batteries to have a good result. RC-81...
-
Page 14: Exercise Guide
So as you can see, the fitter you are, the healthier and greater you will feel. Warm-up Start each workout with 5 to 10 minutes of stretching and some light exercises. A proper warm-up increases your body temperature, heart rate and circulation in preparation for exercise. Ease into your exercise. Training Zone Exercise RC-81... -
Page 15: Workout Guidelines
This will increase the flexibility of your muscles and will help prevent post-exercise problems. Workout Guidelines TARGET ZONE This is how your pulse should behave during general fitness exercise. Remember to warm up and cool down for a few minutes. RC-81... -
Page 16: Warranty
Please visit our website to view our full warranty terms and conditions: http://www.lifespanfitness.com.au/warranty-repairs Warranty and Support: Please email us at support@lifespanfitness.com.au for all warranty or support issues. For all warranty or support related enquiries an email must be sent before contacting us via any other means. RC-81... - Page 17 This will eliminate the movement and static electricity factors. If your hands are dry, then wet them slightly (saliva works as a great conductor if this doesn’t bother you). For more information, please contact our Lifespan Fitness Technical Support Department www.lifespanfitness.com.au support@lifespanfitness.com.au...
Need help?
Do you have a question about the RC-81 and is the answer not in the manual?
Questions and answers