Table of Contents
Advertisement
Advertisement
Table of Contents

Subscribe to Our Youtube Channel
Related Manuals for LifeSpan R5i


Summary of Contents for LifeSpan R5i
- Page 1 Owner’s Manual Recumbent Bike Interactive Trainer...
- Page 2 Please thoroughly read this manual before you assemble or operate your recumbent bike. Neither LifeSpan nor its representatives can accept responsibility for any damages or injury incurred as a result of information presented in this manual except under the terms of the product warranty.
-
Page 3: Table Of Contents
Contents Welcome Safety First Safety First About Your R5i Recumbent Bike Specifications Unique Features Console Overview Starting an Exercise Program Heart Rate Monitoring Programs Warranty Assembling Your R5i Recumbent Bike Exploded View & Hardware Assembly Instructions Console Basics Console Buttons / Date & Time... -
Page 4: Safety First
• Use this exercise product for its intended use as described in this Owner’s Manual. Do not use attachments that are not recommended by LifeSpan. • Keep hands away from all moving parts •... - Page 5 Safety First Safety Tips While in Use • Always consult a physician before beginning an exercise program. • If you experience chest pains, nausea, dizziness or shortness of breath, stop exercising immediately and consult your physician before continuing. Do not wear clothing or jewelry that might catch on any part of the recumbent bike.
-
Page 6: About Your R5I Recumbent Bike
About Your R5i Recumbent Bike Specifications Mechanical and Performance Seat Molded with chair style armrest Seat Adjustment 14 infinite positions Seat Back Breathable Seat Back Adjustment Adjustable Angle Resistance System Magnetic - Eddy Current Pedals Self balancing Flywheel Weight 18 lbs (8.1 kg) Max. -
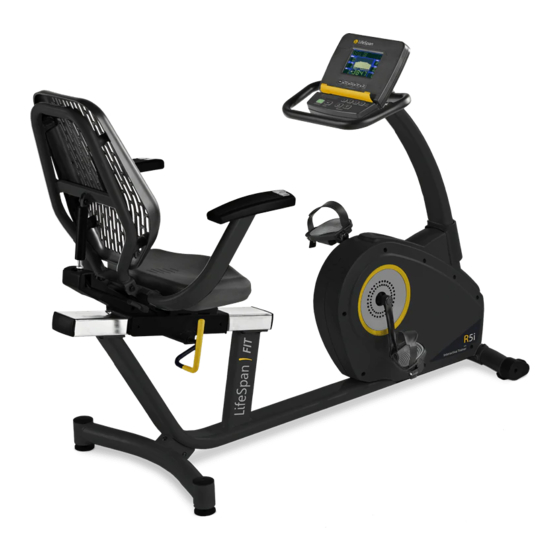
Page 7: Console Overview
About Your R5i Recumbent Bike Console Overview Readout Display Preset Programs Program Media Holder CAUTION: Always consult a phsician before starting a tness program. If you feel faint, dizzy or experience chest pains, stop your workout and consult a physician. - Page 8 About Your R5i Recumbent Bike m Group Quick Change Resistance Buttons Quick Change Resistance Buttons Resistance...
-
Page 9: Starting An Exercise Program
About Your R5i Recumbent Bike Starting an Exercise Program Starting an exercise program can sound like a daunting task, but just remember that your main goal is to boost your health by meeting the basic physical activity recommendations. Before you begin an exercise program, or substantially increase your level of activity, be sure to consult your primary care physician. -
Page 10: Heart Rate Monitoring
About Your R5i Recumbent Bike Heart Rate Monitoring Seeing your heart rate while exercising will help you understand the intensity of your exercise and corresponding heart rate training zone, and predict health benefits found through repeated bouts of exercise. Refer to... - Page 11 About Your R5i Recumbent Bike Reading Your Heart Rate Contact Heart Rate Sensors are built into the hand grips of the R5i to monitor your heart rate during exercise. To use, grasp the sensors with sensors a comfortable grip with the palms of your hands placed over the sensors.
- Page 12 About Your R5i Recumbent Bike Preset Programs Preset programs automatically change the resistance level during a workout according to a preset pattern called a profile. This provides a better workout, since it uses a wider range of muscles and different intensities, a well-known benefit in the cross-training and interval-training world.
- Page 13 About Your R5i Recumbent Bike Negative Interval 1 (30 minute default) A good choice for someone new to interval training. Resistance levels decrease in the second half of the workout. Negative Interval 2 (30 minute default) A slightly higher-intensity version of Negative Interval 1.
- Page 14 About Your R5i Recumbent Bike Ladder (30 minute default) A form of interval training with longer, increasingly-intense intervals. Each unique, altering level is designed to mimic a higher rung on a ladder. This is the most difficult of the preset programs.
- Page 15 About Your R5i Recumbent Bike Uphill Climb (30 minute default) Gradually increases intensity throughout the entire workout.
-
Page 16: Warranty
In order to insure our product warranty and to ensure the safe and efficient operation of your LifeSpan product, only authorized parts can be used. The warranty is void if any parts other than those provided by LifeSpan are used. Exclusions and Limitations: •... -
Page 17: Assembling Your R5I Recumbent Bike
Assembling Your R5i Recumbent Bike Exploded View Prior to starting the assembly process take all of the parts out of the box. Remove plastic bags and lay them out on the floor to become familiar with the components. Since your recumbent bike is a heavy piece of equipment it is recommended you use two people during assembly and follow these assembly instructions to reduce any problems that could occur. - Page 18 Assembling Your R5i Recumbent Bike Hardware Included Item# Part Description Item# Part Description Main Frame Bottom Shock Cover Front Support Seat Bottom Rear Support Console Upright Seat Rail Assembly Upright Cover Seatback/Armrest Left Pedal Seatback Shock Right Pedal Top Shock Cover...
- Page 19 Assembling Your R5i Recumbent Bike Step 1: Remove Components from Box Remove plastic bags and lay all parts out on the floor. Locate the hardware bag. Step 2: Rear Support Assembly Align the Rear Support Assembly (3) with Rear Bracket (B).
- Page 20 Assembling Your R5i Recumbent Bike Step 3: Front Support Assembly Move the Seat (9) forward so it is located in the position as shown below. Align the Front Support Assembly (2) with the Front Bracket (A). Install two M8x75L Bolts (15) and Curve Washers (16) through the Front Support Assembly (2) and into the Front Bracket (A).
- Page 21 Assembling Your R5i Recumbent Bike Step 4: Front Support Assembly A. Check that the Seat Mount (14) is centered along the Seat Rail As- sembly (4), and tighten the Seat Mount Stop Lever (B) to lock the Seat Mount on the rail.
- Page 22 Assembling Your R5i Recumbent Bike Step 5: Seatback / Armrest Assembly NOTE: Make sure seat is locked and remove wire ties from Connectors (H) and (I). A. Plug Connectors (H) from the top of Seat Mount (14) to Connectors (I) from the base of the Seatback/Arm- rest Assembly (5).
- Page 23 Assembling Your R5i Recumbent Bike Step 6: Seatback Shock Assembly Align the Shock Assembly (6) to the Lower Shock Bracket (L), handle should be on the lower right side. Install one M8x30L Bolt (23) through the Lower Shock Bracket (L) and Shock Assembly (6).
- Page 24 Assembling Your R5i Recumbent Bike Step 6: Seatback Shock Assembly (Continued) Align the top of the Shock Assembly (6) with the Upper Shock Bracket (M) on the Seatback/Armrest Assembly (5). Install the M8x20L Bolt (24) through the Upper Shock Bracket (M) and the top of the Shock Assembly (6).
- Page 25 Assembling Your R5i Recumbent Bike Step 7: Shock Assembly Covers Align the Bottom Shock Cover (8) with the bottom of the Lower Shock Bracket (L). Install the three M3x10L Screws (26) through the Bottom Shock Cover (8) into the bottom of the Lower Shock Bracket (L) and tighten securely.
- Page 26 Assembling Your R5i Recumbent Bike Step 8: Seat Bottom Assembly Place Seat Bottom (9) on the Seat Mount (14). Align the four inner holes on the Seat Bottom (9) with four holes on the Seat Mount (14). For a larger person use the four front holes and for a smaller person use the rear holes in the Seat Mount (14).
- Page 27 Assembling Your R5i Recumbent Bike Step 9: Console Upright Assembly Slide the Upright Cover (11) a third of the way up the Console Upright Assembly (10) as shown below. NOTE: Remove wire ties from connectors (N) and (O). Align the Console Upright Assembly (10) with the Console Upright Bracket (P) on the Main Frame Assembly (1).
- Page 28 Assembling Your R5i Recumbent Bike Step 10: Pedal Assembly Identify which pedal goes on the right side and which goes on the left side by locating the “R” on the top of the Right Pedal (13) and the “L” on the...
- Page 29 Assembling Your R5i Recumbent Bike Leveling Your R5i bike comes with Two Leveling Feet (S) in the back and Two Stationary feet (T) in the front. Gently rock the bike back and forth to see if any of the feet are not sitting on the floor Adjust the Rear Feet (S) until all 4 feet are sitting on the floor.
- Page 30 To lock the seat, simply push down on the seat lock handle. Seat Back Tilt Adjustment Your R5i bike comes with the ability to adjust the tilt of the seat back. To tilt the seat back, pull up on the Seat Back Adjustment Lever (V) and push back on the seat back.
- Page 31 Resistance Resistance Console Buttons The R5i comes with our innovative Intelli-Key feature that will prompt you through console operations by using intelligent lights on the buttons that automatically flash when they need to be pressed to continue operations. A. Quickstart: - Press the START button to begin a Manual workout without having to set any individual information.
- Page 32 D. Program Buttons: - The R5i has Program Group buttons. These are designed to help you add variety to your exercise program while staying consistent with your exercise goals. To quickly select a specific program that matches your workout objective use one of the program buttons.
- Page 33 Display Console Overview Alpha Numeric Window - The R5i comes with a 16 character alpha window that is used to show the program name and set user functions like date and time. Workout Feedback: The R5i display window will simultaneously display the...
-
Page 34: Quickstart
Display Console Overview QuickSTART The quickest way to get started with a workout is to press the START button. This will start the recumbent bike in manual mode with the time counting up from 00:00. You can also set a desired workout Time and update your Weight in the console for more accurate calorie calculation by following these steps: A. -
Page 35: Using Programs
Using Programs Starting in Manual Mode The quickest way to get started is to press the START button. Pressing the START button will select the Manual program and the TIME will start counting up from 00:00. You can also press ENTER to select the Manual program. Using the ENTER button will allow you to set a specific workout TIME. -
Page 36: Custom User
Once the program has been set up, simply scroll to the USER1 or USER2 program and press START. My Zone Heart Rate Control Programs The R5i has 2 MyZone Heart Rate control programs: Constant and Interval. In each of these programs you will set... - Page 37 Using Programs HRC1 – Constant Heart Rate Control The Constant Heart Rate is a steady state program that lets you select a single heart rate to maintain throughout your workout. After 3 minutes of warm up, the pedaling resistance will automatically be adjusted every 10 seconds to get your heart rate up to the preset level that you selected and then maintain your heart rate during the workout.
- Page 38 Using Programs HRC2 – Interval Heart Rate Control The Interval program is designed to help you increase your aerobic endurance and improve heart rate recovery. This program lets you select a LOW (or recover target heart rate) and a HIGH target. After a 3-minute warm-up the console will adjust the Level every 10 seconds to maintain your Low target for 2 minutes.
-
Page 39: Maintenance And Tips
Problem: Rough feeling in pedals when in use. Solution: If everything is tight, contact LifeSpan Customer Service for replacement pedals. Problem: Excess play in the handlebars or frame components. Solution: Using the provided assembly tools, go over the R5i to make sure all assembly hardware is tight. -
Page 40: General Maintenance
Moving the R5i Recumbent Bike Your R5i bike is equipped with two transport wheels (U) located on the front support. Carefully lift the back of the bike up until the transport wheels make contact with the floor and roll the bike to the desired location. Be sure to bend your knees and use proper lifting techniques while moving this prod- uct. - Page 41 Recumbent Bike Interactive Trainer LifeSpan Fitness 785 West 1700 South Suite 1 Salt Lake City, UT. 84104 Phone: 877.654.3837 Version 1.0NB www.LifeSpanFitness.com...
Need help?
Do you have a question about the R5i and is the answer not in the manual?
Questions and answers