Dräger Evita 2 dura Instructions For Use Manual
Intensive care ventilator
Hide thumbs
Also See for Evita 2 dura:
- Repair instructions (89 pages) ,
- Short manual (34 pages) ,
- Operating instructions manual (32 pages)
Table of Contents
Advertisement
Quick Links
Advertisement
Chapters
Table of Contents

Related Manuals for Dräger Evita 2 dura


Summary of Contents for Dräger Evita 2 dura
- Page 1 Evita 2 dura Intensive Care Ventilator Instructions for Use Software 4.n...
- Page 2 Working with these Instructions for Use Header line – the title... of the main chapter Preparing for use Fitting components The title of the specific sub-section is printed underneath the main header – to help you find your way quickly from subject to subject.
- Page 3 External flow source — »Active humidifier« available as software version 4.n plus upgrade — The amount of external flow is calculated by Evita 2 dura 4.n — »HME/Filter« (artificial nose) (e.g. for additional tracheal gas insufflation) and adjusts the volume monitoring tolerances in order to avoid inadvertent —...
-
Page 5: Table Of Contents
Contents Contents For Your Safety and that of Your Patients Intended Medical Application Operating Concept Preparing Operation Configuration Fault – Cause – Remedy Care What's what Technical Data Description Parts List Order List Index... -
Page 6: For Your Safety And That Of Your Patients
For Your Safety and that of Your Patients For Your Safety and that of Your Patients Strictly follow the Instructions for Use Liability for proper function or damage Any use of the apparatus requires full understanding and strict The liability for the proper function of the apparatus is observation of these instructions. - Page 7 Back-up ventilation with an independent manual ventilation device If a fault is detected in Evita 2 dura so that its life-support functions are no longer assured, ventilation using an independent ventilation device must be started without delay –...
-
Page 8: Intended Medical Application
— PLV ( P ressure L imited V entilation) Separate, differentiated, synchronised ventilation with two — AutoFlow ® (optional) units, one for each lung, either two Evita 2 dura units or an for automatic regulation of inspiration flow Evita 2 dura with another Evita unit. -
Page 9: Operating Concept
Operating Concept Operating Concept Operating Concept ........... . 10 Ventilation Controls . -
Page 10: Operating Concept
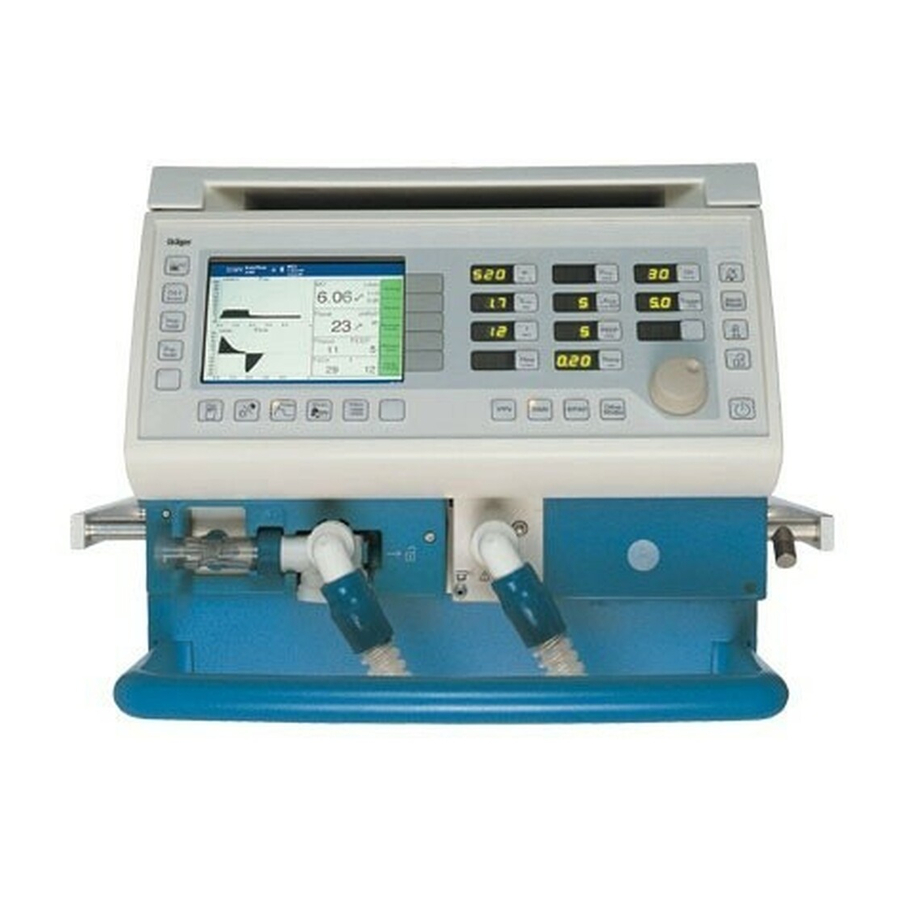
Operating Concept Ventilation Controls Operating Concept Ventilation Controls 1 Keys for selecting the ventilation modes: – IPPV Evita 2 dura – SIMV – BIPAP – other modes 2 Keys for selecting/setting ventilation parameters: – Tidal volume V – Inspiration time T insp –... -
Page 11: Screen Operating Controls
Screen Operating Controls Screen Operating Controls 1 Menu keys for selecting the menu on the screen. Evita 2 dura 2 Central "turn-and-push" rotary knob for selecting and setting the options displayed on the screen. To select/set = turn the rotary knob To confirm = press the rotary knob. -
Page 12: Power Switch
Standby key »O« Placed on its own, away from other keys. For keeping the apparatus on standby Evita 2 dura for switching on ventilation. To switch to standby: ● Press and hold down the »... -
Page 13: Screen Pages
Operating Concept Screen Pages Screen Pages The screen pages consist of two basic structures: — the main page, displaying all important ventilation characteristics at a glance — application-specific pages for functions and settings. Important functions are displayed in the same position in both structures: —... -
Page 14: Screen Page "Settings
Operating Concept Screen Pages The menu keys on the right-hand edge of the screen select the screen pages for the following specific application situations: — Settings Evita 2 dura — Alarms — Measurements — Measurement manoeuvre (optional) — Calib./Config. Screen page »Settings«... -
Page 15: Screen Page "Calibration/Configuration
Operating Concept Screen Pages Screen page »Calibration/Configuration« Sensors — Calibrating the sensors for O and flow — Switching the monitoring system on and off Device — Setting the volume of the acoustic alarm — Setting the screen contrast — Setting the date and time —... -
Page 16: Colour Screen
Operating Concept Colour screen Colour screen For differentiating various items of information on the screen. For messages = Alarm Yellow = Caution or advisory message Blue = Alarm is no longer active Example: »!!! Apnoea« alarm For menu buttons: Green = Can be selected Black = Has been selected Example: Menu button »Device «... -
Page 17: Preparing
Preparing Preparing Preparing for use ............18 Fitting components . -
Page 18: Preparing For Use
Preparing for use Fitting components Preparing for use The following instructions cover: — Assembly of the various equipment items. — Electrical connection and gas connection. — Setting the language for display texts. — Automatic device check with calibration of the sensors. Fitting components ●... -
Page 19: Fitting The O 2 Sensor
Preparing for use Fitting components Fitting the O sensor — when using the system for the first time — when the display reads: »O measurement inop.« — when calibration can no longer be performed. ● Tilt the control unit upwards. 1 Turn port downwards or to the left. -
Page 20: Note On The Use Of Heat And Moisture Exchangers
Preparing for use Note on the use of heat and moisture exchangers Note on the use of bacterial filters Note on the use of heat and moisture exchangers The use of heat and moisture exchangers (HME’s) in the patient connection can considerably increase breathing resistance. -
Page 21: For Ventilating Adults And Children
Connection of ventilation hoses Do not use antistatic or conductive hoses*. Depending on the desired position of the ventilator in relation Evita 2 dura to the bed, the hinged arm can be fitted to either side of the machine. Attachment on left-hand side: 4 Turn both ports to the left. -
Page 22: Fitting The Temperature Sensor (Option)
Preparing for use For ventilating adults and children 1 Hang the hinged arm from the rail on the left-hand side and tighten screws. ● Connect ventilation hoses, and note length of hose (metres). 2 Turn ports in direction of hoses. 3 Install water traps in vertical position at the lowest point of their hose lines. -
Page 23: For Ventilating Infants
Fitting bacterial filter ● Fit the bacterial filter to the inspiratory port. Evita 2 dura Fitting humidifier and ventilation hoses ● Prepare the "Fisher & Paykel MR 730" humidifier in accordance with the separate Instructions for Use, using hose set K (paediatric), as supplied. -
Page 24: In-House/Intra Hospital Transport
2 Press the flat plugs into the rear slits. Evita 2 dura Do not place any liquid container (e.g. infusion container) above or on top of the Evita 2 dura! Any leak, spill or seepage could prevent it working properly. -
Page 25: Supply And Connections
Without optional Evita DC power supply: During the power failure, Evita 2 dura will output a continuous tone for max. 2 minutes. This continuous tone may be output for a shorter period if Evita 2 dura was switched on for less than 15 minutes. -
Page 26: Gas Supply
Follow Instructions for Use of the Evita DC power supply. Other equipment, e.g. printers, may only be connected to the COM ports if Evita 2 dura is connected to the mains power supply via a mains power cable or if it has been earthed via the earth connection on the back of the unit. -
Page 27: Evita Remote
8 »Exp. hold« key – for extended and sustained expiration The function of the respective LEDs and keys is the same as that of the corresponding elements on the front panel of Evita 2 dura and is described in the application chapters of the Instructions for Use. Connection ●... -
Page 28: Note Automatic Self-Test
Hook holder onto a standard rail and clamp into place. ● Hang Remote Pad into holder from above. Note automatic self-test — when connecting the Remote Pad to Evita 2 dura while the latter is switched on — when switching on Evita 2 dura after connecting the Remote Pad. -
Page 29: Nurse Call (Optional)
Evita 2 dura signals an alarm. The central hospital alarm system may only be connected to the nurse call if Evita 2 dura is connected to the mains power supply via a mains power cable or if it has been earthed via the earth connection on the back of the unit. -
Page 30: Device Check
Overextended breathing bags must not be used as they may cause artefacts during the device check! ● The elbow connector must not be plugged into the patient connection of the Y-piece until directed by Evita 2 dura. -
Page 31: Preparing The Child Test Lung 84 09 742
Evita 2 dura runs through its self-test procedure. ● Wait until the 10-second test phase has been completed. After the self-test: 1 Switch Evita 2 dura to standby = Hold down key » « for about 3 seconds. Evita 2 dura 2 Switch off the standby alarm tone with the »Alarm Reset«... -
Page 32: Select Type Of Humidifier
— Active humidifier, e.g. Dräger Aquapor — HME/Filter (artificial nose) If the type of humidifier is known, Evita 2 dura can take the temperature and moisture situation into account when measuring the volume parameters. - Page 33 Preparing for use Device Check The following tests are performed during the device check: System — Secure postioning and clear passage of the expiratory valve — Secure postioning of the flow sensor — Secure postioning of the neonatal flow sensor (if "NeoFlow" option is installed) —...
-
Page 34: Perform "Leak" Test
A leakage flow of 300 mL/min at a pressure of 60 mbar is permissible. Evita 2 dura determines the compliance and resistance of the patient circuit during the »Tightness« test. The established compliance of the hose system is used by the ventilator for automatic correction of the volume-controlled ventilation strokes, as well as of the measured values for flow... - Page 35 ● Press the » « key. The device immediately starts ventilation. Evita 2 dura is ready for use when the device check and leak test have been successfully completed. Either: ● Leave Evita in Standby mode and if necessary preselect the ventilation mode and ventilation parameters, 1 Immediately start up Evita 2 dura, press »...
-
Page 37: Operation
Operation Operation Operation ............38 Starting up . -
Page 38: Operation
Evita 2 dura runs a self-test. ● Wait until the 10-second test phase is complete. Evita 2 dura always begins ventilation with the start-up values marked by an arrow on the on-screen knobs. To select these start-up values, please refer to pages 77 onwards. -
Page 39: Patient Mode
— Previous application mode – tube or mask for optional NIV (example: NIV) The key »prev. patient« is not displayed by Evita 2 dura following a loss of data or removal of a previously used option (e.g. NeoFlow), thus preventing restoration of the previous setting. -
Page 40: Starting Ventilation
30 seconds with the last selected patient mode and ventilation mode and the associated ventilation parameters. The main page is displayed on the Evita 2 dura screen. The user can check and correct the settings in the display fields next to the parameter keys. -
Page 41: Setting Ventilation Modes
1 Press the appropriate ventilation mode key. The yellow LED in the key will light up. Evita 2 dura 2 Set the desired value = turn the rotary knob. Confirm value = press the rotary knob. The yellow LED will go out. -
Page 42: Ippv
Setting Ventilation Modes To prevent settings being changed inadvertently: 1 Press the » « key. Its yellow LED will light up. The Evita 2 dura parameter keys and ventilation mode keys will be protected against inadvertent setting. Before setting a new value: 1 Press the »... - Page 43 Operation Setting Ventilation Modes Sigh – to prevent atelectasis. Atelectasis can be prevented by activating the Sigh function and setting the sigh in the form of an intermittent PEEP. When the Sigh function is activated, the end-expiratory pressure is increased by the set intermittent PEEP for 2 ventilation strokes every 3 minutes.
-
Page 44: Simv, Simv/Asb
Apnoea ventilation – for automatic switchover to volume- controlled mandatory ventilation if the patient stops breathing. Spontaneous breathing with ASB If breathing stops, Evita 2 dura activates an alarm after the set > pressure support Start of alarm time (T... - Page 45 Operation Setting Ventilation Modes Pmax SIMV, SIMV/ASB can be supplemented with the ventilation parameter Pmax: ● Activate »Pmax pressure limit«, see page 79. ● Set the value of Pmax with the »P « insp Pressure limited ventilation PLV* – for manually limiting pressure peaks using the Pmax pressure limit.
-
Page 46: Bipap, Bipap/Asb
Apnoea ventilation – for automatic switchover to volume- controlled mandatory ventilation if the patient stops breathing. If the patient stops breathing, Evita 2 dura activates an alarm > after the set alarm time (T ) and starts volume-... -
Page 47: Bipap Assist
Operation Setting Ventilation Modes BIPAP Assist Biphasic Positive Airway Pressure Assisted Druckkontrollierte, assistierende Beatmung fast slow The inspiratory strokes are the same as for BIPAP, but the rise time rise time changeover from P to PEEP is not synchronised with insp insp expiration by the patient. -
Page 48: Cpap, Cpap/Asb
Operation Setting Ventilation Modes CPAP, CPAP/ASB Continuous Positive Airway Pressure Spontaneous Assisted Spontaneous Breathing breathing with ASB Spontaneous breathing at a raised pressure level, to increase pressure support Start of Apnoea Ventilation the functional residual capacity FRC. Spontaneous breathing slow fast can be assisted with additional pressure by ASB. - Page 49 Setting Ventilation Modes Apnoea ventilation – for automatic switchover to volume- controlled mandatory ventilation if the patient stops breathing. If the patient stops breathing, Evita 2 dura activates an alarm > after the set alarm time (T ) and starts volume-...
-
Page 50: Mmv, Mmv/Asb
Operation Setting Ventilation Modes MMV, MMV/ASB Mandatory Minute Volume Ventilation* Assisted Spontaneous Breathing ASB pressure support The overall minute volume is preset to a mandatory level, which Pmax short long can be adjusted by means of the tidal volume V rise time rise time PEEP... - Page 51 Operation Setting Ventilation Modes Pmax MMV, MMV/ASB can be supplemented with the ventilation parameter Pmax. ● To activate »Pmax pressure limit«, see page 79. Pressure limited ventilation PLV* – for manually limiting pressure peaks using the Pmax pressure limit. The tidal volume remains constant as long as the pressure curve continues to show a short plateau, and the flow curve shows a brief pause in the flow between inspiration and expiration.
-
Page 52: Apnoea Ventilation
It can be switched on in the ventilation modes SIMV, BIPAP, ventilation CPAP, APRV. Spontaneous breathing Evita 2 dura emits an apnoea alarm if during the set alarm with ASB pressure support PEEP period »T « no expiration flow is measured or insufficient Apnoea inspiratory gas is delivered. -
Page 53: Setting Alarm Limits
Operation Setting Alarm Limits Setting Alarm Limits ● Press the »Alarms« menu key. Example display »Limits« This page displays all the alarm limits that can be set/adjusted. < = lower alarm limit > = upper alarm limit Example: Setting the upper alarm limit for f spont ●... -
Page 54: In The Event Of An Alarm
2 The alarm message is displayed in the right-hand corner of the top line of the screen. Evita 2 dura assesses the alarm message according to its priority, marks the text with exclamation marks and generates the various alarm tone sequences. -
Page 55: Suppressing The Audible Alarm
Once the fault has been remedied, the alarm tone is switched off. Caution and advisory messages disappear automatically. Alarm messages (!!!) are then displayed in the colour of the Evita 2 dura status line and must be acknowledged: 1 Press the »Alarm Reset« key. -
Page 56: Displaying Curves And Measured Values
field. To select a second group of 6 measured values: 1 Press the »Values « key. Evita 2 dura To select another pair of curves: 2 Press the »Curves « key. Measured values and curves can be selected, see "Combine displayed measured values", page 75 and "Combine displayed... -
Page 57: Display Measured Values
● Press menu button »Measurements«. Display example: »Table 1« Evita 2 dura displays the measured values and their units of measure in the form of a table. The menu »Table 1« is displayed with all standard available measured values. The measured value MV... -
Page 58: Curve Freezing
Operation Curve freezing Curve freezing To study the curve(s) in detail: 1 Press the »Freeze « key. Evita 2 dura To return to displaying new curve(s): 1 Press the »Freeze « key again. -
Page 59: Special Functions
Active in all ventilation modes. For determining the weaning value NIF* 2 Hold down the »Exp. hold« key. The expiration phase remains effective and Evita 2 dura determines the measured NIF value as long as the key is pressed. After 15 seconds, the system automatically interrupts the expiration phase. -
Page 60: Medicament Nebulisation
flow sensor could cause a fire. During adult ventilation Applicable in every ventilation mode. Evita 2 dura applies the medicament aerosol in synchronisation with the inspiratory flow phase and maintains the minute volume constant. Depending on the set O... - Page 61 Operation Special Functions The minute and tidal volumes displayed may be considerably higher or lower than those actually set to be delivered to the patient due to varying tolerances in flow during nebulising. The measured values prior to nebulisation must be taken into account if necessary.
- Page 62 Operation Special Functions 1 Connect the nebuliser hose to the port on the front panel of the Evita 2 dura. ● Fill the medicament nebuliser in accordance with its Evita 2 dura specific Instructions for Use. Warning: the effect of aerosols on sensors, filters and...
-
Page 63: Oxygen Enrichment For Bronchial Suction
1 Hold down the »O Suction« key until the yellow LED comes on. Evita 2 dura Evita 2 dura ventilates the patient in the set ventilation mode with increased O concentration: 100 % O by volume in adult mode, and a 25 % higher O concentration than the set value in paediatric mode. - Page 64 Operation Special Functions After disconnection for suction Evita 2 dura delivers a minimal flow for the duration of disconnection in order to detect the end of the disconnection phase automatically. In the help line at the bottom of the screen, the amount of time available for suction is continuously counted down (example): »Execute suction and reconnect 120 s«...
-
Page 65: Selecting Standby Mode
— to continue ventilation. 1 Press » « key. The LED goes out, and ventilation commences. If the patient mode is changed while on standby, Evita 2 dura will determine new starting values for ventilation, see page 78. Display (example):... -
Page 66: Calibration
Operation Calibration Calibration The saved calibration/zeroing values remain stored even when the machine is switched off. The pressure sensors for measuring the airway pressure are calibrated automatically. The flow sensor and O sensor are automatically calibrated once per day. Calibration of the flow sensor can be performed at any time, even during ventilation. -
Page 67: Calibrating The Flow Sensor Manually
Start calibration = press the rotary knob. Display (example): Evita 2 dura uses the next inspiration phase for the calibration. Short inspiration times are prolonged to about 1 second. Message in the help line at the bottom of the screen: »Flow calibration«... -
Page 68: External Flow Source
Confirm = press rotary knob. Determination of the external flow is aborted by Evita 2 dura if it exceeds 12 L/min or if flow measurement by Evita 2 dura is faulty. When the external flow has been determined successfully, it is taken into account in the monitoring of the flow sensor:... -
Page 69: Switching Off The Monitor Functions
Switch off: select key »extern. Flow« = turn rotary knob, confirm = press rotary knob. Once the external flow has been measured by Evita 2 dura, its inclusion can be reactivated at any time: ● Select screen key »extern. Flow« = turn rotary knob, confirm = press rotary knob. -
Page 71: Configuration
Configuration Configuration Configuration ............72 System Settings . -
Page 72: Configuration
Configuration System Settings Configuration System Settings Adjusting the volume of the audible alarm ● Press the »Calib./Config.« menu key. ● Press the »Device « menu key. The »System« menu appears. Display (example): ● Select the »Loudness« screen field = turn the rotary knob. Activate = press the rotary knob. -
Page 73: Country-Specific Settings
Configuration Country-specific settings Country-specific settings Selecting the language Evita 2 dura is supplied in the language of the customer's country. The following languages can be selected: — English — French — Italian — Spanish — Dutch — Swedish — American English —... -
Page 74: Interface
7.n) Other equipment, e.g. printers, may only be connected to the COM ports if Evita 2 dura is connected to the mains power supply via a mains power cable or if it has been earthed to the earth connection on the back of the unit. -
Page 75: Screen
Configuration Screen Screen Selecting the displayed combination of measured values Evita 2 dura displays a group of 6 selectable measured values in the right-hand field of the main page. An alternative second group can be displayed by pressing the »Values «. -
Page 76: Selecting The Displayed Curves
Configuration Screen Selecting the displayed curves Evita 2 dura shows two curves in the left-hand field of the main page. A different pair of curves can be selected by pressing the »Curves « key. The curve pairs can be combined as required. -
Page 77: Ventilation Defaults
Configuration Ventilation Defaults Ventilation Defaults — For defining the patient-specific start-up parameters »f« and »VT« — Ventilation parameters active on starting up the device — Alarm limits active on starting up the device — Ventilation mode The »Ventilation« menu for the default settings active on starting ventilation can only be accessed after entering the code number 3032. -
Page 78: Default Ventilation Parameter Values
Configuration Ventilation Defaults Default ventilation parameter values — These defaults specify the ventilation parameters and alarm limits that are not patient-specific and are activated on starting up the device. ● Press the »Calib./Config.« menu key. ● Press the »Ventilation « menu key. ●... -
Page 79: Activating/Deactivating Pressure Limit Pmax
Deactivate Pmax = press rotary knob, the "LED" in the screen key »Pmax« lights up green. Set the value for Pmax: ● Press the »P « parameter key. insp ● Set the desired value = turn the rotary knob. Evita 2 dura Confirm = press the rotary knob. -
Page 80: Apnoea Ventilation On/Off
Configuration Ventilation Defaults Apnoea ventilation on/off To determine whether apnoea ventilation is automatically ready for use when starting. ● Press menu button »Calib./Config.«. ● Press menu button »Ventilation «. ● Enter code number »3032«. ● Select the menu »Mode« via the menu button »Ventilation «. -
Page 81: Set Initial Values For Alarm Limits
Configuration Ventilation Defaults Set initial values for alarm limits ● Press the »Calib./Config.« menu key. ● Press the »Ventilation « menu key. ● Enter code number »3032«. ● With the »Ventilation « menu key, select the »Alarms« menu. Display (example): ●... -
Page 82: Default Ventilation Mode
Configuration Ventilation Defaults Default ventilation mode After switching on, Evita 2 dura starts up in the ventilation mode displayed when this screen key is selected. The factory-set default is IPPV. If you require a different start-up ventilation mode: ● Press the »Calib./Config.« menu key. -
Page 83: Fault - Cause - Remedy
Fault – Cause – Remedy Fault – Cause – Remedy Fault – Cause – Remedy ..........84... - Page 84 Fault – Cause – Remedy Fault – Cause – Remedy Alarm messages in the alarm display field are displayed in hierarchical order. If, for example, two faults are detected at the same time, the more critical of the two is displayed. The priority for alarm messages is marked by exclamation marks: Warning = Message with top priority...
- Page 85 Calibrate flow sensor, page 67, replace if necessary. Expiration valve faulty. Replace expiration valve. External Flow Evita 2 dura calculates the externally Deactivate calculation of the external flow, supplied flow when monitoring correct see page 68. functioning of the flow measurement.
- Page 86 Remote Pad is faulty. Call DrägerService at the next opportunity. The original ventilation functions of Evita 2 dura are not affected. Correct functioning of the nurse call or Remote Pad is not guaranteed, however: remove the nurse call and/or Remote Pad.
- Page 87 Remote Pad is faulty. Call DrägerService at the next opportunity. The original ventilation functions of Evita 2 dura are not affected. Correct functioning of the nurse call or Remote Pad is not guaranteed, however: remove the nurse call and/or Remote Pad.
- Page 88 Leak or disconnection. Check that hose system connections are leakproof. Tube blokked Evita 2 dura only applies a very small Check condition of patient, check tube. volume with each mechanical stroke, e.g. because the tube is blocked. Patient "fights" against the mechanical...
-
Page 89: Care
Humidifier ............94 Care list for Evita 2 dura Intensive Care Ventilator ......95 Assembling . -
Page 90: Care
● Remove the temperature sensor from the Y-piece – do not tug on cable. Remove the sensor probe from the back panel of Evita 2 dura. ● The temperature sensor is designed for wipe-disinfection. The temperature sensor must not be placed in a... -
Page 91: Medicament Nebuliser (Option)
Care Removing parts Medicament nebuliser (option) 1 Disconnect nebuliser hose from medicament nebulizer and from the port on the unit. 2 Disconnect the medicament nebuliser from the adult hose system 2 from the paediatric hose system. 3 Remove catheter connector (ISO cone Ø 15 / Ø 11) from the inlet. -
Page 92: Expiration Valve
Care Removing parts Expiration valve ● Push the catch to the right, pulling off the expiration valve at the same time. If the expiration valve has an optional water trap: ● Remove the collecting jar. Only strip down the expiration valve if badly soiled: ●... -
Page 93: Disinfecting/Cleaning
Care Disinfecting/Cleaning Disinfecting/Cleaning Use surface disinfectants. For surface compatibility, use disinfectants based on: — aldehydes, — quaternary ammonium compounds. To avoid the possibility of damage to material, do not use any disinfectants based on: — alkylamine-based compounds — phenol-based compounds, —... -
Page 94: Ventilation Hoses, Water Traps And Their Collectors, Y-Piece, Expiratory Valve (Or In The Event Of Severe Soiling, Its Individual Components)
Care Disinfecting/Cleaning Ventilation hoses, water traps and their collectors, Y-piece, expiratory valve (or in the event of severe soiling, its individual components) ● Disinfect in a moisture saturated environment at 93 (200 F) for 10 minutes using a cleaning and disinfecting machine. -
Page 95: Care List For Evita 2 Dura Intensive Care Ventilator
Care Care list for Evita 2 dura Intensive Care Ventilator Care list for Evita 2 dura Intensive Care Ventilator Applicable for use with non-infectious patients. For infectious patients, all parts that conduct breathing gas must be additionally sterilised after disinfecting and cleaning. -
Page 96: Assembling
Care Assembling Assembling Mounting the expiration valve The parts must be entirely dry to prevent malfunctioning. Be careful to fit the diaphragm in the correct position. ● Hold stopper by the flange and place diaphragm on the collar of the stopper. ●... -
Page 97: Maintenance Intervals
Care Maintenance Intervals Maintenance Intervals Clean and disinfect equipment and/or components before any maintenance procedures and/or before returning for repair! Note the maintenance intervals specified in the respective Instructions for Use of the options installed! sensor capsule Replace when the following message is displayed: »O measurement inop«... -
Page 98: Clean Or Replace Cooling Air Filter
Care Maintenance Intervals Clean or replace cooling air filter — Filter must be cleaned or replaced when soiled or at the latest after 4 weeks. Replace after 1 year at the latest. 1 Remove cooling-air filter from its slot on the back of machine. -
Page 99: Correct Disposal Of Batteries And O 2 Sensors
Dräger. Correct disposal of apparatus — at the end of its useful life ● After contacting the competent waste disposal company, hand over Evita 2 dura for appropriate disposal. The applicable legal regulations must be observed. -
Page 101: What's What
What's what What's what What's what ............102 Control unit . -
Page 102: What's What
What's what Control unit What's what Control unit 21 20 19 18 17 16 15 14 13 12 13 Key for the BIPAP ventilation mode 1 Screen for displaying application-specific screen pages. 2 Menu keys for displaying the application-specific 14 Key for the SIMV ventilation mode screen pages. -
Page 103: Front Connections
What's what Front connections Front connections 1 Gas outlet (EXHAUST – NOT FOR SPIROMETERS) 2 Flow sensor 3 Expiration valve with expiration port (GAS RETURN) 4 Latch for expiration valve 5 Nebuliser port 6 Inspiratory port (GAS OUTPUT) 7 Locking screw for protective cover (behind it: O sensor and ambient-air filter) -
Page 104: Back Panel
What's what Back panel Back panel 17 16 13 12 1 Fan 11 »CO « socket for CO sensor, optional 2 Power switch with protective flap 12 Connection for neonate flow sensor (optional) 3 »COM2«, »COM3« sockets for RS 232 and 13 »Sync.«... -
Page 105: Back Panel, With Dc Power Supply Mb
What's what Back panel, with DC power supply MB Back panel, with DC power supply MB 12 11 1 Fan 11 »CO « socket for CO sensor, optional 2 Power switch with protective flap 12 Connection for neonate flow sensor (optional) 3 »COM2«, »COM3«... -
Page 107: Technical Data
Technical Data Technical Data Technical Data ............108 Environmental conditions . -
Page 108: Technical Data
Technical Data Environmental conditions Settings Technical Data Environmental conditions In operation Temperature 10 to 40 Atmospheric pressure 700 to 1060 hPa Rel. humidity 0 to 90 %, without condensation In storage Temperature –20 to 60 Atmospheric pressure 500 to 1060 hPa Rel. -
Page 109: Performance Data
Technical Data Performance data Measured value display Performance data Control principle Time-cycled, volume-constant, pressure-controlled Intermittent PEEP frequency 2 cycles every 3 minutes Medicament nebulisation for 30 min Bronchial suction Disconnection detection automatic Reconnection detection automatic Oxygen enrichment max. 3 minutes Active suction phase max. - Page 110 Technical Data Measured value displays measurement in main flow (inspiratory side) Inspiratory O concentration FiO Range 15 to 100 Vol.% Resolution 1 Vol.% Accuracy ±3 Vol.% Flow-Messung Minute Volume MV Spontaneously breathed minute volume MV Range 0 to 99 L/min, BTPS Resolution 0.1 L/min Accuracy...
- Page 111 Technical Data Measured value displays Computed value displays Compliance C Range 0.7 to 200 mL/mbar Resolution Range 0.7 to 99.9 mL/mbar 0.1 mL/mbar Range 100 to 200 mL/mbar 1 mL/mbar Accuracy ±20 % of measured value Resistance R Range 3 to 200 mbar/L/s Resolution Range 3 to 99.9 mbar/L/s 0.1 mbar/L/s...
-
Page 112: Monitoring
60 Vol.% and over: ±6 Vol.% Insp. breathing gas temperature Upper alarm limit alarm when temperature reaches 40 (Evita 2 dura can also be used without temperature sensor if the sensor is not connected on switching on). Tachypnoea monitoring f Alarm when the spontaneous breathing frequency is exceeded during spontaneous breathing. -
Page 113: Machine Outputs
Technical Data Machine outputs Power consumption typically approx. 125 W Machine fuses Range 100 V to 240 V F 5 H 250 V IEC 127-2 (2x) Protection class Machine Class I sensor (sensor connected) Type BF Temperature sensor AWT 01 (sensor connected) Type BF Gas supply gauge pressure... -
Page 114: Materials Used
Technical Data Materials used Cable length Up to 15 m 3000 to 7000 Ω Load impedance Signal level (at load impedance 3000 to 7000 Ω) Between 3 and 15 V High Between –3 and –15 V Electrical isolation Port COM 1 is electrically isolated from the machine electronics. -
Page 115: Description
Description Description Description ............116 Ventilation Modes . -
Page 116: Description
Flow Insp. flow Manual pressure limiting with Pmax Evita 2 dura can prevent peaks of pressure, while maintaining the set tidal volume V , by means of the pressure limit Pmax. The tidal volume V remains constant as long as a pressure plateau P is still detectable and the flow curve shows a brief... -
Page 117: Sigh (Intermittent Peep)
filling of the "slow" alveoli. In Evita 2 dura, the sigh operates during expiration with an intermittent PEEP for two ventilation strokes every 3 minutes. The average airway pressure is higher, and a longer filling time is normally available. -
Page 118: Simv
SIMV time and therefore would normally result in an undesirable increase in the effective SIMV frequency, Evita 2 dura adds back the reduced SIMV time by prolonging the subsequent spontaneous breathing phase by the SIMV time difference Δ T – thus preventing an increase in SIMV frequency. -
Page 119: Asb
— at the latest after 4 seconds (1.5 seconds in paediatric ventilation) if the other two criteria have not come into operation. If this 4-second criterion occurs three times in succession, Evita 2 dura sounds an alarm and warns of a possible leak in the ventilation system. -
Page 120: Bipap
Description Ventilation Modes BIPAP Biphasic Positive Airway Pressure The BIPAP ventilation mode is a pressure/time-cycled ventilation mode in which the patient can always breathe spontaneously. BIPAP is therefore often described as a timed fast slow pressure assist alternation between two CPAP levels.* rise time rise time fast... -
Page 121: Bipap Assist
Description Ventilation Modes Using BIPAP As with IPPV, the time pattern is set using the basic setting parameters of frequency f and inspiration time T . The lower Mandatory Spontaneous Synchronised insp BIPAP stroke breathing BIPAP stroke pressure level is set with the PEEP parameter, while the upper level is set with P . -
Page 122: Mmv
IMV frequency f is set to correspondingly low values. In this case, Evita 2 dura triggers an apnoea alarm that is cancelled again as soon as the mandatory ventilation strokes have been applied. If the cycle time (1/f) is set to a longer >... -
Page 123: Measurements
In addition to hose system compliance, flow/volume measurement is influenced by the environmental factors of temperature and humidity and by leaks in the hose system. Evita 2 dura takes these factors into account and corrects the settings and measured values accordingly. -
Page 124: Automatic Leakage Compensation
flow on the inspiration side and the measured flow on the expiration side. This difference provides a measure of the amount of leakage and is displayed by Evita 2 dura as the leakage minute volume MV . Evita 2 dura can compensate leak for this leakage in volumecontrolled ventilation. - Page 125 Unlimited volume compensation is inappropriate. Evita 2 dura compensates for losses of up to 100 % of the set tidal volume V . Due to technical tolerances, a small leakage minute volume may be displayed even if the hose system is...
-
Page 126: Rapid-Shallow-Breathing Rsb
RSB index <100 1/(min x L) were weaned with a probability of 80 %, while 95 % of those with an RSB index > 100 were not yet ready to be weaned. Evita 2 dura indicates the RSB index in CPAP/ASB and PPS modes. -
Page 127: Insp. O 2 Concentration During Medicament Nebulisation
To minimise the deviation from the set O concentration, Evita 2 dura generates a mixed gas to drive the medicament nebuliser. In adult ventilation, this mixed gas is generated by switching over the compressed gases (medical air and oxygen) in synchronisation with inspiration. -
Page 128: Abbreviations
Description Abbreviations Abbreviations Abbreviation Definition ISO 5369 International standard for mechanical Abbreviation Definition ventilators – "Lung Ventilation" APRV Airway Pressure Release Ventilation Mandatory Minute Volume Ventilation Spontaneous breathing at continuous positive airway pressure with short-term Minute Volume pressure release Leakage minute volume leak Assisted Spontaneous Breathing Spontaneous breathed minute volume... - Page 129 Description Abbreviations Abbreviation Definition Expiratory tidal volume Inspiratory tidal volume Volume trapped in the lung by intrinsic PEEP, trap and exhaled during subsequent expiration.
-
Page 130: Symbols
Description Symbols Symbols Symbol Definition Switch medicament nebuliser on/off Activate/deactivate oxygen enrichment for bronchial Suction suction Insp. Start manual inspiration hold Manually extend the expiration phase Exp. hold Bright/dark screen brightness setting Manual printer logging Switch help function on/off "Freeze" curves in screen Freeze Suppress audible alarm for 2 minutes Alarm... -
Page 131: Bibliography
Description Bibliography Bibliography (1) Baum, M., Benzer, H., Putensen, Ch., Koller, W., Putz, G.: Biphasic Positive Airway Pressure (BIPAP) – eine neue Form der augmentierenden Beatmung Anaesthesist 38 (1989), 452-458 (2) Luger, Th.J., Putensen, Ch., Baum, M., Schreithofer, D., Morawetz, R.F., Schlager, A.: Entwöhnung eines Asthmatikers mit Biphasic Positive Air- way Pressure (BIPAP) unter kontinuierlicher Sufentanil Gabe... -
Page 132: Parts List
68 50 645 Catheter connector, straight, size 12.5 M 23 841 (set of 10) Ambient-air filter 84 12 384 Cooling-air filter (back of Evita 2 dura, 84 12 384 Hose clamp 84 03 566 not illust.) Corrugated hose 0.32 m 84 02 041 "EvitaMobil"... - Page 133 68 50 645 Temperature sensor mounting 84 11 044 Adapter K90 84 03 075 Ambient-air filter 84 12 384 Cooling-air filter (back of Evita 2 dura, 84 12 384 Cap 5x 84 01 645 not illust.) Bellows, paediatric, complete 84 09 742 "EvitaMobil"...
-
Page 134: Order List
M 31 796 Medical air connecting hose 5 m, neutral colour M 34 409 EvitaMobil trolley 84 11 950 For supplying Evita 2 dura with medical air: Breathing air compressor 84 13 890 For adult ventilation Standby option 84 13 939... - Page 135 Software 4.14 Evita 2 dura Water trap 84 04 985 Upgrade modification set 84 14 470 Water container 84 03 976 Software 4.0 plus Evita 2 dura Hose clamp 84 03 566 Modification set – Nurse call/ 84 15 570 Connector M 25 647...
-
Page 136: Index
Index Index Abbreviations ........128 Information . - Page 137 Index UMDNS-Code ........114 Ventilation Controls ....... . . 10 Ventilation defaults .
- Page 140 These Instructions for Use apply only to Evita 2 dura with Serial No.: If no Serial No. has been filled in by Dräger these Instructions for Use are provided for general information only and are not intended for use with any specific machine or device.
Need help?
Do you have a question about the Evita 2 dura and is the answer not in the manual?
Questions and answers