Dräger Evita 2 dura Short Manual
Hide thumbs
Also See for Evita 2 dura:
- Repair instructions (89 pages) ,
- Instructions for use manual (140 pages) ,
- Operating instructions manual (32 pages)

Subscribe to Our Youtube Channel
Related Manuals for Dräger Evita 2 dura


Summary of Contents for Dräger Evita 2 dura
- Page 2 Evita 2 dura – Short guide March 2020, Lübeck © Drägerwerk AG & Co. KGaA, 2019 © Drägerwerk AG & Co. KGaA, 2019...
- Page 3 Evita 2 dura – System overview © Drägerwerk AG & Co. KGaA, 2019 © Drägerwerk AG & Co. KGaA, 2019...
- Page 4 Evita 2 dura– Short guide This Evita 2 dura short guide is intended for informational purposes only. It is not a replacement or substitute for the Instructions for Use. The completion of this guide does not relieve you from reading and understanding the current versions of the instructions for use associated with the relevant device.
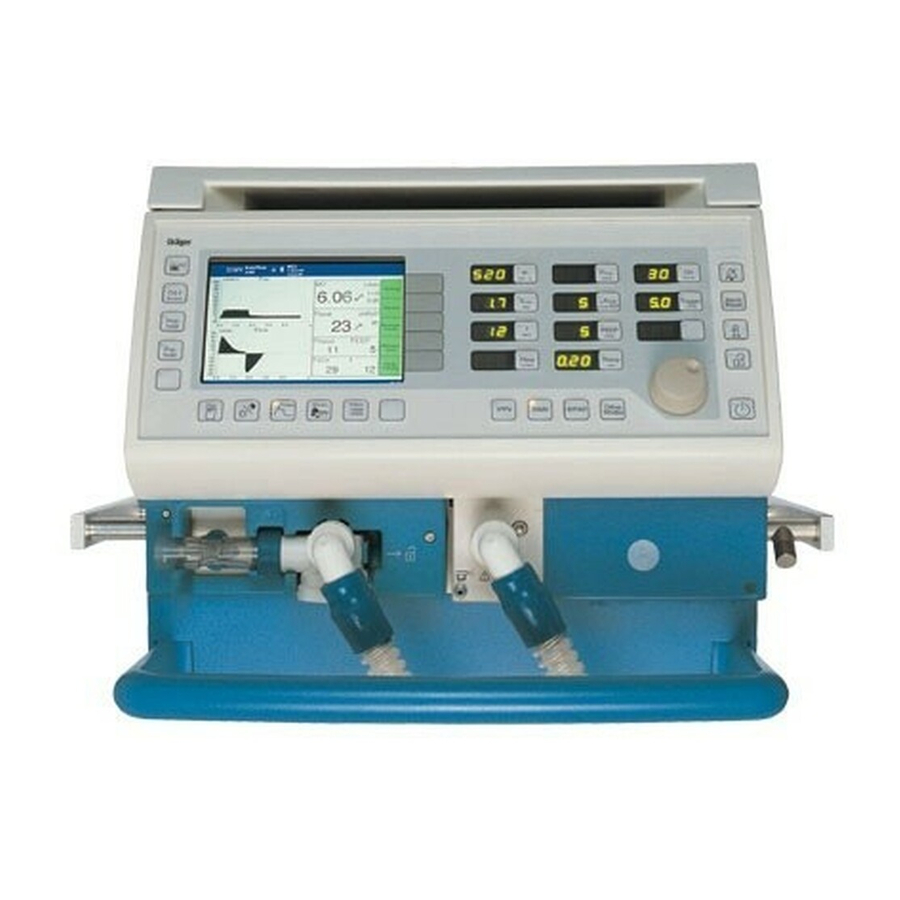
- Page 5 Evita 2 dura – System overview Front connections Expiration valve with expiration port Inspiratory port (GAS RETURN) (GAS OUTPUT) Gas outlet (EXHAUST – NOT FOR SPIROMETERS Locking screw for protective cover (behind it: O sensor and ambient-air filter) Flow sensor...
- Page 6 Evita 2 dura – System overview Back panel COM 2, COM 3 ports for Power switch ON/OFF RS 232, 2 CAN interfaces with protective flap and analog interface (optional) Connection for nurse call (optional) DC socet Cooling-air filter Connector for power cable...
- Page 7 Evita 2 dura – System overview Control unit Screen for displaying Parameter keys for setting Menu keys for displaying Red LED to indicate warnings application-specific the ventilation parameters the application-specific Yellow LED to indicate cautions screen pages screen pages and advisory messages...
- Page 8 Evita 2 dura – Operating concept © Drägerwerk AG & Co. KGaA, 2019 © Drägerwerk AG & Co. KGaA, 2019...
- Page 9 Evita 2 dura – Operating concept Ventilation controls Ventilation controls 1. Keys for selecting the ventilation modes 2. Keys for selecting/setting ventilation parameters 3. Central "turn-and-push" rotary knob for setting the parameters © Drägerwerk AG & Co. KGaA, 2019...
- Page 10 Evita 2 dura – Operating concept Screen operating controls Menu keys for selecting the menu on the screen. 1. Menu keys for selecting the menu on the screen ▪ Settings ▪ Alarms ▪ Measurements ▪ Measurement manoeuvre (optional) ▪ Calib./Config.
- Page 11 Evita 2 dura – Operating concept Screen pages Structure of the main page 1. Line for the active ventilation mode, patient mode and trigger indicator 2. Bar for alarm, warning and advisory messages 3. Field for menu selection keys 4. Field for measured values 5.
- Page 12 Evita 2 dura – Operating concept Screen pages 1. Screen page Settings ▪ For setting apnoea ventilation ▪ For setting intermittent PEEP (sigh) 2. Screen page Alarms ▪ For displaying the measured values with their alarm limits ▪ For setting the alarm limits 3.
- Page 13 Evita 2 dura – Preparation © Drägerwerk AG & Co. KGaA, 2019 © Drägerwerk AG & Co. KGaA, 2019...
-
Page 14: Device Check
Wait until the 10-second test phase has been completed. After the self-test: 2. Switch Evita 2 dura to standby = hold down key for about 3 seconds 3. Switch off the standby alarm tone with the Alarm Reset key 4. - Page 15 Evita 2 dura – Preparation Device check Select type of humidifier If the type of humidifier is known, Evita 2 dura can take the temperature and moisture situation into account when measuring the volume parameters. 1. Touch the Humidification screen key 2.
- Page 16 1. Select the menu Tightness via the menu button Check 2. Activate the screen key Start and confirm by pressing the rotary knob Evita 2 dura is ready for use when the device check and leak test have been successfully completed.
- Page 17 Evita 2 dura – Starting up © Drägerwerk AG & Co. KGaA, 2019 © Drägerwerk AG & Co. KGaA, 2019...
-
Page 18: Patient Mode
Patient mode Patient mode The patient mode can be selected after switching on Evita 2 dura 1. Select the Adults key or the Paed. key or the Neo. key (option) or the prev. patient key by turning the rotary knob. - Page 19 Evita 2 dura – Starting up Ventilation mode Setting ventilation modes To activate the relevant ventilation mode 1. Hold down the relevant key for 3 seconds, briefly press and release the relevant key and confirm by pressing the rotary knob The selected ventilation mode will now be active.
- Page 20 Evita 2 dura – Operating concept Ventilation parameters Setting ventilation parameters 1. To set a ventilation parameter = press the corresponding parameter key. The yellow LED in the key lights up 2. To set the value of the ventilation parameter = turn the rotary knob.
- Page 21 Evita 2 dura – Operating concept Additional settings Additional settings 1. Touching the keys on the right side of the screen allows for access to additional settings 2. To select the relevant settings = turn rotary knob 3. Confirm settings by pressing the rotary knob...
- Page 22 Evita 2 dura – Alarms © Drägerwerk AG & Co. KGaA, 2019 © Drägerwerk AG & Co. KGaA, 2019...
- Page 23 2. The alarm message is displayed in the right-hand corner of the top line of the screen. Alarm priorities Evita 2 dura assigns the alarm message its respective priority. It marks the text with exclamation marks and differently colored backgrounds. Evita 2 dura generates the corresponding alarm tone sequences.
- Page 24 Evita 2 dura– Alarms Setting alarm limits Setting alarm limits 1. Press the Alarms menu key. The page (Limits) displays all the alarm limits that can be set/adjusted ▪ Lower alarm limit ▪ Upper alarm limit 2. Select required screen field by turning the rotary knob 3.
- Page 25 Evita 2 dura – Cleaning, disinfection, and sterilization © Drägerwerk AG & Co. KGaA, 2019 © Drägerwerk AG & Co. KGaA, 2019...
- Page 26 Evita 2 dura – Cleaning, disinfection, and sterilization Safety information on reprocessing WARNING Risk of infection or damage to device Clean, disinfect, and sterilize the device and accessories using validated processes. CAUTION Risk of infection If reusable medical devices are not reprocessed, there is an increased risk of infection to both hospital staff and patients.
- Page 27 Evita 2 dura – Cleaning, disinfection, and sterilization Dismantling Before dismantling − Switch off the ventilator and humidifier, and remove their power plugs. − Drain the water traps and ventilation hoses. − Drain the water container of the humidifier. © Drägerwerk AG & Co. KGaA, 2019...
- Page 28 (2) Remove the the port on the device; (2) Dismantle the from the Y-piece.; (3) Remove the catheter cone connector from the back of the Evita 2 dura; medication nebuliser from the adult medication nebuliser from the paediatric hose from the cuvette;...
- Page 29 Evita 2 dura – Cleaning, disinfection, and sterilization Disassembling Flow sensor: (7) Push the flow Neonatal flow sensor: Unplug sensor Expiration valve: Push the catch (1) Expiration valve: If the expiration Reusable expiration valve: Only strip sensor to the left as far as it will go...
- Page 30 Evita 2 dura – Cleaning, disinfection, and sterilization Disinfecting/Cleaning Use surface disinfectants. For surface compatibility, use disinfectants based on: — aldehydes, — quaternary ammonium compounds. To avoid the possibility of damage to material, do not use any disinfectants based on: —...
- Page 31 Evita 2 dura – Cleaning, disinfection, and sterilization Disinfecting/Cleaning Ventilator without ventilation hoses, gas supply hoses, temperature sensor: − Wipe disinfect e.g., with Buraton 10 F or Terralin (Schülke & Mayr, Norderstedt, Germany). Comply with the manufacturer’s instructions. Cooling air filter, room air filter: −...
- Page 32 Evita 2 dura – Reprocessing list Care list for Evita 2 dura Intensive Care Ventilator Applicable for use with non-infectious patients. For infectious patients, all parts that conduct breathing gas must be additionally sterilised after disinfecting and cleaning. The parts in contact with breathing gas and listed below can be sterilised in hot steam at 134 oC. Refer to the column "Sterilising".
- Page 33 Thank you © Drägerwerk AG & Co. KGaA, 2019 © Drägerwerk AG & Co. KGaA, 2019...
- Page 34 Dräger. Technology for Life®...
Need help?
Do you have a question about the Evita 2 dura and is the answer not in the manual?
Questions and answers