Mitel UC360 Administration Manual
Collaboration point
Hide thumbs
Also See for UC360:
- User manual (88 pages) ,
- Installation manual (8 pages) ,
- Leaflet (7 pages)
Table of Contents
Advertisement
Advertisement
Table of Contents

Related Manuals for Mitel UC360


Summary of Contents for Mitel UC360
- Page 1 MITEL UC360 COLLABORATION POINT ADMINISTRATION GUIDE...
- Page 2 ). The information is subject to change without notice and should not be construed in any way as a commitment by Mitel or any of its affiliates or subsidiaries. Mitel and its affiliates and subsidiaries assume no responsibility for any errors or omissions in this document. Revisions of this document or new editions of it may be issued to incorporate such changes.
-
Page 3: Table Of Contents
UC360 Product Variants ............4 UC360 Collaboration Point (MiVoice Conference Unit) ....... . 4 UC360 Collaboration Point (MiVoice Video Unit) . - Page 4 Mass Deployment of UC360 Collaboration Point ........
- Page 5 Table of Contents Appendix D : XML File Format XML File Format ............. 107 Parameter Model .
- Page 6 UC360 Administration Guide...
-
Page 7: Chapter 1: Uc360 New Features
CHAPTER 1 UC360 NEW FEATURES... - Page 8 UC360 Administration Guide...
-
Page 9: Uc360 New Features And Enhancements
UC360. From the Remote Diagnostic Web page, the Administrator can download a configuration XML file. See “Web Server Settings” on page 48 and “UC360 Web Server” on page 87 for more information. - Page 10 UC360 Administration Guide...
-
Page 11: Chapter 2: Introduction
CHAPTER 2 INTRODUCTION... - Page 12 UC360 Administration Guide...
-
Page 13: Introduction
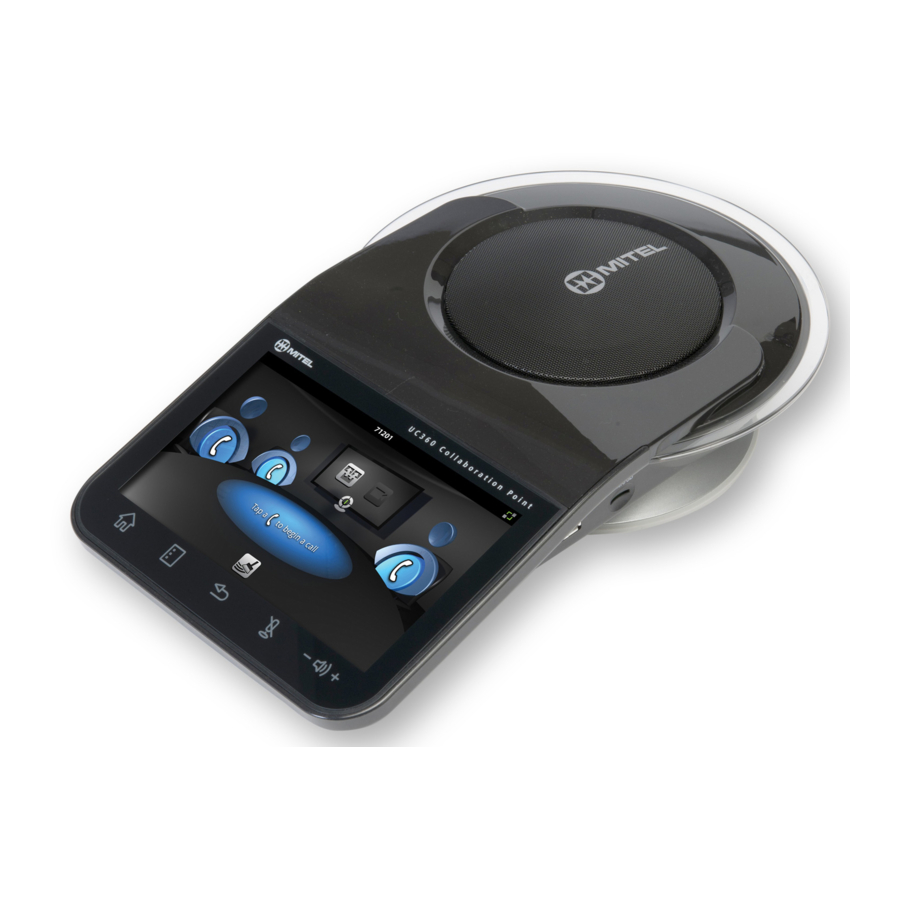
The UC360 has a large 7-inch color multi-touch display screen. The LCD display has a resolution of 1024 x 600 and has a backlight with adjustable brightness. -
Page 14: Uc360 Product Variants
3. If you need to upgrade the software version, see “Upgrade System Software” on page 44. 4. You will see one of the following product variants in the middle of the UC360 display These product variants are described below. These product names appear in the About information to differentiate the product variants. -
Page 15: About This Document
MCD settings for the UC360 - see “Programming MCD for the UC360” on page 63 • how to configure settings for the 5000 CP - see “5000 CP Configuration for the UC360” on page 75 Related Documentation See the following documents for more information on the UC360 Collaboration Point. - Page 16 UC360 Administration Guide...
- Page 17 CHAPTER 3 RECOMMENDED CONFIGURATIONS...
- Page 18 UC360 Administration Guide...
-
Page 19: Recommended Configurations
Executive Office Side Table Ensure that the UC360 is set up in office mode by programming a personal ring group on the MCD. Also, program a hand-off key on the user’s desk phone so that they can hand off calls answered on their desk phone over to the UC360. - Page 20 UC360 Administration Guide 9. Click on Add Member. 10. Add the UC360 DN you want to be in the ring group. 11. Click Save. Configuring the Desk phone for Handoff To program the Handoff key on the Desk phone: 1. From the desk phone, press the Superkey.
-
Page 21: Chapter 4: Uc360 Configuration
CHAPTER 4 UC360 CONFIGURATION... - Page 22 UC360 Administration Guide...
-
Page 23: Introduction
Factory Reset— See “Factory Reset” on page 50. Refer to the following documents for more information: • UC360 User Guide for a description of the UC360, its interface, how to make and receive video calls, and set up remote collaboration. •... -
Page 24: Launching Settings
Menu bar. 2. Press Settings The following screen is displayed: Refer to the UC360 User Guide for details on adjusting the brightness, cleaning the UC360 screen, and unmounting media. For Advanced settings, see “Advanced Settings” on page 9. -
Page 25: Advanced Settings
UC360 Configuration Advanced Settings 1. From the Settings menu, press Advanced. The following screen is displayed. 2. Enter the password. The default password is "admin". It is highly recommended that you use a different password. 3. Press OK. The Advanced Settings screen is displayed. - Page 26 Once reset, the software load reverts to the factory load, and the UC360’s site-specific settings will need to be reconfigured. Note: Do not change the Date and Time while in a call. This may cause the UC360 to reboot.
-
Page 27: Configure System Settings
UC360 Configuration Configure System Settings 1. Press Settings 2. Press Advanced. 3. Press System Settings. You can set/adjust the following settings: • SIP Settings • App Settings • Network Settings • LDAP/AD Settings • Dial Plan Settings • Video Settings •... -
Page 28: Sip Settings
UC360 Administration Guide SIP Settings The UC360 supports the SIP protocol. As a result, it is capable of operating with a number of third-party SIP Servers and SIP end points such as SIP phones, Audio Conference Units and Video Conference Units. - Page 29 Prerequisites • Before configuring SIP settings, ensure that MCD programming or 5000 CP programming is completed. See “Programming MCD for the UC360” on page 63 or “5000 CP Configu- ration for the UC360” on page 75. • Obtain the SIP Server address name, User Name, and Login Name from the User and Device Configuration form.
- Page 30 If the old H264 codec was enabled, then the default configuration, as described, will be in effect. The UC360 must be reset if the H.264 video codec is not enabled, and has been enabled for the first time. G.729a is disabled and not available from the System Settings -> SIP Settings -> Audio codec list menu for the Remote Collaboration/Video Appliance variant of the UC360.
- Page 31 TLS transport during the TLS handshake is validated against the list of trusted root certificate installed on the UC360. The Mitel root certificate is the single entry in this certificate list by default on the UC360. Install Certificates From External Storage You can install new certificates from any.crt file (for example, mat_ca.crt in PEM format) or p12...
-
Page 32: Apps Settings
• RemoteVNC (disabled by default) Note: If a USB keyboard is connected to the UC360, Num Lock does not function. No Apps Enabled If the administrator chooses to disable all apps, then the Present icon on the main screen will be disabled and grayed out so that pressing them will have no effect. -
Page 33: Network Settings
UC360 Configuration Network Settings If installing the UC360 with a MCD, it may be easier to use static VLAN and QoS values by manually entering the information into the UC360 Network Settings menu rather than obtaining parameters via DHCP or other methods. - Page 34 The hardware address associated with the network interface on the UC360. Phone IP Address The UC360 requires an IP address. This is an IPv4 address and it is recommended that the address selected be in the same subnet as the local ethernet camera.
- Page 35 This is the IP address (IPv4) of the first DNS server. IPA Server This is the IP address (IPv4) of the IPA server. The IPA (IP Phone Analyzer) is a Mitel product that can be used to assist with debugging phone and network issues.
- Page 36 (The default value is for Enable VLAN to be off.) • Ping Test IP Address: Allows a user to ping a network IP address. • DCHP Trace: Allows a user to perform a DCHP trace. See the UC360 Engineering Guidelines for details on these options.
-
Page 37: Ldap/Ad Settings
UC360 Configuration LDAP/AD Settings For corporate directory access, the UC360 will use LDAP. You can configure the LDAP Server Settings, LDAP Server updates, and the LDAP Translations Plan. 1. Press Settings 2. Press Advanced. 3. Press System Settings. 4. Press LDAP/AD Settings. - Page 38 UC360 Administration Guide Enable/Disable Connect to MBG There is a connection between the UC360 and the Active Directory via the MiVoice Border Gateway server for Mitel security purposes. • Select the Connect to MBG option to connect to the MiVoice Border Gateway server.
- Page 39 UC360 Configuration LDAP Translations Plan The translation plan appends dialing prefixes to phone numbers that are contained in the LDAP/AD directory so that they can be directly dialed on the connected phone system. 1. Press LDAP/AD Settings. 2. Press LDAP Translations Plan.
- Page 40 UC360 Administration Guide LDAP Server Updates This option allows the UC360 to get contacts list updates from Active Directory. You have the following choices to get the updates. Get updates now • From the LDAP Server Updates menu, press Get updates now.
-
Page 41: Dial Plan
UC360 Configuration Dial Plan The Dial Plan settings feature speed Dial Pad dialing by initiating a call as soon as the entered number matches one of the administrator-specified rules. When no rules match, pressing the Call button starts the call. - Page 42 UC360 Administration Guide Create your dial plan as follows: Rule1 -> extensions 000-899 0XX;1XX;2XX;3XX;4XX;5XX;6XX;7XX;8XX Rule 2 -> 1+10 digits dialing 91XXXXXXXXXX Rule 3 -> 10 digit local dialing area code 613 and 343 9613XXXXXXX;9343XXXXXXX Note: The Dialing Plan does not restrict dialing, but facilitates dialing by eliminating the...
-
Page 43: Video Settings
DBA is an algorithm the UC360 uses to reduce packet loss on a congested communication link. DBA will lower the UC360's transmitted bit rate according to the packet loss feedback it receives from the remote end, the end goal being that a reduction in the transmission rate should alleviate congestion and packet loss. -
Page 44: Rdp Settings
UC360 Administration Guide RDP Settings The RDP Settings allow you to set a Preset Remote Computer for UC360. This allows the user to press a Connect button and open the RDP session for the Preset computer. 1. Press Settings 2. Press Advanced. -
Page 45: Vnc Settings
When the box is selected, the application maps the ALT key to the Mac command key and the Windows key to the Mac option key. This allows the UC360 user to use Mac keyboard functions. When the check box is deselected normal key mapping is in effect. -
Page 46: History Settings
Application, and turns off local video preview. When Close All Apps is disabled, the UC360 does not prompt the user to clear the session history. Only the Close All Apps icon will be available to manually clear the session history. This configuration is preferable for an executive office environment where the UC360 is not typically shared with other users. -
Page 47: Extension Microphone Settings
UC360 Configuration Extension Microphone Settings The Extension Microphone Settings allow you to enable the appropriate setting if Extension Microphones are installed. 1. Press Settings 2. Press Advanced. 3. Press System Settings. 4. Select Extension Microphone Settings. 5. Select either NA Microphone installed or EU Microphone installed. -
Page 48: Advanced Settings Password
UC360 Administration Guide Advanced Settings Password You need to enter a password to access Advanced Settings. 1. Press Settings 2. Press Advanced. 3. Press System Settings. 4. Select Advanced Settings Password. A window opens allowing you to enter a new password. -
Page 49: Camera Settings
• Search — Discover local cameras In order for the camera to be discovered it must be on the same subnet as the UC360. Additionally, you can use the ONVIF Device Manager to define the camera name and location. This is not required, but will give you additional information to differentiate between multiple cameras of the same maker and model listed in the Discovered Cameras list. - Page 50 UC360 Administration Guide Setting Up and Configuring UC360 Cameras Follow the instructions in the camera’s Installation Guide to set up the camera. You will need the camera’s IP address, username and password in order to configure Camera settings in the UC360.
- Page 51 1. In Axis Camera Management, access the Setup Menu. 2. Go to System Options -> Security. 3. Click ONVIF. 4. Add a user: enter the username, password, and select Administrator as the User Group. This is the username and password to be used in the UC360 Camera Settings.
- Page 52 UC360 Administration Guide Setting up the Panasonic Camera Follow the instructions in the Panasonic Installation Guide to set up the camera. Use the software provided on the Panasonic Product CD supplied with the camera or download the software from the Panasonic website. After you have set up the camera, follow the additional instructions below.
- Page 53 UC360 Configuration 3. In the Network Settings screen, set the network parameters as shown below. Click Save. 4. Click Access Camera from the Panasonic IP Settings software initial screen (see above). The software redirects the settings to a new web browser. You will see the live video from the camera.
- Page 54 H.264(1): Transmission priority: Constant bit rate Image quality: Low (motion priority) 2. Click Set. The camera is ready to use. See “Camera Settings” on page 33 to configure the UC360 camera settings. Light Control Mode 50 Hz 60 Hz Compensation When flicker is caused by fluorescent lighting, a setting allows the camera to automatically compensate for the flicker.
- Page 55 The administrator may want to disable anonymous viewer login capabilities. • The UC360 only supports "Digest" authentication. When selecting the Authentication Mode, enable Digest authentication in the cameras. See Ethernet Cameras in the UC360 Engineering Guidelines for more detailed information.
-
Page 56: Country Variant
Spain • In some cases, the UC360 can be deployed in countries that are not included in the above list. In these cases, regional office personnel will be able to suggest the country selection that will provide the most suitable tone plan. -
Page 57: Dialpad Settings
UC360 Configuration Dialpad Settings The Dialpad Settings allows you to enable the dialpad to be displayed as the home screen on the UC360. This setting is disabled by default. 1. Press Settings 2. Press Advanced. 3. Press System Settings. 4. Press Dialpad Settings. -
Page 58: Backup Import/Export
UC360 Administration Guide Backup Import/Export You can use the Backup Import/Export setting to import or export files from an SD card or USB flash drive. For full details on mass deployment, see “MASS DEPLOYMENT” on page 97. 1. Press Settings 2. - Page 59 CA (Certificate Authority) included in the standard list of trusted root CAs in Android Gingerbread 2.3.4 (with the addition of the Mitel root CA). If not, a certificate error is displayed when a download is attempted.
-
Page 60: Upgrade System Software
When upgrading from Release 1.0, it is necessary to use an SD card or HTTP Server. When upgrading from 2.0 and up, USB Flash Drive is supported as well. Important: It is recommended to back up the UC360 units and maintain a copy of the backup files in a safe location. - Page 61 5. Select Upgrade system S/W now. 6. Select SD Card. You will see a series of messages. This can take several minutes; the UC360 will power off and then on. The UC360 will reboot and load the new software. 7. Unmount the USB flash drive or SD Card (see “Unmount SD Card or USB Flash Drive” on...
- Page 62 2. Copy the UC360 load and upgrade files to the /home/e-smith/files/ibays/Primary/html directory. 3. On the UC360, set the HTTP Upgrade IP address to the WAN-side IP setting of the MiVoice Border Gateway. 4. Perform a UC360 upgrade using the normal upgrade procedure.
-
Page 63: Debug Settings
H.264 base profile to improve interoperation with non-Mitel based servers. • Always mirror primary display to HDMI - this option allows the UC360 to mirror the UC360 on the HDMI display is for demo and training purposes only. -
Page 64: Web Server Settings
This setting enables a Remote Diagnostic Web Application that allows you to access debug and diagnostics through a web service on the UC360. 1. Press Settings 2. Press Advanced. 3. Press System Settings. 4. Press Web Server Settings. This setting is disabled by default. For more details, see Appendix B: UC360 Web Server. -
Page 65: Reboot
UC360 Configuration Reboot This option allows you to perform a soft reboot, that is, reset the UC360 while preserving logging and maintaining power to the UC360. 1. Press Settings 2. Press Advanced. 3. Press System Settings. 4. Select Reboot. 5. Select Yes. -
Page 66: Factory Reset
1. Press System Settings. 2. Select Factory Reset. You will be able to cancel out of the window or confirm that the UC360 will have all the settings return to the factory defaults, including the password. The following items will be included. -
Page 67: Sound
UC360 Configuration Sound You can enable audible clicks for all selections and keyboard input: 1. Press Settings 2. Press Advanced. 3. Press Sound. 4. Tap Audible Selection to enable the sound. The default is off. -
Page 68: Display
1. Press Settings, then press Advanced. 2. Press Display. You can configure the Brightness and Screen timeout. To adjust the Brightness of the UC360 Display 1. Press Brightness. 2. Moving the slider to the left or right. 3. Click OK. -
Page 69: Language & Keyboard Settings
Italiano • Nederlands • Portugues (Brasil) • Portugues (Portugal) It is best to connect the external keyboard while the UC360 is powered off. Then power on the UC360. Alternatively, you can reboot the UC360 after the keyboard has been connected. -
Page 70: Date & Time
7. Press Select language. 8. Press Francais (France). You will be asked to confirm the change. Select Yes, and the UC360 will reboot. If a user selects French (France) as the language, the AZERTY keyboard is the only supported external keyboard. If French language and an external QWERTY keyboard is desired, the user should switch language to French (Canada). -
Page 71: Configuring The Uc360 For Use With Mca
Configuring the UC360 for Use With MCA Many users will use MCA for teleconferences on the UC360. You can add a bookmark to the UC360 browser to simplify access to the MCA server that contains the list of all published conferences. -
Page 72: Uc360 Used As Teleworker
For the Dial URI functionality, only the h264baseprofile is supported. Keep Alive Interval If the UC360 is used as a Teleworker set, the Keep Alive Interval should be set to 10 seconds to keep the NAT mapping refreshed. Network Settings The UC360 Network Settings for MiVoice Border Gateway may be added in manually through the Settings application or acquired via DHCP. - Page 73 After these changes are made, reboot the UC360 to populate the corporate directory. Camera Settings (IP Connectivity) If the UC360 is video enabled, the IP camera and the UC360 must be on the same subnet to allow local switching between them. This eliminates possible packet loss and ensures high-quality video.
- Page 74 Min (512 Kbs video) requires a 1Mbs uplink connection to the internet. Dynamic Bandwidth Allocation (DBA) DBA is an algorithm the UC360 uses to lower its transmitted bit rate according to the packet loss feedback it receives from the remote end. Since the UC360 is connected to the remote end via an MiVoice Border Gateway, the UC360 should have its DBA disabled.
-
Page 75: Troubleshooting
Bluetooth on the UC360 is not supported Click force close and the unit recovers and goes back to the browser. If a user turns on Bluetooth services, the UC360 gets into an unknown state. The bluetooth icon is now present in the upper right toolbar. - Page 76 UC360 Administration Guide...
-
Page 77: Chapter 5: Mcd Configuration For The Uc360
CHAPTER 5 MCD CONFIGURATION FOR THE UC360... - Page 78 UC360 Administration Guide...
-
Page 79: Programming Mcd For The Uc360
UC360 on the MCD. The UC360 is a SIP device and can is programmed on the MCD. Licensing is also required on the MCD for the SIP Device. Refer to the UC360 Engineering Guidelines for more details on licensing. -
Page 80: User And Device Configuration
UC360 Administration Guide User and Device Configuration 1. Configure the UC360 as an Endpoint on the MCD under the Profile tab. 2. Fill in the following fields: Last Name: Enter the last name First Name: Enter the first name Number: The DN Number. This number should be the same as the one configured in “Login Name”... - Page 81 SIP Device Capabilities 71 contains programming not suitable for the UC360. This is why an administrator must select an unused SIP Device Capabilities number from 1 to 60 and then program the appropriate settings...
- Page 82 1. Select the Access and Authentication tab under User and Device Configuration. 2. Enter a User PIN and re-enter the same PIN number in Confirm User Pin. This will be the same as the Login Password configured in the UC360 under SIP Settings.
- Page 83 MCD. 1. Select the Keys tab under User and Device Configuration. 2. There must be at least three lines (prime + 2 lines) so that the UC360 can support confer- ence calls. The following fields must be programmed: Label: Any string...
-
Page 84: Sip Device Capabilities
1. Select the SIP Device Capabilities form. 2. Select the number you programmed in SIP Service Selection. Please note that multiple UC360’s can use the same number configured in the form. In this example, 8 is used for the UC360. - Page 85 MCD Configuration for the UC360 SDP Options 1. Select the SDP Options tab under SIP Device Capabilities. 2. Enable the following settings: Allow Device to User Multiple Active M-Lines Limit to one Offer/Answer per INVITE Prevent the User of IP Address 0.0.0.0 in SDP Messages Send Answer only after renegotiation is complete.
- Page 86 UC360 Administration Guide Signaling and Header Manipulation 1. Select the Signaling and Header Manipulation tab under SIP Device Capabilities. 2. Enable the following settings: Allow Display Updates User P-Asserted Identify Header Require Reliable Provisional Responses on Outgoing Calls 3. Disable the following setting: If TLS uses "sips"...
- Page 87 MCD Configuration for the UC360 Distinctive Ring Tones For the Distinctive Ring Tones, the settings should be the following: Timers For the Timers, the settings should be the following: For the remaining tabs, leave them at default settings (i.e. nothing enabled). The remaining tabs include: •...
- Page 88 UC360 Administration Guide...
-
Page 89: Chapter 6: 5000 Cp Configuration For The Uc360
CHAPTER 6 5000 CP CONFIGURATION FOR THE UC360... - Page 90 UC360 Administration Guide...
-
Page 91: 5000 Cp Configuration For The Uc360
The following section describes the hardware and the system programming required for the 5000 CP on the UC360: The following hardware is needed to set up the UC360 on the 5000 CP: • UC360 Collaboration Point unit (Part Number 50006580 (audio only)) •... - Page 92 UC360 Administration Guide The following screen is displayed: 3. For security reasons, you may want to change the password so it is not the extension number; make a note of the password. 4. In System -> Devices and Feature Codes, click Phones.
- Page 93 5000 CP Configuration for the UC360 5. In the right-side pane, configure the SIP phone settings that would normally be configured for other types of telephones to allow outgoing access. 6. After creating the SIP phone, the 5000 Database Programming automatically creates a SIP Phone Group with a default configuration profile.
-
Page 94: Uc360 Programming
SIP registration. If for some reason it fails to register, confirm the password for the SIP extension on the 5000 CP and make sure it matches on the UC360. A power cycle of the UC360 maybe required after confirming the credentials... -
Page 95: Appendix A : Onvif Device Manager
APPENDIX A ONVIF DEVICE MANAGER... - Page 96 UC360 Administration Guide...
-
Page 97: Onvif Device Manager
ONVIF DEVICE MANAGER ONVIF Device Manager In order to use the camera discovery feature in Camera Settings effectively, it is useful to define the camera name and location. This information can be used to differentiate between multiple cameras of the same make and model. ONVIF Device Manager can be used to change the camera name and location. - Page 98 UC360 Administration Guide The Microsoft .NET 4 website is displayed. The ONVIF Device Manager installation requires .NET 4 to continue. The current installation of ONVIF must be terminated. You must restart the installation after .NET 4 is installed. 4. Click Finish.
- Page 99 ONVIF DEVICE MANAGER 5. Next, run the Microsoft .NET 4 installer that you downloaded. 6. Read the license terms, then select the checkbox. 7. Click Install. The installation will then proceed. 8. When the installation is completed, click Finish. Installing the ONVIF Device Manager 1.
- Page 100 UC360 Administration Guide Changing the Camera Name and Location in ONVIF Giving cameras a distinguished name and location will help you identify Discovered Cameras in Camera Setting (see “Camera Settings” on page 33 1. Open the ONVIF Device Manager. The ONVIF compliant devices/cameras are detected automatically and are shown in the list in the left pane.
- Page 101 ONVIF DEVICE MANAGER 5. Select your camera. 6. Click the Identification button from the list of menu options in the upper right corner.
- Page 102 54485, the text before the semicolon will not display in the Discovered Camera list. You will only see UC360 54485. Use other punctuation instead if necessary. You will now see the newly-name camera in the list of discovered cameras in the UC360 Camera Settings when using the Camera Search function.
-
Page 103: Appendix B : Uc360 Web Server
APPENDIX B UC360 WEB SERVER... - Page 104 UC360 Administration Guide...
-
Page 105: Uc360 Web Server
UC360 Web Server The Remote Diagnostic Web Application allows you to access debug and diagnostics through a web service on the UC360. See “Web Server Settings” on page 48 for information on how to enable this service. It is disabled by default. - Page 106 UC360 Administration Guide There is a 4 minute inactivity timeout when on the diagnostics page which will result in an automatic logout and throw the user to a logged out page. When on other pages such as directory listings the authenticated session times out after 6 minutes - this does not result in an immediate redirection to the logged out page, rather when the administrator tries to access diagnostics or other files requiring authentication there is a redirect to the login page.
- Page 107 The “All Logs” link accesses the directory listing all logs package directories stored on the UC360. A maximum of five logs packages are allowed on the unit, deleting the oldest as more are collected.
- Page 108 Again there is a link to the files directory allowing the just collected or previous retained tcpdumps to be downloaded. Note that these files can be very large and the UC360 retains a maximum of 500MB of ethernet trace in this directory. Also note that the Logs Collection moves files from here to the logs package directories.
- Page 109 Note that the file is named MN_MAC.cfg (MAC is the MAC of the UC360 unit as shown in the top info line) to correspond to the file name used by the Mass Deployment configuration scheme Note that Internet Explorer 10 and 11default the "save target as"...
- Page 110 UC360 Administration Guide Import Settings The Import Setting button can be used to request that the UC360 download and apply the configuration of its Mass Configuration XML files. By default, the unit will use the programmed static or DHCP configuration HTTP server to query for the Mass Configuration XML files and apply them in the normal sequence - MN_GENERIC.cfg and MN_MAC.cfg (where MAC is MAC...
- Page 111 The countdown can still be interrupted, for reboot or forced reboot, directly on the UC360 using the cancel icon on the reboot countdown screen, or remotely by the administrator using the Cancel Reboot button on the web page.
- Page 112 UC360 Administration Guide...
-
Page 113: Appendix C : Mass Deployment
APPENDIX C MASS DEPLOYMENT... - Page 114 UC360 Administration Guide...
-
Page 115: Mass Deployment Of Uc360 Collaboration Point
MASS DEPLOYMENT Mass Deployment of UC360 Collaboration Point In order to deploy a large number of UC360 units in an office, there are ways to configure them without physical access to each unit. The UC360 uses configuration files (programmed offline) for setting up its configuration at boot-up time. - Page 116 UC360 Administration Guide 2.3.4 (with the addition of the Mitel root CA). Otherwise, a certificate error will be indicated when a download is attempted. Servers using either a self-signed certificate or one signed by a CA not in that trusted root CA lists require the following setting to be enabled: Settings ->...
-
Page 117: Programming/Configuration Steps
STEP 1: DHCP Server Settings HTTP Configuration Server URI Add the string: id:ipphone.mitel.com;cfg_uri=[http[s]://][hostname|IP][:port_number]/path/to/config/directory in option 125/43 (MiVoice Business provides an option to configure vendor-specific info in option 43, but not in option 125.) Alternatively, DHCP option 66 can also be used to provide the URI. Note that either HTTP or HTTPS may be used for the cfg_uri value, but only HTTP for the sw_uri. - Page 118 UC360 Administration Guide Notes on URI format [http[s]://] hostname | IP [:port_number] /path/to/config/directory hostname is the FQDN (Fully Qualified Domain Name) of the HTTP server IP is the dotted IP address of the server e.g. 10.33.67.89 [] brackets around an item indicate it is optional so port_number is optional | separates a list of options, e.g.
- Page 119 5. Remove all entries in MN_Generic.cfg that will be set in MN_<MAC Addr>.cfg files, i.e. those values that are not going to be generic to all UC360’s or other Mitel sets that use the same mass deployment mechanism. One entry that should certainly be removed is <user_list>...
- Page 120 HTTP server, and overwrite existing settings values with all the defined values in this configuration file. Notes: If the UC360 requests a configuration file that is not on the HTTP server, settings on the UC360 do not change. When a UC360 uses configuration files, you can still change settings manually; however, if these settings are also defined in the configuration files, the files overwrite manual settings the next time the phone reboots if the file is modified after the manual changes were applied.
-
Page 121: Appendix D : Xml File Format
APPENDIX D XML FILE FORMAT... - Page 122 UC360 Administration Guide...
-
Page 123: Xml File Format
<Parameter Model="UC360"> This tag must exist in the XML file, and if it is not found a warning log is issued on the UC360 and the rest of the file will not be processed. All tag and attributes within this XML element are used to specify the UC360 configuration. -
Page 124: User Configuration
If there are either multiple user_list tags or multiple User tags then warning logs will be issued on the UC360 and only the first User tag entry of the first user_list entry will be used. This should be used in the MN_<MAC Addr>.cfg file. For example: <user_list>... -
Page 125: Ldap Translation Plan Rules
XML File Format LDAP Translation Plan Rules The first 5 ldap_translation Rules are processed; any more entries will generate warning logs and be otherwise ignored. Note that a Rule must always be accompanied by its corresponding Prefix. The Prefix may be empty but it must always be there, otherwise warning logs will be issued that the entry is invalid. - Page 126 UC360 Administration Guide <timezone id="America/Denver">Mountain Time</timezone> <timezone id="America/Costa_Rica">Central America</timezone> <timezone id="America/Chicago">Central Time</timezone> <timezone id="America/Mexico_City">Mexico City</timezone> <timezone id="America/Regina">Saskatchewan</timezone> <timezone id="America/Bogota">Bogota</timezone> <timezone id="America/New_York">Eastern Time</timezone> <timezone id="America/Caracas">Venezuela</timezone> <timezone id="America/Barbados">Atlantic Time</timezone> <timezone id="America/Manaus">Manaus</timezone> <timezone id="America/Santiago">Santiago</timezone> <timezone id="America/St_Johns">Newfoundland</timezone> <timezone id="America/Sao_Paulo">Brasilia</timezone> <timezone id="America/Argentina/Buenos_Aires">Buenos Aires</timezone> <timezone id="America/Godthab">Greenland</timezone>...
- Page 127 XML File Format <timezone id="Africa/Brazzaville">W. Africa Time</timezone> <timezone id="Asia/Amman">Amman, Jordan</timezone> <timezone id="Europe/Athens">Athens, Istanbul</timezone> <timezone id="Asia/Beirut">Beirut, Lebanon</timezone> <timezone id="Africa/Cairo">Cairo</timezone> <timezone id="Europe/Helsinki">Helsinki</timezone> <timezone id="Asia/Jerusalem">Jerusalem</timezone> <timezone id="Europe/Minsk">Minsk</timezone> <timezone id="Africa/Harare">Harare</timezone> <timezone id="Asia/Baghdad">Baghdad</timezone> <timezone id="Europe/Moscow">Moscow</timezone> <timezone id="Asia/Kuwait">Kuwait</timezone> <timezone id="Africa/Nairobi">Nairobi</timezone> <timezone id="Asia/Tehran">Tehran</timezone> <timezone id="Asia/Baku">Baku</timezone> <timezone id="Asia/Tbilisi">Tbilisi</timezone> <timezone id="Asia/Yerevan">Yerevan</timezone>...
- Page 128 UC360 Administration Guide <timezone id="Asia/Rangoon">Yangon</timezone> <timezone id="Asia/Krasnoyarsk">Krasnoyarsk</timezone> <timezone id="Asia/Bangkok">Bangkok</timezone> <timezone id="Asia/Shanghai">Beijing</timezone> <timezone id="Asia/Hong_Kong">Hong Kong</timezone> <timezone id="Asia/Irkutsk">Irkutsk</timezone> <timezone id="Asia/Kuala_Lumpur">Kuala Lumpur</timezone> <timezone id="Australia/Perth">Perth</timezone> <timezone id="Asia/Taipei">Taipei</timezone> <timezone id="Asia/Seoul">Seoul</timezone> <timezone id="Asia/Tokyo">Tokyo, Osaka</timezone> <timezone id="Asia/Yakutsk">Yakutsk</timezone> <timezone id="Australia/Adelaide">Adelaide</timezone> <timezone id="Australia/Darwin">Darwin</timezone> <timezone id="Australia/Brisbane">Brisbane</timezone> <timezone id="Australia/Hobart">Hobart</timezone> <timezone id="Australia/Sydney">Sydney, Canberra</timezone>...
-
Page 129: Browser Bookmarks
SHA-256 hash of the password. This is not easy to generate manually, there are online tools that could be used to do this or simply use a UC360 unit and export it's XML cfg using the procedure outline previously. - Page 130 UC360 Administration Guide...
- Page 131 APPENDIX E MASS DEPLOYMENT CONFIGURATION FILE REFERENCE...
- Page 132 UC360 Administration Guide...
-
Page 133: Appendix E : Mass Deployment Configuration File Reference
Mass Deployment Configuration File Reference Mass Deployment Configuration File Reference NOTES: Quotes " are literal. [ are to be replaced with the content ] [ also have keys and values with alternating patterns separated with | System Settings SIP Settings Account Server Address <user list><ProxySvr="[IP]"... - Page 134 UC360 Administration Guide Security TLS Server Validation <tls_server_validation>[0:disabled|1:enabled]</tls_server_validation> Install Certificates from <certificates>{list of trusted CA root certificates in PEM format}</certificates> External Storage Apps Settings <apps app_name=[0:disabled|1:enabled] ..> </apps> app_name is one of RemoteRdp SmartOffice Browser JoinMe RemoteVNC Webex MitelMCA Specify one or more apps that...
- Page 135 Mass Deployment Configuration File Reference Network Settings (cont’d) Tools and Features DHCP <dhcpenable>[0:disabled|1:enabled]</dhcpenable> <cdpenable>[0:disabled|1:enabled]</cdpenable> LLDP <lldpenable>[0:disabled|1:enabled]</lldpenable> 802.1x <protocol_802_1x_enable>[0:disabled|1:enabled]</protocol_802_1x_enable> Enable Firewall Filter <firewallenable>[0:disabled|1:enabled]</firewallenable> Enabled VLAN <vlanenable>[0:disabled|1:enabled]</vlanenable> LDAP/AD Settings LDAP Server Settings Directory Server IP <ldap Svr="[DIRECTORY SERVER IP ADDRESS OR HOST NAME]"></ldap> Address or Host Name LDAP Search Directory <ldap SearchDirectory="[LDAP Search Directory]"></ldap>...
- Page 136 UC360 Administration Guide Dial Plan Settings Rule 1 <dialpl DigitDial="[RULE 1 TEXT]">Rule 1</dialpl> ; supported X supported 0123456789*# supported [] not Rule 2 <dialpl DigitDial="[RULE 2 TEXT]">Rule 2</dialpl> supported First 5 rules are supported. Rule 3 <dialpl DigitDial="[RULE 3 TEXT]">Rule 3</dialpl>...
- Page 137 Mass Deployment Configuration File Reference Advanced Settings Password Password <admin_passwd>[ADVANCED SETTINGS PASSWORD]</admin_passwd> Refer to note about SHA-256 hash - with recommendation to not change password through Camera Settings Enabled <camera Enable="[0:disabled|1:enabled"></camera> IP Address/Host Name <camera Address="[IP ADDRESS/Host Name]"></camera> Port <camera Port="[PORT]"></camera> Username <camera AuthName="[USERNAME]"></camera>...
- Page 138 HTTP URL. Conversely having no port set here means the default port (80) is used. Auto Upgrade <http_upgrade>[0 disabled|1:upgrade on|2:upgrade auto]></http_upgrade> N.B. UC360, will check on reboot as well. Auto Polling <firmware_abs_enable>[0:disabled|1:enabled]</firmware_abs_enable> User Confirmation <http_upgrade_user_confirm>[0 disabled|1:upgrade on]></http_upgrade>...
- Page 139 Mass Deployment Configuration File Reference System Settings (cont’d) Web Server Settings Web Server Enable <web_server Enable="[0:Disabled|1:Enabled"></web_server> Remote diagnostics web server Sound Audible selection (Play sound when <audible_key_press_feedback>"[0:disable|1:enable]"</audible_key_press_feedback> making screen selection) Display Brightness <screen_brightness>[LCD BRIGHTNESS]</screen_brightness> Range 30-255 Screen Timeout <screen_timeout>[… ]</screen_timeout> 15 | 30 | 60 | 120 | 600 | 1800 Language &...
- Page 140 UC360 Administration Guide Data & Time Select Time Zone <time_zone_name>[NAME OF TIMEZONE FROM ANDROID LIST]></time_zone> Use 24-hour format <time_format>[ … ]></time_format> 0:24 hour format | 1:12 hour AM/PM format Select Date Format <date_format>[ … ]</date> {empty} | mm/dd/yyyy | dd/mm/yyyy | yyyy/mm/dd Use SNTP time when available <sntp_enable>[0:disable|1:enable]</sntp_enable>...
Need help?
Do you have a question about the UC360 and is the answer not in the manual?
Questions and answers