
Related Manuals for StarTech.com PROJCEILMNT2


Summary of Contents for StarTech.com PROJCEILMNT2
- Page 1 Universal Ceiling Projector Mount Actual product may vary from photos User Manual SKU#: PROJCEILMNT2 For the latest information and specifications visit www.startech.com/PROJCEILMNT2 Manual Revision: 11/08/2019...
- Page 2 This manual may make reference to trademarks, registered trademarks, and other protected names and/or symbols of third-party companies not related in any way to StarTech.com. Where they occur these references are for illustrative purposes only and do not represent an endorsement of a product or service by StarTech.com, or an endorsement of the product(s) to which this manual...
-
Page 3: Safety Statements
Mesures de sécurité • Les câbles (y compris les câbles d’alimentation et de chargement) doivent être placés et acheminés de façon à éviter tout risque électrique, de chute ou de sécurité 安全対策 • • ケーブル (電源ケーブルと充電ケーブルを含む) は、 適切な配置と引 き回しを行い、 電気障害やつまづきの危険性など、 安全上のリスクを回避す るようにしてください。 Misure di sicurezza • I cavi (inclusi i cavi di alimentazione e di ricarica) devono essere posizionati e stesi in modo da evitare pericoli di inciampo, rischi di scosse elettriche o pericoli per la sicurezza. Säkerhetsåtgärder • Kablar (inklusive elkablar och laddningskablar) ska dras och placeras på så sätt att risk för snubblingsolyckor och andra olyckor kan undvikas. To view manuals, videos, drivers, downloads, technical drawings, and more visit www.startech.com/support... -
Page 4: Warning Statements
Mensagens de Aviso • Certifique-se de que monta este produto de acordo com as instruções. O incumprimento pode resultar em ferimentos pessoais ou danos de propriedade. • Certifique-se de que o peso do monitor não excede a capacidade de peso deste produto. Se exceder a capacidade de peso, pode sofrer ferimentos pessoais ou danos no equipamento. Este produto pode suportar o seguinte peso: 15 kg. • Nunca opere este produto se faltarem peças ou estas estiverem danificadas. • As estruturas de parede variam e é importante certificar-se de que o tipo de estrutura de parede e hardware de montagem que está a usar irá suportar devidamente o equipamento montado. O incumprimento pode resultar em ferimentos pessoais e/ou danos no equipamento. A estrutura de parede deve ser capaz de suportar pelo menos quatro vezes o peso do equipamento montado. • O hardware de montagem incluído com este produto pode não ser adequado para algumas estruturas de parede. Se não tiver o conhecimento necessário para fixar este produto à estrutura de parede que está a usar, contacte um profissional de construção para fazer To view manuals, videos, drivers, downloads, technical drawings, and more visit www.startech.com/support... - Page 5 Advertencias de Uso • Asegúrese de ensamblar este producto según las instrucciones. De lo contrario, pueden producirse lesiones personales o daños en la propiedad. • Asegúrese de que el peso del monitor no exceda la capacidad de carga de este producto. Si se excede dicha capacidad se podrían producirse lesiones personales o daños al equipo. Este producto tiene la siguiente capacidad de carga: 15 kilogramos. • Nunca opere o ponga en funcionamiento este producto si faltan piezas o hay daños en las mismas. • Las estructuras de las paredes pueden variar y, por tanto, es importante determinar con certeza que el tipo de estructura de la pared y el hardware de montaje que se va a utilizar puedan soportar debidamente el equipo. De lo contrario, se pueden producir lesiones personales o daños en el mismo. La estructura de la pared debe ser capaz de soportar al menos cuatro veces el peso del componente instalado. • El hardware de montaje incluido con este producto puede no ser adecuado para algunas estructuras de pared. Si no tiene la To view manuals, videos, drivers, downloads, technical drawings, and more visit www.startech.com/support...
- Page 6 • Les structures des murs varient. Vous devez impérativement vérifier que le type de mur et le matériel de fixation que vous utilisez permettent de soutenir correctement l’équipement. Dans le cas contraire, vous risquez des blessures corporelles ou des dommages matériels. La structure du mur doit pouvoir supporter au moins quatre fois le poids de l’équipement monté. • Le matériel de fixation inclus avec ce produit n’est pas forcément approprié pour toutes les structures de murs. Si vous ne disposez pas des compétences nécessaires pour installer ce produit au mur, contactez un professionnel afin qu’il installe le support mural ou qu’il vous fournisse les instructions de montage spécifiques à votre structure de mur. Waarschuwingen • Zorg dat dit product volgens de instructies in elkaar wordt gezet. Indien dit niet goed gebeurt kan lichamelijk letsel of materiële schade ontstaan. • Zorg dat het gewicht van het scherm de maximale capaciteit van dit product niet overschrijdt. Als u de gewichtscapaciteit overschrijdt, kan persoonlijk letsel of schade aan de apparatuur ontstaan. Dit product ondersteunt het volgende gewicht: 15 kg. • Gebruik dit product nooit als er onderdelen ontbreken of beschadigd zijn. • Omdat wanden verschillen, is het belangrijk dat u ervoor zorgt dat To view manuals, videos, drivers, downloads, technical drawings, and more visit www.startech.com/support...
- Page 7 • Wandstrukturen unterscheiden sich, und es muss sichergestellt werden, dass die Wand und das verwendete Montagematerial das montierte Gerät halten kann. Anderenfalls kann dies zu Verletzungen von Personen und/oder Schäden an Geräten führen. Die Wand muss mindestens das Vierfache des Gewichts des montierten Geräts halten können. • Das mitgelieferte Montagematerial ist möglicherweise nicht für jede Wand geeignet. Wenn Ihnen die nötigen Fachkenntnisse zum Anbringen dieses Produkts an einer Wand fehlen, lassen Sie einen Fachmann den Wandhalter anbringen, oder lassen Sie sich von einem Fachmann Montageanweisungen für Ihre Wand erteilen. 注意 • 必ず取扱説明書に従って本製品の組み立てを行って下さい。 取り扱いを誤 った場合に、 傷害を負う恐れや物的損害が発生する恐れがあります。 • 取り付けるモニターの重量が、 本製品で定められた最大積載重量を超えな いようにして下さい。 最大積載重量をオーバーした場合、 傷害を負う恐れや モニターや本製品に損害が発生する恐れがあります。 本製品は、 最大15kg To view manuals, videos, drivers, downloads, technical drawings, and more visit www.startech.com/support...
- Page 8 もらってから取り付けを行って下さい。 Dichiarazioni di avvertenza • Assemblare il prodotto rispettando le istruzioni. Il mancato rispetto delle istruzioni potrebbe causare danni a persone o proprietà. • Verificare che il peso del monitor non superi la capacità di supporto del prodotto. In caso di superamento della capacità di supporto potrebbero verificarsi danni a persone o apparecchiature. Il prodotto è in grado di supportare i seguenti pesi: 15 kg. • Non utilizzare il prodotto in presenza di parti mancanti o danneggiate. • Le caratteristiche dei muri sono variabili ed è importante verificare che la struttura muraria e l’hardware di montaggio in uso siano in grado di supportare adeguatamente le apparecchiature montate. Il mancato rispetto delle istruzioni potrebbe causare danni a persone o proprietà. La struttura muraria deve essere in grado di supportare un peso almeno quattro volte superiore a quello dell’apparecchiatura montata. • L’hardware di montaggio incluso con il prodotto potrebbe non essere adeguato ad alcune strutture murarie. Se l’utente non dispone delle competenze necessarie per agganciare il prodotto alla struttura muraria in uso, dovrà contattare un professionista edile per installare il supporto a parete o ottenere istruzioni di montaggio per la struttura muraria in uso. To view manuals, videos, drivers, downloads, technical drawings, and more visit www.startech.com/support...
-
Page 9: Table Of Contents
Technical Specifications .......................... 17 Requirements ............................. 18 Mounting the Projector Mount (using Extensions) ......19 Mounting the Projector Mount (Flush) ..........28 Adjusting the Projector Mount ............35 Adjusting the Torque ................36 To view manuals, videos, drivers, downloads, technical drawings, and more visit www.startech.com/support... -
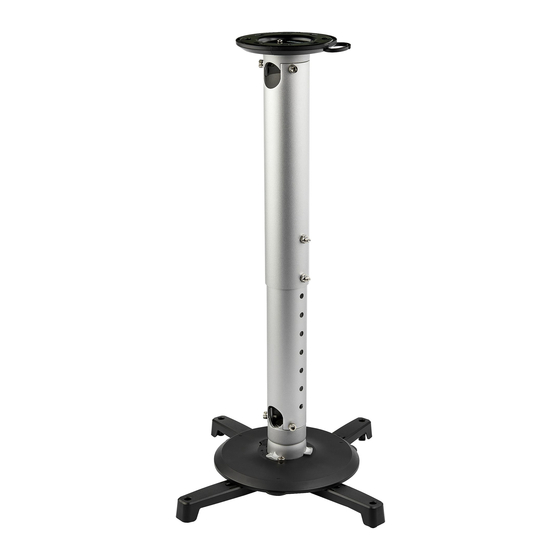
Page 10: Product Diagram
Product Diagram Ceiling Bracket Upper Pole Lower Pole Projector Plate Lock Switch Mounting Arms (x 4) To view manuals, videos, drivers, downloads, technical drawings, and more visit www.startech.com/support... -
Page 11: Product Dimensions
Product Dimensions Flush Installation Extended Installation Min. To view manuals, videos, drivers, downloads, technical drawings, and more visit www.startech.com/support... -
Page 12: Extended Installation Max
Extended Installation Max. To view manuals, videos, drivers, downloads, technical drawings, and more visit www.startech.com/support... -
Page 13: Product Rotation
Product Rotation Mounting Pattern To view manuals, videos, drivers, downloads, technical drawings, and more visit www.startech.com/support... -
Page 14: Product Information
Product Information Package Contents Ceiling Bracket Projector Plate Qty: 1 Qty: 1 Projector Plate Cover Upper Pole Qty: 1 Qty: 1 To view manuals, videos, drivers, downloads, technical drawings, and more visit www.startech.com/support... - Page 15 Ball-Joint Mechanism Qty: 1 Qty: 1 Mounting Arms Mounting Arm Covers Qty: 4 Qty: 4 M6 x 12 mm Screws 5 mm Hex Key Qty: 7 Qty: 1 To view manuals, videos, drivers, downloads, technical drawings, and more visit www.startech.com/support...
- Page 16 Wall Anchors Mounting Screws Qty: 4 Qty: 4 Washers Nuts Qty: 4 Qty: 6 M3 x 24 mm Screws M4 x 24 mm Screws Qty: 4 Qty: 4 To view manuals, videos, drivers, downloads, technical drawings, and more visit www.startech.com/support...
- Page 17 M5 x 24 mm Screws M6 x 24 mm Screws Qty: 4 Qty: 4 M6 x 65 mm Screws Qty: 2 To view manuals, videos, drivers, downloads, technical drawings, and more visit www.startech.com/support...
-
Page 18: Technical Specifications
Technical Specifications 33.1 lb. (15 kg) Total Weight - 25 to + 25 Tilt Swivel To view manuals, videos, drivers, downloads, technical drawings, and more visit www.startech.com/support... -
Page 19: Requirements
8 mm Wrench x 1 • 10 mm Wrench x 1 • Socket Wrench x 1 • 8 mm Socket x 1 • Phillips Head Screwdriver x 1 • To view manuals, videos, drivers, downloads, technical drawings, and more visit www.startech.com/support... -
Page 20: Mounting The Projector Mount (Using Extensions)
Ceiling Bracket Cover away from the Ceiling Bracket. Removing the Ceiling Plate Cover Mount the Ceiling Bracket to the Ceiling using the Mounting Screws (x 4) included or the appropriate hardware. To view manuals, videos, drivers, downloads, technical drawings, and more visit www.startech.com/support... - Page 21 Mounting Holes in the Mounting Arms and into the Mounting Holes on the Projector. Installing the Mounting Arms Using a Phillips Head Screwdriver, tighten the Installation Screws. Be careful not to over-tighten. To view manuals, videos, drivers, downloads, technical drawings, and more visit www.startech.com/support...
- Page 22 Place the Washers (x 4) and Nuts (x 4) onto the Screws (x 4) on the Mounting Arms and use an 8 mm Wrench to tighen the Nuts. To view manuals, videos, drivers, downloads, technical drawings, and more visit www.startech.com/support...
- Page 23 Mechanism with the Slots in the top of the Projector Plate Cover. Installing the Ball-Joint Mechanism Insert the Protrusions into the Slots and rotate the Ball- Joint Mechanism clockwise until it locks into place. To view manuals, videos, drivers, downloads, technical drawings, and more visit www.startech.com/support...
- Page 24 Insert one of the M6 x 12 mm Screws into the Lock Screw Hole on the Projector Plate Cover and tighten it using the 5 mm Hex Key (included). Inserting an M6 x 12 mm Screw To view manuals, videos, drivers, downloads, technical drawings, and more visit www.startech.com/support...
- Page 25 Mounting Holes on the Lower Pole and into the Mounting Holes on the Ball-Joint Mechanism. Using the 5 mm Hex Key tighten the M6 x 12 mm Screws. To view manuals, videos, drivers, downloads, technical drawings, and more visit www.startech.com/support...
- Page 26 Using the 10 mm Wrench hold the Nut on the end of the M6 x 65 mm Screw, use the 5 mm Hex Key to tighten the M6 x 65 mm Screws. To view manuals, videos, drivers, downloads, technical drawings, and more visit www.startech.com/support...
- Page 27 Cable Notch in the Ceiling Bracket. Note: Make sure that all Cables are aligned with the Ceiling Bracket so that they come out the side of the Cable Notch. To view manuals, videos, drivers, downloads, technical drawings, and more visit www.startech.com/support...
- Page 28 Holes (x 3) in the Upper Pole and into the Mounting Holes ( x 3) on the Ceiling Bracket. Using the 5 mm Hex Key, tighten the M6 x 12 mm Screws. To view manuals, videos, drivers, downloads, technical drawings, and more visit www.startech.com/support...
-
Page 29: Mounting The Projector Mount (Flush)
Bracket Cover to reveal the Mounting Holes. The Ceiling Bracket Cover comes apart in two peices, by pulling each side of the Ceiling Bracket Cover away from the Ceiling Bracket. To view manuals, videos, drivers, downloads, technical drawings, and more visit www.startech.com/support... - Page 30 24mm, M5 x 24 mm, or M6 x 24 mm). Insert the selected Installation Screw (x 4), through the Mounting Holes in the Mounting Arms and into the Mounting Holes on the Projector. To view manuals, videos, drivers, downloads, technical drawings, and more visit www.startech.com/support...
- Page 31 Installing the Mounting Arms Using a Phillips Head Screwdriver, tighten the Installation Screws. Be careful not to over-tighten. To view manuals, videos, drivers, downloads, technical drawings, and more visit www.startech.com/support...
- Page 32 Place the Washers (x 4) and Nuts (x 4) onto the Screws (x 4) on the Mounting Arms and use an 8 mm Wrench to tighen the Nuts. To view manuals, videos, drivers, downloads, technical drawings, and more visit www.startech.com/support...
- Page 33 Mechanism with the Slots in the top of the Projector Plate Cover. Installing the Ball-Joint Mechanism Insert the Protrusions into the Slots and rotate the Ball- Joint Mechanism clockwise until it locks into place. To view manuals, videos, drivers, downloads, technical drawings, and more visit www.startech.com/support...
- Page 34 Insert one of the M6 x 12 mm Screws into the Lock Screw Hole on the Projector Plate Cover and tighten it using the 5 mm Hex Key (included). Inserting an M6 x 12 mm Screw To view manuals, videos, drivers, downloads, technical drawings, and more visit www.startech.com/support...
- Page 35 Mounting Holes ( x 2) on the Ceiling Plate. Using the 5 mm Hex Key, tighten the M6 x 12 mm Screws. Installing the Ball-Joint Mechanism to the Ceiling Plate To view manuals, videos, drivers, downloads, technical drawings, and more visit www.startech.com/support...
-
Page 36: Adjusting The Projector Mount
Rotate the Projector Mount in order to adjust the direction the Projector is pointing. Rotate the Projector Mount Tilt the Projector Mount up or down to adjust the tilt of the Projector Mount. To view manuals, videos, drivers, downloads, technical drawings, and more visit www.startech.com/support... -
Page 37: Adjusting The Torque
Pole or the Ceiling Bracket, depending on your installation method. Using a Socket Wrench and 8 mm Socket, loosen or tighten the Nut located in the center of the Ball-Joint Mechanism. To view manuals, videos, drivers, downloads, technical drawings, and more visit www.startech.com/support... - Page 38 When you have adjusted the torque accordingly, replace the Ball-Joint Mechanism. Using the 5 mm Hex Key tighten the M6 x 12 mm Screws, securing the Ball-Joint Mechanism back in place. To view manuals, videos, drivers, downloads, technical drawings, and more visit www.startech.com/support...
- Page 39 Limitation of Liability In no event shall the liability of StarTech.com Ltd. and StarTech.com USA LLP (or their officers, directors, employees or agents) for any damages (whether direct or indirect, special, punitive, incidental, consequential, or otherwise), loss of profits, loss of business, or any pecuniary loss, arising out of or related to the use of the product exceed the actual price paid for the product.
- Page 40 StarTech.com is an ISO 9001 Registered manufacturer of connectivity and technology parts. StarTech.com was founded in 1985 and has operations in the United States, Canada, the United Kingdom and Taiwan servicing a worldwide market.
Need help?
Do you have a question about the PROJCEILMNT2 and is the answer not in the manual?
Questions and answers