
Related Manuals for StarTech.com PROJWALLMNT


Summary of Contents for StarTech.com PROJWALLMNT
- Page 1 Universal Projector Wall Mount Actual product may vary from photos User Manual SKU#: PROJWALLMNT For the latest information and specifications visit www.startech.com/PROJWALLMNT Manual Revision: 11/08/2019...
- Page 2 This manual may make reference to trademarks, registered trademarks, and other protected names and/or symbols of third-party companies not related in any way to StarTech.com. Where they occur these references are for illustrative purposes only and do not represent an endorsement of a product or service by StarTech.com, or an endorsement of the product(s) to which this manual...
-
Page 3: Safety Statements
Säkerhetsåtgärder • Installation och/eller montering får endast göras av behöriga yrkespersoner och enligt gällande lokala förordningar för säkerhet och byggnormer. To view manuals, videos, drivers, downloads, technical drawings, and more visit www.startech.com/support... -
Page 4: Warning Statements
• Använd aldrig produkten om delar saknas eller är skadade. • Eftersom väggstrukturer varierar är det viktigt att kontrollera att väggstrukturen och monteringsutrustningen som du använder klarar av To view manuals, videos, drivers, downloads, technical drawings, and more visit www.startech.com/support... - Page 5 • Le matériel de fixation inclus avec ce produit n’est pas forcément approprié pour toutes les structures de murs. Si vous ne disposez pas des compétences To view manuals, videos, drivers, downloads, technical drawings, and more visit www.startech.com/support...
- Page 6 Wenn Ihnen die nötigen Fachkenntnisse zum Anbringen dieses Produkts an einer Wand fehlen, lassen Sie einen Fachmann den Wandhalter anbringen, oder lassen Sie sich von einem Fachmann Montageanweisungen für Ihre Wand erteilen. To view manuals, videos, drivers, downloads, technical drawings, and more visit www.startech.com/support...
- Page 7 To view manuals, videos, drivers, downloads, technical drawings, and more visit www.startech.com/support...
-
Page 8: Table Of Contents
Table of Contents Compliance Statements ................... i Safety Statements ....................ii Warning Statements ..................iii Product Diagram ....................1 Front-Side View ............................1 Rear-Side View ............................2 Adjustment Knobs ............................ 3 Product Dimensions ..................4 Product Information ..................5 Package Contents ............................. 5 Technical Specifications ................... -
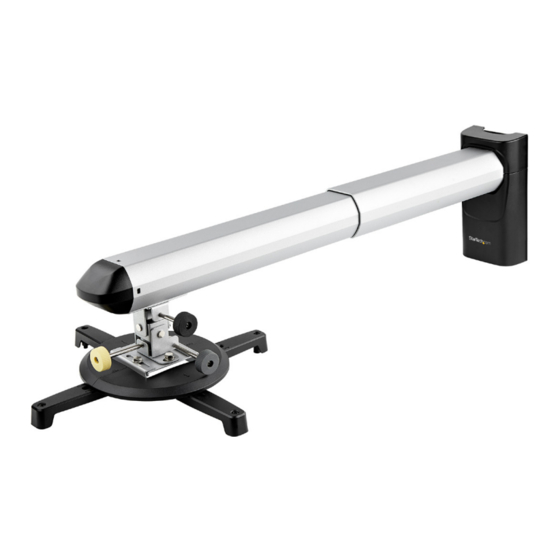
Page 9: Product Diagram
Product Diagram Front-Side View Upper Decorative Cover Projector Pole Pole End Cap Lower Decorative Cover Mounting Arm Covers To view manuals, videos, drivers, downloads, technical drawings, and more visit www.startech.com/support... -
Page 10: Rear-Side View
Rear-Side View Adjustment Module Wall Bracket To view manuals, videos, drivers, downloads, technical drawings, and more visit www.startech.com/support... -
Page 11: Adjustment Knobs
Adjustment Knobs 1) Tilt Turn clockwise to adjust the picture down. Turn counterclockwise to adjust the picture up. 2 ) Rotate Turn clockwise to adjust the picture counterclockwise. Turn counterclockwise to adjust the picture clockwise. 3) Swivel Turn clockwise to adjust the picture to the right. Turn counterclockwise to adjust the picture to the left. -
Page 12: Product Dimensions
Product Dimensions Note: All measurements are listed in millimeters. To view manuals, videos, drivers, downloads, technical drawings, and more visit www.startech.com/support... -
Page 13: Product Information
Wall Cover Module Cover Qty: 1 Qty: 1 Qty: 1 Qty: 1 Mounting Arms Mounting Arm Hinge Connector Wall Anchors Covers Qty: 4 Qty: 1 Qty: 6 To view manuals, videos, drivers, downloads, technical drawings, and more visit www.startech.com/support Qty: 4... - Page 14 Mounting Screws 10 mm Wrench 5 mm Hex Key Washers Qty: 6 Qty: 1 Qty: 1 Qty: 4 M3 x 24 mm Screws M4 x 24 mm Screws M5 x 24 mm M6 x 25 mm M6 x 8 mm Hex M6 x 10 mm Screws Hex Screw...
- Page 15 Requirements Phillips Head Screwdriver • Spirit/Bubble Level • Mounting Surface • (Optional) Two People for the Installation • To view manuals, videos, drivers, downloads, technical drawings, and more visit www.startech.com/support...
-
Page 16: Technical Specifications
Technical Specifications Type of Measurement Measurement Weight Capacity Up to 33.1 lb. (15 kg) Tilt +50 to -50 Swivel +100 to -100 Horizontal Movement +20 mm to -20 mm To view manuals, videos, drivers, downloads, technical drawings, and more visit www.startech.com/support... -
Page 17: Installation
Contact a construction professional to install the Universal Projector Wall Mount. Failure to do so may result in personal injury and/or equipment damage. PROJWALLMNT can be mounted using the included Mounting Hardware. Ensure the top of the Wall Bracket is level with a Spirit/Bubble Level before fastening it to the Mounting Surface. -
Page 18: Attach The Mounting Arms
Projector Pole M6 x 8 mm Screws Wall Mount Attach the Mounting Arms Place the Projector on a flat and level Surface, with the Mounting Holes facing upwards. To view manuals, videos, drivers, downloads, technical drawings, and more visit www.startech.com/support... - Page 19 Tighten the M-Type Screws with a Phillips Head Screwdriver. Warning! Do not over-tighten the M-Type Screws. If you encounter any unexpected resistance, immediately stop and attempt to use a different length of M-Type Screw. To view manuals, videos, drivers, downloads, technical drawings, and more visit www.startech.com/support...
-
Page 20: Attach The Adjustment Module
Head Screwdriver and readjust the position of the Mounting Arms. Tighten the M-Type Screws once the correct position has been achieved. Figure 4 Washer Adjustment Module Variable Position Mounting Arm Screw Cover To view manuals, videos, drivers, downloads, technical drawings, and more visit www.startech.com/support... -
Page 21: Attach The Projector Mount Assembly
Module Cover Attach the Projector Mount Assembly Place the Hinge Connector onto the Adjustment Module. Align the holes in the Hinge Connector with the holes in the Adjustment Module. To view manuals, videos, drivers, downloads, technical drawings, and more visit www.startech.com/support... - Page 22 Thread the two M6 x 10 mm Screws through the Adjustment Module and into the Hinge Connector. Hand tighten the M6 x 10 mm Screws by one rotation. (Figure 6) Note: There must be a 2-3 mm gap between the Adjustment Module and the Hinge Connector in order to complete the following installation steps.
- Page 23 Step 2 using the 10 mm Wrench. (Figure 8) Figure 8 M6 x 10 mm Screw 10 mm Wrench Attach the Power and Video Cables to the Projector. (Figure 9) Figure 9 Power and Video Cables To view manuals, videos, drivers, downloads, technical drawings, and more visit www.startech.com/support...
- Page 24 Adjust the length of the Projector Pole by pulling apart to lengthen and pushing together to shorten. Tighten the two 5 mm Hex Bolts located underneath, using the 5 mm Hex Key. (Figure 11) To view manuals, videos, drivers, downloads, technical drawings, and more visit www.startech.com/support...
-
Page 25: Cable Management
Determine if the Power and Video Cables will be routed out of the Upper or Lower Decorative Cover. Break away the Plastic Tab on the Decorative Cover that was chosen in Step 2. (Figure 12) To view manuals, videos, drivers, downloads, technical drawings, and more visit www.startech.com/support... -
Page 26: Operation
Adjust the Wall Mount Tilt Angle Remove the Upper and Lower Decorative Covers. Note: To remove these Decorative Covers, press the sides at the top of the Lower Decorative Cover and pull apart. To view manuals, videos, drivers, downloads, technical drawings, and more visit www.startech.com/support... -
Page 27: Adjust The Swivel
Wall Bracket, until the two Covers snap into place. Adjust the Swivel Loosen the Adjustment Screw, located next to the Grey Adjustment Knob, using the 10 mm Wrench. To view manuals, videos, drivers, downloads, technical drawings, and more visit www.startech.com/support... -
Page 28: Adjust The Tilt
• to adjust the Projected Image down. - or - Turn the Yellow Adjustment Knob in a Counterclockwise • direction to adjust the Projected Image up. (Figure 15) To view manuals, videos, drivers, downloads, technical drawings, and more visit www.startech.com/support... -
Page 29: Adjust The Rotation
Projected Image counterclockwise. - or - Turn the Black Adjustment Knob in a Counterclockwise • direction to rotate the Projected Image clockwise. (Figure 16) Figure 16 To view manuals, videos, drivers, downloads, technical drawings, and more visit www.startech.com/support... -
Page 30: Adjust The Horizontal Lateral Position
Projected Image to the left or right. (Figure 17) Figure 17 Adjustment Screw 10 mm Wrench Tighten the two Adjustment Screws located on the top of the Adjustment Module, using the 10 mm Wrench. To view manuals, videos, drivers, downloads, technical drawings, and more visit www.startech.com/support... -
Page 31: Warranty Information
Limitation of Liability In no event shall the liability of StarTech.com Ltd. and StarTech.com USA LLP (or their officers, directors, employees or agents) for any damages (whether direct or indirect, special, punitive, incidental, consequential, or otherwise), loss of profits, loss of business, or any pecuniary loss, arising out of or related to the use of the product exceed the actual price paid for the product. - Page 32 StarTech.com is an ISO 9001 Registered manufacturer of connectivity and technology parts. StarTech.com was founded in 1985 and has operations in the United States, Canada, the United Kingdom and Taiwan servicing a worldwide market.
Need help?
Do you have a question about the PROJWALLMNT and is the answer not in the manual?
Questions and answers