Table of Contents
Advertisement
Quick Links
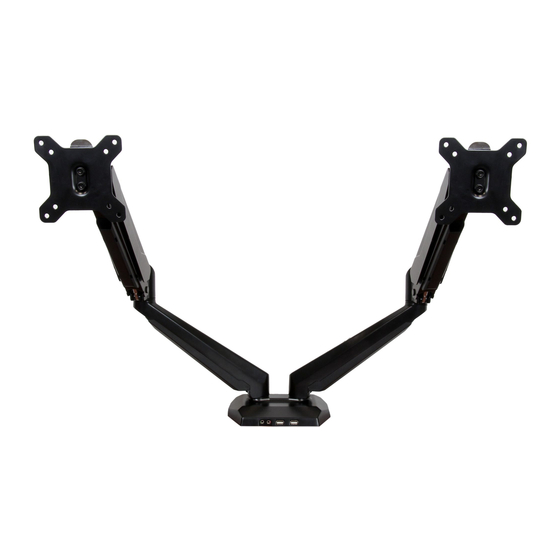
Dual Monitor Mount with Built-In
2-Port USB Pass-Through
ARMSLIMDUO
FR: Guide de l'utilisateur - fr.startech.com
DE: Bedienungsanleitung - de.startech.com
ES: Guía del usuario - es.startech.com
NL: Gebruiksaanwijzing - nl.startech.com
PT: Guia do usuário - pt.startech.com
IT: Guida per l'uso - it.startech.com
For the latest information, technical specifications, and support for
this product, please visit www.startech.com/ARMSLIMDUO.
Manual Revision: 03/26/2019
*actual product may vary from photos
Advertisement
Table of Contents

Summary of Contents for StarTech.com ARMSLIMDUO
- Page 1 Dual Monitor Mount with Built-In 2-Port USB Pass-Through ARMSLIMDUO *actual product may vary from photos FR: Guide de l’utilisateur - fr.startech.com DE: Bedienungsanleitung - de.startech.com ES: Guía del usuario - es.startech.com NL: Gebruiksaanwijzing - nl.startech.com PT: Guia do usuário - pt.startech.com IT: Guida per l’uso - it.startech.com...
-
Page 2: Table Of Contents
Product diagram ..................3 Product dimensions ..........................4 Technical specifications ................5 Assemble the ARMSLIMDUO ..............5 Attach the desk clamps to the mounting arms ................5 Attach the mounting arm to a desk or table ................... 7 Attach the monitors to the VESA monitor mounts ............... 8 Attach the VESA monitor mounts to the mounting arm ............ -
Page 3: Introduction
Introduction You can use the ARMSLIMDUO to mount two displays on your desk and take advantage of the full-motion articulation and the cable-management system that comes with the ARMSLIMDUO. The ARMSLIMDUO features two 3.5 mm audio ports and two USB pass-through ports, and comes with a desk-clamp mount. - Page 4 M5 hex key M6x12 mm screws Quantity: One Quantity: Eight M8x12 mm screws Rubber pads Quantity: Four Quantity: Two Instruction manual Quantity: One Instruction manual...
-
Page 5: Product Diagram
Product diagram VESA monitor mounts Cable cover Cable cover Mounting arms Cable cover Cable cover Close-up view of the base Audio port Microphone port USB A pass-through ports Instruction manual... -
Page 6: Product Dimensions
Product dimensions Instruction manual... -
Page 7: Technical Specifications
Technical specifications The ARMSLIMDUO can support up to 8.0 kg (17.6 lb) of weight per mounting arm. The desk clamp can support a maximum thickness of 90 mm (3.54 in.). Assemble the ARMSLIMDUO Warning! Make sure that all of the hardware is assembled securely and checked for stability before you load the monitors. - Page 8 figure 2 6. Line up the two holes in one of the desk clamps (lower bracket) (3) with the two holes on the end of one of the desk clamps (upper bracket). Make sure that the hand screw on the desk clamp (lower bracket) is pointing downwards and away from the mounting arm.
-
Page 9: Attach The Mounting Arm To A Desk Or Table
Attach the mounting arm to a desk or table 1. Turn the hand screws on the desk clamps (lower bracket) (3) counterclockwise until you reach the thickness of the desk or table. (figure 4) 2. Slide the desk clamp over the edge of the desk or table and turn the hand screws on the desk clamps clockwise until the mounting arm is securely fastened to the desk or table. -
Page 10: Attach The Monitors To The Vesa Monitor Mounts
Attach the monitors to the VESA monitor mounts Warning! To prevent scratching during the installation process, you should handle the surface of the monitors with care. Do one of the following: • To install monitors that have a flush installation surface, insert four of the M4x12 mm screws (5) through one of the VESA monitor mounts (4) and into the mounting holes on the back of the monitor. -
Page 11: Attach The Vesa Monitor Mounts To The Mounting Arm
Attach the VESA monitor mounts to the mounting arm 1. Slide one of the VESA monitor mounts (4) with the monitor attached into the slot on one of the mounting arms (1). (figure 7) 2. Repeat step 1 for the second monitor that you’re attaching. figure 7 3. - Page 12 4. To change the tilt tension, use the M5 hex key to turn the screws closest to the VESA monitor mounts clockwise or counterclockwise. (figure 9) figure 9 5. To change the swivel tension, use the M5 hex key to turn the second screws from the VESA monitor mounts clockwise.
-
Page 13: Route The Cables
Route the cables Make sure that the cables that you’re routing are unplugged before you complete the following steps. 1. Remove the cable covers from the spring mounting arms. 2. Run the cables along one of the spring mounting arms and hold the cables in place while you snap the cable covers back onto the spring mounting arm. -
Page 14: Manage Your Cables
Manage your cables You can use the integrated pass-through ports on the ARMSLIMDUO to conveniently extend your computer connections to the base of the monitor mount and keep your cables organized. To avoid cluttering your desk with cables, you can plug your devices into the monitor mount instead of directly into your computer system. -
Page 15: Technical Support
StarTech.com. Where they occur these references are for illustrative purposes only and do not represent an endorsement of a product or service by StarTech.com, or an endorsement of the product(s) to which this manual applies by the third-party company in question. Regardless of any direct acknowledgement elsewhere in the body of this document, StarTech.com hereby... - Page 16 StarTech.com is an ISO 9001 Registered manufacturer of connectivity and technology parts. StarTech.com was founded in 1985 and has operations in the United States, Canada, the United Kingdom and Taiwan servicing a worldwide market.


Need help?
Do you have a question about the ARMSLIMDUO and is the answer not in the manual?
Questions and answers