Table of Contents
Advertisement
Quick Links
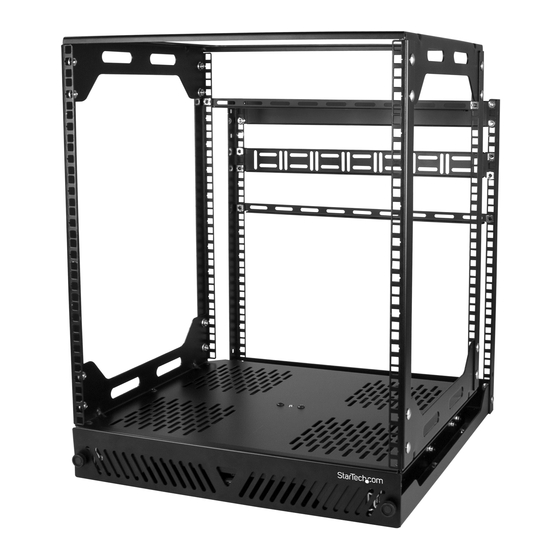
12U Slide-Out Rotating Server Rack
- 4 Post
PORACK12U
FR: Guide de l'utilisateur - fr.startech.com
DE: Bedienungsanleitung - de.startech.com
ES: Guía del usuario - es.startech.com
NL: Gebruiksaanwijzing - nl.startech.com
PT: Guia do usuário - pt.startech.com
IT: Guida per l'uso - it.startech.com
For the latest information, technical specifications, and support for
this product, please visit www.StarTech.com/PORACK12U.
Manual Revision: 08/14/2017
*actual product may vary from photos
Advertisement
Table of Contents

Subscribe to Our Youtube Channel
Related Manuals for StarTech.com PORACK12U


Summary of Contents for StarTech.com PORACK12U
- Page 1 12U Slide-Out Rotating Server Rack - 4 Post PORACK12U *actual product may vary from photos FR: Guide de l’utilisateur - fr.startech.com DE: Bedienungsanleitung - de.startech.com ES: Guía del usuario - es.startech.com NL: Gebruiksaanwijzing - nl.startech.com PT: Guia do usuário - pt.startech.com IT: Guida per l’uso - it.startech.com...
- Page 2 StarTech.com. Where they occur these references are for illustrative purposes only and do not represent an endorsement of a product or service by StarTech.com, or an endorsement of the product(s) to which this manual applies by the third-party company in question. Regardless of any direct acknowledgement elsewhere in the body of this document, StarTech.com hereby...
- Page 3 Warning statements Avertissements Make sure that you assemble this product according to the instructions. Assemblez ce produit conformément aux instructions. Read the entire manual and make sure that you understand the instructions before you start to assemble Lisez tout le manuel et assurez-vous que vous comprenez les instructions avant de commencer à and use this product.
-
Page 4: Table Of Contents
Table of Contents Warnings ..............................i Product diagram ..................1 Back view..............................1 Front view ..............................2 Side view ..............................3 Product dimensions ................4 Package contents ...................7 Requirements ..................7 Assembly ....................8 Attach the vertical rails ........................... 8 Attach the top bracket ..........................9 Attach the stabilizing plate........................ -
Page 5: Product Diagram
Product diagram Back view 1 - Top bracket 2 - Stabilizing plate 3 - Cable manager 4 - Narrow cable manager 5 - Vertical rails 6 - Sliding tray Instruction manual... -
Page 6: Front View
Front view 1 - Top bracket 2 - Vertical rails 3 - Narrow cable managers 4 - Cable manager 5 - Stabilizing plate 6 - Sliding tray 7 - Security plate 8 - Thumbscrews Instruction manual... -
Page 7: Side View
Side view 1 - Top bracket 2 - Stabilizing plate 3 - Cable manager 4 - Narrow cable manager 5 - Vertical rails 6 - Sliding tray Instruction manual... -
Page 8: Product Dimensions
Product dimensions Front view Top view 465 mm (18.3 in.) 451 mm (17.8 in.) 491 mm (19.3 in.) Side view Side view (slide in) (slide out) 553 mm (21.8 in.) 1030 mm (40.5 in.) Instruction manual... - Page 9 Bottom view 340 mm (13.4 in.) (mounting holes) 15 mm diameter 310 mm (12.2 in.) (mounting holes) 7 mm diameter Instruction manual...
- Page 10 +90° -90° Can be rotated left and right Instruction manual...
-
Page 11: Package Contents
Caution! In order to turn the rack left and right, you need to install the rack in an area that is at least 650 mm (25.5 in.) wide. Requirements are subject to change. For the latest requirements, please visit www.StarTech.com/PORACK12U. Instruction manual... -
Page 12: Assembly
Assembly To make the assembly easier to complete, consider assembling the PORACK12U with another person’s assistance. Attach the vertical rails 1. If the security plate is attached, unscrew the thumbscrews from the front of the security plate and remove it from the sliding tray. -
Page 13: Attach The Top Bracket
Attach the top bracket 1. Position the top bracket on the inside of the vertical rails that are attached to the front of the sliding tray. 2. At each of the four sides, insert two assembly screws through the vertical rails and the top bracket. -
Page 14: Attach The Stabilizing Plate
Attach the stabilizing plate 1. Position the stabilizing plate behind the two vertical rails at the back of the sliding tray. 2. At each end of the stabilizing plate, insert two assembly screws through the stabilizing plate and the vertical rails. 3. -
Page 15: Attach The Security Plate
1. To attach the security plate, line up the holes on the security plate with the holes on the front of the sliding tray. 2. Screw the thumbscrews into the security plate and sliding tray. When you’re done assembling the PORACK12U, it should resemble the following: Instruction manual... -
Page 16: Installation
Caution! In order to rotate the PORACK12U, you need to install the rack in an area that is at least 650 mm (25.5 in.) wide. -
Page 17: Load Equipment
Caution! Do not exceed the weight capacity of the PORACK12U. The rack can support up to 125 lb. (56.7 kg). -
Page 18: Rotate The Rack
Rotate the rack Caution! In order to rotate the PORACK12U, you need to install the rack in an area that is at least 650 mm (25.5 in.) wide. You can rotate the PORACK12U 90° to the left or right. 1. If the security plate is attached, unscrew the thumbscrews from the front of the security plate and remove it from the sliding tray. - Page 19 +90° -90° Can be rotated left and right Instruction manual...
-
Page 20: Technical Support
Limitation of liability In no event shall the liability of StarTech.com Ltd. and StarTech.com USA LLP (or their officers, directors, employees or agents) for any damages (whether direct or indirect, special, punitive, incidental, consequential, or otherwise), loss of profits, loss of business, or any pecuniary loss, arising out of or related to the use of the product exceed the actual price paid for the product. - Page 21 StarTech.com is an ISO 9001 Registered manufacturer of connectivity and technology parts. StarTech.com was founded in 1985 and has operations in the United States, Canada, the United Kingdom and Taiwan servicing a worldwide market.
Need help?
Do you have a question about the PORACK12U and is the answer not in the manual?
Questions and answers