Table of Contents

Related Manuals for StarTech.com ARMBARDUOG


Summary of Contents for StarTech.com ARMBARDUOG
- Page 1 Dual-Monitor Desk Mount - with Grommet/Desk-Clamp Mount *actual product may vary from photos User Manual SKU#: ARMBARDUOG For the latest information and specifications visit www.startech.com/ARMBARDUOG Manual Revision: 11/06/2018...
-
Page 2: Compliance Statements
This manual may make reference to trademarks, registered trademarks, and other protected names and/or symbols of third-party companies not related in any way to StarTech.com. Where they occur these references are for illustrative purposes only and do not represent an endorsement of a product or service by StarTech.com, or an endorsement of the product(s) to which this manual... -
Page 3: Safety Statements
Safety Statements Safety Measures • Product installation and/or mounting should be completed by a certified professional as per the local safety and building code guidelines. Mesures de sécurité • L’installation et/ou le montage du produit doit être réalisé par un professionnel certifié... -
Page 4: Table Of Contents
VESA Mount ............................... 4 Technical Specifications ................5 Requirements ..................6 Installation ....................7 Attach the ARMBARDUOG to Your Mounting Surface ..............7 Attach Monitor Arms to the Column ....................12 Attach Monitors ............................14 Attach the Cable-Management Clips ....................17 Operation ....................18 Adjust the Position of the Monitors .................... -
Page 5: Product Information
Product Information Package Contents Cable- Management Clips Column x 1 VESA Adapter x 2 Monitor Arms x 2 (Column) x 2 Cable- End-Cap Screws Management Clips Desk-Mount End Caps x 2 (Monitor Arm) x 2 Clamp x 1 M4x14 mm Screws Hex Key x 8 (narrow) Hex Key x 1... -
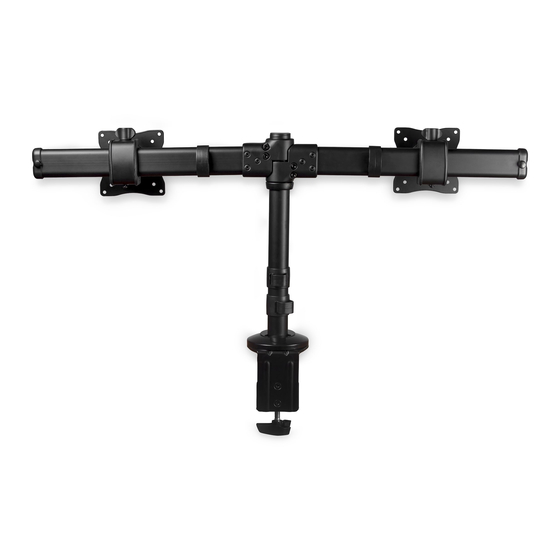
Page 6: Product Dimensions
Product Dimensions Front View 1. Monitor Arms 2. Cable-Management Clips (Column) 3. Column 4. Desk-Mount Clamp Side View 1. End Caps User Manual... -
Page 7: Top View
Top View 1. Cable-Management Clips (Monitor Arm) Angled View (Includes Tilt Angles) User Manual... -
Page 8: Grommet Mount
Grommet Mount 1. Mounting Cover 2. Grommet-Mounting Adapter 3. Grommet-Mounting Plate VESA Mount 1. VESA Adapter User Manual... -
Page 9: Technical Specifications
Technical Specifications Type of Measurement Measurement VESA mounting hole pattern 75x75 100x100 Weight capacity Up to 17.6 lb. (8 kg) per monitor mount Tilt +300 to -300 Screen size 330 to 686 mm (13 to 27 in.) Rotate 3600 Swivel +300 to -300 User Manual... -
Page 10: Requirements
Requirements • Two People for Installation • Mounting Surface • Desk-Mount Clamp (on Desk Edge) or Grommet Mount (in Desktop Grommet) • Two Monitors Note: Both Monitors must conform to the size, weight and VESA pattern require- ments (see Technical Specifications). -
Page 11: Installation
Installation Attach the ARMBARDUOG to Your Mounting Surface There are two ways that you can attach the ARMBARDUOG to a mounting surface: a Desk-Mount Clamp or a Grommet Mount. The Desk-Mount Clamp ships preassembled. Use the Desk Clamp to Attach the ARMBARDUOG Warning! Ensure that the weight of the Monitors does not exceed the weight capacity of this product. - Page 12 3. Screw the Column into the top of the Desk-Mount Clamp. (Figure 3) 4. Use the Hex Key Screwdriver to tighten the screws in the Desk-Mount Clamp. (Figure 4) Figure 3 Figure 4 Column Desk Clamp Hex Key Screwdriver 5. Seat the Mounting Cover so that it is flush with the top of the Desk-Mount Clamp. (Figure 5) Figure 5 Column...
- Page 13 6. Remove the backing from the five Rubber Pads and attach them underneath the top of the Desk-Mount Clamp, on the surface touching the table. (Figure 6) Figure 6 7. Turn the knob on the Desk-Mount Clamp counterclockwise until it reaches the thickness of the Desk.
- Page 14 If you exceed the weight capacity, you may experience personal injury or damage to your Monitors and ARMBARDUOG. This product can support the following weight capacities: Up to 8 kg (17.6 lb.) per monitor mount, for a total of 16 kg (35.2 lb.).
- Page 15 3. Affix the Rubber Pads to the bottom of the Grommet-Mounting Adapter. (Figure 10) Figure 10 Grommet- Mounting Adapter Rubber Pads 4. Slide the Mounting Cover over the Column and screw the Column into the top of the Grommet-Mounting Adapter. (Figure 11) Figure 11 Column Mounting...
-
Page 16: Attach Monitor Arms To The Column
6. Thread the Grommet-Mounting Plate onto the Rod. 7. Place the assembled Column and Grommet-Mounting Adapter over the grommet hole in the Mounting Surface. On the underside of the Mounting Surface, insert the Rod up through the grommet hole and into the Column. Note: The Grommet-Mounting Adapter can accommodate a grommet hole that is between 10.5 and 50 millimeters (0.41 and 1.96 inches) in diameter. - Page 17 4. Slide a second Monitor Arm down the Column so that it sits against the first Monitor Arm. (Figure 15) Note: When you assemble the ARMBARDUOG for the first time, you need to use the Hex Key to tighten the Screws in each of the Monitor Arm joints. (Figure 16)
-
Page 18: Attach Monitors
Warning! Attaching the Monitors is a two-person job. Do not attempt to complete this task by yourself. To accommodate different Monitor designs, the ARMBARDUOG comes with two sets of Screws that are different lengths and diameters. To select the appropriate Screws for the type of Monitors that you’re using, complete the following: •... - Page 19 5. Complete steps 1 to 4 to add a VESA Adapter to a second monitor. 6. Slide one of the VESA Adapters with the Monitor attached over the end of one of the Monitor Arms attached to the Column. 7. Slide the second VESA Adapter and Monitor onto the other Monitor Arm. (Figure 8.
- Page 20 9. Insert an End-Cap Screw through the hole in each of the End Caps and into the Monitor Arms, and tighten the End-Cap Screws in place. (Figure 20) Figure 20 End Cap Thumbscrew User Manual...
-
Page 21: Attach The Cable-Management Clips
Attach the Cable-Management Clips 1. Snap one of the Cable-Management Clips (Monitor Arm) over each of the two Monitor Arms. (Figure 21) Figure 21 Cable-Management Clip (Monitor Arm) Cable-Management Clip (Column) 2. Snap the two Cable-Management Clips (Column) over the Column. (Figure 22) Figure 22 Cable-Management Column... -
Page 22: Operation
Operation Adjust the Position of the Monitors You can configure the Monitors in many ways: (Figure 23 & 24): Figure 23 00 to 300 00 to 300 +300 to -300 3600 +300 3600 +300 -300 -300 Figure 24 +300 to -300 +300 to -300 +300 to -300 3600... - Page 23 1. To position the Monitors: • To adjust the angle of the Monitor Arms, use the Hex Key to loosen the two Screws at each of the Monitor Arm joints. Position the Monitors as desired, and use the Hex Key to tighten the Screws and lock the Monitors into position.
- Page 24 • To raise or lower the Monitors minutely, use the Adjustment Screws located on the top of the VESA Adapters. (Figure 27) Figure 27 Adjustment Screw • To move the Monitors along the Monitor Arms, use a Phillips Head Screwdriver to loosen the Screw located on the underside of each of the VESA Adapters.
-
Page 25: Warranty Information
Limitation of Liability In no event shall the liability of StarTech.com Ltd. and StarTech.com USA LLP (or their officers, directors, employees or agents) for any damages (whether direct or indirect, special, punitive, incidental, consequential, or otherwise), loss of profits, loss of business, or any pecuniary loss, arising out of or related to the use of the product exceed the actual price paid for the product. - Page 26 Hard-to-find made easy. At StarTech.com, that isn’t a slogan. It’s a promise. StarTech.com is your one-stop source for every connectivity part you need. From the latest technology to legacy products — and all the parts that bridge the old and new — we can help you find the parts that connect your solutions.
Need help?
Do you have a question about the ARMBARDUOG and is the answer not in the manual?
Questions and answers