
Subscribe to Our Youtube Channel
Related Manuals for Extron electronics HSA 822


Summary of Contents for Extron electronics HSA 822
- Page 1 User’s Manual HSA 822 Hideaway ® Surface Access Enclosure 68-617-02 Rev. G 08 08 © 2008 Extron Electronics. All rights reserved.
- Page 2 Precautions Safety Instructions • English Warning This symbol is intended to alert the user of important Power sources • This equipment should be operated only from the power source indicated on the product. This equipment is intended to be used with a main operating and maintenance (servicing) instructions power system with a grounded (neutral) conductor.
-
Page 4: Table Of Contents
... A-3 Template, Replacement Parts, and Accessories Interface Accessories ... A-4 Top Plate Dimensions ... A-5 HSA 822 cut-out template ... A-6 Appendix B • Packaging for Shipment ® HSA 822 Hideaway Enclosure • Table of Contents Enclosure ... 1-2 ... -
Page 5: Chapter 1 • Introduction
Table of Contents, cont’d HSA 822 Hideaway ® Enclosure Chapter One Introduction About the HSA 822 Hideaway ® Enclosures Features All trademarks mentioned in this manual are the properties of their respective owners. 68-617-02 Rev. G 08 08 HSA 822 Hideaway ®... -
Page 6: About The Hsa 822 Hideaway Enclosure
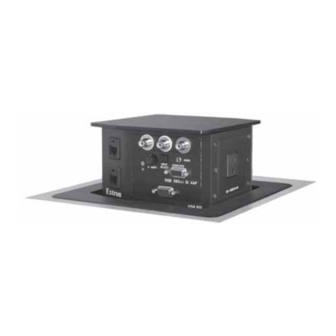
Surface Access Enclosure VIDE LEVE O OUT SERR PEAK DDSP V-SYN C WIDTH COMP SYNC SYNC Extron RGB 580 xi Figure 1-2 — HSA 822 and RGB 580 xi xi xi xi xi configuration ® HSA 822 Hideaway Enclosure • Introduction... -
Page 7: Preparing The Table And Mounting The Enclosure
Introduction, cont’d The HSA 822 is available in a variety of surface finishes, including black anodized aluminum, brushed aluminum, brushed brass, and polished aluminum. Features • UL/CUL listing • CSA certification • Easy access to connectors and controls • Durable mechanical movement and latching mechanism •... -
Page 8: Installation Overview
Enclosure • Installation Preparing the Routing Template Extron provides a metal routing template for the HSA 822 at no charge. The HSA 822 template is part #70-191-01. Extron recommends using this template as a guide to cut the hole in the table where the HSA will be installed. -
Page 9: Preparing The Table And Mounting The Enclosure
A, “Reference Information”) and a sabre saw or keyhole saw, but this method is not recommended. Prepare the table as follows: The opening in the table for the HSA 822 should be CAUTION cut only by licensed and bonded craftspeople. - Page 10 ® Enclosure • Installation IN PU DI O HSA 822 Clamshell Power Cord Flat Washer RJ-45 Connectors Full Thread Mounting Bolts Figure 2-3 — Mounting the HSA 822 enclosure ® HSA 822 Hideaway Enclosure • Installation Mounting Surface AAP Cables...
-
Page 11: Cabling And Installing The Aaps
Extron’s various single space and double space AAP devices, including the various RGB 580xi AAPs, can be mounted to the HSA 822. See appendix A, “Reference Information”, for RGB 580xi AAP part numbers. The screws for installing an AAP are built into its AAP panel, so no additional screws are needed. -
Page 12: Cabling The Enclosure
Installation, cont’d Cabling the Enclosure Bottom panel features Figure 2-6 — HSA 822 enclosure underside connectors RJ-45 connectors — See Cabling the RJ-45 connectors below. All RJ-45 connectors are teminated in accordance with the TIA/EIA 568 A standard. AC power connector — Connect this cord to the power source. -
Page 13: Routing The Aap Cables
® Enclosure • Installation 2-12 Bezels The HSA 822 ships with RJ-45/RJ-11 connector bezel plug-ins in a variety of colors and a black, blank bezel. Bezel To change to a different color RJ-45 connector bezel or if an RJ-45 connector is not needed or... -
Page 14: Replacing The Gas Lift
Installation, cont’d HSA 822 Hideaway ® Enclosure Chapter Three Maintenance and Modifications Replacing an AAP Replacing the Bezels Removing and Replacing the Enclosure Replacing the Gas Lift Adjusting the Top Surface HSA 822 Hideaway ® Enclosure • Installation 2-14... -
Page 15: Replacing An Aap
Maintenance and Modifications The HSA 822 surface mount enclosures can be modified in the future to replace an AAP. The most probable corrective maintenance procedures required are leveling the top surface and replacing the gas lift. Most of the maintenance procedures require removing the surface mount enclosure from the table. -
Page 16: Replacing The Bezels
Maintenance and Modifications, cont’d Replacing the Bezels The HSA 822 ships with RJ-45 connector bezel plug-ins in a variety of colors and a black, blank bezel. Replace a bezel as follows: Remove the top and bottom screws on the right and left sides of the AAP panel (figure 3-1). - Page 17 Enclosure IN PU DI O Remove (16) screws. Shroud Clamshell Power Cord Flat Washer RJ-45 Connectors Full Thread Mounting Bolts Figure 3-4 — Removing the HSA 822 from the table ® Enclosure • Maintenance and Modifications Mounting Surface AAP Cables...
-
Page 18: Replacing The Gas Lift
Replacing the Enclosure”, steps 1 through 9, in this chapter. Place the enclosure on a horizontal surface. Disconnect the 3-prong cable connectors on the interior AC cables (figure 3-5). HSA 822 Hideaway ® Enclosure • Maintenance and Modifications Figure 3-5 — Disconnecting the interior AC cables Turn the enclosure upside-down. - Page 19 Top Panel Bracket Frame Clevis Nut Top Panel Clevis Enclosure Frame Figure 3-6 — Changing the gas lift HSA 822 Hideaway ® Enclosure • Maintenance and Modifications 3-10 Gas Lift Lifting Platform HSA 822 Hideaway CAUTION With the top panel bracket detached from the lifting platform, the bracket will be floppy atop the gas lift.
-
Page 20: Adjusting The Top Surface
Maintenance and Modifications, cont’d Adjusting the Top Surface The top lifting panel of the HSA 822 can be adjusted to raise or lower its level flush with the flange. It can also be adjusted to ensure that the lifting panel is horizontal and not tipped. -
Page 21: Adjusting The Top Surface Level
Maintenance and Modifications, cont’d Adjusting the top surface level The top lifting panel of the HSA 822 can be adjusted to ensure that the lifting panel is horizontal and not tipped. Level the lifting panel of the HSA 822 as follows: Remove the surface mount enclosure from the table. - Page 22 Specify the desired power connector and finish when ordering. The USA version of the HSA 822 is also available in brushed aluminum, polished aluminum, and brushed brass finishes. Visit the Extron web site, www.extron.com for more part numbers.
- Page 23 USER ACCESS EXTRON ELECTRONICS Figure A-2 — HSA 822 metal routing template If you choose not to use Extron’s metal routing template, the cut-out template (figure A-3) will help you properly prepare the mounting surface. The cut-out template is not to scale and is for reference only.
-
Page 24: Hsa 822 Cut-Out Template
Cut surface material Tilting Plate Top Panel out along this line. User Access (Connectors and AAP Openings) TEMPLATE IS NOT FULL SIZE. Figure A-3 — HSA 822 cut-out template HSA 822 Hideaway ® Enclosure • Reference Information HSA 822 Hideaway 0.5"... - Page 25 Enclosure • Packaging for Shipment Disconnect all cables, remove any AAPs, and remove the HSA 822 from the table or desk. See “Removing and Replacing the Enclosure”, steps 1 through 8, in chapter 3, “Maintenance and Modifications”. Place the enclosure upside-down on a horizontal surface.
- Page 26 ® Enclosure • Packaging for Shipment Insert the HSA 822 and the clamshell into one of the foam shells (figure B-4). Either open end of the clamshell and the open top panel will fit into the recesses in the foam.
- Page 27 Figure B-6 — Placing the HSA in the shipping carton Close the shipping carton and seal it with high quality shipping tape. Ship the HSA to Extron using a reputable shipping company. HSA 822 Hideaway ® Enclosure • Packaging for Shipment HSA 822 Hideaway ®...
- Page 28 Packaging for Shipment, Cont’d ® HSA 822 Hideaway Enclosure • Packaging for Shipment...
Need help?
Do you have a question about the HSA 822 and is the answer not in the manual?
Questions and answers